
User:Cedartree

| Name | Cedar Brumm |
|---|---|
| Affiliations | |
| Location | |
| Nationality | |
| Registered | 2017 |
[[category:242-2017 People]]
Cedar Brumm
[edit | edit source]Cedar Brumm was born January 26, 1996 and is a current college senior at Principia College in Elsah, IL. He is majoring an business administration, and has an eye for marketing and retail management. He also has two minors, one in education and the other in global studies.
3D Printing
[edit | edit source]Cedar's experience with 3D printed began very recently. His only interaction with 3D printing has started with his 3D printing class offered at Principia College. Five weeks into the semester, he has built his very own Jellybox Printer and has printed many useful and many funny objects to use. He is very excited about 3D printing and is still very much learning about the entire process and the mechanics of it all.
Education
[edit | edit source]Cedar went to Principia Upper school for high school, and is now a senior at Principia College. He is majoring in Business Administration.
Open Source
[edit | edit source]Open source technology is really cool to me because it opens up and connects a lot of people behind one objective and enables them to advance that technology in a positive way. I like how open everybody is on the internet when you are looking for help. I have loved talking to people on different JellyBox forums and learning how to print useful and fun objects from my 3D printer. I hope to eventually develop a board game that is completely 3D printed and fun and playable. Stay tuned!
Mini Mech Project
[edit | edit source]Experiment:
Test coupons for strength. I have 3D printed six filament coupons, three being printed vertically and three being printed horizontally. I am going to test them to see how much force they can withstand to see what the optimal way to print the coupons is for the strongest coupon. I changed the variables between the three prints. For vertical prints, I changed the nozzle temperature and tests 200, 210 and 220 degrees celsius. For the horizontal prints I changed the print speed from 100 to 150 and finally 200.
Hypothesis:
I think that for my vertical prints the 210 degrees will be strongest. I think this because all recommendations online are for 210 degrees because that makes it the strongest. We will see tomorrow. As for the horizontal prints I think that the one printed at 100 percent speed will be strongest because it took the fullest amount of time preparing the coupon.
For my experiment, my vertical and horizontal test coupons resulted in this data:

As evidenced by my data I was correct in my hypothesis that the 210 degree print would be the strongest. I think that an interesting piece of data is that my vertical coupon that tested at 220 degrees only withstanded 45N before it snapped, and only stretched .3mm. I wonder if this is because heating it up more makes the plastic weaker as it hardens.
As for the horizontal testing, the data is very interesting. The print at 100 speed and the print at 200 speed were very close in the force that they can withstand, with the 100 speed print being slightly stronger than the 200 speed. However, the 200 speed print stretch much farther than the 100 speed while withstanding almost the same amount of force. I wonder if this is because as it prints faster and the filament works through the coupon that it stretches the filament as it is liquid, making it more pliable but still just as strong.
As a revised hypothesis, I think I would keep my predictions as they are now represented through the data I collected. I would add to my hypothesis that I think that the horizontal strips would be stronger than the vertical strips because they are more structurally supported. I also want to test the coupons printing at even higher speeds, like 300 or 400 percent speed and see if that affects the strength of the coupons.
My Stuff
[edit | edit source]| Picture | Description | Something else |
|---|---|---|

|
This is the hot end we are using on our JellyBox | Something else |

|
This is the Rock wall hold I designed for class | Something else |

|
This is my vertically printed test coupon | Something else |

|
Look at this graph, this is data from breaking my test coupon | Something else |
OSH Project
[edit | edit source]For my OSH project I am designing a footstop for a longboard. A footstop is almost any height change in your board that keeps your foot from moving, providing a familiar landmark for your foot to find without looking down. It does not have a universal placement however, as everyone has their personal preferences of the angle and placement of their feet, which leads to tons of different footstop designs.
The simplest footstop is usually a bushing and a washer on an extra long screw. This helps give your foot a consistent place marker to find and lock in with, as well as adding couple extra steeze points to your setup. The most ‘complicated’ footstop is custom made to be a footstop, made of plastic or metal, and has adjustable mounting holes to provide the most versatile fit for everyone. The footstop I am making will be especially useful for me, but I am providing a CAD file so that anyone may edit the design to their personal preferences.
Footstops benefit all more serious types of riding. From freeride to downhill, you can’t go wrong with a well placed footstop. Locking your feet in at speeds is a must, especially if you don't have any drops in your deck. The only discipline footstops don’t help so much with is carving or cruising. For pushing you want to be able to put your feet anywhere on the deck without trying to maneuver around an obstacle, which will make pushing around the lake a less tasking process.
Some people on drop-decks or drop-throughs have trouble finding a place to put their footstop because the mounting holes on their decks aren't in the right place. This is easily fixed (if you don't mind using a drill on your board) by making a hole or two in the desired location and treating those like the mounting holes.
| Picture | Description | Something else |
|---|---|---|

|
This is this CAD file of the footstop I designed! | Something Else |
| Here is the STL of my footstop! | A footstop typically costs anywhere from Print at 210C at 100 speed. Its a pretty simple print! |
OSAT Project
[edit | edit source]For my OSAT project I am designing a sailing cleat. You can see where I committed to this project here: Requests_for_3-D_printable_open_source_appropriate_technology |}
As I am still developing skills in FreeCAD my work is very much in the prototype stage, but here is the rough draft of my sailing cleat as it stands today:
| Picture | Description | Something else |
|---|---|---|
| Here is the FreeCad File
As well as an .scad file of my prototype |
Remember this is just a very rough draft! I will resubmit soon with the complete CAD file with the printable sailing cleat! | |
| This is the completed FreeCAD file |
Abstract
[edit | edit source]Horn cleats, like the cleat that I am designing, are essential in sailing. Whether the cleat is mounted on the gunnel, the mast or even on a dock, these cleats are essential in cleating off stray lines such as a halyards while you are sailing so they do not whip around and get lost as you sail. If these are on the dock, these cleats are used to keep your boats attached to the dock using towlines to prevent them from blowing off into the ocean / lake where you are docked.
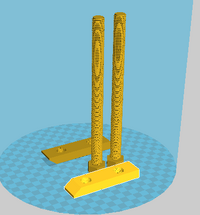
- Picture of completed print using

Bill of Materials
[edit | edit source]- You only need filament and a 3D printer to make this cleat! You will also need 100mm screws to secure it onto the gunnel or on a dock.
Tools needed
[edit | edit source]- Jellybox or similar RepRap 3-D printer
- Filament
Technical Specifications and Assembly Instructions
[edit | edit source]- Print time estimate: 3.5 Hours
Common Problems and Solutions
[edit | edit source]- Make sure to print it horizontally and not vertically, as the support structure may not work as well if you try and print it vertically
Cost savings
[edit | edit source]- The cost of this print is likely less than $1.
- The quivalent of this product is around $15-$20
- You can save up to $19 or around 90% of what this would normally cost!
Big Money Project
[edit | edit source]| Digital Photo | Free Design/Link to Libre3D | Commercial equivalent/Cost | Approximate Savings in US$ |
|---|---|---|---|

|
Chapel Cookie Cutter | [1], $8.99 | $8.75 |
This is a cookie imprint I made of a popular building called the Chapel on my College campus! You can use this on your cookies before you bake them and they will come out with a chapel design on them! The total costs of printing this is ~$.25 and you save up to $8.75 (or more! - depending on what you buy as a substitute) by printing this than buying a similar product.