Original file (1,170 × 632 pixels, file size: 100 KB, MIME type: image/jpeg)
Suitable Surfaces
Well-bonded solid floors; dry, clean well-cured concrete (cured for at least 60 days prior); wood floors with plywood on top. All surfaces must be clean and dust free. Can be installed over radiant heated floors (do not turn heat above 27° C or 81° F).
Unsuitable Surfaces
Rough, uneven surfaces including carpet and underlay. Rough, heavy textured and/or uneven surfaces may be visible/tangible through the vinyl and distort the finished surface. This product is not suitable in rooms that could potentially flood or rooms that have damp concrete or saunas. Do not install this product in areas, which are exposed to long-term direct sunlight such as sunrooms or solariums.
WARNING: DO NOT REMOVE OLD RESILIENT FLOORING. THESE PRODUCTS MAY CONTAIN EITHER ASBESTOS FIBERS OR CRYSTALLINE SILICA, WHICH CAN BE HARMFUL TO YOUR HEALTH.
Preparation
The vinyl planks should be allowed to acclimatize at room temperature (approx 20 °C) for 48 hours prior to installation. Carefully check planks for any defects before installation. Check that all BATCH NUMBERS and ITEM NUMBERS are the same and that you have purchased sufficient material to complete the job. Remove any traces of glue or residue from the previous flooring.
New concrete floors need to dry out for at least 60 days prior to installation. Wood plank floors require a plywood subfloor. All nail heads must be driven down below the surface. Securely nail all loose boards. Scrape, plane or fill uneven boards, holes or cracks using floor-leveling compound if sub-floor is uneven - over 3.2mm within a span of 1.2m. If installing over existing tile, use a floor levelling compound to skim coat grout lines. Make sure the floor is smooth, clean, and free of wax, grease, oil or dust and sealed as necessary before laying planks.
Tools And Supplies: Utility knife, spacers, pencil, tape measure, ruler and safety goggles.
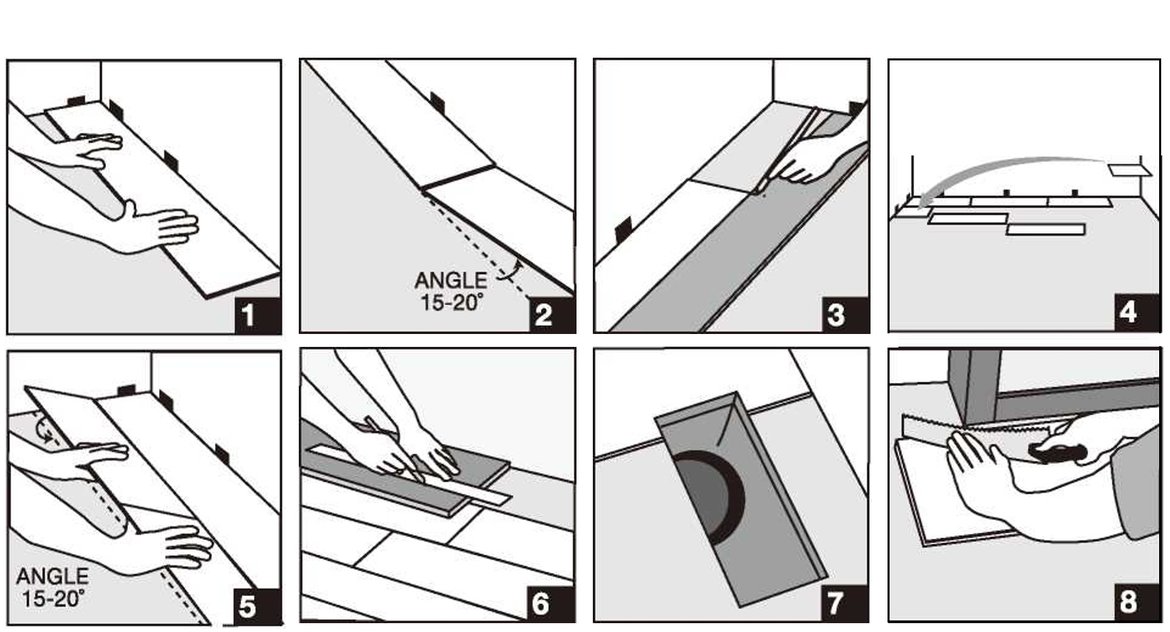
Installation: Start in a corner by placing the first plank with the tongue side facing the wall. Use spacers along each wall to maintain an expansion space of 8 – 9.5 mm between the wall and the flooring. Diagram 1.
To attach the second plank, insert the end tongue into the end groove of the very first plank at an angle of approx. 15-20 degrees. When lowered, the plank will click into place. Line up edges carefully. The planks should be flat to the floor. Diagram 2.
Continue connecting the first row until you reach the last full plank. Fit the last plank by rotating the plank 180° with the pattern side upward, place beside row. Measure and mark, then using a ruler and utility knife, score the plank and snap off. Attach as described above. Diagram 3.
Begin the next row with the off cut piece from the previous row to stagger the pattern. Pieces should be a minimum of 200 mm long and joint offset should be at least 400 mm. Diagram 4.
NOTE: It is faster to assemble planks into anew row at the ends and then attach the entire row to the previous row on the long sides.
To start your second row, lay your first plank on the subfloor. Take your second plank, insert the end tongue into the end groove of the first plank at an angle of approx. 15-20 degrees. When lowered, the plank will click into place with light pressure. The planks should be flat to the floor. Make sure gaps are as small as possible. Continue assembling the planks this way until you have your second row complete.
To attach the second row to the first row, tilt and push the side tongue into the side groove of the first panel at an angle of prox. 15-20 degrees. Lower and click into place lining the edges up carefully. Continue laying remaining planks in this manner. Diagram 5.
To fit the last row, lay a plank on top of the previous row. With the tongue to the wall, lay another plank upside down on the one to be measured and use it as a ruler. Don't forget to allow room for spacers. Cut the plank and attach into position. Diagram 6.
Door frames and heating vents also require expansion room. First cut the plank to the correct length. Then place the cut plank next to its actual position and use a ruler to measure the areas to be cut out and mark them. Cut out the marked points allowing the necessary expansion distance on each side. Diagram 7.
You can trim door frames by turning a plank upside down and using a handsaw to cut away the necessary height so that planks slide easily under the frames. Diagram 8.
Note:
If the total length of installation area is over 10 m must be left an expansion space of 8-10 mm and so on.
If the total width of installation area is over 8 m, it must be left an expansion space of 8-10 mm, and so on.
If not, we will not be responsible for any damages or claims after installation.
Care And Maintenance Guide Sweep regularly to remove surface grit and dust. Use a damp cloth or mop to clean up any dirt and footprints but avoid using excessive moisture. All spills should be cleaned up immediately. CAUTION: Planks are slippery when wet.
Never use wax, polish, abrasive cleaners or scouring agents as they may dull or distort the finish.
High heels can damage floors. Use protective pads under furniture. Use doormats at entrance ways to protect floor from discoloring. Do not allow pets with unclipped nails to scratch or damage the floor.
Avoid exposure to direct sunlight for prolonged periods of time. Use drapes or blinds to minimize direct sunlight during peak sunlight hours.
It's a good idea to save a few planks in case of accidental damage. Planks can be replaced or repaired by a flooring professional.
Luxury Vinyl Flooring - Installation Guide from luxury vinyl flooring blogs
File history
Click on a date/time to view the file as it appeared at that time.
| Date/Time | Thumbnail | Dimensions | User | Comment | |
|---|---|---|---|---|---|
| current | 16:41, 27 July 2021 | | 1,170 × 632 (100 KB) | Cheng (talk | contribs) | Uploaded own work with UploadWizard |
You cannot overwrite this file.
File usage
There are no pages that use this file.