No edit summary |
No edit summary |
||
| Line 112: | Line 112: | ||
|pics= | |pics= | ||
|size= | |size= | ||
|File:ImagineersWedge1.5.jpg |Cutting the aluminum tubing for legs | |[[File:ImagineersWedge2.jpg|Drilling into the aluminum legs |180px]]<td><b>Step 1:</b> Acquire, fabricate, and cut materials. Drill pilot holes where necessary. | |File:ImagineersWedge1.5.jpg |Cutting the aluminum tubing for legs | |[[File:ImagineersWedge2.jpg|Drilling into the aluminum legs |180px]]<td><b>Step 1:</b> Acquire, fabricate, and cut materials. Drill pilot holes where necessary. | ||
}} | }} | ||
{{How to | {{How to | ||
|title=Step 2: The wood frame and shelves | |title= Step 2: The wood frame and shelves | ||
|File:ImagineersWedge3.jpg | | |header1= Image 1 | ||
|header2= Image 2<td>Step | |||
|pics= | |||
|size= | |||
|File:ImagineersWedge3.jpg |Cutting the aluminum tubing for legs | |[[File:ImagineersWedge4.5.jpg|Drilling into the aluminum legs |180px]]<td><b>Step 1:</b> Assemble the wood frame and shelving. | |||
<b>Step 2:</b>To keep the wood frame from having water damage issues, caulking was used on the seams and a sealant was used on the wood surfaces. We used a salad bowl finishing stain to seal the wood. | |||
}} | }} | ||
| Line 128: | Line 131: | ||
|pics= | |pics= | ||
|size= | |size= | ||
|File: | |File: ImagineersWedge5.jpg |Caption | |[[File:ImagineersWedge5.jpg |Caption |180px]]<td><b>Step 1:</b> Attach the legs to the top and shelves. | ||
}} | }} | ||
Revision as of 21:21, 29 April 2016
Abstract

The purpose of this project is to create a wedging table that will be used in Zane Middle School’s Art class. The Imagineers team created and designed a wedging table to provide a reliable efficient area to wedge clay. The Imagineers was formed as part of Humboldt State University’s Engineering 215: Introduction to Design, taught by Camille Penny.
Background
Humboldt State University's Engineering 215: Introduction to Design provides its class with experience in design projects, team building, and communication skills. The Imagineers team was formed as part of an assignment for Engineering 215. The team's task was to provide Zane Middle School with a wedging table for their Art class. The team members include Oscar Bermudez, Shaela Hogue, Vincent Hurtado, and Erin Pyne.
Problem Statement
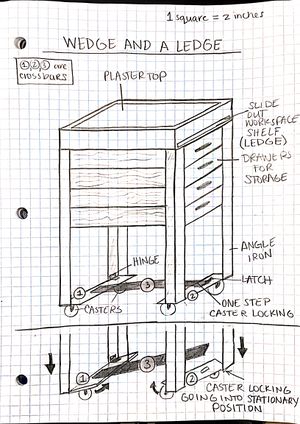
The objective of this project was to provide Zane Middle School with a portable area to wedge clay. The Imagineers designed a wedging table that can be portable and is also able to be stationary when in use, the table also provides storage and a side ledge to place dry clay.
Criteria
Below is a table listing and defining the criteria that was considered when choosing the projects' final design.
| Criterion | Definitions |
|---|---|
| Safety | The table should not contain any toxic chemicals, sharp metal, or splintered wood. The locking casters need a caution warning. |
| Sturdiness | The table should not be able to teeter over, wood or metal must be securely attached throughout the table, and the locking casters must be able to remain locked. |
| Portability | The table should move with ease, fit within all doorways, and be able to lock in place. |
| Durability/Longevity | the table should need little maintenance, and should be able to withstand minor weathering. |
| Cost | The cost for materials that compose the wedge and a ledge cannot exceed the amount of $300; this includes $75 per group member. |
| Environmental Impact/Sustainability | Reusable items would be most preferred, or the use of less harmful products used to construct the design. |
| Aesthetics | The table needs to be appealing to the public eye. It should be clean and not look out of place. |
Description of final project

Through the use of the Delphi Method, this is a process where as a team we evaluated each one of the designs each of the team members created, the design with the greatest raking would be chosen as the final design. The solution with the greatest ranking was “Wedge and a Ledge” design. This design is located to the right, it meets most of the criteria that was stated above section "Criteria". It is appealing, affordable, made of durable materials, uses materials with low impact to the environment, highly portable, is one of the safer alternatives, and is reinforced with three crossbars which provide it with support.
Costs
Below is a table showing the cost of our materials along with the grand total.
| Quantity | Material | Source | Cost ($) | Total ($) |
|---|---|---|---|---|
| 2 | Aluminum posts | Arcata Scrap | 7.50 | 15.00 |
| 4 | Casters | Ace Hardware | 7.19 | 28.76 |
| 4 | Hinges | Ace Hardware | 5.39 | 21.56 |
| 16 | Screws for Casters | Ace Hardware | .20 | 3.20 |
| 8 | Screws for hinges | Ace Hardware | NA | NA |
| 16 | Screws for plaster box | Ace Hardware | NA | NA |
| 6 | Wood for plaster box | Donated by Almquist Lumber | 0 | 0 |
| 12 | Wood for shelves | Donated by Almquist Lumber | 0 | 0 |
| 4 | Wood for wheel assembly | Donated by Almquist Lumber | 0 | 0 |
| 1 | Wood glue | Donated by Almquist Lumber | 0 | 0 |
| 1 | Plaster of paris | Client | 0 | 0 |
| Total Cost | $68.52 | |||
Testing Results
This section is being worked on
How to build
This section is being worked on
Use Template:How_to
Discussion and next steps
This section is being worked on
References
This section is being worked on
See Help:Footnotes for more. Template:Reflist