No edit summary |
No edit summary |
||
| Line 16: | Line 16: | ||
==Project== | ==Project== | ||
This page describes how you can build a Curing box for photocrosslinkable resins. Such curing boxes are mainly used for after curing of stereolithography builds. Research Group of Polymer Technology develops biodegradable photo-crosslinkable resins for SLA devices. Therefore, we can use a box like this | This page describes how you can build a Curing box for photocrosslinkable resins. Such curing boxes are mainly used for after curing of stereolithography builds. Research Group of Polymer Technology develops biodegradable photo-crosslinkable resins for SLA devices. Therefore, we can use a box like this to test the crosslinking of our materials. There are many designs on curing boxes on the web, but none of them fit all of our needs. One requirement set by our users was to be able to create a N2 atmosphere within the box. This should be possible with this box as long as box is airtight enough. | ||
Examples of other DYI curing boxes and sources of inspiration: | |||
Lägg till länkar här. | |||
==Parts== | ==Parts== | ||
| Line 24: | Line 26: | ||
*UV LED Flexible Strip | *UV LED Flexible Strip | ||
** Purchase [https://www.ebay.com/i/231905956009?rt=nc 12V 5050 SMD 395-405nm UV LED Flexible Strip] | ** Purchase [https://www.ebay.com/i/231905956009?rt=nc 12V 5050 SMD 395-405nm UV LED Flexible Strip] | ||
** The wavelength is important and 405nm | ** The wavelength is important and 405nm is suitable for our materials as well as most commercial resins for stereolithography devices | ||
* Shelf brackets | * Shelf brackets | ||
** I modified [https://www.thingiverse.com/thing:223288 this] model found on Thingiverse to suit my needs, here is a link to my [https://www.youmagine.com/designs/shelf-bracket-parametric shelf bracket] that you can modified using eg. the parametric OpenSCAD file | ** I modified [https://www.thingiverse.com/thing:223288 this] model found on Thingiverse to suit my needs, here is a link to my [https://www.youmagine.com/designs/shelf-bracket-parametric shelf bracket] that you can modified using eg. the parametric OpenSCAD file | ||
| Line 30: | Line 32: | ||
** To make the door airtight, bars are needed to attach the insulating weather strip on. Parametric 3D printable model I created can be found [https://www.youmagine.com/designs/bar-for-insulation-strip here] including OpenSCAD file. | ** To make the door airtight, bars are needed to attach the insulating weather strip on. Parametric 3D printable model I created can be found [https://www.youmagine.com/designs/bar-for-insulation-strip here] including OpenSCAD file. | ||
* Hose connector | * Hose connector | ||
** A nice Universal hose adapter can be found [https://www.thingiverse.com/thing:26096/#comments here]. I decided to use it as it is by just scaling it | ** A nice Universal hose adapter can be found [https://www.thingiverse.com/thing:26096/#comments here]. I decided to use it as it is by just scaling it downa little. | ||
* Weather strip for sealing door and silicone sealant | * Weather strip for sealing door and silicone sealant to seal gaps. | ||
** Buy in local hardware store | ** Buy in local hardware store | ||
* Glas plate as shelf | * Glas plate as shelf | ||
| Line 40: | Line 41: | ||
|height=135 | |height=135 | ||
|title= 3D Printable parts | |title= 3D Printable parts | ||
|Image: | |Image:Insulation corner bar openscad view.png|[https://www.youmagine.com/designs/bar-for-insulation-strip Bar for insulation strip] | ||
|Image: | |Image:Shelf bracket openscad view 2.png|[https://www.youmagine.com/designs/shelf-bracket-parametric Shelf bracket parametric] | ||
|Image:Hose connector openscad view.png|[https://www.thingiverse.com/thing:26096/#comments Hose connector] | |||
}} | }} | ||
==Directions== | ==Directions== | ||
1.) | 1) Choose a box suitable for your needs. For example the one from IKEA mentioned above. | ||
2) Print the parts you need. Note that all 3D printable models shared on this page are parametric and therefore customizable according to your needs using OpenSCAD. | |||
3) Put together the box according to the [http://www.appropedia.org/File:Curing_box.png curing box design] | |||
4) Make sure the box is airtight by sealing the box with a silicone sealant. | |||
- a way to test is by purging with N2 for some time while having a SMALL burning candle inside the box. The candle should go out if the N2 atmosphere is good enough. | |||
==Final Prints and Parts== | ==Final Prints and Parts== | ||
This far the following parts have been printed | |||
4. Shelf brackets usinf fused filament fabrication | |||
An idea would be to print sliding rails on which the brackets can slide so that the hight can be altered easily | |||
1. Bar (printed in two parts)for insulation strips using fused filament fabrication . 3 more should still be printed. However, I am waiting for a FFF printer with a bigger build platform to be functional so that I can print the part whole and not divided into two. | |||
1. Hose connector printed using stereolithography because I had access to such a device. This allows for a part with better resolution | |||
a. Add picture of ready hose connector | |||
| Line 63: | Line 75: | ||
|Image:Shelf bracket.jpg|Printed shelf brackets | |Image:Shelf bracket.jpg|Printed shelf brackets | ||
|Image:Bar insulation.jpg|One printed bar (printed in two pieces) for insulation weather strip | |Image:Bar insulation.jpg|One printed bar (printed in two pieces) for insulation weather strip | ||
}} | }} | ||
==Estimated Cost== | ==Estimated Cost== | ||
The cost of a curing oven from Formlabs is.. link to device | |||
Ett annat exempel på pris. | |||
Ihopräknat totala priset för | |||
- Lådan | |||
- LED | |||
- Weather strip | |||
- Silicone seal | |||
- Printade bitar | |||
- Glasskiva | |||
==Ideas to improve the design== | |||
Revision as of 14:01, 28 October 2017
26.10.2017 This page is being created and therefore in the process of editing.
Final project of Kasper Dienel in course ELEC-L3999: 3D Printing of Open Source Hardware for Science at Aalto University.
26.10.2017 Comment: The plans for the curing box are ready and most of the parts purchased, printed or CADs created, but the whole box is not yet put together. This is because the LED strips ordered on ebay will not arrive until in november or early december.
Designer
Kasper Dienel Aalto University, Research Group of Polymer Technology
Project
This page describes how you can build a Curing box for photocrosslinkable resins. Such curing boxes are mainly used for after curing of stereolithography builds. Research Group of Polymer Technology develops biodegradable photo-crosslinkable resins for SLA devices. Therefore, we can use a box like this to test the crosslinking of our materials. There are many designs on curing boxes on the web, but none of them fit all of our needs. One requirement set by our users was to be able to create a N2 atmosphere within the box. This should be possible with this box as long as box is airtight enough. Examples of other DYI curing boxes and sources of inspiration: Lägg till länkar här.
Parts
- The box
- Purchase for example a EKET Cabinet with door from IKEA.
- UV LED Flexible Strip
- Purchase 12V 5050 SMD 395-405nm UV LED Flexible Strip
- The wavelength is important and 405nm is suitable for our materials as well as most commercial resins for stereolithography devices
- Shelf brackets
- I modified this model found on Thingiverse to suit my needs, here is a link to my shelf bracket that you can modified using eg. the parametric OpenSCAD file
- Bars for insulating strip
- To make the door airtight, bars are needed to attach the insulating weather strip on. Parametric 3D printable model I created can be found here including OpenSCAD file.
- Hose connector
- A nice Universal hose adapter can be found here. I decided to use it as it is by just scaling it downa little.
- Weather strip for sealing door and silicone sealant to seal gaps.
- Buy in local hardware store
- Glas plate as shelf
Directions
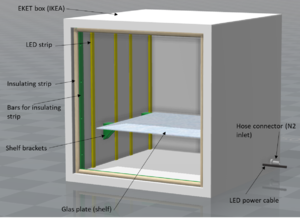
1) Choose a box suitable for your needs. For example the one from IKEA mentioned above.
2) Print the parts you need. Note that all 3D printable models shared on this page are parametric and therefore customizable according to your needs using OpenSCAD.
3) Put together the box according to the curing box design
4) Make sure the box is airtight by sealing the box with a silicone sealant. - a way to test is by purging with N2 for some time while having a SMALL burning candle inside the box. The candle should go out if the N2 atmosphere is good enough.
Final Prints and Parts
This far the following parts have been printed 4. Shelf brackets usinf fused filament fabrication An idea would be to print sliding rails on which the brackets can slide so that the hight can be altered easily 1. Bar (printed in two parts)for insulation strips using fused filament fabrication . 3 more should still be printed. However, I am waiting for a FFF printer with a bigger build platform to be functional so that I can print the part whole and not divided into two. 1. Hose connector printed using stereolithography because I had access to such a device. This allows for a part with better resolution a. Add picture of ready hose connector
Estimated Cost
The cost of a curing oven from Formlabs is.. link to device Ett annat exempel på pris. Ihopräknat totala priset för - Lådan - LED - Weather strip - Silicone seal - Printade bitar - Glasskiva


