We have been intrigued with a unique style of composting toilet which is in use by some members of the natural building community. It combines two tried and tested principles of organic gardening: vermicomposting and moldering (i.e., low temperature) composting toilets. Although I have never used one, I am told that it works well. In order to further this idea we have researched one installation and are attaching simple plans for construction. The basic idea is to create a friendly habitat for worms and keep them continuously supplied with food. Their job is to consume and digest compostables (including human bio-wastes) into rich garden compost. In order to facilitate harvest of this compost the system is designed to operate in batches, and consists of two chambers. One chamber is used until it is "full". The worms are then allowed to complete digestion while a second chamber accepts new material. (A similar batch method is typically used for composting.) When the second chamber becomes filled, the first chamber is emptied and the process starts all over. Because urine contains a lot of sodium and urea (an important nutrient for photosynthesis), it is best to separate it for direct application (or diluted with 5 parts water) on plants.
As with regular composting toilets, other household compostables, such as kitchen scraps, may be added to the vermicomposting chamber. To keep worms happy it is important to provide the proper initial habitat including bedding material whenever the process starts in an empty chamber. Ideally, the worms will be able to move back and forth between the chambers, so when food is exhausted from one side they will automatically move to the second side. This will help to evacuate the worms before the finished vermicompost is moved into the garden. If the compost is to be used for edible plants (as opposed to ornamentals), it may be desired to finish it by passing it through a high temperature compost pile. This will help insure sterilization, destroying any potential pathogens.
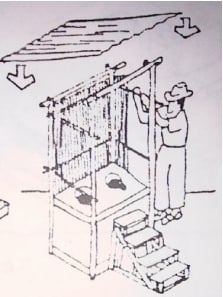
Here is a basic schematic for a two chamber vermicomposting toilet: This drawing comes out of a Mexican book called Agricoltura Sostenible: Un Acercamiento a la Permacultura, which was put together by Alejandra Caballero and Joel Montes. (Alejandra teaches Permaculture to campesinos and others. Gringos are invited to learn Permaculture and natural building, in Mexico, where it has been part of the culture for millennia. Alejandra and her family are all extraordinary teachers, and their family ranch is an extraordinary site where they are actively engaged in all aspects of Permaculture and local self-development and education. Interested people should obtain more information from the Cob Cottage Company. Ask about courses in Mexico.)
Below are some actual photos of a vermicomposting toilet designed by Kiko Denzer.
Practical example[edit | edit source]
Kiko is a sculptor who works in various materials, including earth (also known as cob or adobe). Among other things, he makes sculpted, wood-fired bread ovens out of earth, and has published a manual on building ovens and making bread called Build Your Own Earth Oven. He and his wife, Hannah, work and live in Oregon's coast range. Another one of his projects can be seen here.
His design was based on the schematic above. He writes:
I adapted my toilet design from them, and I think anyone else ought to be able to do the same. The only tricky part is making a little catch funnel for urine at the front of the hole, where it can catch pee from seated members of either sex. (If I'm just peeing, I use a yogurt container and pour it in, or you can build a separate urinal, if you want to get fancy. If you want to get really fancy, like Alejandra's husband Paco, you can install a fresh water rinse system for the urine funnel, to keep it from clogging up with precipitated salts from the pee). We cover each solid deposit with fir sawdust which we get from an old guy down the road with a lumber mill. Toilet paper goes right in. So did some old underwear, and there was nothing left but the elastic! "When I cast the concrete chambers, I set a piece of plastic pipe as a urine drain to drain both compartments (slanted, of course). On one end is a 90 degree elbow, positioned just below the front of the hole in the far compartment. The pipe goes through the wall dividing the chambers to a "T" junction, also just below the center of the second hole. Then it goes on through the last wall to a 5 gallon plastic pee pot, which gets emptied onto the compost or onto garlic in the early spring.
Kiko's vermicomposting toilet is located in a solar barn pictured here:
The barn's interior is finished with a lime wash, pigmented with our local ochre. Earthen floor is rough coat only -- awaiting summer to put down the smooth finish coat. The toilet box is cast concrete, extending below ground in an 'el' that reaches forward, toward the viewer. On top of the leg of the 'el' is a trapdoor for emptying each of two chambers, which are divided vertically. While deposits are being made in one, the worms are finishing off the other. The hand washing sink water supply is an exterior rain barrel (see below); the sink drains into the toilet, where it flushes the urine funnel, diluting the urine so it can be applied directly to garden beds as fertilizer, added to working compost piles, or sprinkled on the lawn. Odors are only as objectionable as our attitudes make them, and in any case, easily contained and quickly dissipated.
Urine collection[edit | edit source]

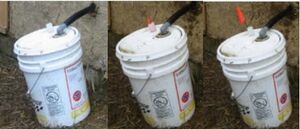
Pee drains into a 5 gallon bucket outside (pictured below). The bucket is rigged with a flag on a foam cork that fits (loosely) inside a piece of plastic pipe fitted into the lid -- this mechanism provides a simple indicator for when the bucket needs emptying. As urine generates ammonia and a very basic (as opposed to acidic) environment it is necessary to separate it from the other wastes to prevent toxicity to the worms.
Interior layout[edit | edit source]
The seating is 2-by-6 cedar planking (below, far left), since moisture and condensation do form on the inside. The 5-1/2" slot (made by hinging the central plank) makes a nicely sized and comfortable hole and seat. All the planking is fitted, w/angular cuts. For ease of removal, side planks aren't fixed; this makes for more convenient access when necessary. The wall behind the seat is vertical, woven willow wattle, plastered from behind and smoothed in front to expose the wattle. It is still awaiting final cleaning and lime wash.
The funnel (center left, at front of opening slot, look for the black drain hole) is hand-shaped cement mortar over expanded metal lath, placed to catch urine flow from sitting persons of either gender (men can use it standing as well, although it's less messy to just go outside). I fit black plastic pipe into the lath funnel, and plugged the opening with a wad of paper while I worked the cement. The original funnel extended a bit too far back, so I cut it down with a masonry saw and hammer and chisels. A plastic bottle with the bottom cut out also works, especially for determining optimum placement
The compost at the bottom of the working chamber (right) is looking nearly done. At this stage, I sometimes find worms wandering at the edges of their home -- looking for more food, I presume. But populations adapt quickly. They typically work throughout the pile (paper and kitchen wastes too), making for speedy composting. They like moisture. A dry pile isn't normally a problem, though it did happen this past fall. We just added a little water every few days, and the worms quickly came back up to speed. This chamber is accessed by removing the steps above which normally cover it.
We haven't been keeping close track of how long we're letting the worms work, but I'd estimate that it takes us about a year to fill one chamber (a bit less than 20 cubic feet). This year, I think we emptied it about nine months after closing. For safety's sake, Hannah has been composting the worm castings with our regular hot compost, and then her final precaution has been to spread the compost and let it sit on the beds over winter, so it's all thoroughly worked before it even gets close to food. However, there was one reference in the Humanure Handbook suggesting that worms manage to kill pathogens. I haven't had a chance to check it out yet. (Biocycle, no. 90, Nov. 1998, p 18.)" A Mexican study has reported that pathogens were reduced to safe levels after 60 days of vermicomposting (http://www.ncbi.nlm.nih.gov/pubmed/20093021)
Whether you purchase one of the many commercially available composting toilets or make you own vermicomposting or sawdust toilet, we wish you happy composting. Congratulations on your decision to close the human nutrient cycle, helping to prevent pollution and conserve and enhance the earth's natural fertility!


