
How to make a "Sunbrella" solar cooker

| Type | Solar cooker |
|---|---|
| Authors | Teri Grunthaner |
| Status | |
| Years | |
| Made | Yes |
| Replicated | No |
| Cost | USD 80.97 |
An umbrella by rain, a parabolic solar cooker by shine... a Sunbrella!
The energy used for conventional cooking comes from a variety of sources: wood, gas, oil, coal, electricity, etc. Though solar cooking seems to be its own category, it is the basis for all the rest. The Sun's energy powered the growth of the tree; plants and animals buried on the ocean floor a hundred million years ago anaerobically decomposed to produce crude oil[1]...
The difference between using conventional techniques, such as wood, oil, and gas, and using pure solar energy is the number of transfers the energy has to undergo (as well as the byproduct of usage, of course). To use gas, for instance, the Sun shines, the tree grows, the animal eats, the fungus feasts, the gas burns, and then the pot heats. To use pure solar energy, as with a Solar Cooker, the Sun shines… and then the pot heats. Simple, straight-forward, and seemingly much more efficient for the purpose of cooking food for human consumption.
Solar cooker designs
[edit | edit source]Solar cookers are solar concentrators where precision and efficiency has been sacrificed for ease of construction and use of readily available materials. Inexact geometries that still allow for water boiling or bread baking temperatures are used. Some calculations relevant to the design of solar cookers with paraboloidal reflectors can be found on the Sun related calculations page.
There is a whole spectrum of Solar Cooker designs, each with their own unique costs, benefits, and optimal conditions. Some examples...
-
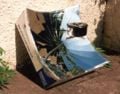
 Solar Panel Cooker: Simply a cut up box with foil glued to sides. Example project: Mechanical mathematician for paraboloids
 -
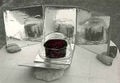
 Solar Box Cooker: Glass panel creates greenhouse effect. Example project: Solar box cooker research project
 -
 Solar Basket Cooker: A culturally appropriate Solar Box Cooker. Example project: Willow Basket Parabolic Solar Cooker
 -
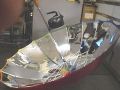
 Solar Satellite Cooker: The parabolic shape focuses the sunlight on a single point. Example project: Papasan chair solar cooker
 -
 Parabolic Solar Cooker: Assembled by children using mathematical formulas. Example project: How to make a solar oven for kids (Locally Delicious)
 -
 Solar Umbrella Cooker: Umbrellas are often conical, but can get very close to a parabola. Example project: How to make a "Sunbrella" solar cooker
 -
 Solar Tire Cooker: A recycled black tire sandwich for lots of insulation and thrift


Background
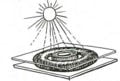
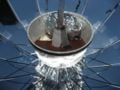
[edit | edit source]Parabolic reflectors [2] concentrate sunlight into a focal point. The more exact the shape, the tighter the focus. When a parabolic solar cooker is not aimed correctly, the focal point disperces, creating off-axis parabolic reflection. Thus, frequent adjusting of parabolic solar cookers must occur to keep the focus in place. This focus creates very high temperatures, ideal for areas like Humboldt County where the Sun is not very strong or direct [3].
Opportunities Abound
As a student taking Appropriate Technology at Cal Poly Humboldt in the spring of 2009 with access to incredible human resources (Bart Orlando and Lonny Grafman), I couldn't imagine a better time or place for me to cooperatively design, build, test, and enjoy an umbrella solar cooker.
Amazing opportunities for growth present themselves at every angle of this project, fore I am able to…
- Make connections and friendships with community members
- Work cooperatively with incredible teachers and students
- Expand my knowledge of ways to utilize the Sun's energy
- Refresh my math skills and learn to apply it to engineering
- Recycle materials for another generation
- Build upon the appropriate technology collective's information resources
- Integrate social, economical, and ecological responsibility in a DIY project
- Make a wiki-webpage
- Inspire others to do the same and recognize their bounty of opportunities
This project was truly made possible by the one and only Bart Orlando. Bart is an appropriate technology visionary who, among many other things, converts commonly found items into solar cookers. He mentors and works with students in the Humboldt area to design and create innovative technologies such as the Parabolic Basket Solar Cooker for non-industrialized cultures and the Papasan Chair Solar Cooker for industrialized cultures. He is a teacher at heart and creates educational displays and demos everywhere he goes, from events and schools to farmers' markets and co-ops. His mission is to reduce the negative health and environmental impacts of using wood and other conventional methods of cooking and make solar cooking accessible to all… who cook food. ☺ Thank you, Bart, for your dedicated work, guidance, and friendship. More examples of A.T. projects Bart has envisioned can be seen online at Projects With Bart [4].
This project was inspired by another Sunbrella made in 2000. Thank you to all who document their work online!
-
 thumb
thumb -
 thumb
thumb -
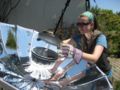
 Bart Orlando with Sunbrella


Design
[edit | edit source]An umbrella is a mighty appropriate tool in Humboldt County, as is a cooker that utilizes a clean renewable resource. Thus, we decided to combine the two to make an incredible apparatus: an umbrella in the rain, a solar cooker in the Sun... a Sunbrella!
Criteria
The guidelines we used when designing the Sunbrella, as well as by which we judged our success, make up our criteria. You can also think of them as goals...
- Effective - Can cook food and boil water
- Safe - Is stable while cooking
- Portable - Can collapse well enough to be transported and stored efficiently
- Functional - Can withstand usage in the rain without damage
- Durable - Can withstand repeated uses as a cooker
- Simple - Is easy to understand, use, and construct
- Economical - Utilizes reused/recycled materials and creates little waste
- Attractive - Arouses interest and thought and is esthetically pleasing
' Frame
The frame is like the skeleton, it is what holds the parabolic shape of the cooker. Since our frame is an umbrella, we searched far and wide for one that had the right size, shape, and shaft.
- Size - The greater the diameter of a parabolic cooker, the more sun rays are reflected to the focus. We calculated that an umbrella with a diameter between 50-60 inches would be most appropriate, as we want to be able to feed and keep a few people dry while still being able to easily transport the Sunbrella.
- Shape - Most umbrellas are not quite parabolic, but are instead often catenary or conical. The number of panels that make up an umbrella determines how smooth the 3-D shape is, so the more the better in terms of a paraboloid. We aimed to settle on no fewer than 12 panels comprising our umbrella.
- Shaft - The ends of the shaft are really what is important: the handle and the tip. A straight handle seemed to us to be the most compact and gave us more possibilities for the cookware. The tip plays a huge part in the mounting of the Sunbrella, so we wanted one that was long and strong.
After many weeks of searching the Humboldt region, we decided to purchase an umbrella off Ebay: a white, 60 inch diameter, 16 panels, and straight handle, and a 2.5 inch tip that extends from the shaft (so it is really strong). About a week before we were done, we found the perfect umbrella almost identical to this one except better because it is rainbow colored, silver shaft and ribs (instead of black), and has a higher focal point. You'll see pictures of both throughout this page.
Reflectors
[edit | edit source]The reflectors are what, as I'm sure you can guess, actually reflects the sun rays. There are many materials available on the market that have varying degrees of reflectivity, durability, price, and so on. A great reflector comparison table was made by another Engr 305 student in 2008. Ideally, a very high thread count cloth-like material, like liquid lame, would be permanently sewn onto the panels for ease of set-up. This material was not readily available but is out there*, so we instead decided to create individual reflectors that would slip onto the panels when being used as a cooker and stored when not. We settled with mylar and cellulose acetate.
- Mylar - A film made from polyester that has 98% reflectivity. It has a good consistent color, dimensional stability, high heat resistance, and is non-tearing. [5]
- Cellulose Acetate - Looks like plastic, is easy to cut, and is flexible. CA is made from wood pulp and can be composted and incinerated. It also has poor thermal retention, is hypoallergenic, and is resistant to mold and mildew. [6]
Construction
The reflectors took a lot of time and energy to construct. We had to undergo several trial-and-errors to find the right size reflector -- it wasn't as easy as it seems. We found that the umbrella's panels could not be covered with isosceles triangle reflectors because of the curvature, which caused a gap between the reflectors in the middle when bowed to fit the curve. So, we decided to widen the angles of the triangle and allow one of the sides down by the most acute angle hang over into the next panel area.
- Measure an individual panel's (plus a few more for an average) width at the rim plane and midway point, the full radial length, the radial length between the rim plane and the midway point, and the radial length between the rim plane and the desired length of the reflectors (we left 4 inches from the umbrella's vertex).
- On a large piece of cardboard, make a line (near a side) the length of the rim plane width. From the midpoint of that line, draw a perpendicular line equal to the full radial length, marking the point on that line where the midway point lies and the desired length of the reflector is.
- At the midway point, draw a centered line (it's intersection at it's midpoint) parallel to the rim plane line the length of the midway point width.
- Using a yard stick (or any long straight edge), connect an end point of the rim plane line with an end point of the midway point line on the same side of the full radial line. Trace the line from the rim plane to the point of intersection with the full radial line. (If it does not intersect, it's okay.) Repeat with the other end points.
- Draw a line parallel to the rim plane line at the point along the radial length where the desired length of reflector is. You should now have a trapezoid with height the desired length of reflector and base the length of the rim plane line.
- Lay a sheet of cellulose acetate down with a side and corner aligned with the rim plane line and one of it's end points (respectfully). Firmly secure the sheet in place so that you can cut out the trapezoid with a utility knife.
- Slip the trapezoid into a panel section. Assess how the piece lines up, and make corrections accordingly. In our umbrella, one of our sides lines up perfectly, while the other side overhangs into the adjacent section near the center of the umbrella. We like this as it helps hold that end down on the next panel.
- Continue until all panels are filled.
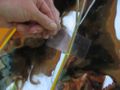
- For the mylar, create a stencil that is identical to the cut cellulose acetate pieces, except take in a centimeter or so on one of the long edges and the rim plane edge so the cellulose acetate overhangs.
- Tape the mylar to the cellulose acetate about 1 centimeter down from the rim plane edge.
Stand
[edit | edit source]The stand is the mount, or base, for the solar cooker. It is crucial that the stand be easily adjustable so the solar cooker can track the Sun with minimal disruption to the cooking process. The stand obviously must also be strong enough and well grounded to support the Sunbrella with food in it.
We brainstormed quite a few different designs for the stand, two of which we actually tried:
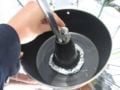
- Stake - This design acts like an extension of the umbrella's tip. We screwed a long stake onto a long copper pipe that is just flexible enough to be manually adjusted, but strong enough to maintain it's shape while holding the Sunbrella. The stake is firmly stuck into the ground, and then the umbrella's tip is secured into the end of the copper pipe. Some kind of support is needed to keep the stake from freely rotating in the soil, like bungee cords also staked on either side.
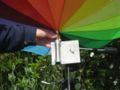
- Tripod - Tripods are wonderful for a solar cooker stand because they are well grounded and are easily adjusted and fixed in any direction. We designed an interface where the umbrella attaches to the tripod using an aluminum plate, piping, brackets, and rubber tubing. This interface screws onto where a camera usually does and snuggly holds onto the Sunbrella. For constructing this interface, we were very fortunate to know someone who has access to an iron-working machine that could cut and drill the aluminum sheet like nothing. Thank you John Davis from Solar Racks in Arcata!
-
 Stake design
 -
 Stake-copper piping interface
 -
 Sunbrella mounted with stake (now more like a Sunflower!)
 -
 Umbrella-tripod interface


Cookware
[edit | edit source]The cookware is what facilitates the cooking of the food, including a pot, its base, and ideally a windshield (oh, and of course a mixer and a pot holder). Usually, parabolic solar cookers do not have a shaft running right through the focal point. This creates some challenges, but in turn enables creativity.
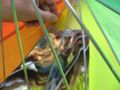
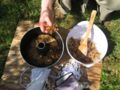
- Pot - This can be a whole variety of things, like a pan, dish, or jar. Whatever it is, it should be black, as black absorbs the whole spectrum of light. When sizing the pot, it is important to consider the focal point's size (meaning how focused it really is) and location. Since our umbrella's focal area (it wasn't much of a point) was on and above the beams, we needed to put the pot as low as possible. We decided to use a bunt cake dish, which is a donut-like pot with a hollow cone in the middle. This pot slides over the handle and down the shaft perfectly and nestles on the beams. Because the bottom of the pot gets so hot, we decided to use two bunt cake dishes, one inside the other with a little space between, so to avoid burnt food and allow convection.
- Base - The base is what the pot sits on or is suspended by. It must be able to handle the high temperature of the pot and the heaviest weight possible when full of food. For the Sunbrella, the rib beams act as the base, but since they are black as well, we needed to protect them from the high heat. We covered the rib beams with aluminum foil, fit a tin pie pan below the rib beams, as well as stuck a foil-wrapped wooden donut-like block below the pot.
- Shield - Some kind of clear windshield that leaves a little space between it and the pot enables the pot to absorb the sun rays but keeps the wind from cooling it off by convection.
Container
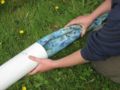
[edit | edit source]Since the umbrella does not always have to be a Sunbrella, convenient storage for the reflectors and other components would be nice. We decided to use a length of PVC piping with two end caps. We cut a wedge of foam to secure the umbrella inside the tube. The reflectors are simply wrapped in cloth and eased inside. More ideas have come up for the container, and can be found in the Further section.
-
 thumb
thumb -
 The umbrellas we tested.
 -
 Liquid Lame
 -
 Umbrella components.
 -
 thumb
thumb -
 Taping the reflectors
 -
 Tripod stand in action
 -
 Double bunt cake dish.
 -
 Foam support in container


Materials and Costs
[edit | edit source]| Quantity | Material | Source | Cost ($) | Total ($) |
|---|---|---|---|---|
| 1 | 60-in 16 panel Wedding Umbrella (plus shipping) | Ebay | $17.95 | $27.90 |
| 1 | 25-ft roll Mylar | Let it Grow | $11.00 | $11.00 |
| 3 | 40 X 25 in. sheets Cellulose Acetate | Arcata Art Center | $7.00 | $21.00 |
| 1 | roll Packing Tape | Ace Hardware | $3.50 | $3.50 |
| 2 | Bunt Cake Dish | The Hospice Thrift Shop | $1.00 | $2.00 |
| 1 | Bunt Cake Lid | The Hospice Thrift Shop | $0.50 | $0.50 |
| 1 | donut-shaped Wooden Block | Bart Orlando | Donated | Free |
| 1 | roll Recycled Aluminum | Ace Hardware | $3.50 | $3.50 |
| 1 | Tin Pie Pan | Friend's house | Salvaged | Free |
| 1 | Tripod | Bart Orlando | Borrowed | Free |
| 1 | 5 X 4 X 3/16 in. sheet of Aluminum | Arcata Scrap and Salvage | Salvaged | Free |
| 1 | 3/4 in. Stainless Steel Tube | Arcata Scrap and Salvage | Salvaged | Free |
| 2 | 3/4 in. Pipe Brackets | Ace Hardware | $0.27 | $0.54 |
| 2 | 10-24 Bolts | Ace Hardware | $0.11 | $0.22 |
| 2 | 10-24 Nylox Nuts | Ace Hardware | $0.12 | $0.24 |
| 1 | Wing Nut | Ace Hardware | $0.27 | $0.27 |
| 1 | ft of Rubber Plastic Tubing | Ace Hardware | $0.57 | $0.57 |
| 1 | large piece scrap Foam | Wing Inflatables | Donated | Free |
| 1 | 4-ft 4 in. PVC Piping | Arcata Recycling Center | $4.00 | $4.00 |
| 2 | PVC End Caps | Ace Hardware | $3.00 | $6.00 |
| Total Cost | $80.97 | |||
Tools
- Ruler
- Yard Stick
- Scissors
- Utility Knife
- Pliers
- Cutting Shears
- Cardboard
- Gloves
- Sunglasses
- Notebook
- Camera
- Radio
Implementation
[edit | edit source]Setup
Setting up the Sunbrella is amazingly simple, and only takes one person about 10 minutes! It's as easy as....
-
 1. Fit umbrella into interface
 -
 2. Insert reflectors facing away from Sun
 -
 3. Layer reflectors for anchoring
 -
 4. Secure reflectors with tabs
 -
 5. Prop-up cookware
 -
 6. Create/fill space for pot
 -
 7. Adjust tripod so pot is in focal area


Once all the reflectors are in place, watch out for off-axis parabolic reflection. This scattering of light could hurt someone's eyes or possibly start a fire if the time is right and flameable materials are around. When not using the cooker, either face it 180 degrees off-axis, or cover with a sheet.
Cooking
Now for the fun part! Experiment with baking, frying, sauteing... Check out some great solar cooking tips and recipes on the internet and in books for inspiration.
Be sure to always wear UV protective sunglasses when using the Sunbrella and have pot holders and towels handy while cooking. Also, keep an eye on how illuminated the pot is... parabolic solar cookers need to be adjusted every 15 minutes or so to keep an accurate focus on the Sun.
-
 Load food
 -
 Set pot
 -
 Slip lid into place
 -
 Relax & talk to people about solar cooking!
 -
 Check food using potholders
 -
 Enjoy & share with others


Takedown
Turn the Sunbrella away from the Sun and undo what you just did... simple! Be sure to take care of the reflectors. Stack them together, leaving the cellulose acetate side up on both ends for protection, and wrap in cloth. Storing the Sunbrella in the container is pretty intuitive, but just in case you were wondering...
-
 Taco-fold in reflectors
 -
 Carefully ease in umbrella
 -
 Cap and go!


Evaluation
[edit | edit source]So, in the end, how well did we satisfy our criteria? Though I don't want to be making excuses, time constraints were the number one reason for hasty decisions that didn't necessarily fit our criteria... but we tried!
- Effective? - Yes, we successfully baked cookies and a cake. Unfortunately, we have yet to test boiling water because we have not figured out how to keep condensation from forming on the shaft and dripping down onto the Sunbrella reflectors. We will keep an update on our testing.
- Safe? - Yes, the Sunbrella has yet to ignite black construction paper (though we don't doubt it could in mid summer), and the tripod is very stable. However, the off-axis parabolic reflection needs to be watched out for, since it could hurt someone's vision. Also, both mylar and cellulose acetate are flamible.
- Portable? - Yes, the Sunbrella's container takes up about 2-3 closed umbrella's worth of space and is lightweight. A smaller tripod is needed, however, as the one we had access to is too bulky for easy transport.

- Functional? - Yes, because the reflectors are taken out when not in use, the umbrella functions just like any other one.
- Durable? - Yes and no, since though we have used the Sunbrella many times already, we are finding that the mylar is scratching where the reflectors slip under the ribs and contact the tabs.
- Simple? - Yes, amazingly simple!
- Economical? - Yes and no, as we did buy quite a few new materials, including the umbrella, mylar, and cellulose acetate. The mylar will also need to be replaced after a while. But, at least it's main input (Sun rays) is free, abundant, and clean!
- Attractive? - Yes, I think it's beautiful! It combines common items that everyone recognizes, an umbrella and a tripod, into something (almost) everyone needs, a cooker! Also, both umbrella colors, white and rainbow, have the potential to spark great conversation about sunlight and the color spectrum.
Overall, a wonderful step towards low-impact, do-it-yourself living!
Furthur
[edit | edit source]A project is never done, as there is always an infinite number of ways to improve and adapt a technology. We had fun dreaming up some of the possibilities to take the Sunbrella (as the Merry Pranksters put it) FURTHURRRR!!
- The container can be designed to also use the Sun's rays by using black tubing designed for holding hot water. While the Sunbrella is in use, the container can be filled with water and left in the Sun, providing a hot shower after a hot meal!
- The end caps on the container can be filled with concentric cups for dishware.
- A satellite receiver antenna could be connected to the Sunbrella's shaft for telecommunication.
Please add (and try!) your visions!
Literature Review
[edit | edit source]- Radabaugh, Joseph M. 1998. "Heaven's Flame: A Guide to Solar Cookers." Oregon: Home Power Publishing.
- The book outlines the environmental and social benefits of solar cookers, several different designs and experiments, and instructions on how to build the SunStar solar oven, as well as cooking tips and how to produce the SunStar Kit to send to others.
- Halacy, Beth and Dan, eds. 1992. "Cooking With the Sun: How to Build and Use Solar Cookers." California: Morning Sun Press.
- This book details how to build a solar hot plate and solar oven, with guidelines for usage and lots of recipes.
- Martin, Rachel and others. "Design of Solar Ovens for Use in the Developing World." 2006. International Journal for Service Learning in Engineering 2, no.1: 78-91. http://www.ijsle.org/ (accessed February 10, 2009).
- Professors and students combined laboratory testing done at Cornell University with field research done in Nicaragua to gain an understand of what it takes to design solar ovens for use in the developing world.
- Paredes, Juan Francisco. 2006. "Portable Solar Barbecue: A Portable Parabolic Cooker Built From an Umbrella." The Solar Cooking Archive. http://www.solarcooking.org/ (accessed February 10 2009).
- Instructions on how to build a solar cooker from an umbrella, aluminized cardboard, and a tripod.
Contact Information
[edit | edit source]- Teri Grunthaner — Behavioral and Socio-Economics, Cal Poly Humboldt '11 tlg49@humboldt.edu
- Bart Orlando — Medical Biology, UC Irvine '82 bart6591@yahoo.com

Related projects
[edit | edit source]| Authors | |
|---|---|
| License | CC-BY-SA-3.0 |
| Organizations | Cal Poly Humboldt |
| Cite as | Doodle (2009–2026). "How to make a "Sunbrella" solar cooker". Appropedia. Retrieved June 7, 2026. |