


我们对此的主要兴趣是通过将廉价聚合物层焊接在一起来制造热交换器。这是违反直觉的,但我们最新的理论和早期实验结果表明,这种类型的热交换器非常高效,而且便宜得离谱。请参阅:扩展微通道热交换器,了解我们的最新论文。这些热交换器可用于各种能源效率应用,包括我们制造太阳能水巴氏灭菌系统的工作。如果我们能够获得一个有效的系统,它将代表一种极其廉价的家庭或家庭规模的水巴氏灭菌方法。
如果您将该系统用于其他应用程序,请告诉我们它们是什么。制作愉快!
机械零件清单

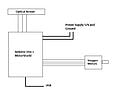
- 我们将整个系统安装在一个挖空的双抽屉文件柜中,安装了激光安全开关,以及带有磁性闭合器的新抽屉。顶部钻了一个孔,供电线和光纤激光器穿过。
- 我们将腿延伸到方形底部,以使柜子导轨保持完整,如图所示。
- 我们添加了第二个基板层,该基板层由金属 (Al) 基板和下部铁玻璃盖板组成(再次参见右侧的详细信息)。高透射率玻璃来源:SGG DIAMAN - 圣戈班玻璃视觉产品系列 - 超透明低铁玻璃。
- 我们添加了新的 3D 打印部件,将光纤激光器耦合到设备上。在我们的例子中,它悬挂在玻璃上方,镜头的位置使得焦点位于玻璃下方。
印刷零件
- 遵循 http://www.thingiverse.com/thing:11653 和打印组件的指南。
- 此外,如果您要复制我们的激光设置,则需要此处的专用组件:http://www.thingiverse.com/thing:28078
米住零件
斯托克驱动器
| 部分说明 | 零件号 | 关联 |
|---|---|---|
| 18齿聚碳酸酯同步带轮 | 6T16M018DF6005 | https://sdp-si.com/eStore/PartDetail.asp?Opener=Group&PartID=42977&GroupID=347 |
| 玻璃纤维增强氯丁橡胶齿形滑轮带 | 一个6Z16MB89060 | https://sdp-si.com/eStore/PartDetail.asp?Opener=Group&PartID=70713&GroupID=342 |
电子产品
电子零件
- Arduino MEGA 2650 - https://www.sparkfun.com/products/11061
- Adafruit Motroshield - http://adafruit.com/products/81
- 6x SN754410 H 桥电机驱动器 - https://www.sparkfun.com/products/315
- 2x Aavid 散热器http://www.alliedelec.com/search/productdetail.aspx?SKU=70115208
- 2x Adafruit 步进电机 - https://www.adafruit.com/products/324
- 2x Opto Endstop - http://web.archive.org/web/20130124025709/http://store.makerbot.com:80/ electronics/ electronics-kits/ Optical-endstop-v2-1-kit.html
- 5V和12V电源(例如使用的电脑电源)
- 2x(或更多)12V 电脑风扇
- MAX3323 芯片(或类似芯片)- http://www.digikey.com/product-detail/en/MAX3323EEPE%2B/MAX3323EEPE%2B-ND/1701884
- 4x 1uf 电容器
- 母串行面包板电缆
- 连接线
- 光纤激光器。有关我们激光的详细信息,请参阅:激光焊接协议:MOST
- JDSU 光纤耦合二极管激光器 L4-9897510-100M - http://web.archive.org/web/20150506125656/http://www.jdsu.com: 80/en-us/Lasers/Products/A-Z-Product-List/Pages/diode-laser-9xx-nm-optical- Coupled-10w-6398-l4-series.aspx
- 激光安装 264
- TEC源5305
- 激光光源 4320
- 固件:https://sourceforge.net/projects/lasersystemforp/
- 软件说明请参见:激光焊接协议:MOST
电子设备构建和通信设置
- 连接电子设备
电子电路原理图
拆下电源跳线! Arduino 和电机扩展板。
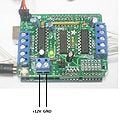
12V和地
光电终端连接

用终点挡板设置边界
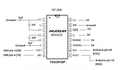
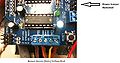
MAXIM 3323E 引脚分配
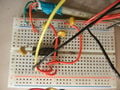
带有 MAXIM 芯片的面包板布局
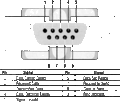
DB9 母头电缆前视图
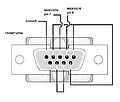
DB9 母头电缆引脚分配


- 靠近GND引脚的跳线一定要去掉,否则会损坏Arduino!
- 将 12 V 电缆连接至 MotorShield 上的 M+ 引脚,并将接地线连接至 MotorShield 上的 GND 引脚。
- 如果使用 Adafruit 步进电机,请按照以下顺序连接电线:从 M1 到 M2,棕色,绿色,跳过 Gnd 引脚,黄色和红色。从M4到M3棕色,绿色,跳过Gnd引脚,黄色和红色。
- 如图所示连接 Opto Endstops。
- 固定终点挡板,使激光托架到达机构的左下角。
- 将MAX3323E引脚1连接到一个1uF电容,在1和3之间连接一个1uF电容,在4和5之间连接一个1uF电容,最后一个1uF电容连接到引脚6,如图所示。引脚 7 和 8 连接到 DB9 电缆的引脚 3 和 4,引脚 11、12、13、14 和 16 连接到 5V,引脚 15 接地。引脚9连接到Arduino引脚19,引脚10连接到Arduino引脚18。如图所示将电容器接地,如果使用极化电容器,请确保将MAX3323E引脚1和6中的电容器的负极接地,将引脚3之间的电容器接地1 和 3 以及引脚 5 用于 4 和 5 之间的电容器。
- 将DB9的引脚1连接到地,引脚2和5连接到引脚9,引脚3连接到MAX3323的引脚7,引脚4连接到MAX3323的引脚8,引脚7连接到引脚8。
- 使用 adruino 软件将固件上传到 Arduino (http://www.arduino.cc/)。
- 将 DB9 电缆连接至 LaserSource 4320 RS232 输入
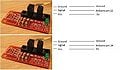
注意:根据您是否使用不同的步进电机或者您的系统是否需要电机提供更大的扭矩,这将需要电机驱动器提供更多的电流。使用 SN754410 H 桥电机驱动器替换库存 Adafruit 电机驱动器会将电流从 0.6A 增加到 1A。如果需要大量扭矩,可以通过将相同的引脚焊接在一起来堆叠驱动器。确保使用散热器 (Aavid Heat Sink) 和导热膏来帮助热传递,否则驱动器将过热。强烈建议使用冷却风扇。注意:这不是增加电流的最佳方法,应采取适当的预防措施来减少热故障。
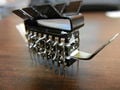
电机驱动芯片堆栈

安全
The Laser is composed by three main devices: LaserMount 264, TECSource 5300 and LaserSource 4320.The LaserMount 264 is a united that integrates a Peltier cooler for precise temperature control and the laser itself.TECSource 5300 is a temperature controller that needs to be attached with the LaserMount.LaserSource 4320 is a Laser Diode Driver, it controls the laser behavior such as Voltage, Current, PWM Duty Cycles and
On/Off control.
The installation of the LaserSource and the TECSource are very straightforward. After unpacking the units, make sure all packing materials have been removed and nothing obscures the ventilation ports on the side and front of the units.
Change The Voltage Selection to the appropriate value and make sure both devices are properly grounded.
The devices have vent holes on the side and front, do not block these vent holes, or overheating may occur, causing damage to the unit.
Connect the cables from the TECSource and the LaserSource labeled LASER and TEC to the LaserMount properly.
To power up the unit, connect the AC power cord to the unit, turn the power switch, located on the front panel, to the on (I) position. The unit will display the model, serial number, and firmware version, go through a quick power-up self-test, and return to the last known operating state.
In order to achieve the highest level of accuracy, the TECSource should be powered on for at least one hour prior to taking measurements.
Once devices are powered up, it is necessary to enable the External Fan Control on the TECSource menu options.Make sure the temperature controller current limit is set to a maximum value of 7.4A.
General Basic Precautions:
The LSO shall be notified of the purchase of any laser, regardless of the class. Such notification should include the classification, media, output power or pulse energy, wavelength, repetition rate (if applicable), special attachments (frequency doublers...etc.), beam size at the laser aperture, beam divergence and users.
No attempt shall be made to place any shiny or glossy object into the laser beam other than that for which the equipment is specifically designed.
Eye protection devices which are designed for protection against radiation from a specific laser system shall be used when engineering controls are inadequate to eliminate the possibility of potentially hazardous eye exposure (i.e., whenever levels of accessible emission exceed the appropriate MPE levels.) This generally applies only to Class IIIB and Class IV lasers. All laser protective eyewear shall be clearly labeled with optical density values and wavelengths for which protection is afforded.
Skin protection can best be achieved through engineering controls. If the potential exists for damaging skin exposure, particularly for ultraviolet lasers (200-400 nm), then skin covers and or "sun screen" creams are recommended.
手 - 大多数手套都会提供一定程度的激光辐射防护。紧密编织的织物和不透明的手套提供最好的保护。
手臂 - 实验室夹克或外套可以为手臂提供保护。对于 IV 类激光器,应考虑阻燃材料。
理论激光功率要求
| 材料 | 光斑尺寸(毫米) | 激光功率(W) |
|---|---|---|
| 聚合物 | 1 | 10 |
| 聚合物 | 0.3 | 1 |
| 聚合物 | 0.1 | 0.1 |
| 铝 | 1 | 1000 |
| 铝 | 0.3 | 100 |
| 铝 | 0.1 | 10 |
如果材料是保鲜膜或铝箔厚度,则所需功率约为三倍。因此,基本上能够聚焦光束不仅可以为您提供更小的通道,而且还可以降低所需的激光功率。
也可以看看
- 激光焊接协议:MOST
- 开源激光聚合物焊接系统:线性低密度聚乙烯多层焊缝的设计和表征
- 膨胀微通道换热器
- 膨胀微通道换热器:无损评估
- 有限差分热交换器模型:热耦合的流量分布不均
- 自动化家用太阳能水巴氏灭菌器聚合物热交换器的设计优化
- 开源激光切割机项目
- 开源聚合物焊机文献综述
- 扩展微通道换热器:有限差分建模
- Zhang C、Anzalone NC、Faria RP、Pearce JM (2013)开源 3D 打印光学设备。 PLoS ONE 8(3):e59840。 doi:10.1371/journal.pone.0059840 开放获取