Starting the Growbot's Web Server and Other Related Programs[edit | edit source]
-
Fig 1: Home page of the Web UI
-

Fig 2: About page with links to the Appropedia page
-
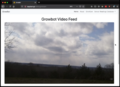
Fig 3: Growcam page with webcam stream
-
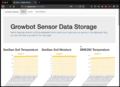
Fig 4: Graphs page with automatically generated graphs from all the sensors in the database
-
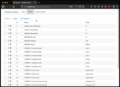
Fig 5: The Flask-Admin page that allows you to see your "sensor" database table
-
Fig 6: The Flask-Admin page that allows you to see your "sensorreading" database table


Summary[edit | edit source]
To start up the the website for the Growbot, you will need to make sure that you already have everything installed that you need on the Raspberry Pi. Then you will need to ssh into the Raspberry Pi, open up a tmux session, run app.py (the actual web app), and all of the sensor reading programs in their own separate "panes" inside of tmux. This way, once everything is setup, you can detach from the tmux session and disconnect from your ssh into the Raspberry Pi, and everything will continue to run. If you simply ssh into the Pi anything you run will be terminated immediately at disconnect. There are other tools to get around this, but this guide will show you how to use tmux.
Install Necessary Software[edit | edit source]
If you already have followed the Firmware Installation guide then you are good to move on to the next section, otherwise you can find a setup guide here.
Connect (SSH-in) to the Raspberry Pi[edit | edit source]
You will need to know the IP address of the Pi on the Growbot in order to do this. The Pi will only be accessible via ssh if it is connected to the same network as the same computer/mobile device that you are trying to ssh into it on.
Finding the IP address of the Raspberry Pi[edit | edit source]
Once you make sure that you are connected to the same network as the Raspberry Pi, you can log into your router to see a list of all devices (you will have to consult your routers manual or google.com if you are unsure of how to do this). Some routers will allow you to refer to the Pi as "raspberrypi" so you may not even need to know the IP address to connect right off the bat.
SSH into the Raspberry Pi[edit | edit source]

Now that you have the IP address or hostname of your raspberry Pi, you can ssh into it by issuing the following command into your terminal on Mac or Linux ssh pi@raspberrypi Here, you would replace "raspberrypi" with the IP address found in the last section if your router is unable to automatically resolve the hostname of the Raspberry PI. If you are on Windows you will need to use a program called PuTTY. With Putty, you should just have to enter the IP address or hostname. Then once the window with a black background pulls up, it will prompt you to enter in a username pi, and then a password raspberry (as setup in the installation guide).
[edit | edit source]

To open a tmux session type tmux into the terminal that you are ssh'd into. A green bar should be shown at the bottom of the terminal that displays what current panes are open. You can think of panes as similar to tabs, or windows. The following commands will help you create, close, and navigate through the panes you have open.
TMUX Commands
- Create a new pane:
ctrl-b, thenc - Go to the next pane:
ctrl-b, thenn - Go to the previous pane:
ctrl-b, thenp - Go to the specified pane:
ctrl-b, then the number of the pane you want to switch to - Close the current pane:
ctrl-d
Run the Web Server[edit | edit source]

Now that you can open and navigate the panes, you need to have one of them run the app.py python program. To do this simply type python3 app.py while in the GrowBotWebInterface directory. If you are not there already you can get to there by typing the following in the terminal cd ~/git/OSHE_Growbot/GrowBotWebInterface. Once the web server is running you can access it with your browser by going to raspberrypi:5000, replacing "raspberrypi" with your Pi's IP address if your router does not automatically resolve the hostname.
Run the Sensor Reading Programs[edit | edit source]

A new pane will have to be created for every sensor program that you wish to run ctrl-b, then c. Once you are in a new pane, the sensor programs can be run with python3 program-name.py, where "program-name" would be replaced with the name of sensor program you wish to run. This should be done for all of the sensors that you wish to be read and stored into the database.
Disconnect From the Raspberry Pi[edit | edit source]

To detach from the current tmux session and disconnect from the Pi you will need to enter ctrl-b, then d to detach from the tmux session, and exit to disconnect from the Raspberry Pi itself.
Reconnecting to Raspberry Pi[edit | edit source]
To reconnect to the Pi, follow the same steps as in "SSH into the Raspberry Pi", but instead of typing in "tmux" all by itself to open a new session, you will want to type tmux attach, which will put you in the session you most recently left. If that does not work you can run tmux list-sessions to see the list of currently running sessions and then attach to one of those specifically with tmux a -t session-name where you would replace "session-name" with the output from tmux list-sessions.
How to terminate TMUX sessions[edit | edit source]
Running tmux kill-session from either inside or outside of a tmux session will terminate the most recent session.
Adding Sensors[edit | edit source]
Summary[edit | edit source]
In order to add sensors to the Growbot, there must be a program to save/store the values into the SQLite3 database on the Raspberry Pi. This could be written in any programming language that is able to interface with a SQLite database and your sensor, but Python3 has been used for this example. There are two tables in the database named "sensor" and "sensorreading". The "sensor" table stores the name of the sensor and its units, while the "sensorreading" table stores the time, name of the sensor, and the value of the sensor. If the new sensor's script is written correctly (adds the correct information to the correct tables in the database), the website should generate graphs automatically with correct tiles and units and data. One other thing to mention is that often sensors will be able to read multiple different things, such as the SeeSaw Soil Sensor which is able to read both temperature and moisture. Even though there is only one physical PCB, sensor values produced by it are treated as separate. That is why you must have one table entry into the "sensor" table and one entry in the "sensorreading" PER SENSOR VALUE. Otherwise, the web interface will not be able to correctly graph the data from your sensors.
The following three code snippets are all that you need to begin reading values into the database. The code here comes from SensorTemplate.py in the code repository on GitHub (which has additional comments at the top of the file). If there is any further confusion on how to edit this code for a new sensor that you wish to add, you can look at SoilSensorReadOnly.py. This file has the inclusion of a few more packages in order to allow for code to actually read the sensor's values. Other than that, it should be in the same form as these following code snippets.
Imports[edit | edit source]
import time
import datetime
import model # For saving the sensor data to the database
Sensor setup in the database[edit | edit source]
# Create an instance of our data model access layer object.
# This object takes care of all the Peewee ORM and DB access so our code in this
# file is very simple and just calls a function on the model access layer object.
data = model.SensorData()
# Define which sensors we expect to be connected to the Pi and their units.
sensor1Name = 'Generic-Sensor Temperature'
sensor1Units = '°C'
sensor2Name = 'Generic-Sensor Moisture'
sensor2Units = '%'
# If there are no prexisting entries into the sensor table in the database with
# these exact names and units, then a new entry will be created in the table.
data.define_sensor(sensor1Name, sensor1Units)
data.define_sensor(sensor2Name, sensor2Units)
Loop to read in sensor values and store them[edit | edit source]
   try:
       # Loop to continually add data to the database.
       while True:
           # Get the current time for this batch of sensor readings.
           reading_time = datetime.datetime.now()

           # Read sensor moisture
           # Put your code for reading the sensor data here
           moist = 10;  # Replace this with your code

           # Read sensor temperature
           # Put your code for reading the sensor data here
           temp = 20;  # Replace this with your code

           # Print out sensor values
           print("Reading Sensor -> Generic-Sensor: Temperature: " + str(temp) + "°C,  Moisture: " + str(moist) + "%")


           # Add the sensor readings to the database.
           data.add_reading(time=reading_time, name='{0}'.format(sensor1Name), value=value1)
           data.add_reading(time=reading_time, name='{0}'.format(sensor2Name), value=value2)

           # Wait 2 seconds and repeat. set this to something more reasonable
           # once you are done testing. The Website is currently set up to show 120
           # points on each graph, so if you are storing a sensor value every
           # 2 minutes (120 seconds) into the database, then your graphs will show
           # you a view of the last 4 hours.
           time.sleep(2.0)

       finally:
           # Finally close the connection to the database when done.
           data.close()