Installing an Operating System (Raspbian) on the Growbot's Raspberry PI[edit | edit source]
Summary[edit | edit source]
In this page, you should find a complete walk through on how to get everything installed (software-wise) on your Growbot. You will need a computer with an internet connection, a micro-SD card 8GB or larger, and a way to connect that micro-SD card to your computer. With that you should be able to successfully download and install all the necessary software for your Growbot to function. Warning: Following this installation guide will erase the data on your SD card! So save your data elsewhere if you care about what was on there before, but otherwise you can proceed.
Install Raspbian[edit | edit source]

Navigate to the Raspberry Pi Foundation's download page. You will need to download the Raspberry Pi Imager program for your computer's operating system (OS). If for some reason this does not work, you can try Etcher, another utility that allows you to flash the OS onto the micro-SD card. In this case you would have to download the .img file separately from the Raspbian page (choose the "Lite" or "Minimal Image" option). To download and flash the OS onto the micro-SD card, you will need to run the Raspberry Pi Imager program once it is done downloading. Once open, select: "CHOOSE OS" --> "Raspbian (other)" --> "Raspbian Lite". Next click on "CHOOSE SD CARD" and select on the micro-SD card you want to flash, Warning: Triple check to make sure it is the right one! Once you have your micro-SD card selected you can click "Write". This may take a while depending on your internet connection, so just be patient.
Get the Raspberry Pi connected to your WiFi/Network[edit | edit source]
Once Raspbian Lite is installed on your micro-SD card, we will have to specify the WiFi network and password that we want the Pi to automatically connect to once we power it up, as well as enabling SSH. This is done by creating a blank file named "ssh" (with no file extension) in the boot partition of the micro-SD card. Note: This is the boot partition, NOT the boot directory one level down from the root partition. A sure way to know is that the micro-SD card should look like two connected devices once you are done flashing, and the device named "root" is the correct one to place this empty "ssh" file in. The last thing that needs to be done to allow you to ssh into the Pi is now to ensure that the Pi will actually connect to the correct network when it boots. This is done by creating a file named "wpa_supplicant.conf" in the boot directory, NOT the boot partition. This file should then contain the following:
country=us
update_config=1
ctrl_interface=/var/run/wpa_supplicant

network={
  scan_ssid=1
  ssid="WiFi-Network-Name"
  psk="WiFi-Password"
}
Above you would replace "WiFi-Network-Name" with your actually WiFi's name and likewise with "WiFi-Password". Once this is done you are ready to go! Just eject your micro-SD card, put it in the Pi, and power it up.
Connect (SSH-in) to the Raspberry Pi[edit | edit source]
You will need to know the IP address of the Pi on the Growbot in order to do this. The Pi will only be accessible via ssh if it is connected to the same network as the same computer/mobile device that you are trying to ssh into it on, this should have already been taken care of in the last section.
Finding the IP address of the Raspberry Pi[edit | edit source]
Once you make sure that you are connected to the same network as the Raspberry Pi, you can log into your router to see a list of all devices (you will have to consult your routers manual, the back/bottom/side of you router, or google.com if you are unsure of how to do this). Some routers will allow you to refer to the Pi on your network as "raspberrypi" so you may not even need to know the IP address to connect right off the bat.
SSH into the Raspberry Pi[edit | edit source]

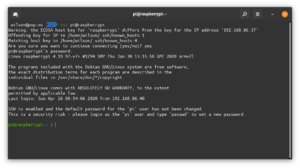
Now that you have the IP address, or hostname, of your raspberry Pi, you can ssh into it by issuing the following command into your terminal on Mac or Linux ssh pi@raspberrypi Here, you would replace "raspberrypi" with the IP address found in the last section if your router is unable to automatically resolve the hostname of the Raspberry PI. If you are on Windows you will need to use a program called PuTTY. With Putty, you should just have to enter the IP address or hostname. If working with a raspberry pi 4, you must first enable ssh in start menu>preferences>raspberry pi configurator. Then once the window with a black background pulls up, it will prompt you to enter in a username pi (by default set this way), and then a password raspberry (again, set to this by default) Passwords will not be visible while typing, but do not worry your keystrokes are being entered.
Update Operating System (OS)[edit | edit source]

sudo apt-get update and sudo apt-get upgrade after first bootOnce logged in we can get really get going. Start by checking for updates with sudo apt-get update and sudo apt-get upgrade. If it prompts you to say yes or no type y and then enter. If you want to avoid doing this for other "apt" commands you can add -y to the end of those commands. Now simply give your Pi time to update.
Enable Webcam and Other Services in raspi-config[edit | edit source]

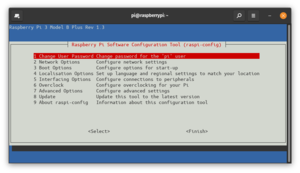
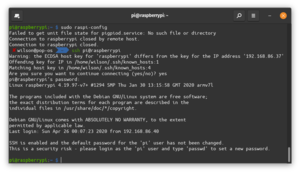
sudo raspi-config to enable system servicesNow that everything is updated, we need to make sure everything is enabled on the Pi that needs to be for complete operation. To do this type sudo raspi-config into the terminal and hit enter. This should open the Pi's configuration tool. We do not need to enable SSH as we already did that manually before our first boot, but the camera, I2C, and Remote GPIO do still need to be enabled. Here you can also change your password if you would like in "1 Change User Password". Use your arrow keys to navigate to "5 Interfacing Options" and hit enter. Here we will enable everything we need, "P1 Camera", "P5 I2C", and "P8 Remote GPIO". Once all of these are enabled, then you can select to go back, and then select to "Finish". To select the "Finish" button, you will need to arrow-key to the right. If you ever change WiFi networks, the raspi-config tool is where you should go to change those things. Once you hit enter while "Finish" is selected, you will be prompted to reboot. Select "Yes" and hit enter. Something like Connection to raspberrypi closed. will appear in your terminal. Now just wait for a few seconds and try to ssh into the Pi again. If it is not working it is due to the Pi not having fully booted yet, so be patient.

Installing the Programs Necessary to Run the Web Server[edit | edit source]
Summary[edit | edit source]
Now that we have the OS installed, updated, and we are connected to the Raspberry Pi with our services enabled, we can go about installing the software we will be using to operate/configure the Raspberry Pi in the Standard Operating Procedures page. This will be broken up into three steps, first the software we need to run the Growbot web server and sensor code will be installed, then we will clone the GitHub repository with the code for this project to the Pi, then required python packages will be installed.
Installing TMUX, Python3, and other software utilities[edit | edit source]
We can finally install some software. Type sudo apt-get update && sudo apt-get install python3-pip tmux git libatlas-base-dev to install programs that are needed to use the Growbot. If you want to have a bit of fun before moving on, you can also install neofetch with sudo apt-get update && sudo apt-get install neofetch -y. Neofetch can be run by simply typing neofetch into the terminal. It will then print out some neat information about your Pi. If afer any command has finished, you find the left over output ugly, you can declutter the screen with the command clear.

neofetch on the Raspberry PiInstalling the Web Server and Sensor Programs from GitHub[edit | edit source]

Next, the code for this project can be downloaded by entering the following command/commands:
mkdir ~/git && cd ~/git && git clone https://github.com/OSHE-Github/OSHE_Growbot.git This will create a directory (folder) for git and then download the files into a directory called "OSHE_Growbot" inside of the git folder.
Installing the Necessary Python3 Packages with PIP[edit | edit source]

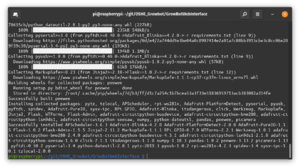
Now that we have cloned the GitHub repository, we can install the python packages required by the code. This can be done by typing these command/commands into the terminal: cd ~/git/OSHE_Growbot/GrowBotWebInterface && sudo pip3 install -r requirements.txt. These will install all the required dependencies for this project.
What Now?[edit | edit source]
Now that all of the software nessesary for the web server is installed, you can get to actually giving it a test. Head over to the Standard Operating Procedures to learn how to get the website running.