
CCAT yurt rainwater catchment

| Type | rainwater catchment |
|---|---|
| Authors | Tiesha Whittaker. Sarah Shimizu Jessica Radtkey Matt de Young Sean Colley |
| Location | Arcata, California |
| Status | Deployed |
| Years | 2006 |
| Cost | USD 136.52 |

Our project for ENGR 114 was to build a rainwater catchment system around the yurt at CCAT on campus at Cal Poly Humboldt. The purpose of the rainwater catchment system is to capture and store rainwater in a large storage drum for use to water plants on the CCAT grounds. Water is a resource that is always present around us but not always in an immediately useful form. Therefore, it is necessary that we use innovative and appropriate techniques to capture and transform the water that we have into a useful form of water for our needs.
The long history of rainwater collection, can be traced (in recorded history) as far back as ancient times some 3,000 years ago (850 BC) if not even farther. The need for water is a basic human essential for maintaining life, without it, no civilization could have prospered. Rainwater collection in ancient Constantinople is one of the last megalithic structures of its kind. The CCAT Rainwater Catchment Group consists of: Sean Colley, Matt de Young, Jessica Radtkey, Sarah Shimizu, and Tiesha Whittaker. Taken from: http://web.archive.org/web/20190126224328/http://www.rain-barrel.net:80/rainwater-collection.html
Our Rainwater Catchment System is located around the Yurt at The Campus Center for Appropriate Technology (CCAT) on the HSU Campus
Construction of The Rainwater Catchment System
[edit | edit source]
Materials
[edit | edit source]Here's what we needed for supplies:
- 80 feet of black landscaping drainage pipe (pieces in 10 foot sections)--3 inch diameter (See #Update Spring 2007)
- a box of screws, washers, bolts
- plumber's tape (galvanized metal, rust proof)
- 55 gallon storage tank
- 70 foot cable
- wire mesh (for keeping debris out of the drainage system)
- 2 black, plastic t-junction (connecting pieces for the drainage system)--3 inch diameter
- 1 25-foot gardening hose
- plastic mesh (recycled from ccat)
- 3 end caps (2 for drainage system by yurt door, 1 for capping the 10 min water -diversion)--3 inch diameter
- 2 eye hooks
- duct tape
- 100 12-inch zip ties
Budget
[edit | edit source]


Our budget for this project was revised many times before we had our final design approved so we could go out and shop of supplies. Here are our receipts for the project; Fig 2 is an example of how one of our group members was reimbursed by CCAT for purchases of material from the project.
How we did it: (The process)
[edit | edit source]
Construction instructions:
We started by draping the cable around the edge of the yurt roof and fastening the cable to 2 eye hooks next to the yurt door. We left some slack in the cable so that it could be adjusted as we built. We then began cutting a 2-inch section out of the landscape drainage with a box cutter so the water could get in. Once the drainage sections were cut, we began to piece them together, fitting the cut sections into one another and place them around the edge of the roof.
We attached the drainage to the cable with the plumber's tape. We wrapped the plumber's tape around the drainage tubing and over the cable and fastened each point with a bolt to a washer and screw. To accomplish this, we took a drill and drilled holes half an inch from where we cut the drainage tubing on either side and pushed the bolt through each side and secured it with the washer and screw. We adjusted the slope of the drainage tubing as we went by using shorter pieces of plumber tape closer to the door and longer pieces of plumber tape closer to the storage tank to provide the water with a downslope to move along. We used tin snips to cut the plumber's tape to the desired length.
The final step in installing the drainage system was to cover the opening of the drainage with wire mesh to prevent debris from falling into the gutter. We cut appropriate-sized sections of wire mesh and attached it to the drainage system with black zip cable ties. We had to put 2 zip ties together for each connection point because the zip ties purchased were not long enough individually. We connected the drainage system to 2 t-junctions. The first t-junction pieced together the 2 ends of the drainage tubing that ran around the circumference of the roof; the second t-junction was attached to the first t-junction; one of the open ends (the one that was facing the ground) was attached to an extra piece of drainage tubing and was capped off at the end with an end cap. This closed-off drainage tubing acts as the first 10-minute water diversion system.
We felt it was necessary to install this system to divert the dirty runoff from the roof. We cut two small holes at the bottom of the capped drainage tube to ensure that the dirty water would leak out slowly enough and allow the rest of the rainwater to be stored in the tank. The second opening on the t-junction came off to the side and acted as a spout for the water to flow into the storage tank. As the water pours out of the gutter system into the storage drum it first passes through a wire mesh that lays over the drum and is secured with the open cap crewed over it. A hose was connected to the nozzle at the bottom of the tank, which will be utilized as needed for watering the plants at CCAT.
Note: The storage tank was set directly across from the yurt door before construction; we had to level out the ground so the storage tank would sit flat.

Gallery
[edit | edit source]-
Fig 1: The Yurt before the construction.
-
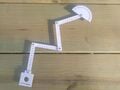 Fig 6: Sean seeking out supplies and acting goofy like always.
 -
 Fig 7: T-Connectors for gutters.
 -
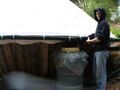 Fig 8: Matt securing gutter.
 -
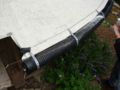 Fig 9: Mesh filter over gutter to prevent debris from entering system.
 -
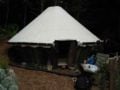 Fig 10: Tiesha and Sean working on installing and adjusting the gutter.
 -
 Fig 11: Sarah the hardest worker who is always chuggin' away. Here she is cutting open the gutter out of the drainage pipe.


Timeline of Project
[edit | edit source]From start to finish our group had about 7 weeks to do this once we decided what project we agreed to work on. For about the first 3 weeks the group broke out individually and did research on rain catchment and worked up different designs. During these first few weeks we would meet for team meetings to see what everyone else had and how to then proceed. The next two and a half weeks we spent looking for materials to build with and then formulate a budget to submit to CCAT for approval. This part we had to do a couple times before CCAT sent out a project manager with our group to actually buy the materials and then start building. This was due to the fact that CCAT wanted more appropriate building material like wood. Due to time constraints to build the wooden gutter system and the total cost of using the wood the plastic garden drainage pipe was chosen. The next week and a half the group built the rain catchment system, mostly on the weekends and some time put in during school. We then showed it off to the rest of the class as our final project.
Future Tips/Things to do differently next time
[edit | edit source]Throughout the process we were faced with the challenge of having to use appropriate materials and technology to the fullest extent possible. When we initially thought to hammer into the yurt itself we were informed that we needed to design a catchment system that was free from the yurt itself, ensuring easy removal and reinstallment. This request prompted our design technique of having a circular cable around the bottom portion of the canvas that our catchment system could hang off from. This design worked a lot better than a different technique that could have caused damage to the yurt structure or the canvas top. Another challenge we dealt with was the request to use as little plastic as possible and to stick with natural materials whenever possible. The plastic gutter was used because of time limitations and difficultly contacting a person who might be able to create wooden holders and/or gutter tubing. If there were more time and money we might have chosen a different way to hang the gutter other than the metal pieces and tape which won't withstand the rain over a long period of time. Finally, we tried to include as many materials already available at CCAT like the drum and pvc piping but it would have been better to find more second hand materials for use in the construction.
Update Spring 2007
[edit | edit source]Do not use drainage pipe. This pipe holds small amounts of water in each of the many ribs. This standing water leads to pest and mold problems. Instead use smooth pipe.
Update Fall 2007
[edit | edit source]This project has been dismantled due to problems such as water not being captured, and the water that was captured sitting and compounding the mold problem on the roof of the yurt. Another attempt will be made learning from the lessons of this project.
Update September 2018
[edit | edit source]The rainwater catchment system for the yurt has been completely dismantled due to the issues mentioned in previous updates. Currently there are no plans to revive the catchment system for the yurt.
| Authors | |
|---|---|
| License | CC-BY-SA-3.0 |
| Organizations | Campus Center for Appropriate Technology (CCAT), Cal Poly Humboldt Students |
| Cite as | Tiesha (2006–2026). "CCAT yurt rainwater catchment". Appropedia. Retrieved July 16, 2026. |