m (Standardize wikitext) |
|||
| (88 intermediate revisions by 9 users not shown) | |||
| Line 1: | Line 1: | ||
[[File:Oudoorclassroom.jpg|thumb|Above: The outdoor classroom's seating arrangement with Zane Middle School students.]] | |||
{{Device data}} | |||
== Abstract == | |||
The team Suoicortalaepxcitsiligartilacrepus was tasked with providing both seating and writing surfaces for Zane Middle School's outdoor classroom. After determining criteria and parameters, and applying these to multiple seating concepts and designs, it was decide by our clients that the seating would take the form of 12 folding, truss-style benches. The benches would fit the S.T.E.A.M. orientation of the school by being constructed with engineering design principles and of artistic design. The benches are easy to set up, long lasting, safe, and collapsible. All benches, writing surfaces, and shadowboxing for multiple bench arrangements were completed on time, and only slightly over budget. | |||
== Background == | == Background == | ||
== Problem | In the Spring of 2018, Engineering 215 Team Suoicortalaepxcitsiligartilacrepus was commissioned by Lonny Grafman and the Faculty at Zane Middle School in Eureka, California to build an outdoor classroom for students and teachers to use at Zane Middle School. The school has been the recipient of many projects in the past, but until now did not have an outdoor classroom. | ||
The project criteria outlines qualities which the classroom must possess as | |||
{| class="wikitable | == Problem Statement == | ||
The goal of this project is to create an outdoor classroom learning environment for junior high school students. | |||
=== Criteria === | |||
The project criteria outlines qualities which the outdoor classroom must possess as desired by the client. | |||
{| class="wikitable" | |||
|+ Table-1: Criteria and Constraints | |+ Table-1: Criteria and Constraints | ||
! style="background: #1A1A1A; color: white;"| Criteria | |||
! style="background: #1A1A1A; color: white;"| Constraints in order of importance | |||
|- | |- | ||
| Safety | |||
| Must not possess sharp edges, not be easily splintered, and resist tipping. | |||
|Safety | |||
|Must not possess sharp edges, not be easily splintered, and resist tipping. | |||
|- | |- | ||
|Utility | | Utility | ||
|Must function as effectively as an indoor classroom. | | Must function as effectively as an indoor classroom. | ||
|- | |- | ||
|Plasticity | | Plasticity | ||
|Must be usable by teachers regardless of subject being taught. | | Must be usable by teachers regardless of subject being taught. | ||
|- | |- | ||
|Durability | | Durability | ||
|Must have a useful design life of five years, and be resilient to graffiti. | | Must have a useful design life of five years, and be resilient to graffiti. | ||
|- | |- | ||
|Portability | | Portability | ||
|Components must be movable by no more than one adult or three students. | | Components must be movable by no more than one adult or three students. | ||
|- | |- | ||
|Cost | | Cost | ||
|Project must be cost less than $450.00 | | Project must be cost less than $450.00. | ||
|- | |- | ||
|Aesthetics | | Aesthetics | ||
|Must fit with the STEAM motif of Zane Middle School | | Must fit with the STEAM motif of Zane Middle School. | ||
|- | |- | ||
|Storability | | Storability | ||
|Must easily fit into available storage space in staff lounge area | | Must easily fit into available storage space in Zane staff lounge area. | ||
|- | |- | ||
|Comfort | | Comfort | ||
|Must be easy to sit in for more than 1 hour | | Must be easy to sit in for more than 1 hour. | ||
|} | |} | ||
== Description of final project == | == Description of final project == | ||
=== Final Bench === | |||
The final bench design is built of light-weight redwood planks, which will ensure longevity outdoors. It also folds to compact dimensions of roughly 18"x58"x5". The legs hinge outward, and the lid becomes the seating platform, and is placed on top of the unfolded legs. | |||
<gallery caption="Final Bench Design Gallery"> | |||
Image:prototype4.jpg|First constructed bench based on our final design (folded). | |||
Image:prototype5.jpg|First constructed bench based on our final design (unfolded). | |||
Image:finallegs.jpg|Final design's unfolded legs. | |||
Image:setupfolded.jpg|Folded benches in a classroom arrangement. | |||
Image:setupopen.jpg|Unfolded benches in a classroom arrangement | |||
</gallery> | |||
=== Final Writing Surface === | |||
The writing surface design is made from standard clipboards and white board applique. The applique is applied to the reverse side of the clipboard to provide an alternative writing surface that does not interfere with the front side. | |||
= | <gallery caption="final writing surface design gallery"> | ||
Image:Final Writing Surface front.jpg|Front of clipboard writing surface. | |||
Image:Final Writing Surface rear.jpg|Reverse of clipboard writing surface. | |||
</gallery> | |||
== | == Prototyping == | ||
== | === Prototype 1 === | ||
This first prototype used pegs that fit into slots to support the seating platform. Unfortunately the pegs were difficult to set up, and could fall out if the bench was used on uneven ground. The also increased the weight, and decreased the stability of the bench. This prototype also had a handle and casters, unfortunately the casters were so small that the bench had to be held up at an extreme angle for them to work, and on rough surfaces they did not work that well. The bench was also extremely heavy due to the 2"x4" members that greatly increased the weight of the bench. | |||
<gallery> | |||
Image:IMG_1081.JPG|Our first prototype. | |||
Image:Prototype flipped.JPG| Our first prototype turned over. | |||
</gallery> | |||
=== Prototype 2 === | |||
The next step was to create a bench with a new support structure that could be kept all in one piece. Several designs were created by constructing prototypes out of stirring sticks. Eventually a wing-style folding bench with a hinged seating platform was decided on. All handles and casters were removed, as viable versions of the wheels were too expensive. | |||
After building a prototype with the new folding legs, it was apparent that this was the design to pursue, and that it made more sense for the seating platform to be completely separate, as hinging it would add unnecessary cost and complication to the design. It was also resolved to replace the 2"x4" seating platform with thinner lighter fence boards. The client confirmed that his was the proper course and seemed excited for the direction that the project was heading. It was also figured out that the bench could be built to partly fold into itself by constructing it out of 2"x2" and allowing building the seating platform to partly encapsulate the folded leg structure. These changes made the bench weigh less, and fold into a much smaller form factor. It was these changes that led to the final design. | |||
<gallery> | |||
Image:stirstickprototype.jpg|Stir stick prototype. | |||
Image:prototype2.jpg|2nd Prototype legs. | |||
Image:prototype3.jpg|2nd prototype folded. | |||
</gallery> | |||
== Costs == | |||
{| class="wikitable" | |||
! Quantity | |||
! Material | |||
! Source | |||
! Cost ($) | |||
! Total ($) | |||
|- | |||
| 33 | |||
| 1"x6"x6' Redwood Fence Board | |||
| The Mill Yard | |||
| align="right"| 5.29 | |||
| align="right"| 300.00 | |||
|- | |||
| 3 | |||
| 2"x4"x8' Construction Redwood | |||
| The Mill Yard | |||
| align="right"| 22.37 | |||
| align="right"| = | |||
|- | |||
| 33 | |||
| 2"x2"x3' Construction Redwood | |||
| The Mill Yard | |||
| align="right"| 2.50 | |||
| align="right"| = | |||
|- | |||
| 66 | |||
| 2"x2"x4' Construction Redwood | |||
| The Mill Yard | |||
| align="right"| 3.33 | |||
| align="right"| = | |||
|- | |||
| 22 | |||
| 2"x2"x6' Construction Redwood | |||
| The Mill Yard | |||
| align="right"| 5.50 | |||
| align="right"| = | |||
|- | |||
| 10 | |||
| 2" Strap Hinge 2 pk | |||
| The Mill Yard | |||
| align="right"| 3.69 | |||
| align="right"| = | |||
|- | |||
| 12 | |||
| 2" Strap Hinge 2 pk | |||
| Ace Hardware | |||
| align="right"| 3.69 | |||
| align="right"| 44.28 | |||
|- | |||
| 9 | |||
| 2"x2"x8' Furring Strip | |||
| Lowe's/Pierson's Building Center | |||
| align="right"| 3.49 | |||
| align="right"| 33.92 | |||
|- | |||
| 3 | |||
| 1"x6"x6' Cedar Fence Board | |||
| Lowe's | |||
| align="right"| 3.78 | |||
| align="right"| 12.24 | |||
|- | |||
| 2 | |||
| 2"x4"x8' Framing Stud | |||
| Lowe's | |||
| align="right"| 3.87 | |||
| align="right"| 8.35 | |||
|- | |||
| 2 | |||
| 2"x6"x8' Lumber | |||
| Lowe's | |||
| align="right"| 7.27 | |||
| align="right"| 15.70 | |||
|- | |||
| 2 | |||
| 1.5" Brass Hinges 2 pk | |||
| Lowe's | |||
| align="right"| 2.49 | |||
| align="right"| 5.37 | |||
|- | |||
| 8 | |||
| Exterior Wood Screws 1 lb. Box | |||
| The Mill Yard | |||
| align="right"| 4.49 | |||
| align="right"| 33.95 | |||
|- | |||
| 2 | |||
| White Nylon Floor Protector 100 pk | |||
| Amazon | |||
| align="right"| 7.99 | |||
| align="right"| 17.25 | |||
|- | |||
| 1 | |||
| White Board Paint | |||
| Amazon | |||
| align="right"| 23.78 | |||
| align="right"| 23.78 | |||
|- | |||
| 3 | |||
| White Board Applique | |||
| Amazon | |||
| align="right"| 13.05 | |||
| align="right"| 42.24 | |||
|- | |||
| 36 | |||
| Clipboards | |||
| Donated | |||
| align="right"| 1.00 | |||
| align="right"| 0.00 | |||
|- | |||
| 2 | |||
| Road Paint | |||
| Donated | |||
| align="right"| 8.00 | |||
| align="right"| 0.00 | |||
|- class="sortbottom" | |||
| colspan="4" align="right" | '''Total Cost''' | |||
| align="right"| '''$527.33''' | |||
|} | |||
== Testing Results == | |||
Tests consisted of sitting on the benches to test the weight that they could hold. Three large adults could sit on each bench without difficulty. The benches were brought to Zane Middle School, where the client and multiple students tested the benches. All tests confirmed that the benches could reliably hold multiple students without any signs of weakness or instability. | |||
== Poster == | |||
[[File:TeamSuoicort 215Zane SP18 Poster.jpg|thumb|1000px|center|Final Poster.]] | |||
== How to build == | |||
{{Step | |||
| number = 1 | |||
| text = Accurately measure out the lengths of all components. | |||
| image = File:Measuringwood.jpg | |||
| caption = A handsome student measuring wood | |||
}} | |||
{{Step | |||
| number = 2 | |||
| text = Cut the wood to the right measurements | |||
| image = File:cuttingwood.jpg | |||
| caption = cutting the wood | |||
}} | |||
{{Step | |||
| number = 3 | |||
| text = Attach all of the pieces together. | |||
| image = File:screwittogether.jpg | |||
| caption = screwing the pieces | |||
}} | |||
== Maintenance == | |||
=== Schedule === | |||
;Daily | |||
* Move indoors if raining to prevent rusting/rotting. | |||
; | ;Yearly | ||
* | * Inspect benches for splinters/rough edges. | ||
* Sand or paint to remove those rough areas. | |||
;Every 2 years | |||
* Inspect for weakness/rotting components. | |||
* Replace those members or benches that are worn or damaged to the point of not being safe anymore. | |||
== Set Up Instructions == | |||
The truss bench design for the Outdoor Classroom is a two-piece collapsible bench. To set up the bench for class, students will need to transport the bench, separate the two-piece design, and assemble the bench. | |||
Assembly of the collapsible truss bench begins with the transportation the benches to a designated shadow box. Three students will be required in the transport and set up of the bench. Two of the students will carry the short ends of the bench while the third student carries the bench in an area that needs support as determined by the strengths of the first two students. The students will travel from the bench storage area with the bench to the numbered shadow boxes for set up of the bench. | |||
Once the collapsed bench is set down and laid next to the shadow box two students will remove the top piece of the bench from the bottom piece and move it to the side for later assembly. Two students will unfold the two hinged legs from the bottom piece and tilt the bottom piece into an upright position. Two students will pick up the top piece of the bench and lay it down on the upright bottom piece with the guidance of the third student. After the top piece has been placed one or two students will adjust and angle the legs of the bottom piece to best support the top piece. The bench set up is complete and can now be used to sit on. | |||
The process to take down and store the bench can be done by the same process in reverse. A visual step by step process can be seen below. | |||
== Troubleshooting == | == Troubleshooting == | ||
This is only how to troubleshoot basic operation. | This is only how to troubleshoot basic operation. | ||
{| class="wikitable" | {| class="wikitable" | ||
! Problem | ! Problem | ||
! Suggestion | ! Suggestion | ||
|- | |- | ||
| Bench top will not fit with the bench bottom when folded | |||
| | | Trade bench tops between benches until all benches are fitted together or sand the bench top 2'x2' beams until it fits with bench bottom | ||
| | |||
|} | |} | ||
== | == Suggestions for future changes == | ||
In the future it may be necessary to sand the benches, or lacquer them with a thick finish, so as to reduce splinters.It may also be a good idea to add velcro straps or latches to make it easier to carry without falling open. Wheels and other forms of improving mobility may also be added, but as of now, the benches are light enough to be carried by one or two children. Painting the benches with the school colors may also be a great art project, as well as increase the aesthetics of the benches. | |||
== Video == | |||
{{Video|5cYE-ZE77xw}} | |||
{{Page data}} | |||
{{ | |||
[[Category: | [[Category:Zane Middle School]] | ||
[[Category:Engr205 Introduction to Design]] | |||
[[Category:Fabrication]] | |||
[[Category:Furniture]] | |||
Latest revision as of 19:56, 22 August 2023

Abstract[edit | edit source]
The team Suoicortalaepxcitsiligartilacrepus was tasked with providing both seating and writing surfaces for Zane Middle School's outdoor classroom. After determining criteria and parameters, and applying these to multiple seating concepts and designs, it was decide by our clients that the seating would take the form of 12 folding, truss-style benches. The benches would fit the S.T.E.A.M. orientation of the school by being constructed with engineering design principles and of artistic design. The benches are easy to set up, long lasting, safe, and collapsible. All benches, writing surfaces, and shadowboxing for multiple bench arrangements were completed on time, and only slightly over budget.
Background[edit | edit source]
In the Spring of 2018, Engineering 215 Team Suoicortalaepxcitsiligartilacrepus was commissioned by Lonny Grafman and the Faculty at Zane Middle School in Eureka, California to build an outdoor classroom for students and teachers to use at Zane Middle School. The school has been the recipient of many projects in the past, but until now did not have an outdoor classroom.
Problem Statement[edit | edit source]
The goal of this project is to create an outdoor classroom learning environment for junior high school students.
Criteria[edit | edit source]
The project criteria outlines qualities which the outdoor classroom must possess as desired by the client.
| Criteria | Constraints in order of importance |
|---|---|
| Safety | Must not possess sharp edges, not be easily splintered, and resist tipping. |
| Utility | Must function as effectively as an indoor classroom. |
| Plasticity | Must be usable by teachers regardless of subject being taught. |
| Durability | Must have a useful design life of five years, and be resilient to graffiti. |
| Portability | Components must be movable by no more than one adult or three students. |
| Cost | Project must be cost less than $450.00. |
| Aesthetics | Must fit with the STEAM motif of Zane Middle School. |
| Storability | Must easily fit into available storage space in Zane staff lounge area. |
| Comfort | Must be easy to sit in for more than 1 hour. |
Description of final project[edit | edit source]
Final Bench[edit | edit source]
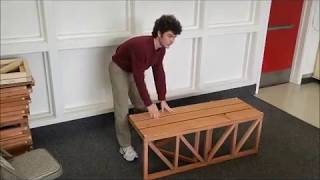
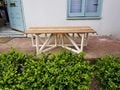
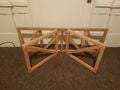
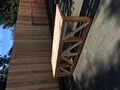
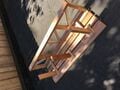
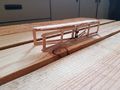
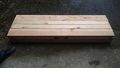
The final bench design is built of light-weight redwood planks, which will ensure longevity outdoors. It also folds to compact dimensions of roughly 18"x58"x5". The legs hinge outward, and the lid becomes the seating platform, and is placed on top of the unfolded legs.
- Final Bench Design Gallery
-
First constructed bench based on our final design (folded).
-
First constructed bench based on our final design (unfolded).
-
Final design's unfolded legs.
-
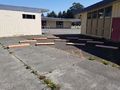
Folded benches in a classroom arrangement.
-
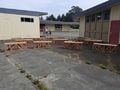
Unfolded benches in a classroom arrangement


Final Writing Surface[edit | edit source]
The writing surface design is made from standard clipboards and white board applique. The applique is applied to the reverse side of the clipboard to provide an alternative writing surface that does not interfere with the front side.
- final writing surface design gallery
-
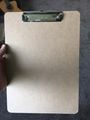
Front of clipboard writing surface.
-
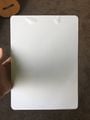
Reverse of clipboard writing surface.


Prototyping[edit | edit source]
Prototype 1[edit | edit source]
This first prototype used pegs that fit into slots to support the seating platform. Unfortunately the pegs were difficult to set up, and could fall out if the bench was used on uneven ground. The also increased the weight, and decreased the stability of the bench. This prototype also had a handle and casters, unfortunately the casters were so small that the bench had to be held up at an extreme angle for them to work, and on rough surfaces they did not work that well. The bench was also extremely heavy due to the 2"x4" members that greatly increased the weight of the bench.
-
Our first prototype.
-
Our first prototype turned over.


Prototype 2[edit | edit source]
The next step was to create a bench with a new support structure that could be kept all in one piece. Several designs were created by constructing prototypes out of stirring sticks. Eventually a wing-style folding bench with a hinged seating platform was decided on. All handles and casters were removed, as viable versions of the wheels were too expensive.
After building a prototype with the new folding legs, it was apparent that this was the design to pursue, and that it made more sense for the seating platform to be completely separate, as hinging it would add unnecessary cost and complication to the design. It was also resolved to replace the 2"x4" seating platform with thinner lighter fence boards. The client confirmed that his was the proper course and seemed excited for the direction that the project was heading. It was also figured out that the bench could be built to partly fold into itself by constructing it out of 2"x2" and allowing building the seating platform to partly encapsulate the folded leg structure. These changes made the bench weigh less, and fold into a much smaller form factor. It was these changes that led to the final design.
-
Stir stick prototype.
-
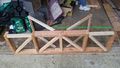
2nd Prototype legs.
-
2nd prototype folded.


Costs[edit | edit source]
| Quantity | Material | Source | Cost ($) | Total ($) |
|---|---|---|---|---|
| 33 | 1"x6"x6' Redwood Fence Board | The Mill Yard | 5.29 | 300.00 |
| 3 | 2"x4"x8' Construction Redwood | The Mill Yard | 22.37 | = |
| 33 | 2"x2"x3' Construction Redwood | The Mill Yard | 2.50 | = |
| 66 | 2"x2"x4' Construction Redwood | The Mill Yard | 3.33 | = |
| 22 | 2"x2"x6' Construction Redwood | The Mill Yard | 5.50 | = |
| 10 | 2" Strap Hinge 2 pk | The Mill Yard | 3.69 | = |
| 12 | 2" Strap Hinge 2 pk | Ace Hardware | 3.69 | 44.28 |
| 9 | 2"x2"x8' Furring Strip | Lowe's/Pierson's Building Center | 3.49 | 33.92 |
| 3 | 1"x6"x6' Cedar Fence Board | Lowe's | 3.78 | 12.24 |
| 2 | 2"x4"x8' Framing Stud | Lowe's | 3.87 | 8.35 |
| 2 | 2"x6"x8' Lumber | Lowe's | 7.27 | 15.70 |
| 2 | 1.5" Brass Hinges 2 pk | Lowe's | 2.49 | 5.37 |
| 8 | Exterior Wood Screws 1 lb. Box | The Mill Yard | 4.49 | 33.95 |
| 2 | White Nylon Floor Protector 100 pk | Amazon | 7.99 | 17.25 |
| 1 | White Board Paint | Amazon | 23.78 | 23.78 |
| 3 | White Board Applique | Amazon | 13.05 | 42.24 |
| 36 | Clipboards | Donated | 1.00 | 0.00 |
| 2 | Road Paint | Donated | 8.00 | 0.00 |
| Total Cost | $527.33 | |||
Testing Results[edit | edit source]
Tests consisted of sitting on the benches to test the weight that they could hold. Three large adults could sit on each bench without difficulty. The benches were brought to Zane Middle School, where the client and multiple students tested the benches. All tests confirmed that the benches could reliably hold multiple students without any signs of weakness or instability.
Poster[edit | edit source]

How to build[edit | edit source]

Accurately measure out the lengths of all components.

Cut the wood to the right measurements

Attach all of the pieces together.
Maintenance[edit | edit source]
Schedule[edit | edit source]
- Daily
- Move indoors if raining to prevent rusting/rotting.
- Yearly
- Inspect benches for splinters/rough edges.
- Sand or paint to remove those rough areas.
- Every 2 years
- Inspect for weakness/rotting components.
- Replace those members or benches that are worn or damaged to the point of not being safe anymore.
Set Up Instructions[edit | edit source]
The truss bench design for the Outdoor Classroom is a two-piece collapsible bench. To set up the bench for class, students will need to transport the bench, separate the two-piece design, and assemble the bench.
Assembly of the collapsible truss bench begins with the transportation the benches to a designated shadow box. Three students will be required in the transport and set up of the bench. Two of the students will carry the short ends of the bench while the third student carries the bench in an area that needs support as determined by the strengths of the first two students. The students will travel from the bench storage area with the bench to the numbered shadow boxes for set up of the bench.
Once the collapsed bench is set down and laid next to the shadow box two students will remove the top piece of the bench from the bottom piece and move it to the side for later assembly. Two students will unfold the two hinged legs from the bottom piece and tilt the bottom piece into an upright position. Two students will pick up the top piece of the bench and lay it down on the upright bottom piece with the guidance of the third student. After the top piece has been placed one or two students will adjust and angle the legs of the bottom piece to best support the top piece. The bench set up is complete and can now be used to sit on.
The process to take down and store the bench can be done by the same process in reverse. A visual step by step process can be seen below.
Troubleshooting[edit | edit source]
This is only how to troubleshoot basic operation.
| Problem | Suggestion |
|---|---|
| Bench top will not fit with the bench bottom when folded | Trade bench tops between benches until all benches are fitted together or sand the bench top 2'x2' beams until it fits with bench bottom |
Suggestions for future changes[edit | edit source]
In the future it may be necessary to sand the benches, or lacquer them with a thick finish, so as to reduce splinters.It may also be a good idea to add velcro straps or latches to make it easier to carry without falling open. Wheels and other forms of improving mobility may also be added, but as of now, the benches are light enough to be carried by one or two children. Painting the benches with the school colors may also be a great art project, as well as increase the aesthetics of the benches.