CourtneyOto (talk | contribs) |
|||
| (26 intermediate revisions by 4 users not shown) | |||
| Line 1: | Line 1: | ||
{{TOCright}} | {{TOCright}} | ||
{{Template: Waterpod Student Projects Header}} | {{Template: Waterpod Student Projects Header}} | ||
| Line 8: | Line 5: | ||
[[Image:Waterpod2.jpg|thumb|left|Figure 1: The WaterPod]] | [[Image:Waterpod2.jpg|thumb|left|Figure 1: The WaterPod]] | ||
The [[Waterpod]] was created to demonstrate a possible way of future living through water based communities. These communities would be self sustaining and nomadic; allowing for growing populations to thrive in a highly innovative and more sustainable manner. As a way of inspiring innovation, the WaterPod contacted the [http://www.humboldt.edu/~ere_dept/ Environmental Resources Engineering] Department at Humboldt State University in order to have their [[Engr215]] students design highly sustainable tools to be utilized on the pod. | The [[Waterpod]] was created to demonstrate a possible way of future living through water based communities. These communities would be self sustaining and nomadic; allowing for growing populations to thrive in a highly innovative and more sustainable manner. As a way of inspiring innovation, the WaterPod contacted the [http://www.humboldt.edu/~ere_dept/ Environmental Resources Engineering] Department at Humboldt State University in order to have their [[Engr215]] students design highly sustainable tools to be utilized on the pod. | ||
== Abstract == | == Abstract == | ||
| Line 15: | Line 10: | ||
{{break clear}} | {{break clear}} | ||
The [[Waterpod]] was created to demonstrate alternative living models for future living through [[water]] based communities. These communities would be self-sustaining and nomadic; allowing for growing populations to thrive in an innovative and more sustainable manner. As a way of inspiring innovation through sustainability, the Waterpod contacted our team, Green Apple, to design and build a simple [[hydroponics]] system that would be utilized on the pod for the six month period of their demonstration of self-sustainability. What resulted was the Hang Thyme hydroponics system; a hydroponic living wall that doesn’t require electrical energy. The living wall design is easy to build, implement, and maintain sustainable agriculture. | |||
The [[Waterpod]] was created to demonstrate alternative living models for future living through water based communities. These communities would be self-sustaining and nomadic; allowing for growing populations to thrive in an innovative and more sustainable manner. As a way of inspiring innovation through sustainability, the Waterpod contacted our team, Green Apple, to design and build a simple hydroponics system that would be utilized on the pod for the six month period of their demonstration of self-sustainability. What resulted was the Hang Thyme hydroponics system; a hydroponic living wall that doesn’t require electrical energy. The living wall design is easy to build, implement, and maintain sustainable agriculture. | |||
{{break clear}} | {{break clear}} | ||
== Objective & Criteria == | == Objective & Criteria == | ||
The Waterpod project "embodies self-sufficiency and resourcefulness, learning and curiosity, human expression, and creative exploration. It intends to prepare, inform and provide current alternative future living sustainable space." | The Waterpod project "embodies [[self-sufficiency]] and resourcefulness, learning and curiosity, human expression, and creative exploration. It intends to prepare, inform and provide current alternative future living sustainable space." | ||
==='''Objective'''=== | ==='''Objective'''=== | ||
| Line 77: | Line 67: | ||
| 3 | | 3 | ||
|} | |} | ||
== Final Solution == | |||
[[Image:hangthyme.jpg|thumb|right|Figure 2: Front view of the Hang Thyme design]] | |||
Our final design, as seen in Figure 2, is titled the Hang Thyme. The Hang Thyme is a hydroponic green wall that is used to grow herbs in minimal amounts of space; utilizing energy readily available in the natural world. Such energies include gravity (drip irrigation system), sunlight, and heat from the sun. The green wall can either be left free standing or can be hung. | |||
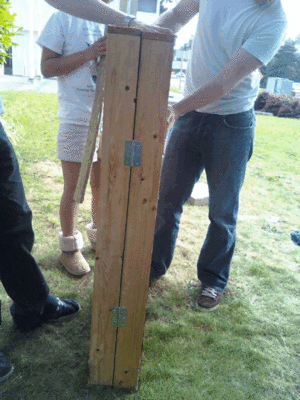
[[Image:HangthymeFrame1.gif|thumb|left|Figure 3: Side view of the frame with hinges.]] | |||
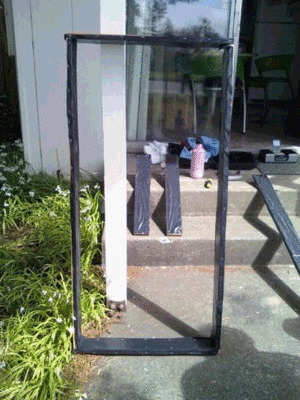
[[Image:HangthymeFrame2.gif|thumb|left|Figure 4: Front view of the frame.]] | |||
===The Frame=== | |||
The frame that supports the nutrient reservoirs and growth medium are essentially two bookshelves constructed with 1x4in pieces of wood. The dimensions of the box frames are 4ft in height and 2ft in length. As shown in Figure 3, the frames are connected by hinges that allow the unit to fold into itself, providing an easier means of transporting or shipping the model. All wood used in construction is first finished with shellac and later lined with plastic to prevent wood rot from constant exposure to moisture; also displayed in Figure 4. | |||
===The Growth Medium=== | |||
The Hang Thyme utilizes Rockwool (also known as mineral wool) as its growth medium. Rockwool is constructed with fibers made from natural or synthetic minerals. However, due to its high alkaline content, the Rockwool tends to turn the nutrient solution basic and can alter the pH. For this reason it is essential that the Rockwool is allowed to soak at least 24 hours in water with a low pH to neutralize its basic qualities. Rockwool also has the capacity to retain both air and water for hours up to days, allowing healthy root growth. Spacing between the fibers will enable the roots to spread and grow, increasing plant stability. Another quality of Rockwool is that it will not absorb the nutrients in the solution and therefore allows the nutrient solution to be recycled through the living wall. | |||
[[Image:Reservoirs.jpg|thumb|right|Figure 5: Water reservoirs demonstrating their drip irrigation system.]] | |||
[[Image:Externalsupport.jpg|thumb|right|Figure 6: External support in use.]] | |||
===Nutrient Reservoirs=== | |||
Two buckets are attached to the frame with fitted structures to hold them in place. The top reservoir has 1/16” holes drilled on the bottom center to allow drip irrigation. The holes are spaced 4” apart, regulating water flow, which in turn, keeps the growth medium constantly moist (please refer to Figure 5). The top reservoir is attached to the frame by two wooden tabs, one of which is hinged, allowing easy setting and removal. The bottom reservoir collects excess nutrient solution runoff that can be recycled back into the top reservoir. | |||
===External Support=== | |||
As previously mentioned, the Waterpod Hang Thyme can either be left free standing or hanging. If one would prefer to leave the device free standing, we have included a support constructed from a 4”x4” beam that attaches to the back. As shown in Figure 6 the Waterpod Hang Thyme can be opened to a 90 degree angle with the support in back creating an x like shape. This shape provides sufficient support to both the front and back ends of the device. | |||
{{break clear}} | |||
== Cost & Materials == | == Cost & Materials == | ||
| Line 162: | Line 177: | ||
=== Time Cost === | === Time Cost === | ||
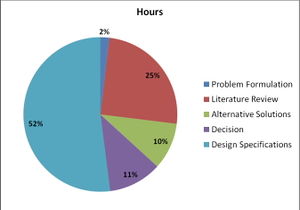
The total time spent on this project between four people was 321 hours. | The total time spent on this project between four people was 321 hours. | ||
[[Image:Timepiechart.jpg]] | [[Image:Timepiechart.jpg|thumb|right]] | ||
=== Estimated Time Of Construction === | |||
The total time of construction came to approximately 30 hours. | |||
== Tools == | == Tools == | ||
| Line 173: | Line 191: | ||
*A staple gun | *A staple gun | ||
*A table saw | *A table saw | ||
== Specifications == | == Specifications == | ||
Technical specifications including a schematic (CAD, pictures of the device). | Technical specifications including a schematic (CAD, pictures of the device). | ||
Here is some [[Help:Contents#Uploading|help uploading files]]. | Here is some [[Help:Contents#Uploading|help uploading files]]. | ||
== Operation Instructions == | == Operation Instructions == | ||
[[Image:Backmeshing.jpg|thumb|right|Figure 7: Reinserting Rockwool slabs.]] | |||
[[Image:Externalsupport.jpg|thumb|right|Figure 8: External support in place.]] | |||
[[Image:hangthyme.jpg|thumb|right|Figure 9: Placement of nutrient reservoirs and catchments.]] | |||
# Remove the Rockwool slabs from the system and allow them to soak in the nutrient solution for 24 hours. | # Remove the Rockwool slabs from the system and allow them to soak in the nutrient solution for 24 hours. | ||
# With the unit flat on its back, the black mesh strips are on the ground reinsert the slabs into their original formation shown in Figure | # With the unit flat on its back, the black mesh strips are on the ground reinsert the slabs into their original formation shown in Figure 7. | ||
# When the slabs are in place, pull the unit up right and open it up until it’s approximately at a 90 degree angle and place the external support in the slot as seen in Figure | # When the slabs are in place, pull the unit up right and open it up until it’s approximately at a 90 degree angle and place the external support in the slot as seen in Figure 8. | ||
# Insert the two nutrient reservoirs and the nutrient catchment systems as shown in Figure | # Insert the two nutrient reservoirs and the nutrient catchment systems as shown in Figure 9. The two top reservoirs can be inserted by lifting up on the wooden tab and sliding them into place. | ||
#To plant seeds holes need to be drilled such that the seeds can be deposited. The depths will vary based on the choice of plant. | #To plant seeds holes need to be drilled such that the seeds can be deposited. The depths will vary based on the choice of plant. | ||
# Once the plants are in place the growth medium must be kept moist. This can be done by filling the two clear containers at the top with the nutrient solution. Pre-drilled holes will allow for the nutrient solution to trickle down onto the medium where it will be absorbed and transported throughout the medium via gravity. | # Once the plants are in place the growth medium must be kept moist. This can be done by filling the two clear containers at the top with the nutrient solution. Pre-drilled holes will allow for the nutrient solution to trickle down onto the medium where it will be absorbed and transported throughout the medium via gravity. | ||
# When the two lower containers become filled they can be removed and the nutrient solution can be recycled into the top containers. | # When the two lower containers become filled they can be removed and the nutrient solution can be recycled into the top containers. | ||
# The watering schedule will vary based on climate conditions, however the medium should be kept moist at all times. | # The watering schedule will vary based on climate conditions, however the medium should be kept moist at all times. | ||
{{break clear}} | |||
== Next steps == | == Next steps == | ||
== | The Hang Thyme hydroponics system will be touring with The Waterpod in New York for six months starting in the summer of 2009. | ||
== Contact == | |||
*'''Ian Green''' ihg1@humboldt.edu | |||
*'''[[Dane Noland]]''' | |||
*'''Courtney Oto''' [[Special:EmailUser/CourtneyOto|email]] | |||
*'''Carolina Perez''' [[Special:EmailUser/cp56|email]] | |||
== References == | == References == | ||
<references/> | <references/> | ||
Sholto,J. (1920) Hydroponics: The Bengal System With Notes On Other | ===Books=== | ||
*Sholto,J. (1920) Hydroponics: The Bengal System With Notes On Other Methods Of Soilless Cultivation, R. Dayal, New Dehli. | |||
*Resh, M. (1978) Hydroponic Food Production, Woodbridge Press, Santa Barbara. | |||
*Watt, S.B. (1975). A Manual on the Hydraulic Ram for Pumping Water. London: Russel Press Ltd. | |||
*DeKorne, James B. (1992). The Hydroponic Hot House. Port Townsend: Loompanics Unlimited. | |||
*Kingsbury, N., Dunnet N. (2004). Planting Green Roofs and Living Walls. Portland: Timber Press Inc. | |||
*Tacke, J.H. (1988). Hydraulic Rams, A Comparitive Investigation. Delft, The Netherlands: Delft University of technology. | |||
*International Society for Pharmeceutical Engineering. (2000). Specifying Peristaltic Pumps. Wilmington: Watson-Marlow | |||
===Journals=== | |||
*Al-Jousi, Odeh R. (2003). “Greywater Reuse: towards sustainable water management.” Elsevier Science., 156(2003), 181-192. | |||
*Anslow, Mark. (2008). “Horticultural Capital.” Ecoligist, The 38:4:12-12. | |||
===Websites=== | |||
*Schmidt, J., Gerber, J., and Courter, J. “Hydroponics As A Hobby.” College of Agricultural, Consumer, and Environmental Sciences at the University of Illinois, <http://www.aces.uiuc.edu/vista/html_pubs/hydro/hydrotoc.html> (Feb. 22, 2009). | |||
*(2008). “Glossary Of terms.” Growing Edge, <http://www.growingedge.com/basics/glossary.html> (Feb. 23, 2009). | |||
*(2007). “Tips On Making Your own Hydroponics System.” The Hydroponic Garden, <http://www.peterjonesweb.com/hydroponics/tips_on_making_your_own_hydroponics_system.html> (Feb. 22, 2009). | |||
*(2003). “Growing Mediums.” Hydro empire, <http://www.hydroempire.com/store/growing_mediums.php> (Feb. 20, 2009). | |||
*(2008). “Growing Medium. “ Simply Hydro, <http://simplyhydro.com/growing1.htm> (Feb. 23, 2009).beconrad. “Increase Your Hydroponics Success with the Right Plants.” Hydroponics Search, <http://www.hydroponicsearch.com/index.php?option=com_content&task=view&id=664&Itemid=99999999> (Feb. 19, 2009). | |||
*“Hydroponic Systems.” Online Image. 2008. Simplyhydro.com. February 17th 2009. < http://simplyhydro.com/system.htm> USGS Georgia Water Science Center (2006). “Hydrology Primer.” <http://ga.water.usgs.gov/hydroprimer.html> (Feb. 26, 2009). | |||
*Pushard, Doug (Feb. 2009). “Is Rainwater Really Safe- One sample Case.” <http://www.harvesth2o.com/rainwater_safe.shtml> (Feb. 26, 2009). | |||
*Koch Membrane Systems Inc. (2008). “Comparing Waste Water treatment Technologies.” <http://www.kochmembrane.com/mbr_basics.html> (Feb. 26, 2009). | |||
*Texas A&M, Agri Life Extension (2009). “Rainwater Harvesting.” <http://rainwaterharvesting.tamu.edu/rainwaterbasics.html> (Feb. 26, 2009). | |||
*ASCE Research Library (1993). “The Maya: America’s First Water Resources Engineers.” <http://cedb.asce.org/cgi/WWWdisplay.cgi?0702126> (Feb. 26, 2009). | |||
== Categories == | == Categories == | ||
[[Category:Engr215 Introduction to Design]] | [[Category:Engr215 Introduction to Design]] | ||
[[Category:Urban agriculture]] | |||
[[Category:Waterpod]] | [[Category:Waterpod]] | ||
[[Category:Projects]] | |||
Revision as of 08:35, 28 October 2010
Background
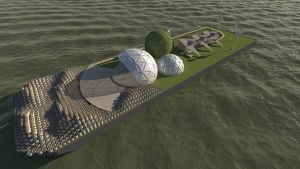
The Waterpod was created to demonstrate a possible way of future living through water based communities. These communities would be self sustaining and nomadic; allowing for growing populations to thrive in a highly innovative and more sustainable manner. As a way of inspiring innovation, the WaterPod contacted the Environmental Resources Engineering Department at Humboldt State University in order to have their Engr215 students design highly sustainable tools to be utilized on the pod.
Abstract
The Waterpod was created to demonstrate alternative living models for future living through water based communities. These communities would be self-sustaining and nomadic; allowing for growing populations to thrive in an innovative and more sustainable manner. As a way of inspiring innovation through sustainability, the Waterpod contacted our team, Green Apple, to design and build a simple hydroponics system that would be utilized on the pod for the six month period of their demonstration of self-sustainability. What resulted was the Hang Thyme hydroponics system; a hydroponic living wall that doesn’t require electrical energy. The living wall design is easy to build, implement, and maintain sustainable agriculture.
Objective & Criteria
The Waterpod project "embodies self-sufficiency and resourcefulness, learning and curiosity, human expression, and creative exploration. It intends to prepare, inform and provide current alternative future living sustainable space."
Objective
To design and build a specific, yet cost effective component for the Waterpod to help educate the community of New York move towards self-sustainability.
- Uses no electricity
- Demonstrates a "Do-It-Yourself" design project
- Conserves space
- Uses renewable/recyclable materials
- Effective healthy plant growth using no pesticides or chemicals
The Simple Hydroponic Living Wall system demonstrates an easy Do-It-Yourself project that shows the community/society to move towards a self-sustainable future. The system is easy and safe to use for an individual and prepares him/her for a futuristic ecology.
Criteria
| Criteria | Description | Weight |
|---|---|---|
| Cost | Cannot exceed the fixed budget of $300 | 10 |
| High Energy Efficiency | Cannot exceed the maximum energy allotment of 1 kW | 9 |
| Easy To Build/Maintain | A design that the average person could understand, implement, and maintain | 8 |
| Safety | A solid foundation and free of toxic materials | 7 |
| Durability | Must meet or exceed six months of use | 6 |
| Portability | Must be easily moved and maneuvered by a person | 5 |
| Maximize Growth Space | Must effectively grow produce in minimal space | 4 |
| Aesthetics | Must be visually attractive | 3 |
Final Solution
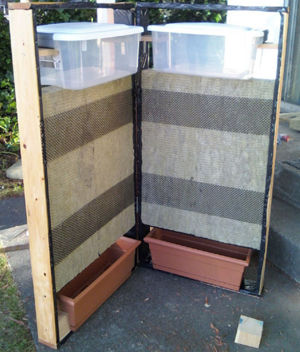
Our final design, as seen in Figure 2, is titled the Hang Thyme. The Hang Thyme is a hydroponic green wall that is used to grow herbs in minimal amounts of space; utilizing energy readily available in the natural world. Such energies include gravity (drip irrigation system), sunlight, and heat from the sun. The green wall can either be left free standing or can be hung.
The Frame
The frame that supports the nutrient reservoirs and growth medium are essentially two bookshelves constructed with 1x4in pieces of wood. The dimensions of the box frames are 4ft in height and 2ft in length. As shown in Figure 3, the frames are connected by hinges that allow the unit to fold into itself, providing an easier means of transporting or shipping the model. All wood used in construction is first finished with shellac and later lined with plastic to prevent wood rot from constant exposure to moisture; also displayed in Figure 4.
The Growth Medium
The Hang Thyme utilizes Rockwool (also known as mineral wool) as its growth medium. Rockwool is constructed with fibers made from natural or synthetic minerals. However, due to its high alkaline content, the Rockwool tends to turn the nutrient solution basic and can alter the pH. For this reason it is essential that the Rockwool is allowed to soak at least 24 hours in water with a low pH to neutralize its basic qualities. Rockwool also has the capacity to retain both air and water for hours up to days, allowing healthy root growth. Spacing between the fibers will enable the roots to spread and grow, increasing plant stability. Another quality of Rockwool is that it will not absorb the nutrients in the solution and therefore allows the nutrient solution to be recycled through the living wall.


Nutrient Reservoirs
Two buckets are attached to the frame with fitted structures to hold them in place. The top reservoir has 1/16” holes drilled on the bottom center to allow drip irrigation. The holes are spaced 4” apart, regulating water flow, which in turn, keeps the growth medium constantly moist (please refer to Figure 5). The top reservoir is attached to the frame by two wooden tabs, one of which is hinged, allowing easy setting and removal. The bottom reservoir collects excess nutrient solution runoff that can be recycled back into the top reservoir.
External Support
As previously mentioned, the Waterpod Hang Thyme can either be left free standing or hanging. If one would prefer to leave the device free standing, we have included a support constructed from a 4”x4” beam that attaches to the back. As shown in Figure 6 the Waterpod Hang Thyme can be opened to a 90 degree angle with the support in back creating an x like shape. This shape provides sufficient support to both the front and back ends of the device.
Cost & Materials
| Quantity | Material | Source | Cost ($) | Total ($) |
|---|---|---|---|---|
| 2 | Hinge Narrow 2" ZN CD/2 | Ace Hardware Store | 3.99 | 7.98 |
| 18 | Screw | Ace hardware Store | 0.10 | 1.80 |
| 2 | Corner Brace 2 x 5/8" | Ace Hardware Store | 3.99 | 7.98 |
| 1 | Film Poly Blk3mil 10 x 25' | Ace Hardware Store | 11.99 | 11.99 |
| 1 | Gutter Guard 6" x 20' Vinyl | Ace Hardware Store | 4.29 | 4.29 |
| 2 | Shellac Spray Clear 13 oz. | Ace Hardware Store | 9.49 | 18.98 |
| 1 | Catch Draw Lock 2- 1/2" zn | Ace Hardware Store | 5.99 | 5.99 |
| 1 | Staple 3/8" HD 1000 | Ace Hardware Store | 3.99 | 3.99 |
| 1 | Hinge Narrow NRP 3" zn | Ace Hardware Store | 4.99 | 4.99 |
| 4 | 12" Grodan Rockwool Slab | Local Hydroponics Store | 12.30 | 49.20 |
| 1 | Bath Caulk Silicon Rubb White | Ace Hardware Store | 5.99 | 5.99 |
| 1 | Box of Wood Screws 6 x 1-1/2 | Ace Hardware Store | 5.49 | 5.49 |
| 2 | Plastic 18 qt Container | Target | 4.99 | 9.98 |
| 2 | Terra-Plastic 20 in Flower Box | Target | 12.99 | 25.98 |
| 2 | Herb Seed Package | Target | 4.97 | 9.94 |
| 16 ft | 1' x 4" Douglas Fir Wood | Arcata Lumber | 6.93 | 6.93 |
| 1 | L Brackets 3 x 3/4 Cor Iron | Ace Hardware Store | 4.29 | 4.29 |
| 6 ft | 4 x 4 Douglas Fir Wood | Ace Hardware Store | 4.80 | 4.80 |
| Total Cost | $190.59 | |||
See this example of a cost table for more on tables.
Time Cost
The total time spent on this project between four people was 321 hours.
Estimated Time Of Construction
The total time of construction came to approximately 30 hours.
Tools
Tools used were:
- A power drill
- A box cutter
- A pair of wire cutters
- A staple gun
- A table saw
Specifications
Technical specifications including a schematic (CAD, pictures of the device). Here is some help uploading files.
Operation Instructions


- Remove the Rockwool slabs from the system and allow them to soak in the nutrient solution for 24 hours.
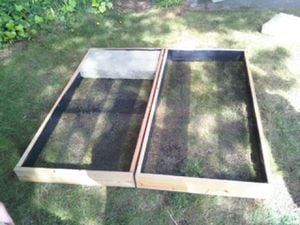
- With the unit flat on its back, the black mesh strips are on the ground reinsert the slabs into their original formation shown in Figure 7.
- When the slabs are in place, pull the unit up right and open it up until it’s approximately at a 90 degree angle and place the external support in the slot as seen in Figure 8.
- Insert the two nutrient reservoirs and the nutrient catchment systems as shown in Figure 9. The two top reservoirs can be inserted by lifting up on the wooden tab and sliding them into place.
- To plant seeds holes need to be drilled such that the seeds can be deposited. The depths will vary based on the choice of plant.
- Once the plants are in place the growth medium must be kept moist. This can be done by filling the two clear containers at the top with the nutrient solution. Pre-drilled holes will allow for the nutrient solution to trickle down onto the medium where it will be absorbed and transported throughout the medium via gravity.
- When the two lower containers become filled they can be removed and the nutrient solution can be recycled into the top containers.
- The watering schedule will vary based on climate conditions, however the medium should be kept moist at all times.
Next steps
The Hang Thyme hydroponics system will be touring with The Waterpod in New York for six months starting in the summer of 2009.
Contact
- Ian Green ihg1@humboldt.edu
- Dane Noland
- Courtney Oto email
- Carolina Perez email
References
Books
- Sholto,J. (1920) Hydroponics: The Bengal System With Notes On Other Methods Of Soilless Cultivation, R. Dayal, New Dehli.
- Resh, M. (1978) Hydroponic Food Production, Woodbridge Press, Santa Barbara.
- Watt, S.B. (1975). A Manual on the Hydraulic Ram for Pumping Water. London: Russel Press Ltd.
- DeKorne, James B. (1992). The Hydroponic Hot House. Port Townsend: Loompanics Unlimited.
- Kingsbury, N., Dunnet N. (2004). Planting Green Roofs and Living Walls. Portland: Timber Press Inc.
- Tacke, J.H. (1988). Hydraulic Rams, A Comparitive Investigation. Delft, The Netherlands: Delft University of technology.
- International Society for Pharmeceutical Engineering. (2000). Specifying Peristaltic Pumps. Wilmington: Watson-Marlow
Journals
- Al-Jousi, Odeh R. (2003). “Greywater Reuse: towards sustainable water management.” Elsevier Science., 156(2003), 181-192.
- Anslow, Mark. (2008). “Horticultural Capital.” Ecoligist, The 38:4:12-12.
Websites
- Schmidt, J., Gerber, J., and Courter, J. “Hydroponics As A Hobby.” College of Agricultural, Consumer, and Environmental Sciences at the University of Illinois, <http://www.aces.uiuc.edu/vista/html_pubs/hydro/hydrotoc.html> (Feb. 22, 2009).
- (2008). “Glossary Of terms.” Growing Edge, <http://www.growingedge.com/basics/glossary.html> (Feb. 23, 2009).
- (2007). “Tips On Making Your own Hydroponics System.” The Hydroponic Garden, <http://www.peterjonesweb.com/hydroponics/tips_on_making_your_own_hydroponics_system.html> (Feb. 22, 2009).
- (2003). “Growing Mediums.” Hydro empire, <http://www.hydroempire.com/store/growing_mediums.php> (Feb. 20, 2009).
- (2008). “Growing Medium. “ Simply Hydro, <http://simplyhydro.com/growing1.htm> (Feb. 23, 2009).beconrad. “Increase Your Hydroponics Success with the Right Plants.” Hydroponics Search, <http://www.hydroponicsearch.com/index.php?option=com_content&task=view&id=664&Itemid=99999999> (Feb. 19, 2009).
- “Hydroponic Systems.” Online Image. 2008. Simplyhydro.com. February 17th 2009. < http://simplyhydro.com/system.htm> USGS Georgia Water Science Center (2006). “Hydrology Primer.” <http://ga.water.usgs.gov/hydroprimer.html> (Feb. 26, 2009).
- Pushard, Doug (Feb. 2009). “Is Rainwater Really Safe- One sample Case.” <http://www.harvesth2o.com/rainwater_safe.shtml> (Feb. 26, 2009).
- Koch Membrane Systems Inc. (2008). “Comparing Waste Water treatment Technologies.” <http://www.kochmembrane.com/mbr_basics.html> (Feb. 26, 2009).
- Texas A&M, Agri Life Extension (2009). “Rainwater Harvesting.” <http://rainwaterharvesting.tamu.edu/rainwaterbasics.html> (Feb. 26, 2009).
- ASCE Research Library (1993). “The Maya: America’s First Water Resources Engineers.” <http://cedb.asce.org/cgi/WWWdisplay.cgi?0702126> (Feb. 26, 2009).
