No edit summary |
No edit summary |
||
| Line 65: | Line 65: | ||
===My Thought Process (or lack thereof)=== | ===My Thought Process (or lack thereof)=== | ||
Since there is no real manual on how to stain your floor with iron sulfate, it was all a bit of an experiment. The rooms downstairs in CCAT that got little or no light we decided should have a lighter stain, thus I used the less saturated stain and left more water on the floor previous to staining it to further dilute it. I also only did three stains on it. The office, which gets good sunlight and has beautiful | Since there is no real manual on how to stain your floor with iron sulfate, it was all a bit of an experiment. The rooms downstairs in CCAT that got little or no light we decided should have a lighter stain, thus I used the less saturated stain and left more water on the floor previous to staining it to further dilute it. I also only did three stains on it. The office, which gets good sunlight and has beautiful [Campus Center for Appropriate Technology Natural Paint Project|golden naturally painted walls], needed a darker stain. So I went heavy on the iron sulfate, using a little more then a 2:1 ratio and about 1.5 ~ 2 cups coffee grounds. I stained the floor in there 4 times, with lots of dust sitting on top. When I go to seal it, I will leave the dust there, as it should result in a darker color. | ||
===Problems=== | ===Problems=== | ||
One problem that I have not had, but that has been discussed as dire is efflorescence. This is a calcium build up that results on concrete from being too wet. There is a balance you need to strike between being wet enough for the stain to look good and being so wet you get a build up that is rumored to be very difficult to remove. | One problem that I have not had, but that has been discussed as dire is efflorescence. This is a calcium build up that results on concrete from being too wet. There is a balance you need to strike between being wet enough for the stain to look good and being so wet you get a build up that is rumored to be very difficult to remove. | ||
| Line 95: | Line 95: | ||
</gallery> | </gallery> | ||
[[Link title]] | |||
Revision as of 17:39, 10 May 2007
Natural Stain for Concrete Floors
Another Campus Center for Appropriate Technology project brought to you by an HSU student
The Campus Center for Appropriate Technology (CCAT) at Humboldt State University has been in the process of reconstruction for several years. With reconstruction drawing to an end and plans for moving back into the new old Buck House finalizing, many efforts at finishing touches have begun. (You can be a part too!). The downstairs of CCAT will be a completely public space, with an ADA accessible bathroom, office space, a possible art gallery, living space, a composting room, a mechanical room, and access to the future attached greenhouse. The floor downstairs was bare concrete, poured by Beacom Construction earlier in the construction process, with a radiant heat system installed by (*). The need to make the floor beautiful and durable was expressed, with natural and non-toxic methodology preferred. Jess Huyghebaert, late in the Spring 2007 semester, has decided to take this on as her ENGR 305 project, convinced that it is possible to adapt the not-so-eco-friendly concrete floor to something that demonstrates using natural elements and compromise between conventional and non-conventional construction.
What you're about to read...
Looking for a natural stain, I found the answer deep in cyberspace, in a woman's personal account of staining her own floor with iron sulfate, having read about it in a natural building document. Another fellow, using her guidelines, stained his floor as well and created a similar webpage. These accounts were my bible and only source of information, besides the back of the iron sulfate box which read "IRON WILL STAIN...sweep concrete surfaces immediately to prevent staining. Use when concrete is dry. If concrete is wet when contact occurs, staining may be impossible to prevent." YAHOO! So what you are about to read is a blend of "How to", experimentation and my personal experience with iron sulfate. Put on yer polka dotted shoelaces, turn up the tunes and here we go.
Discovery
The difficulty in working with a concrete floor, is that unlike a wall, floors receive much wear and tear and have somewhat complicated chemical make up. Thus, any product used on concrete tends to have harsh components and some chemical composition that is not entirely eco or anthro friendly. When the search was begun for a natural concrete stain and sealant, it became apparent that the majority of products were manufactured by companies and individual solutions were almost nonexistent. Now, creating your own reality is very rewarding, thus buying stain in a can just to roll it on didn't seem like much fun. Then, I found Cathy Moore's web page on her experience with iron sulfate as a stain for concrete. Found in nurseries, hardware and gardening stores, the product itself is used for lawn greening, containing some percentage of iron and sulfur. The iron is an element that will soak in and permanently stain the concrete floor. Yah! Being able to stain the floor with my own concoction was very exciting. Iron sulfate is natural components (the ingredients on the box read "11% sulfate, 30% iron", and is used as a fertilizer, thus relatively eco-friendly and certainly not damaging to it's surrounding environment. Finding a sealant for the floor proved to be more difficult. The point of a sealant is to create a durable floor that will resist wear and tear- requiring some difficult, unnatural solutions. I have bought three different sealants, each a bit more eco-friendly then the other and I plan on testing all three, for durability, user friendliness and toxicity.
Implementation
The phrase "permanent stain" might hold some apprehension in it. Don't get hung up on it- just go for it! Nothing is truly permanent. And if the most horrible thing comes of the stain- you can always make a rug out of old cloth to cover it. :)
Supplies!
- Mop
- Soap
- Scrub brush
- Broom (or two)
- Bucket
- Iron Sulfate
~I found a "Lilly Miller" brand of Iron Sulfate, coming from Oregon at the nursery in McKinleyville, with a higher concentration of iron in it then the Hi Yield Copperas recommended.
- coffee grounds, for a darker stain, found used at any coffee shop for free.
- measuring implements (I used a 2 1/4 qt. jug for measuring water and a 16 oz. jar for the iron sulfate
- cheese cloth
- pillow case/ skirt ends
- gloves
- socks
Prep Work
The process must begin with a perfectly clean floor. Some have suggested utilizing a floor buffer, but I found that a simple eco-friendly soap, some real hard scrubbing and mopping multiple times got the floor clean enough, without spending money or using electricity. It can be difficult to get concrete "clean". I had some problems as the contractor who poured the concrete must have walked in it and there was strange rust stains I couldn't get out. The stain masks these pretty well, but does create some inconsistency. Is your mop no longer full of muck? Then we can start staining.
Stir it Up, little darling
Wohoo clean floor! Now let's put some more stuff on it! Depending on how dark you want your floor to be, you should experiment with the saturation point of iron sulfate in water. These are the two ratios I have tried so far- along with their results.
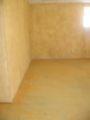
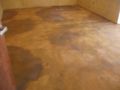
- 1 lb (16 oz) iron sulfate to 1 gallon (4 quarts) water ratio gives a orange stain. (PICTURE)
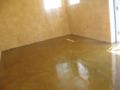
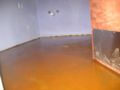
- 2 lb iron sulfate to 1 gallon water + 1~2 cups coffee grounds gives a more saturated, or darker look. (PICTURE)
- There's plenty of wiggle room, as you will be doing multiple stains and can always make it darker.
The thing to remember is that you can always make the floor darker. Making it lighter will be difficult- so start with a mild saturation.
I mixed it in five gallon buckets, in small batches as I read that the stain is less effective as time progresses. The solution must be stirred for a couple minutes, and I had to be sure not leave it for too long, otherwise the iron sulfate would solidify on the bottom. Straining the solution through cheese cloth, especially the coffee ground solution is a good idea. The solution then remains of the same concentration. I taped the cheese cloth over one five gallon bucket and dumped the other one in there. When someone else was around, they could hold the cheese cloth so I didn't have to use masking tape (yes! less waste!)
The solution will look sort of like watered down cloudy milk depending on the concentration of iron sulfate, or brown when coffee was added. No fear. Let's spread it!
Spread some of that Love!
Use Protection
Using protection against the stain is highly advised- high concentrations of iron sulfate felt caustic on my skin, though no damage has been really assessed. I wore plastic gloves and socks while staining. Leaving foot prints behind is not desirable, the socks help with that. Though the socks were soaked when I finished staining a room, I felt better wearing them as opposed to just walking barefoot. Also, my toenails and feet have turned slightly orange... wear protection. Shoes however, have more potential for tracking in dirt and leaving marks, so creativity is key.
and Do it
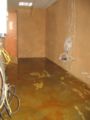
There are two ways to go about staining - it can be done on a wet floor or a dry floor. I mopped the mechanical room ( a room we wanted a lighter stain in) with just water and left it decently wet, then applied the stain. This was said to let the stain penetrate better, but I found it leaves a more uneven coat and dilutes the color some. Applying the stain to a dry floor gets a more even spread, less cloudy looking.
Applying the stain, I carried the bucket in one hand (so not to leave any rings on the floor) and used a large piece of cloth (old skirt) to spread the stain. This looked much better then using a mop which I tried first. The mop left streaks and unsightly patterns. Using cloth bunched up left a more even coat. The stain looks clear upon application, but after ten minutes or so, color will begin to show. Making sure every area has been covered is important, and I found the more stain put on the floor, the better. Don't be stingy- flood the floor with the stain.
Uh, that floor looks kinda UGLY

(CHANGE IMAGE)
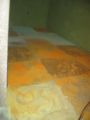
Yah, that'll happen. When I put down the first stain, I thought I had ruined the CCAT floors. It was splotchy, and had large visible swipe marks on it. Yikes. Do not panic. Anything worth having requires work!
Do it again! Do it again!
Depending on how dark or thorough you want the stain to look, stain the floor again! Staining the floor at least three times is a good idea. If you want to do it more then three times, keep in mind the problem of efflorescence. What the heck is efflorescence? In order to stain the floor again, I had to let it dry, and then sweep- on floors that had the 1:1 stain there is little dust to sweep, but still do it. Sweeping distributes the stain dust so that it is not concentrated, it also helps get rids of the swipe marks. Next, wet the concrete again- this hopefully allows the stain to soak in even more. It also gets rid of the swipe marks- and you can create a pattern if you want. Then- mix up another batch of stain, strain it and spread it!
My Thought Process (or lack thereof)
Since there is no real manual on how to stain your floor with iron sulfate, it was all a bit of an experiment. The rooms downstairs in CCAT that got little or no light we decided should have a lighter stain, thus I used the less saturated stain and left more water on the floor previous to staining it to further dilute it. I also only did three stains on it. The office, which gets good sunlight and has beautiful [Campus Center for Appropriate Technology Natural Paint Project|golden naturally painted walls], needed a darker stain. So I went heavy on the iron sulfate, using a little more then a 2:1 ratio and about 1.5 ~ 2 cups coffee grounds. I stained the floor in there 4 times, with lots of dust sitting on top. When I go to seal it, I will leave the dust there, as it should result in a darker color.
Problems
One problem that I have not had, but that has been discussed as dire is efflorescence. This is a calcium build up that results on concrete from being too wet. There is a balance you need to strike between being wet enough for the stain to look good and being so wet you get a build up that is rumored to be very difficult to remove.
Options Options Options
There are multiple ways to stain your floor with iron sulfate. One of the personal accounts I found said he used a garden sprayer to apply the stain and then scrubbed it in with a short haired broom. The other account used a very diluted solution because she didn't want very dark floors. You could swirl, you could flood, you could scrub- there's many ways to apply the stain, and let it dry. Check out the two accounts I found Cathy Moore with light floor and Lawrence Lile's thorough account
===Analyze yo' situation ===
CCAT is a student run house demonstrating appropriate technology. Some components of being an appropriate technology that I was very aware of during this project was minimal waste, minimal environment impact, low embedded energy and people friendly.
Minimal Waste?
I was very conscious of how much waste this project created. To date I have recycled several plastic gloves and the wrapper from the mop, and recycled the cardboard boxes the iron sulfate came in. I have used old clothes ripped up for rags, and skirt ends as means for spreading the stain. The two 5 gallon buckets I used were rescued from other construction projects and will go to good use in the CCAT area after I am finished. The floor was disgusting, from being in a household under construction, so all that I swept up went into the trashcan (containing little metal shards, texture, gypsum, paint, etc.) I will have to toss the mop head when I am completed with the project, but the handle is reusable. The brooms were all borrowed, I'll have to return them all to their owners. What will actually be in the trash can when I am finished? The floor sweepings, the mop head and perhaps the cheese cloth, if it is not compostable.
Minimal Environmental Impact
Why Not Just use Conventional Methods?
Cool Floor, Cool House
-
First stain of the office floor
-
2nd stain going on office floor
-
The compost room experimentation
-
First stain in the bathroom
-
3rd stain on the office floor
-
In the mechanical room...


