No edit summary |
No edit summary |
||
| Line 44: | Line 44: | ||
! M3x20 Screws | ! M3x20 Screws | ||
! M3x6 Screws | ! M3x6 Screws | ||
! Wires | |||
|- | |- | ||
! Image | ! Image | ||
| [[Image:Blnd_asst_bracelet_apetsiuk.jpg| | | [[Image:Blnd_asst_bracelet_apetsiuk.jpg|100px]] | ||
| [[Image:Blnd_asst_case_apetsiuk.jpg|110px]] | | [[Image:Blnd_asst_case_apetsiuk.jpg|110px]] | ||
| [[Image:Blnd_asst_cover_apetsiuk.jpg|110px]] | | [[Image:Blnd_asst_cover_apetsiuk.jpg|110px]] | ||
| [[Image:Blnd_asst_arduino2.jpg|110px]] | | [[Image:Blnd_asst_arduino2.jpg|110px]] | ||
| [[Image:Blnd_asst_usound_sensor.jpg| | | [[Image:Blnd_asst_usound_sensor.jpg|90px]] | ||
| [[Image:Blnd_asst_buzzer.jpg| | | [[Image:Blnd_asst_buzzer.jpg|90px]] | ||
| [[Image:Blnd_asst_laser.jpg| | | [[Image:Blnd_asst_laser.jpg|90px]] | ||
| [[Image:Blnd_asst_button.jpg| | | [[Image:Blnd_asst_button.jpg|90px]] | ||
| [[Image:Blnd_asst_battery.jpg| | | [[Image:Blnd_asst_battery.jpg|90px]] | ||
| [[Image:Blnd_asst_m3x20_screw.jpg| | | [[Image:Blnd_asst_m3x20_screw.jpg|90px]] | ||
| [[Image:Blnd_asst_m3x6_screw.jpg| | | [[Image:Blnd_asst_m3x6_screw.jpg|90px]] | ||
| [[Image:Blnd_asst_wires.jpg|90px]] | |||
|- | |- | ||
! Quantity | ! Quantity | ||
| Line 70: | Line 72: | ||
| 4 | | 4 | ||
| 4 | | 4 | ||
| 10 | |||
|- | |- | ||
! Cost/item | ! Cost/item | ||
| Line 83: | Line 86: | ||
| $ 0.02 | | $ 0.02 | ||
| $ 0.02 | | $ 0.02 | ||
| $ 0.01 | |||
|} | |} | ||
'''Total cost''' is $ 5.00. | |||
*3D source files could be downloaded from here: | |||
*Code for arduino is available at: | |||
*For arduino programming you may need the free open source Arduino IDE which could be downloaded from: https://www.arduino.cc/en/Main/Software | |||
== Tools needed for fabrication of the OSAT== | == Tools needed for fabrication of the OSAT== | ||
# [[Athena Build Overview| MOST Delta RepRap]] or similar RepRap 3-D printer | # [[Athena Build Overview| MOST Delta RepRap]] or similar RepRap 3-D printer | ||
# | # Plastic Filament | ||
# Soldering Iron | |||
# Solder | |||
# Screwdriver | |||
# Hexagon Key | |||
# Breadboard | |||
# Paper Knife | |||
# Tweezers | |||
# Wires Stripper | |||
== Skills and Knowledge Necessary to Make the OSAT == | == Skills and Knowledge Necessary to Make the OSAT == | ||
* | All skills you need are at the basic level: | ||
* 3D printing | |||
* 3D Design | |||
* Electronics | |||
* Programming | |||
== Technical Specifications and Assembly Instructions== | == Technical Specifications and Assembly Instructions== | ||
| Line 107: | Line 121: | ||
=== Common Problems and Solutions=== | === Common Problems and Solutions=== | ||
* | * Solder all the wires with the components being in the place of the approximate final position. It may be complicated to bend soldered wires. | ||
== Cost savings== | == Cost savings== | ||
Revision as of 19:45, 6 December 2018
Blind Person's Assistant
THIS PAGE IS UNDER CONSTRUCTION. But it will be ready very soon.
Project developed by Aliaksei_Petsiuk
Template:Statusboxtop Template:Status-design Template:Status-prototype You can help Appropedia by contributing to the next step in this OSAT's status. Template:Boxbottom
Abstract
The given project is a part of Open Source Appropriate Technologies assignment, and it is designed to support visually-impaired people.
As per World Health Organization, there are about 300 million visually-impaired people in the world, 40 millions of them are totally blind. Scientists and engineers are working on systems which would be able to improve the quality of lives of people with the lost vision. A number of modern projects and achievements in this field has been listed in the Reference section.
- Ultrasonic-based visually impaired person's sssistant
-
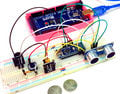
Prototyping stage
-
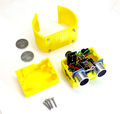
Printed parts and soldered electronic components
-
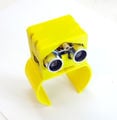
Completed assembly
-
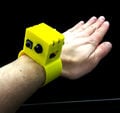
Testing procedures


Bill of Materials
The full list of materials used for the project is provided in the table below.
| Component | Bracelet | Case | Cover | Arduino Nano | Sensor | Buzzed | Laser | 3V Button | Battery | M3x20 Screws | M3x6 Screws | Wires |
|---|---|---|---|---|---|---|---|---|---|---|---|---|
| Image | 
|

|

|

|

|

|

|

|

|

|

|

|
| Quantity | 1 | 1 | 1 | 1 | 1 | 1 | 1 | 1 | 2 | 4 | 4 | 10 |
| Cost/item | $ 0.20 | $ 0.20 | $ 0.20 | $ 3.00 | $ 1.50 | $ 0.30 | $ 0.40 | $ 0.10 | $ 0.50 | $ 0.02 | $ 0.02 | $ 0.01 |
Total cost is $ 5.00.
- 3D source files could be downloaded from here:
- Code for arduino is available at:
- For arduino programming you may need the free open source Arduino IDE which could be downloaded from: https://www.arduino.cc/en/Main/Software
Tools needed for fabrication of the OSAT
- MOST Delta RepRap or similar RepRap 3-D printer
- Plastic Filament
- Soldering Iron
- Solder
- Screwdriver
- Hexagon Key
- Breadboard
- Paper Knife
- Tweezers
- Wires Stripper
Skills and Knowledge Necessary to Make the OSAT
All skills you need are at the basic level:
- 3D printing
- 3D Design
- Electronics
- Programming
Technical Specifications and Assembly Instructions
- Provide directions for print/assembly - be detailed enough in your “how to” to ensure that someone could construct the device from your description. Consider the elegance of IKEA like instructions.
- Include print time estimate
- Include assembly time estimate
- Including drawings or pictures of the device at stage of assembly at minimum. (http://www.appropedia.org/Special:Upload)
Common Problems and Solutions
- Solder all the wires with the components being in the place of the approximate final position. It may be complicated to bend soldered wires.
Cost savings
- If your solution is not a low cost one then it is not really appropriate.
- Estimate your costs
- Find a commercial equivalent
- Calculate $ savings and % savings
Benefited Internet Communities
- Name and add links to at least 5 using single brackets around [url name]
References
- The sources of information (e.g. engineering handbooks, journal articles, government documents, webpages, books, magazine articles etc.). References should use the <ref> </ref> and <references/> tags and can be in any format but should include all the information necessary for someone else to find the same information you did. For example: [1]
- ↑ web page: Department of Energy (DOE) Landscaping and Energy Efficiency, DOE/GO-10095 (1995) Available: http://www.eren.doe.gov/erec/factsheets/landscape.html
Based on the developmental needs addressed (e.g. food, heat, electricity, clean water, health care, etc.) be sure to label your device in the proper categories e.g. use [[Category:Water]]. Be sure to categorize your device so that it will be easy to find – for example “Low voltage connection basics” is categorized in [[Category:How tos]] [[Category:Electricity]] [[Category:Electric lighting]].