
The purpose of this project is to create a protective barrier for indoor lab/lecture classes at Six Rivers Charter School that will protect students and teachers from excessive exposure to COVID-19 when in-person instruction resumes. Team REMS was formed through Engineering 215 - Introduction to Design, an engineering course taught by Lonny Grafman at Cal Poly Humboldt.
Background[edit | edit source]
Six Rivers Charter School is a high school in Arcata, California. Together, with Lonny Grafman, they collaborated to inspire the Fall 2020 ENGR 215 class to develop solutions to the problems facing them in their future return to in-person instruction. The Fall 2020 ENGR 215 class designed four solutions to the various problems that Six Rivers Charter School faces. Team REMS chose to design an indoor lab barrier that would allow students to participate in indoor labs/lectures while minimizing exposure to COVID-19.
Problem statement and criteria[edit | edit source]
Team REMS' future design set out to answer the question, "How do we allow for students at Six Rivers Charter School to participate in in person classes while minimizing risk of exposure to COVID-19 and abiding by state and local COVID-19 safety guidelines?". The criteria that would guide the design process were developed by Team REMS and the client representative of Six Rivers Charter School and are listed below in a table that weighs their significance to the problem statement on a scale from 0-10 where 0 is the least important and 10 is the most important. Below, each criterium is constrained as well.
| Criteria | Constraints | Weight (0-10) |
|---|---|---|
| COVID-19 Safety (CDC guidelines) | abides by state and local COVID-19 safety guidelines | 10 |
| Instructor Interaction | aids in student-instructor interaction | 9 |
| Replicability | is replicable and can be built by one with little to no expertise | 8 |
| Cost | is under the budget of $200 | 8 |
| Aesthetics | is simple and elegant | 7 |
| Student Collaboration | aids in student collaboration | 6 |
Description of final project[edit | edit source]
The Delphi Matrix, which produces a score for each potential design based on how it meets the stated criteria, proposed that the indoor lab protective barrier design Team REMS would develop would prove to be the optimal solution to the problem statement. After testing the prototypes and letting the stated criteria guide the design process further, the final design was created. 1.5"x1.5" Aluminum Angle and 0.75"x0.75" Aluminum Angle were used to create the frame of the barrier. Transparent vinyl sheets were used to create the front and side panels. To secure the vinyl to the frame, we used a combination of nuts, bolts, washers and Gorilla Mounting Tape. The dimensions of the barrier are 36"x36"x27". It is a 3-sided barrier with extended side panels for extra user protection.
-
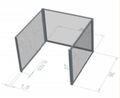
Final Design of the Barrier using AutoCAD: by Molly Milford
-
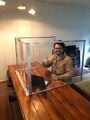
Barrier in use: photo by Javier Ramos-Cool
-
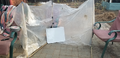
Final Barrier on Table: photo by Javier Ramos-Cool


Prototyping[edit | edit source]
-
Human Test: This prototype was used to get an idea of how students would feel inside a barrier.
-
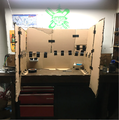
Small version of actual design: This small scale prototype was used to show how a transparent material would look on a solid frame.
-
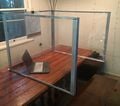
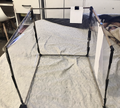
To-scale Model: This prototype was used to see how it would feel to sit behind a large to-scale barrier. It was also used to test whether the user would want to poke their head around the extended sides of the barrier.
-
Strength of Frame: This prototype was used to see how strong the frame needed to be in order to hold materials such as the vinyl and a whiteboard.


Costs[edit | edit source]
| QTY | Material | Source | Cost ($) | Total ($) |
|---|---|---|---|---|
| 5 | 1.5"x1.5" Aluminum Angle | Amazon | 13.10 | 65.5 |
| 5 | 0.75"x0.75" Aluminum Angle | Amazon | 9.70 | 48.5 |
| 1 | double sided tape | AceHardware | 8 | 8 |
| 8 of each | nuts, bolts, washers | Ace Hardware | 13.44 | 13.44 |
| 1 Roll | vinyl | Marine vinyl | 45 | 45 |
| Total Cost | 180.44 | |||
Testing Results[edit | edit source]
Team REMS has conducted simple tests on the indoor lab barrier to see how well it works. The "bump" test was used to see how sturdy the barrier was on a table. A team member walked past the barrier and bumped it with their body. The barrier was very sturdy and did not need any stabilizers. The "mobility" test was used to see if one person is able to mount the barrier on a table. The test was successful and one person was able to mount the barrier alone. The vinyl panels allow for great, clear visibility. The frame does not obstruct the view of the user. Team REMS has not yet implemented the barrier at Six Rivers Charter School so we have yet to see how real high school students interact with the barrier.
How to Build[edit | edit source]

Gather tools and materials

Using a straight edge and scissors, cut three 36"x27" pieces of vinyl.

Measure and cut four 27" pieces of 1.5"x1.5" aluminum angle. These will be the upright corner pillars. Measure and cut one 36" piece of the 1.5"x1.5" aluminum angle. This will become the front bottom frame piece. They will be referred to as the "wide" aluminum angles in the following procedure. 4. Also cut five 36" pieces of the 0.75"x0.75" aluminum angle which will become the remaining pieces of the frame. These will be called the "thin" aluminum angles in the following procedure.

Begin assembly of the left panel. Gather one 27" wide aluminum angle and two 36" thin angles and set them on the working surface. Set the wide angle on the surface with one lip pointing up. Line up the ends of the thin aluminum with the ends of the wide aluminum. Mark a spot to drill where both angles will be drilled through.

Now separate and drill through the thin angle on the dot. Then, re-align the two angles and mark the wide angle through the hole that you just drilled. Separate and drill the wide angle on the dot. Repeat this process for the right-side panel.

Begin assembly of the front panel. Gather two 27" wide aluminum angles, one 36" wide angle, and one 36" thin angle. Align one 27" wide angle with the bottom of the 36" wide angle. Mark a spot to drill where it will go through both pieces. Remove and drill the first piece. Realign and mark through the hole you just drilled. Drill through the second piece. Repeat for the other side of the panel.

Align the 36" thin angle with the open side of the panel. Repeat the process of marking and drilling with this last piece to create a 4-sided frame.

Connect at each corner with a bolt, nut and washer to make it a rigid frame.

Next, stand the front panel upright with the help of a friend and align the open side of a side panel with the side pillar of the front panel. Once aligned, follow the procedure of marking, drilling, re-marking and drilling for both ends of the panel. Repeat on the other side.

Now that all panels are framed, its time to insert the vinyl. Begin with the front panel. Lay the front panel frame on the working surface. Remove the bolts and nuts but keep the frame aligned. Lay one piece of vinyl in the frame. Make sure all sides are aligned to the frame. Carefully drill holes through the vinyl into the bolt holes that you drilled earlier. Attach the vinyl with the 4 nuts, bolts and washers.

Repeat step 10 for the side panels but only use 2 bolts to secure it to the closed side. There should be 4 holes in the vinyl but only two will be secured with bolts.

With the help of a friend, stand up the front panel and align a side panel with the vinyl attached with two bolts. Align the edges of the corners of the frames and follow the procedure to mark and drill a hole through the side panel frame. Do this for the top and bottom corners and secure with two nuts, bolts and washers as before. Repeat this step with the other side panel.

Now the barrier should be able to stand freely. The next step is to tape the vinyl to each section of the frame. Begin by cutting three 1.5" pieces of Gorilla Mounting Tape. These will be used for the vertical pillars. Remove the protective strip on the back of the tape. Pull the vinyl gently away from the pillar and stick the tape onto the pillar.

Once you have attached three evenly spaced strips to the pillar, you can pull the vinyl tight and secure it to the tape. Apply pressure at each strip to make sure it is secure. Repeat this process for each pillar and the bottom piece of the front panel.

To secure the vinyl to the thin pieces of the frame, cut four or five 0.5" pieces of Gorilla Mounting Tape. Follow the mounting procedure as described in step 14.

Inspect the final product and add any glue tape wherever it is required. Other than that, you should be all done!
Maintenance[edit | edit source]
Maintenance of the indoor barrier is fairly simple and includes wiping down the vinyl and frame with disinfectant after each use, replacing Gorilla Mounting Tape periodically, and cleaning the vinyl to preserve its transparency.
| Maintenance | Materials | Time | Cost ($) |
|---|---|---|---|
| Wipe down barrier | disinfectant and paper towels | 1 minute (daily) | .50 |
| Replace glue tape | Gorilla Mounting Tape | 5 minutes (monthly) | 1.00 |
| Clean vinyl | Windex or similar cleaner and paper towels | 2 minute (weekly) | 1.00 |
Troubleshooting[edit | edit source]
| Problem | Suggestion |
|---|---|
| wobbly frame | check for loose nuts |
| detached vinyl | replace glue tape |
Suggestions for future changes[edit | edit source]
- Replace vinyl with less expensive alternative
- add accessories to aid students in their learning