Sager Traction splint application is included in this California-based EMT program as it introduces an additional long bone fracture management skill with equipment found in many BLS ambulances. It is not required for skills verification for California Registration.[1]
The two main types of traction splints used in EMS programs around the country are the bipolar type (Hare) and the unipolar type (Sager) which is detailed here.
In a unipolar traction splint, a steel rod sits between a patient's legs and applies traction from the ankle with counter pressure directed onto the ischial tuberosity (resting where a bicycle seat would on the pelvis). Unipolar splints are more effective for proximal femur fracture than a bipolar splint, and a single splint can be used for a bilateral femur fracture. However, there is an increased risk of damage to the genitalia as the splint can move from the initial ischial tuberosity placement during transport, and it is not as comfortable for the patient.

Indications/Contraindications for Traction Splinting[edit | edit source]
A suspected or obvious isolated fracture of the midshaft femur is the primary indication for a traction splint. Traction splinting decreases pain, hemorrhage and the risk of converting a closed fracture into an open one during transport. Traction splinting for lower extremity fractures is seldom used unless the limb has neurovascular compromise, and care must be taken to not overstretch the limb.[2]
If there are soft tissue injuries of foot or ankle traction may not be effective, or may result in additional injury, because traction splints require attachment to the foot or ankle to be able to apply traction.
Absolute contraindications for traction splinting include:
- Fractures of ankle or foot and
- Partial amputation or avulsion with bone separation while only marginal tissue connects the distal limb.
- In the field, open femur fractures are contraindications to traction splint application
- Significant injuries to the knee
For simple (non-traction) splinting, the principles from the Upper Limb Splinting skill page may be applied to lower limb injuries that should not be subjected to traction.
Application of a Unipolar (Sager) splint[edit | edit source]
- Assess the scene using the PENMAN mnemonic. Don appropriate PPE and ensure the scene is safe before attempting a rescue.
- If the patient is conscious, explain the process to them.
- Apply manual stabilization. Have a second rescuer position themselves next to the patient and stabilize the limb near the fracture site
- Assess pulse, motor, sensory function in the lower extremities if not already performed as part of the full trauma exam.
- Control any bleeding and cover open wounds with a dry sterile dressing before splinting.
- Position the Sager between the patient's legs, resting the ischial perineal cushion (the saddle) against the ischial tuberosity, with the shortest end of the articulating base towards the ground and the traction handle pointing up. In the case of a unilateral fracture, the splint should be placed in the perineum on the side of the injury. In bilateral fractures, excluding pelvic trauma, the side with the greatest degree of injury should be the side of placement.
- Apply the ischial strap as high around the upper thigh of the fractured limb as you can. Push the ischial perineal cushion gently down while at the same time pulling the ischial strap laterally under the patient's thigh. This will seat the lower end of the cushion comfortably against the ischial tuberosity. Tighten the ischial strap lightly.
- Set the traction bar to the starting size. Lift the spring ratchet to extend the inner shaft until the crossbar rests approximately 1" beyond the patient's heels, then re-engage the ratchet (simply pulling the bar out to size can cause the patient unnecessary pain with each "click" of the ratchet).
- Loosen the tension strap on the the correct malleolar (ankle) harness for the side of the injury, and attach to the distal end of the tension bar. Ensure that the tension adjustment buckle for the ankle strap is facing laterally.
- Attach the patient's distal limb to the splint. Wrap the malleolar harness around just above the ankle, folding down the number of sizing cushions needed to allow the ankle strap to be secured snugly in place at the ankle above the medial and lateral malleoli. This should be tight enough to pull without slipping past the ankle, but not so tight that it impedes blood flow.
- Take up all the slack in the tension strap on the ankle harness to engage the ankle harness tightly against the crossbar.
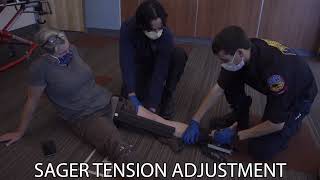
- Apply tension to the limb. Use your thumb to pull the ratchet up so that it does not "click" and send shock through the patient's injury during adjustment, and brace that hand to stabilize the black shaft and provide counter traction. With your other hand, grasp the red traction handle and gently extend the inner shaft until the desired amount of traction is recorded on the traction scale. It is suggested to use 10% of the patient's body weight per fractured femur up to 7kg (15 pounds) for each leg. If bilateral fractures are present – the maximum amount would be 14kg (30 pounds). Sager traction splint can display the actual traction applied on the gauge.
- Secure the patient's legs to the splint. At the hollow of the knees, gently slide the large elastic thigh strap through and gently work it upwards to the thigh, repeating with the smaller straps to the knee and ankle level, taking care to to minimize lower and mid-limb movement.
- Check the upper ischial strap at the upper thigh making sure it is not too tight, but snug and secure, then firmly secure the elastic bands. Take care to avoid excessive pressure on the knees.
- Secure the feet with a figure of 8 strap around both feet
- Place the strap under ankles
- Cross the straps and bring them between both feet
- Bring the crossed straps under soles of feet
- Bring straps over top of feet
- Secure the straps
- Recheck the CMS status of the patient's feet. Note the absence or presence of distal pulses. Patient is now ready for transport.
Documentation[edit | edit source]
Documentation of traction splinting should be included in the Patient Care Report (PCR) in the form:
- "Patient assessment reveals closed right femoral fracture. No other trauma or bleeding noted. Traction splinting explained to patient. Patient placed in Sager traction splint to relief of pain from 10/10 to 4/10. Distal CSM intact before and after procedure."
Self Assessment[edit | edit source]
- Practice with the Sager Traction Splint Skill Sheet
- Test your knowledge with this quiz
Tips and Tricks[edit | edit source]
- Femur fractures are intensely painful and are made more so by a negative feedback loop. In this loop, the fractured femur causes pain response from tissues by "stabbing" into them (muscles in the upper leg have natural elasticity that "pulls" the fractured parts of the femur towards and past each other). The body's natural response to this increase in pain is muscular contraction which worsens the "stabbing". Applying a traction splint is initially very painful but if done correctly will result in a significant relief of pain.
- If multiple rescuers are available, manual in line traction titrated to patient's pain relief may be provided by a single rescuer.
Additional Resources[edit | edit source]
TBD - extra videos to watch, links to other pages for more reading