The psychomotor skill is basically applying the principles and surgical knowledge/parameters onto a physical bone determined in the surgical planning of corresponding x-ray image. To undergo psychomotor training, the skills of x-ray based surgical planning should have already been acquired by the trainees from the Surgery Planning Sub-modules, as explained here. In the case-studies of the psychomotor sub-modules, the x-ray planning (in these cases a AP or LAT picture of the 3D bone model) of the cases are already been done by expert surgeon and trainee has to only apply the surgical knowledge/parameters of the planning onto the physical bone. The surgical knowledge/parameters basically involves, understanding the deformity and its extent, determining correct bone resection site, determining correct position and orientation of the fixator implant's pins and the final correction. Trainee can check the expert's surgery plan first and then perform the psychomotor training.
How to use the Psychomotor Training Sub-Module[edit | edit source]
Main page[edit | edit source]
The Psychomotor Training is given through two sub-modules - Guided and Non-Guided Psychomotor Training. The idea is that the trainee first undergo psychomotor training with a step-wise guidance (Guided Psychomotor Training sub-module) and then perform the psychomotor training without the guidance (Non-Guided Psychomotor Training sub-module), to assess her/his own skill. In the Guided Psychomotor Training case-studies, visual guidance will be given at each step of bone deformity correction and augmented guidance will be displayed on the camera view, on the computer screen running the OpenSurgiSim software. In the Non-guided Psychomotor Training, there will be no guidance at any step of the deformity correction. However, there will be performance measurement and the final assessment of the deformity correction in the last step for both Guided and Non-guided case-studies.
The trainees have to select the Guided Psychomotor or Non-Guided Psychomotor sub-module in the Opensurgisim main page to go to the Psychomotor Training Sub-Module. From the case-list in the main page, trainees can select from a variety of case-study categories to train on. It is advised that the trainees sequentially follow all the cases within each category (top to bottom).

To open the selected case, trainee can click the 'Expand' button (second from top-right, below 'Home' button). The trainee will find that there are number of steps designed by the trainer (expert surgeon) to physically correct the deformity in the case and to apply the external fixator implant on the 3D printed bone assembly. At each step that involves drilling or placement of pins into the bone or bone resection/cutting or assembling the fixator, a special AR-based guidance can be turned on to get the real-time feedback on the performance (eg: drilling position and angle). This guidance will be only available in the case-studies of the Guided Psychomotor sub-module. There will be the final step in both Guided and Non-Guided sub-modules where the final surgical performance will be assessed. This will be also based on the AR-based system (object-tracking).
The following are the steps to be followed by the Trainees in the psychomotor part of each selected case of the Psychomotor Training Sub-Module. At each step, the screen will display the instructions. Trainee can navigate between the steps by clicking on the right and left arrow buttons on the top right and top left corners on the screen.
Step 1 - Preparation of Workspace area (Assembly of Equipments)[edit | edit source]
In this step, trainees have to prepare the training workspace area and perform a few assemblies for the setup according to the detailed instructions.

Step 2 - Clinical Tools[edit | edit source]
In this step, trainees have to bring all the clinical tools and keep them ready for the surgical training. The clinical tools include Oscillating saw machine, power drill machine, drill bits, drill sleeves, rail frame of fixator, clamps of fixator, fixator pins and T-handle. How to get these tools.

Step 3 - Bone Assembly[edit | edit source]
In this step, trainees have to assemble the bone parts from the modular bone kit according to the selected bone case (from 1 to 10 case-studies). The screen will show the parts required to be assembled to form the particular case. The parts are given labels to identify them. Trainees can refer the 3D part assembly video and the part assembly table to understand this step in detail.

Step 4 - AR system calibration[edit | edit source]
In this step, the trainees have to calibrate the AR setup for acceptable lighting conditions, camera position and making sure that the object-tracking markers are detected well. Follow the detailed instructions.

Step 5 - Surgical Goal (Deformity Assessment and its planning)[edit | edit source]
This step will show the preoperative deformed bone, where to cut the bone according to the surgery plan and how it will look after the correction and fixation using the external rail-fixator. This screen is only to give visual idea to the trainee regarding the goal of the surgical case-study.

Step 6 - Fixator Proximal Pin-1 Fixation[edit | edit source]
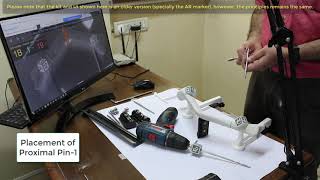
This step will train the trainee to use the drill sleeve for drilling an accurate hole using the power drill for the first pin on the Proximal part (pin-1). This is the most important step because the overall alignment of the proximal part of the bone with respect to the fixator (and hence wrt to the distal part of the bone) depends on the location and direction of this pin.
The instructions given as four panels to guide the trainee (figure below). The first two panels shows the right and wrong way of drilling onto the bone in terms of location and direction. Although the intended user of this module are Trainee or Junior orthopedic surgeons who very well know how to prevent over-drilling (plunging into soft tissue by mistake while drilling the bone), the third panel does show and alert for the same. Finally, the fourth panel shows how to insert the first pin through the created hole.

AR-based guidance - To get a real-time guidance during drilling the hole, the trainees can click on the button "switch on object tracking guidance" to open the AR based object tracking mode. The software screen will show camera view of the bone with ideal drilling location and direction in the form of black dotted lines overlaid as augmented guidance. The screen will also show the axis of drilling performed by the trainee.
For this, the trainees have to place the given independent marker on the drill sleeve while placing them on the bone for drilling. The top-left screen will also show a panel with the angular and positional error of the drill-sleeve positioned by the trainee. The objective is to place the drill-sleeve to minimise the angular and positional errors. When the angular and positional error in the panel turns green, it means that drill sleeve position and orientation with respect to the bone is within the acceptable range. Practising multiple times with the guidance through various case-studies will make the trainee skilled in this step.
Please note that, our expert trainer surgeons suggests that avoiding over-drilling of the bone is not an issue with Junior or Trainee orthopedic surgeons however we can easily add detection and auto-feedback of the same, using our object-tracking system (this part will be more clear once many trainee undergo training with the module)
Make sure that all the markers are visible to the camera during the AR-based guidance and view is not obstructed by hand of any object, specially when the trainee is observing the error values.
The following video shows the drilling and fixing the Proximal Pin-1 by a trainee on bone assembly of Case-1 and relative AR-based guidance given by OpenSurgiSim software (only in Guided- Sub-Module case-studies).
Step 7 - Fixator Proximal Pin-2 Fixation[edit | edit source]
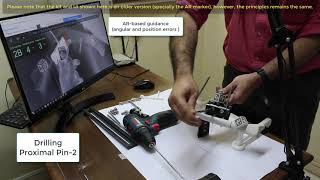
This step will train the trainee to use the drill sleeve through the fixator clamp for drilling an accurate hole using the power drill for the second parallel pin on the proximal part (pin-2). Here, the trainee places the clamp through the first pin through one of the hole as per the instructions (clamp has 5 holes) and then places the drill sleeve through another hole as per the instructions and then drill through the sleeve. This is also an important step because the overall alignment of the proximal part of the bone with respect to the fixator (and hence wrt to the distal part of the bone) depends on the location and direction of the fixator clamp and hence the location and direction of this second pin.
The instructions given are as four panels to guide the trainee, like the previous step (Step-6). The first two panels shows the right and wrong way of positioning the clamp in terms of location and direction. The next two panels shows the similar instructions as in the previous step.

AR-based guidance - This is same as in the previous step and helps the trainee to get guidance on her/his performance.
The following video shows the drilling and fixing the Proximal Pin-2 by a trainee on bone assembly of Case-1 and relative AR-based guidance given by OpenSurgiSim software (only in Guided- Sub-Module case-studies).
Step 8 - Fixator Distal Pin-1 Fixation[edit | edit source]
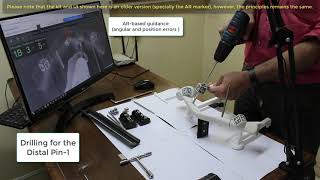
This step will train the trainee to use the drill sleeve for drilling an accurate hole using the power drill for the first pin on the Distal part (pin-3). This is also an important step because the overall alignment of the distal part of the bone with respect to the fixator (and hence wrt the proximal part of the bone) depends on the location and direction of this pin. The instructions given as four panels to guide the trainee just like in the Step-6.

AR-based guidance - This is same as in the previous step and helps the trainee to get guidance on her/his performance.
The following video shows the drilling and fixing the Distal Pin-1 by a trainee on bone assembly of Case-1 and relative AR-based guidance given by OpenSurgiSim software (only in Guided- Sub-Module case-studies).
Step 9 - Fixator Distal Pin-2 Fixation[edit | edit source]
This step will train the trainee to use the drill sleeve through the fixator clamp for drilling an accurate hole using the power drill for the second parallel pin on the distal part (pin-4). This step and its related instructions are the same as in the Step-7.

AR-based guidance - This is same as in the previous step and helps the trainee to get guidance on her/his performance.
The following video shows the drilling and fixing the Distal Pin-2 by a trainee on bone assembly of Case-1 and relative AR-based guidance given by OpenSurgiSim software (only in Guided- Sub-Module case-studies).

Step 10 - Resection of bone[edit | edit source]
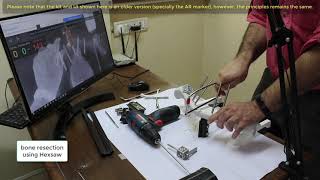
This step will train the trainee to make accurate bone resection so that the distal and proximal parts of the bone can be separated for deformity correction. The importance of this step is that the accurate bone cut can result in a good union of the bones while healing. Improper resection can lead to a gap between the proximal and distal parts and healing (gradual joining of the two bones may fail). The cut has to be along the bisector of the distal and proximal axes of the bones (depending on case) as learned during the planning case-studies. To make the cut, the trainee will first draw the bisector, drill 2-3 holes along the bisector through the drill sleeves accurately positioned on the bisector and finally make the bone resection through the holes. Here, the most important step is to determine the bisector and accurately position the drill sleeve for making accurate holes in right position and orientation. The three panels on the screen guides/instructs the trainee to do the same.

AR-based guidance - To get a real-time guidance during drilling the hole, the trainees can again click on the button "switch on object tracking guidance" to open the AR based object tracking mode. The software screen will show camera view of the bone with proximal and distal bone axes, ideal location and direction of the bisector in the form of blue solid line overlaid as augmented guidance. The screen will also show the axis of drilling performed by the trainees. For this, the trainees have to place the given independent marker on the drill sleeve while placing them on the bone for drilling. The top-left screen will also show a panel with the angular and positional error (hence the cutting error) of the drill-sleeve positioned by the trainee on the augmented bisector line. The objective is to place the drill-sleeve to minimise the errors. When the angular and positional error in the panel turns green, it means that drill sleeve position and orientation with respect to the bisector is within the acceptable range. Practising multiple times with the guidance through various case-studies will make the trainee skilled in this step. Make sure that all the markers are visible to the camera during the AR-based guidance and view is not obstructed by hand of any object, specially when the trainee is observing the error values.
The following video shows the resection of bone assembly of Case-1 by a trainee and relative AR-based guidance given by OpenSurgiSim software (only in Guided- Sub-Module case-studies).
Step 11 - Assembly of Rail Fixator[edit | edit source]
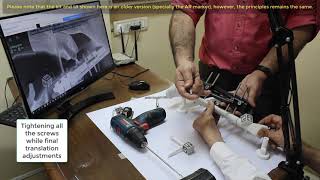
This step will train the trainee to insert and lock the two clamps (proximal and distal) through corresponding pair of the fixator pins attached to the proximal and distal parts of the resected bone at proper level and then insert the rail of the fixator through the clamps and create the final fixator-bone assembly. The trainees have to tighten the screws of the clamps to the rail to complete the external rail fixator-bone assembly with the corrected bone. This step is also important because inserting and locking the clamp at wrong level along the pins can create translation error between the distal and proximal part of the bone.

AR-based guidance - To get a real-time guidance during the final alignment of the fixator-bone assembly, the trainees can again click on the button "switch on object tracking guidance" to open the AR based object tracking mode. The software screen will show camera view of the bone with proximal and distal bone axes, overlaid as augmented guidance. The top-left screen will show a panel with the correction error which is in the form of angulation, translation and rotation between the proximal and the distal part. The objective is to adjust the fixator-bone assembly to minimise the translation errors. At this step the trainee (or even in a real surgery) can not make changes to the angulation or rotational errors, unless they re-perform the pins position and orientation on one part of the bone (distal or proximal). The idea is to get all these errors less in the first attempt itself. When the errors in the panel turns green, it means that correction errors are in the acceptable range. Practising multiple times with the guidance through various case-studies will make the trainee skilled in this step. Make sure that all the markers are visible to the camera during the AR-based guidance and view is not obstructed by hand of any object, specially when the trainee is observing the error values.
The following video shows the Fixator clamp insertion, Fixator Rail insertion and Final Alignment of fixator-bone assembly by a trainee on bone assembly of Case-1 and relative AR-based guidance given by OpenSurgiSim software (only in Guided- Sub-Module case-studies).
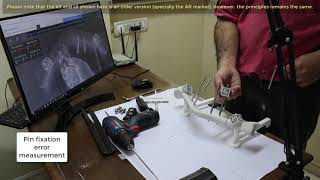
Step 12 - Final performance measure[edit | edit source]
This step will finally evaluate the trainee performance. This step is based on AR-based guidance/object-tracking and common for both the Guided and the Non-Guided Sub-Modules of the Psychomotor Training. Once the trainee comes to this step, the camera view with AR guidance will automatically display on the screen.
Trainee will First place the independent marker on each pin one-by-one and the software will automatically record the positional and direction error in the placement of the pin (hence the drilling).
Trainee will then place the independent marker along the 'cut-error measurement tool' (just like placed over the pin or the drill sleeve) and then place the flat circular part on the bone resection plane. The software will then automatically detect the errors in the position and direction of the bone resection.
The final deformity correction error in terms of Angulation, Rotation and Translation will be measured automatically by the software.
Make sure that all the markers are visible to the camera during the AR-based guidance and view is not obstructed by hand of any object, specially when the error values being recorded.
Click on the button 'Save Assessment' on the top to finally storing and locking the error values in the system. Trainee can click on 'Re-record Assessment' button to record the errors once again if required.
Self-Assessment and Scores[edit | edit source]
After going through each step of the Psychomotor case-studies, finally the following errors will be measured (using AR-based object tracking as described in previous section) and a single Case-Score will be generated based on the errors. The summary of the errors will be displayed in a performance chart as described in the next section.
- Positional error of each pin
- Direction error of each pin
- Position error in the bone resection/cut
- Direction error in the bone resection/cut
- Angulation error in deformity
- Translation error in deformity
- Rotation error in deformity
Case performance chart[edit | edit source]
A summary performance chart can be accessed at the end of the each case-study after the final automatic performance measurement, described in the previous section. The chart will showcase trainee's performance scores in pin-placement, bone resection/cutting and deformity correction (Angular, Rotational and Translational), calculated from the corresponding errors. An overall Case-Score is generated by averaging the scores of all performance scores.

Assessment pathway[edit | edit source]

Case Score and Case Completion level[edit | edit source]
For each case-study, trainees will be assigned scores based on the errors measured by the software as mentioned in the previous section. This score is known as Case Score. A Case Completion level (in terms of percentage) will be assigned depending on number of guided steps which Trainees have finished within that particular case.
Category Score and Category Completion level[edit | edit source]
A case-study category consists of a number of cases. A Category Score is an average score based on the average of all Case Scores of the cases within that selected category. Similarly, a Category Completion level (in terms of percentage) is an average of all the Case Completion level within that selected category.
Module Score and Module Completion level[edit | edit source]
A module consists of a number of case-study Categories. A Module Score is an average score based on the average of all Category Scores of the categories within that selected Module. Similarly, a Module Completion level (in terms of percentage) is an average of all the Category Completion level within that selected module.
How this measured performance of the learned skill will translate into its clinical performance[edit | edit source]
Although, unlike in the Surgery-Planning Sub-Modules which trains on real-patient X-ray images the Psychomotor-Training Sub-Module trains on 3D printed physical bones, the measured performance of the skills learned here (accuracy in drilling location/angle, accurate bone resection, accurate external-fixator implant fixation and achieving bone correction) will also directly translate into clinical performance for the following reasons:
- The requirement for psychomotor training is mainly the positional aspects and the geometry. Surgeon need to learn positional skills like accurate location/orientation of drilling or cutting the bone, accurate fixation of implant pins onto the bone, accurate achieved bone correction etc. The 3D printed bones match exactly in shape and size as they are acquired from 3D models of real-patient bones.
- The structure of the 3D printed bones is close enough to the real bone (hollow inside and with two cortex walls). However, the intended users of the module (Junior or trainee orthopaedic surgeons) are already familiar with the operations on the bone material and hence matching the material of the training bone models with that of the real bone do not add any significant value in the training.
- The surgeon's view and pose aspects during the training is same as in the surgery. For example, the positioning and view of the 3D printed bones (AP view from top) wrt the surgeon is exactly like in real surgical settings.
- The web-cam based view for the guidance on the computer screen matches exactly the C-arm view on the screen which is used during the real surgery (greyscale view of bone from the top/AP). For guidance, we added augmented-reality based guidance on the same view for the guided part of the training.
- Although the complete bone is visible unlike in the surgery, the surgical procedures (drilling, pin fixations, cutting) performed in the training are on the same locations on the bone that are exposed during a real surgery. Also, the C-arm view during the surgery does show the complete bone as done in the web-cam view of the training.
- The external-fixator implant and all the clinical equipment used in the training and their application in the training are exactly the same as in the real surgery.
- There are 10 unique deformity cases covering all kinds of basic bone deformities. Trainee will go through 10 guided case-studies and two repetitions of 10 (hence 10x2) non-guided case-studies. Practicing multiple times on all kinds of case studies will make surgeon confidence and competent enough to start on a real-surgery.
Please note that the psychomotor training covers all the aspects of the surgery that includes bone. The soft tissue procedures are already learned by the Juinior and Trainee orthopedic surgeons for whom this training module is developed.