
Las Malvinas botica popular ecoladrillo 2013

| Type | Ecoladrillo |
|---|---|
| Authors | Mabel Alegría cesar diaz Hammerly Acevedo Justine Cook Adrienne Ibsen |
| Location | Las Malvinas, Santo Domingo, Dominican Republic |
| Status | Deployed |
| Years | 2013 |
| Made | Yes |
| Replicated | No |
| Cost | USD 2640 |
The objective for this project is to build a small local pharmacy (Botica Popular) for the people of Las Malvinas, which will provide basic medical supplies and medications to the community at a much lower cost.
The objective for this project is to build a small local pharmacy (Botica Popular) for the people of Las Malvinas, which will provide basic medical supplies and medications to the community at a much lower cost. The pharmacy will be built over a cistern. The goal is to design and construct a sound structure that utilizes local and readily available materials and implements the use of plastic waste. The end product must be cost efficient and must satisfy the communities wants and needs.
Background
[edit | edit source]The site location of the project is in the heart of a community called Las Malvinas. Las Malvinas is located in Santo Domingo Norte, across from Rio Isabela, and is home to more than 150 families. A number of community leaders gathered at a meeting with members from ColectivoRevark and Practivistas Dominicana on June 2, 2013 to discuss the needs of the community. It was settled that the top priority of the community was to build a structure for a local pharmacy. The goal of this construction project was to construct a building that contains less embedded energy than a traditional concrete structure, and utilized local and affordable materials. The project was divided into two alternative construction student groups. Three walls of the pharmacy will be built using concrete blocks built with alternative materials. The interior wall separating the storage room and service room will be built using an ecoladrillo technique. The exterior walls were reserved for block construction to avoid the issue of compromising security concerns of building with plastic bottles. The ecoladrillo team consists of Mabel, Cesar, and Hammerly (UNIBE students) and Brandon, Adrienne, and Justine (Cal Poly Humboldt students). With the help of numerous community members, a number of prototypes were tested to find a satisfactory ecoladrillo model for the wall. Our goal is to finish the pharmacy by July 6th, 2013.
-
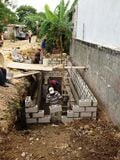 Fig 1: Las Malvinas Cistern under construction
 -
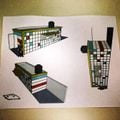 Fig 2: Initial Botica Popular model created by ColectivoRevark

Literature Review
[edit | edit source]See Las Malvinas Botica Popular Ecoladrillo 2013/Literature Review for relevant research completed for this project.
Criteria
[edit | edit source]| Criteria | Constraints | Weight (0-10) |
|---|---|---|
| Safety | Building components and methods are safe for employees and customers | 10 |
| Security | The wall could withstand basic burglary attempts | 9 |
| Affordability | The building is within program budget | 8 |
| Materials | Appropriate and locally sourced materials, easily obtained by community | 8 |
| Longevity | The structure is built with the future in mind; something that will last | 8 |
| Replicability | The building is built using methods that can be replicated by community members | 7 |
| Climate/Environmental | The structure is weather resistant and environmentally appropriate | 7 |
| Educational | The methods and the structure act as an educational piece | 6 |
| Aesthetics | No visual impacts according to community preference | 5 |
Timeline
[edit | edit source]Here is a detailed timeline with photos of the project development.
| Date | Activity | Photos | Members | |
|---|---|---|---|---|
| June 5th | Meeting with the community of Las Malvinas |  |
Everyone | |
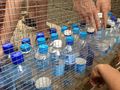
| June 6th | Begin collecting plastic bottles in la Zona Colonial |  |
Adrienne, Brandon, Cesar, Justine, Mabel | |
| June 10th | Make signs to collect plastic bottles and raise awareness of community project on UNIBE campus |  |
Brandon,Mabel | |
| June 15th | Develop prototypes. Using a wooded frame (2' x 4') and chicken wire, the group experimented with a mortar and plastic bottle wall. In addition, a similar technique was used to develop a block type prototype. On this day more progress was made on the cistern as well. Also, many valuable community concerns were presented. Most notably from Gregory and Julio who expressed their concerns with security, stating that a ecoladrillo on a pharmacy that carries valuable medicine would need to be able to withstand burglary. At the end of the day, Domingo, a valuable asset in previous projects was contacted and it was agreed that we would meet the following morning to further discuss ecoladrillo. |  |
Adrienne, Brandon, Justine, Mabel | |
| June 16th | Meet with Domingo to get input on how to make an ecoladrillo wall more durable yet not have a ton of weight embedded into it. Durability for security, and lightness to avoid major injuries if there was any collapsing of the wall (as earthquake hazard is a component to take very seriously in Hispaniola).
To add, Julio helped make an ecoladrillo 'brick'. Julio did this by putting four cinder blocks together as barriers and staggering 18 water bottles filled with caliche (right side up and up side down) in between the four cinder blocks. To fill the voids between the water bottles, he put in a mix of cement, sand and earth. The brick came out beautifully, but was very heavy, therefor not ideal for our situation. |
  |
Adrienne, Brandon, Cesar, Justine, Mabel | |
| June 18th | Build cistern. |  |
Adrienne, Brandon, Cesar, Justine, Mabel | |
| June 19th | Start and finish a new (and final) prototype. Using the same mixture of cement and sand between the plastic water bottles, we made essentially the same prototype as made before with planks of wood and chicken wire. The only difference was that we sifted out caliche and filled the water bottles with caliche to increase the R-Value of the prototype.
Also, a trench was dug out for where the foundation of the storage room of the botica popular will stand. |
  |
Adrienne,Brandon,Cesar,Justine,Mabel | |
| June 20th | Build foundation for botica storage room by collecting large rocks to put in the bottom of the trench. Then create large 'vigas' out of four long rebar pieces tied together by multiple shorter rebar pieces that are perpendicular. These rebar 'vigas' were layed over the large rocks, and attached were more vertical rebar columns. After this, a mix of sand, gravel and cement was made and the trench was then filled with this mix. |   |
Adrienne, Brandon, Justine | |
| June 21st | Test plasters for our prototypes to cover the outside of the chicken wire. Justine came up with an idea to put paper between the plastic bottles and chicken wire so that the plaster has something to adhere to besides metal and plastic. |  |
Adrienne, Brandon, Justine | |
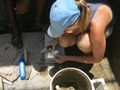
| June 22nd | Test plasters. Working with mixes of sand, sawdust, caliche, and cement. |  |
Justine | |
| June 23rd | Work on the seal for the cistern |  |
Adrienne, Brandon, Justine | |
| June 24th | Collect bottles | Adrienne, Brandon, Justine | ||
| June 25th | Collect bottles. The first round of fibercrete blocks have been produced and are dry and ready to lay down. | Adrienne, Brandon, Justine | ||
| June 26th | About six layers of fibercrete bricks have been laid down on top of the foundation for the storage room of the botica popular. |   |
Adrienne, Brandon, Justine | |
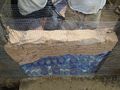
| June 30th | The cistern has been sealed on the inside. In order for the cap to be added, a wood frame needed to be constructed as a mold to pour the concrete mix onto. |   |
Adrienne, Brandon, Justine | |
| July 2nd | The cap on the cistern is set and dry. The ecoladrillo wall is the dividing internal wall between the selling and storage rooms. The selling room is standing on top of the cistern and the storage room farther North of the cistern standing on the foundation that was made. The ecoladrillo wall's foundation is the cap to the cistern, thus today is the first day we can start constructing the ecoladrillo wall. Today we transported out (to Las Malvinas) multiple bags of bleached plastic water bottles from la Zona Colonial where they were in storage. |  |
Adrienne, Brandon, JustineCesar | |
| July 3rd | Today we layed fibercrete bricks into two separate columns to support the ecoladrillo wall. The idea is to attach the chicken wire using concrete nails to the two surrounding columns that were created today. As they take a day to dry, we wanted to get the 'skeleton' or supporting structure done as fast as possible. |  |
Adrienne, Brandon, Justine | |
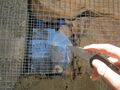
| July 4th | The two supporting columns are dry and stable, thus we can start hammering chicken wire into the bricks. By the end of today we completed one section of ecoladrillo. In all of our prototypes, we had practiced with horizontal bottles (caps and bottoms each touching the chicken wire). We ran into a bit of a snag when we realized the floor on the storage side of the Botica Popular would not be installed for some time. As we only had support from the cistern cap (doubling as the floor in the selling room), we decided to have the bottles vertical so there was not any excess hanging over an area where there is not yet flooring. We also ended up nailing the chicken wire into the mortar in between the fibercrete bricks instead of the bricks themselves. The mortar has more cement in it and would provide more strength and durability for attaching the chicken wire. |  |
Adrienne, Brandon, Justine | |
| July 5th | The start of the second 'section' of ecoladrillo. Also, Holly is showing off her awesome juggling skills as well as the progress the team she is on has made! Holly is on the Fibercrete team and they have very few bricks to add to the Botica Popular to finish their project. |   |
Adrienne, Brandon, Justine | |
| July 6th | Today Justine (and other Practivistas) worked on finishing of the finished internal part of the ecoladrillo wall. This is a picture of the waterbottle portion nearly finished, the final step is plastering both sides and including a Truth Window. |  |
Justine | |
| July 7th | Justine started and finished plastering both sides of the ecoladrillo wall. She even included a small 'Truth Window' which allows one to view the internal part of the wall to see what materials it is composed of. |  |
Justine |
Budget
[edit | edit source]This is the budget for the recreation of the ecoladrillo wall.
| Material | Quantity | Unit Price (RD$) | Total (RD$) |
|---|---|---|---|
| Chicken Wire | 8 square meters | 110.00/yard | 880.00 |
| Rebar | 6.5 meters | 950.00 for 0.5 quintal | 950.00 |
| Cement | 3 bags | 270.00 | 810.00 |
| Plastic bottles | 1,000 | Obtained from waste stream | 0.00 |
| Paper | 8 square meters | Re-purposed cement bags | 0.00 |
| Caliche | TBD | Donated for the community | 0.00 |
| Total Cost | $2,640.00 | ||
Final Design
[edit | edit source]Video
[edit | edit source]
Botica Popular
[edit | edit source]-
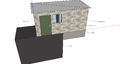
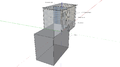
 A 3D model made in Google SketchUp representing the area in which the Botica Popular was built; including the cistern which it stands on and the foundation that was created to support the storage half of the botica.
 -
 This is an altered front view of the Botica Popular. The selling window is open to visualize the wall that was built by the Ecoladrillo team.
 -
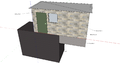
 An 'X-Ray' view of the building
 -
 A final 'X-Ray' view of the Botica Popular. There is an internal water bottle patterned wall showing the wall that was constructed by the Ecoladrillo team.


Ecoladrillo
[edit | edit source]In all of the wood framed prototypes, the plastic water bottles were placed horizontally (caps and ends touching the chicken wire). There are a few reasons our team decided doing this on our prototypes, and had this idea favored for the wall we would be building on the Botica Popular. We were interested in this horizontal method for the sake of experimenting with something a little different than the 2012 Ecoladrillo team. Also, laying the bottles horizontally would lessen the voided area between each bottle. This would require a higher quantity of bottles to fill the same area wall, thus taking more plastic bottles out of the waste stream.
Installation complications ensued when we realized a floor on the storage side of the Botica would not be installed until after the students were to depart from the República Dominicana. This stopped us from executing our horizontal bottle plan, as our idea was to have a little bulge on either side of the wall, which would eventually be evened out with a thick plaster. Without the support of the floor it was decided that a horizontal orientation for the bottles would not be ideal.
Changing our initial plan, the bottles were placed vertically. This eliminated the tedious work of having to taper the chicken wire around the fibercrete blocks, and also made it so the wall was completely flush. This would lead us to use less plaster, therefore less cement, as we would not have to add a few inches of plaster 'wall' to make it flush.
-
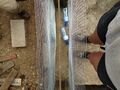 Start to Ecoladrillo: Two chicken wire 'walls', and horizontal rebar for support
 -
 Nailed the chicken wire to the mortar between the fibercrete bricks
 -
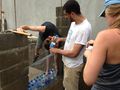 Brandon, Luis and Justine filling in the bottom layer of water bottles
 -
 Tying the two pieces of chicken wire together with wire ties to prevent fluctuation or expansion in wall width
 -
 Using old cement bags to put between the plastic bottles and chicken wire so the plaster will have something to adhere to
 -
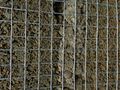
 First section of ecoladrillo complete!
 -
 Finishing the top section of the ecoladrillo wall
 -
 Ecoladrillo water bottle portion complete, and beginning of plastering


Plaster
[edit | edit source]The plaster used was a traditional mix of sand, cement, and water. The first plaster layer used a ratio of approximately 18 shovels-full of sand and 1/3 of a bag of cement. Water was added slowly and mixed thoroughly until the consistency was thin enough to pass though the chicken-wire, but thick enough to hold its form inside the wall in the space between the bottles. The second layer of plaster needed to be just thin enough not to slide off the wall when applied. Each layer thereafter used a slightly lower ratio of sand per batch.
-
 Justine starting at the very bottom of the ecoladrillo wall on the storage room side.
 -
 Justine plastering the 'selling room' side of the Botica Popular.
 -
 Creating the truth window
 -
 Placing the truth window
 -
 Truth window plastered in
 -
 Putting the rebar over the finalized and plastered ecoladrillo wall


| Authors | |
|---|---|
| License | CC-BY-SA-3.0 |
| Organizations | Cal Poly Humboldt, Practivistas Dominicana Program |
| Cite as | Aibsen40, Bmr81, Jmc1238, Cep42 (2013–2026). "Las Malvinas botica popular ecoladrillo 2013". Appropedia. Retrieved July 28, 2026. |