Intravenous (IV) Setup and monitoring is included in this California-based EMT program as it is commonly required skill in the field for EMTs supporting paramedics. It is not required for National NREMT registration or skills verification for California Registration. In California, the State EMSA allows EMT's to transport patient with an established IV as long as there isn't any medication in the IV bag. If patient has an IV that is administering a medication a nurse must accompany the patient as EMT's cannot transport a patient with medication in the IV fluid or as part of a piggyback system, (a second IV flowing into the primary IV bag). Follow your state and county protocols governing scope of practice.
Purpose[edit | edit source]
IV therapy is the infusion of fluid directly into the venous circulation of a patient, usually via a cannula. In the prehospital setting the paramedic or nurse on scene will determine when intravenous fluids are required and may place intravenous (IV) cannulas. There are various indications for the administration of fluid in the prehospital setting such as replacement of electrolytes or restoration of blood volume secondary to hemorrhage or dehydration.
Setting up[edit | edit source]
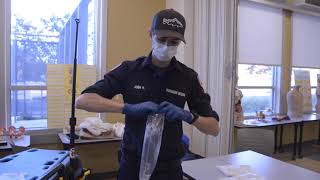
As an EMT you may be called upon to prepare an IV bag for a paramedic. This consists of attaching the IV tubing to the bag (spiking), and flushing the tubing to prime it. IV tubing must be primed with IV solution to remove air from the tubing to prevent air from entering the circulatory system. An air embolism is a potential complication of IV therapy and can enter a patient’s blood system through cut tubing, unprimed IV tubing, access ports, and drip chambers with too little fluid.
- Introduce yourself to the patient as part of the team. The paramedic will explain the procedure of placing the IV cannula to the patient and gain their consent.
- Check the "Five Rights" of delivering medications
- Right Patient: The paramedic or nurse on scene will provide medical direction on the need for IV fluids for a given patient
- Right Drug: Many IV bags look identical, ensure that you have chosen the specified bag: 0.9% Normal Saline (NS, 0.9NaCl, or NSS) is one of the most common IV fluids for volume replacement in hemorrhage, vomiting, diarrhea, hemorrhage, drainage from GI suction, metabolic acidosis, or shock. Lactated Ringers (LR) which is the most similar to blood plasma is often used in extensive burns and trauma patients suffering from acute blood loss. Dextrose 5% (D5 or D5W) and "half normal saline" (0.45NS) may also be called for.
- Right Dosage: Choose the the appropriate drip set. In the prehospital there are two drip sets used, 60 drops (micro drip) for drug administration and 10 drops (macro drip) for fluid support. If not specified, macro drip is assumed.
- Right Route: Intra Venous Administration (IV)
- Right Date: Ensure the IV fluids are not expired.
- Remove the outer packing of the bag and hang it up on a drip stand or other device that will be higher than the patient. (Do not do this until you have verified the fluid type. Once the original bag that the IV bag is sealed in has been broached, it cannot be stored. It must be used immediately.) Not all IV bags have this outer packaging. Be familiar with the brand your organization uses.
- Inspect the bag for any cloudiness or particulate matter present in the fluid and inspect the injection port and the spike port. Do not use the bag if impurities are present or there is damage to the ports.
Spiking:
- Perform hand hygiene and don appropriate PPE.
- Gather supplies. You will need sterile IV solution, primary IV tubing, time label, change label, and alcohol swab.
- Verify the IV solution to be used is: a) The proper solution b) Clean, without particulate matter c) Not outdated d) Not leaking e) Warmed or cooled as indicated
- Select the proper administration set: Primary IV tubing can be macro-drip or micro-drip tubing. a) Macro drip chamber for trauma b) Micro drip chamber for medical conditions and drug administration
- Prepare the IV bag and administration set using an aseptic technique to prevent contamination.
- Remove IV bag from its protective envelope and gently squeeze to detect any punctures or leakage.
- Steady the port of the IV bag with one hand, and remove the protective cap by pulling smoothly to the right to keep it sterile.
- Remove the IV tubing from its protective wrapping or box
- Move the roller clamp about 3 cm below the drip chamber and close the clamp.
- Remove the protective cover on the IV solution port and keep sterile. Remove the protective cover on the IV tubing spike. Be careful and do not contaminate the spike.
- Invert the IV bag.
- Without contaminating the solution port, carefully insert the IV tubing spike into the port, gently pushing and twisting.
- Hang bag on IV pole. The IV bag should be approximately one meter above the IV insertion site.
Flushing:
- Invert all access ports and backcheck valve to prevent air bubbles remaining in the line during flush.
- Fill the drip chamber one-third to one-half full by gently squeezing the chamber. Remove protective cover on the end of the tubing and keep sterile. Filling the drip chamber prevents air from entering the IV tubing.
- With distal end of tubing over a basin or sink, slowly open roller clamp to prime the IV tubing. Invert backcheck valve and ports as the fluid passes through the tubing. Tap gently to remove air and to fill with fluid. Inverting and tapping the access ports and backcheck valve helps displace and remove air when priming the IV tubing.
- Once IV tubing is primed, check the entire length of tubing to ensure no air bubbles are present. This step confirms that air is out of the IV tubing.
- Close roller clamp. Cover end with sterile dead-ender or sterile protective cover. Hang tubing on IV pole to prevent from touching the ground. Keep the distal end sterile prior to connecting IV to patient.
- Label tubing and IV bag with date, time, and initials.
- Perform hand hygiene.
- Open the drip set and slide the wheel or thumb rest of the slide clamp down to the thinnest part of the slide clamp cassette to close the line off.
- Remove the cover from the spike port on the bag by twisting and breaking it off. Uncap the spike on the drip chamber and insert the spike into the port, without touching the end. The EMT must assure that the process of setting up the IV administration set is a sterile process. Be cautious that you do not stick the spike into the side of bag.
- Fill the drip chamber half way by squeezing it. If you over-fill the chamber to where you cannot see the drip in the chamber, invert the bag and drip chamber. Squeeze the drip chamber, allowing the fluid to return to the bag.
- Slide the wheel of the slide clamp back towards the larger end of the wheel cassette to allow the fluid to run through the administration set to the end of the IV line. Leave the end cap in place, only loosening it slightly if required to allow fluid to flow during flushing. Turn the flow of fluid off by sliding the wheel down to the thinnest part of the wheel cassette to clamp off the tubing.
- Ensure NO bubbles are in the line, if there are bubbles present, tap the side of the tubing to float the bubbles up to the drip chamber.
- Present the set up bag to the paramedic. Do not attach to the IV line yourself.
- Note in the patient record the type of fluid, the location and bore size of the IV cannula, the time started and the rate.
Depending on the EMS system, you may be required to attach an extension tubing to the end of the administration set. Extension sets come in a variety of lengths and have additional injection ports on them. Once an IV has been established it provides easy access to change out the original IV bag and administration set to something else without disturbing the IV injection site. Add an extension by:
- Open a sterile extension set and note the male and female capped ends
- Uncap the female Luer end, remove the protective cap from the end of the drip set line (a male Luer connector), and fasten together without allowing any contamination.
- Flush the extension similarly to the drip set.
Setting the drip rate[edit | edit source]
The drip rate refers to the number of drops of fluid that enter the drip chamber each minute. The drip rate is set manually using the slide clamp, and determines the speed at which the fluid is infused into the patient. In California, it is not within scope of practice for EMTs to prescribe the drip rate, but they may adjust the slide clamp to maintain the specified drip rate. To determine and adjust the drip rate:
- Count the number of drips in a 15 second period, multiply by 4, that is your current drip rate (drips per minute)
- Adjust the slide clamp either tighter (to slow the drips) or looser (to increase the rate), re-count and adjust until the prescribed drip rate is achieved.
Complications to Observe and Possible correction to take[edit | edit source]
If, without an adjustment of the slide clamp, the drip in the chamber stops running, or starts running slower than it should:
- Check to see if the patients extremity is causing the issue. Straighten out their wrist, or in the case of an IV being inserted in the antecubital fossa (the crease of the inside area of the elbow) have the patient straighten their arm out.
- There is the potential a small clot may have formed at the end of the IV catheter inside the patient. DO Not make any attempt to dislodge the clot by opening up the IV drip to full and/or squeeze the bag to force the fluid to force off the clot.
- Check the height of the IV bag. In general, the lower the IV bag is with respect to the patient, the slower the IV will drip, and the higher the IV bag, the faster the IV will drip. Changes in height of the bag as you move the patient from a board to a gurney or into an ambulance and back out will cause your IV drip rate to change and require adjustment.
If it appears that fluid is building up in the tissue around the IV insertion site.
- Turn off the IV with the slide clamp.
If the above techniques to not work, the EMT should turn off the IV to prevent further problems. Once you arrive at receiving facility, notify the medical staff immediately that IV has been turned off.
Documentation[edit | edit source]
Documentation of an IV setup should be included in the Patient Care Report (PCR) in the form:
- IV setup does not need to be documented by the EMT. If fluids are running at a prescribed rate, that rate and amount of fluid administered may be documented on a PCR. If an IV is indicated in the prehospital environment, the paramedic or nurse should retain care of the patient.
Self Assessment[edit | edit source]
Tips and Tricks[edit | edit source]
- "Drip" is abbreviated by "gtt". IV drip tubing is measured in drops/milliliter. A drip set rated at 10 gtts/mL will provide larger "drops" than one rated at 60 gtts/mL because the 10 drop set only needs 10 "drops" to make 1 mL whereas the 60 drop set needs 60 "drops".
- There are several different drip chambers available. Most common in EMS are macro drip sets (10, 12, or 15 gtts/mL) or micro drip sets (60 gtts/mL). Be sure you are attaching the correct tubing to the IV bag.
Additional Resources[edit | edit source]
TBD - extra videos to watch, links to other pages for more reading
References[edit | edit source]
TBD - Footnotes, references, standards