
This page outlines the following: the organizational trays that were made for the tool carts using the vacuum former, a 3D printed V-8 engine with a handheld crank that illustrates the motions of a V-8 engine, a plaque made with the 4*4 Forest Scientific CNC router that highlights its ability to make precision cuts and designs, a container for the rock tumbler showcasing the process of the rock tumbling stages, and an articulating figure made by the Stratasys 3D printer which highlights the details and complexity of its ability.
Background[edit | edit source]
Fall 2023 was the first ever semester at Cal Poly Humboldt in which the engineering department had access to its very own Makerspace. A makerspace is a space where people of all walks of life safely work together and have access to a variety of tools and machines. The 2023 fall semester Engineering 205 Introduction to design class, taught by Lonny Grafman, was given the assignment of creating additions to this space that will serve to improve, inspire, and illustrate what the Cal Poly Engineering department's makerspace has the potential to bring into existence.
Problem statement[edit | edit source]
The objective of this project is to create items that will live and breathe in the makerspace, and provide inspiration, personality and examples for future students to have visual representations of what using the Makerspace has to offer. In the end, 5 different projects were created for the makerspace. Some of the different tools that we used were the: vacuum former, rock tumbler, soldering iron station, Prusa i3MK3+, Stratasys F370, Forest Scientific 4*4 CNC router, Dremel, table saw, miter saw, and more.
Criteria[edit | edit source]
Below is the criteria list made in collaboration with the client to take into consideration of each project made. This helped to create the best possible design for each machine used in the Makerspace. The list also includes constraints with weights ranging from (1-10 highest).
| Criteria | Description | Weight (1-10) |
|---|---|---|
| Safety | Each example will follow the safety protocol of the Makerspace | 10 |
| Capability | Each example shown should give a clear understanding of what a specific machine can do | 9 |
| Symbolic | Each example should represent the essence of engineering, upcycling, and sustainability | 8 |
| Durability | Each example should be able to last at least one year | 5 |
| Portability | Each example should be able to fit in two hands or be held with two hands | 3 |
| Cost | Each member of the group is allowed to spend no more than $75 on this project with $100 from the client | 1 |
Prototyping[edit | edit source]
Rock Tumbler[edit | edit source]
- Images of the Vacuum Formed Prototype(s)
-
Grit Demonstration Prototype
-
Rock Tumbler Quiet Box Prototype 2


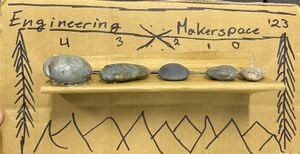
The images above are the first and second prototypes for the rock tumbler stellar example and exciting example project, created for the Fall 2023 semester. The goal of this display was to illustrate what the process of tumbling rocks with the makerspace rock tumbler would look like. At the top are the name of the makerspace and its department. The plaque was also to be designed using the forest surrounding the school for inspiration. Then, in the center, are the rocks in each of the four stages on display for users to see and touch what examples of what the stages can and do look like from before the tumbling process to the finished, polished rock.
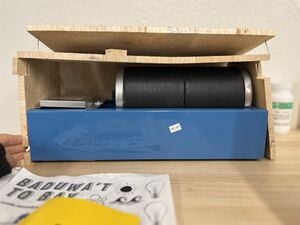
The next version of the rock tumbler display was more a of a box, as seen in the second photo to the left. This iteration of the rock tumbler display was more focused on keeping the noise level that was being emitted from the rock tumbler at a level that is more tolerable. This prototype would allow for a greater display area as well as noise dampening effects. The noise dampening effects are considered to be especially helpful due to the level of sound that is emitted from the rock tumbler. The level of sound can be considered overwhelming which leads to the rock tumbling machine being turned off intermittently. With the machine being turned off for various periods of time, results from the machine can vary greatly and create a polished rock that has not been properly tumbled.
Vacuum Former[edit | edit source]
- Images of the Vacuum Formed Prototype(s)
-
Vacuum Formed 3-D Printed Parts
-
Vacuum Formed Tools
.jpg)
.jpg)
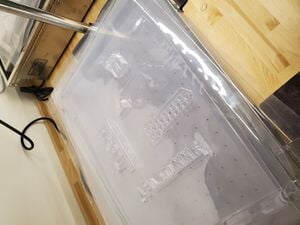
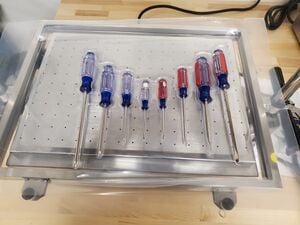
Above shown are the prototypes made from the small vacuum former located in the Makerspace at Cal Poly Humboldt. The first photo on the left is a sample of random 3-D printed parts in order to determine how well the materials would work with the heated plastic. The second photo on the right is our second prototype of some vacuum formed screwdrivers. During the process we realized the objects being vacuum formed would sometimes get stuck in the plastic if it was heated for too long. In order to keep this problem from happening, the plastic would be heated for either or shorter or longer time period depending on what object is being vacuum formed.
CNC Router[edit | edit source]


For the CNC router, a topographical map of Humboldt Bay will be created. This first prototype shows the general outline of the bay as well as a portion of the mountains that could showcase the watershed. For this first prototype, the area is increased that is displayed to include more of the mountainous region. The bottom right-hand corner of the prototype above does not show this region because the CNC machine may be unable to create the thin detailed ravines. If the CNC cannot achieve the required detail, then this region will not be included, and the topographical map will be scaled down as needed. The prototype was tested by showing it to an Environmental Resources Engineering professor, who suggested to show as much of the watershed as possible. However, due to the complexity of this project involving the CNC router and with little information available about making a 3D-topographcial map, the team was unable to move forward with this prototype.
The next design was creating a 2D-map of Cal Poly Humboldt campus using the CNC router. However, when finding an image for Humboldt's campus some problems arose. The major problem was removing text and labels from the campus map. Several editing tools were used to erase the text and labels. However, when erasing the text, it also erased parts of the buildings and with that it will damage the design of the project. With this obstacle, the team was unable to move forward with this project. The team ultimately decided to create a Cal Poly Humboldt Sign to demonstrate the excellent and precise cutting and drilling from the CNC router.
Prusa 3D-Printers[edit | edit source]


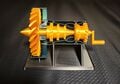
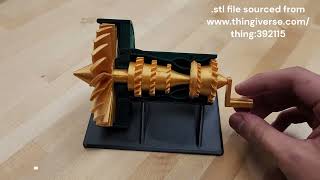
The goal for the 3D-Printer is to test the durability, density, and create an articulate object to catch people’s attention. The 3D-printed V8 Engine model has posed to be a great success in fulfilling the goals of the 3D-printer. The test was conducted by researching different objects that can express articulate moving objects and engineering related. It was decided to 3D-print a working V8 engine model to demonstrate these essential aspects. The files were on Thingiverse, and those files were uploaded to UltiMaker, a 3D-printing software that performs any essential edits to the object before printing. The only edit to the V8 engine model was adding supports to the individual parts of the engine. Once all the individual parts were printed, the team assembled the engine parts into a V8 engine. The team decided to use a single M4-0.7 x 10mm socket head cap screw to connect to the handle. After the assembling process, team members tested the V8 engine by rotating the handle clockwise and the engine performed a successful motion of the piston heads. It was concluded that the 3D-printers in the makerspace at Cal Poly Humboldt can print successful articulate objects.
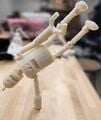
This flexible robot arm was one of the objects that was 3D-printed using the small printers. However, the print didn’t come out as expected, as the parts didn’t show any flexibility to it. The small gears within the parts were not moving. It was concluded that the small printers are not as strong enough to print this flexible robot arm. The team decided to move forward with another example, in this case 3D-printing a little robot man with ball joints using the Stratasys F370. To demonstrate the motion of moving parts involving the Stratasys F370.
Final product[edit | edit source]
For the final product of each machine used to highlight its capabilities in the Cal Poly Humboldt Makerspace, five designs were made to give inspiration and knowledge of how useful this space can be for students and anyone with the passion for innovation and design.
CNC Router:
- Image of the Cal Poly Humboldt Wooden Sign (Final Design)
-
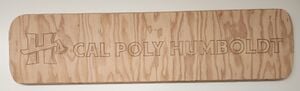
Cal Poly Humboldt Sign (CNC Router)

Vacuum Former:
- Image of Vacuum Formed Tool Organizers (Final Design)
-
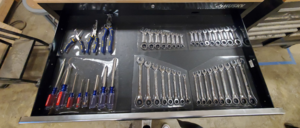
Vacuum Formed Plastic Tool Organizers

Rock Tumbler:
The final display for the rock tumbler is a multipurpose box. The first purpose of this box is to show the rock tumbling process. The box was decorated with different types of rock throughout the tumbling stages, in a manner that is clear and organized. The box will be a visual and palpable representation of the different stages. These rocks will decorate the box, moving from the raw rocks through the stages to the final polished rocks in a manner that is clear and striking. This portion of the box will serve to communicate how the stages will look in comparison to each other and also add Cal Poly Humboldt Lumberjack personality to the makerspace. On the top of the box is a designated area for each of the tumbling barrels. These areas will serve the purpose of identification, containing labels and spaces for each barrel that will allow a user to put their name, date, as well as the grit stage that their barrel is in. The labels will serve the purpose of adding organization, information, and communication to the rock tumbler. The last piece of utility that the box will being to the makerspace is the dampening of the noise that is emitting from the rock tumbler due to the its continuous barrel rotation. While rotating the barrels will emit about 74 decibels of sound, the box is made different layers of material that have been thoughtfully put together for the purpose of quietening this noise. This will help to ensure more consistent results by eliminating the need to unplug the machine and stop the rotation of the barrels due to the noise level.
Prusa i3MK3+:
- Images of the V8 Engine made with the Prusa I3MK3+ 3D printer (Final Design)
-
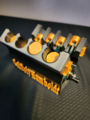
Side view of V8 Engine
-
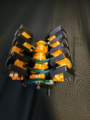
Interior view of V8 Engine
-
Jet Engine Model


Stratasys F370:
- Image of the 3-D Printed Robot Man (Final Design)
-
3D-Printed Little Robot Man

Construction[edit | edit source]
Forestry Scientific 4*4 CNC:
Obtain a 1 feet by 4 feet of plywood from a nearby lumber store. Using the internet, search up the Cal Humboldt sign & logo that is found on google images. Download that image to a computer, and using a software called V-Carve Pro. Download that image to V-Carve Pro, a software that only connects to the CNC router. In V-Carve Pro, some features consist of entering dimensions of the material being used for the CNC router. And other features are the type of drill bit to use and previewing the cutting and drilling of the sign before the actually real cutting. Once all the features are correct, the CNC router will begin its cutting and drilling.

Vacuum Former:
A sheet of plastic was cut into smaller dimension that corresponded to the small vacuum former. Once the sheets were cut, each was placed on the vacuum former holder and raise it to the top. Connect the vacuum to the right connections on the side of the machine and make sure it is on securely. Place the object you are trying to vacuum form on the platform and turn on the machine and wait a few minutes until the plastic heats to the point of sinking down. Once it is heated to your preference, slowly bring down the holder over the object you are trying to vacuum form and turn on the vacuum (only takes a few seconds). Turn off the vacuum and the machine and wait a few moments before taking your plastic off the holder.
Rock Tumbler:
To start the making of the rock tumbler box, a frame should be built with strip board that is .5"*.75" cut to length. Deciding what length to cut to will also give you the allowance around the rock tumbler. For this project, I gave a .5" allowance on each side, to make the the opening in the center of the frame 1" larger than the rock tumbler. From this point, I cut the rubberwood to fit flush on the side and the top piece (covering only one side of the top/bottom of the frame) to fit flush with the rubber wood edges on the sides. The next layer is the plywood, Team 3:1 used .75" plywood this box. This will be cut in the same manner as the rubberwood. Once you have all of you pieces and they fit together well, clamp down the frame, rubberwood and the plywood together in order to proceed drilling holes for the screws that will hold the piece together. In this project, a screw was typically placed a third of the way in on either side that is being attached, resulting in 8 screws on each face. It is important to take note of the drill bit that you are using to create the pilot holes, making sure that it is an appropriate size for the screws that will be used. The screws used in this box were multi-purpose 1.5"-2" screws, they should not be longer than the 3 layers thick, but long enough to go into all 3 layers and make a secure fashioning. Once you have assembled you box, sand down any sharp edges. This will help prevent splinters and also help the corners and edges keep from breaking.
After this point it is time to decorate. Team 3:1 used chalk board stickers, added to the top of the piece, to help add organization and to help keep track of the different barrels (name, date started, grit stage.) We also made pockets in the box at the top and on the side of the box where we inlaid tumbled rocks for color and decoration.
Prusa i3MK3+:
For constructing the 3D-printed V8 and jet engines model, downloading the files can be found here: V8 Engine Modeland Jet Engine Model. And uploading the files to a free software, called UltiMaker Cura to add tree supports to the engines. Other features to edit the engines using UltiMaker Cura consist of, resolution: 0.15mm, infill density: 20%, and shell thickness: 0.8 by 0.8 mm. The files come with instructions to assemble the engine parts together, using super glue is the best option to connect them together. For the V8 engine, using a single M4-0.7 x 10mm socket head to connect the handle to the crankshaft, to create motion of the piston heads.

Stratasys F370:
For constructing the 3D-printed little robot man, downloading the file can be found here: Little Robot Man. And uploading that file to a free software called, GrabCAD Print to edit any features to the little robot man. The features include, resolution, infill density, and shell thickness to fit the Stratasys F370. Once 3D-printed, connect the robot parts together using the ball-joints.

- Sample gallery
Inspirational Video[edit | edit source]
The video below displays each of the designs described in the above sections.
Bill of materials[edit | edit source]
Description of costs, donations, the fact that this is just proposed, etc. For a simple cost table, see Help:Table examples#Cost Table and Template:Bill of materials for two nice formats.
| Item | Amount | Cost per unit | Total |
|---|---|---|---|
| Plastic Sheets | 4 | USD 26.02 | USD 104.08 |
| Plywood | 1 | USD 20.00 | USD 20.00 |
| Eye Hooks | 1 | USD 2.99 | USD 2.99 |
| Cup Hooks | 1 | USD 2.99 | USD 2.99 |
| Drill bits | 1 | USD 6.99 | USD 6.99 |
| Chalk Board Label Stickers | 1 | USD 3.49 | USD 3.49 |
| Plywood for CNC | 1 | USD 40.00 | USD 40.00 |
| XL Command Strips | 1 | USD 11.50 | USD 11.50 |
| PLA Filament (Roll) | 1 | USD 20.87 | USD 20.87 |
| Socket Head Cap Screw | 1 | USD 7.99 | USD 7.99 |
| Gorilla Super Glue (20 g) | 1 | USD 7.98 | USD 7.98 |
| White PLA Filament | 1 | USD 24.99 | USD 24.99 |
| Grand total | USD 253.87EUR 218.33 <br />GBP 185.33 <br />CAD 314.80 <br />MXN 5,293.19 <br />INR 19,002.17 <br /> | ||
Operation[edit | edit source]
Shown below are the simple operations for each design project created.
Go on the internet and use a website called Thingyverse to download a file to a free software called UltiMaker Cura.
Edit your file with changing the infill density, shell thickness, and resolution.
Print your 3-D model and assemble your parts.
Pick a design and download it to a software called V-carve pro
Enter your dimensions and decide what drill bit to use for your design.
After editing start cutting and drilling your design
Cut the plastic to the correct dimensions so that it fits in the holder of the vacuum former. Raise it to the top and lock it in.
Locate the valve to connect the vacuum and insert it. Make sure it is secure enough so that no air escapes.
Select an object you want to vacuum form and place it on the platform.
Turn on the machine and let the plastic heat up until the it sinks to your desired length then bring the plastic down over the object tightly.
Turn on the vacuum for a few seconds and then off. Let plastic sit for a few minutes and then remove. Turn off machine as well.
Place box over the rock tumbler to reduce the sound.
Maintenance[edit | edit source]
This section discusses the the maintenance of each design made for the Makerspace and the cost of the maintenance if applicable.
- Vacuum Former: The cost of maintenance for this design would just be ordering more plastic if the organized inserts are becoming dull or not holding their shape as well as they used to. Depending on how much plastic is ordered it should remain around the same price of $26.02 per sheet. The maintenance of the design would be very low given that the plastic will last long and can withstand many stresses about every year or so. If maintenance is needed the person who wants to create new organized inserts should be the person to maintenance this project.
- RoxBox: The cost to maintain the box is a quarterly cost of $10.00. This cost is for the replacement of the chalkboard stickers, chalk pens, and to reglue rocks that may have come loose.
- Prusa i3 MK3S+ 3D Printer: The maintenance cost for the 3D-printed engines consist of only purchasing new filament. The type of filament needed for both the V8 and jet engine models is PLA Filament - 1.75mm (1kg) that cost $20.87 per filament roll. For the V8 engine model you will need a small pack of M4-0.7 x 10mm Socket Head Cap Screws with a price of $7.99. The jet and V8 engine models, gorilla super glue, 20 gram, clear with a price at $7.98 are needed to super glue any engine parts and letters back together.
- Stratasys F370: The maintenance cost for the little robot man consists of only purchasing new filament for the Stratasys F370. The filament needed is, Hatchbox 1.75mm White PLA 3D Printer Filament, 1 KG Spool, Dimensional Accuracy +/- 0.03 mm, at a price of $24.99 per filament roll.
- CNC Router: The maintenance cost for the Cal Poly Humboldt sign consists of buying plywood with the dimensions of 4 feet by 1 feet from a nearby lumber store. The plywood was bought by the makerspace, however, the price is roughly $30. And to hang up the Cal Poly Humboldt sign, using command strips is the best option to hang on a smooth wall surface. The price for a Command Picture Hanging Heavy Weight Adhesive Strips Extra Large White (8 ct) is $11.50 per one package.
Conclusion[edit | edit source]
Testing results[edit | edit source]
This section demonstrates the different designs made with the selected machines and describe the trial and error made with prototyping, testing materials, and designs.
Vacuum Former:
The photos above are tools being tested with the vacuum former to see how well the plastic will interact with the material and if it would actually vacuum form. The tools above seemed to work well with the plastic but when the plastic was heated for a longer time, the tools would get stuck and make it difficult to grab. This was a problem because the tools sitting in the organized inserts for the toolboxes would need to be easily accessible. This led to the process of not heating the plastic as long as the first try. After the second try, the tools were still able to be vacuum formed with the same detail and were able to be pulled out of the plastic easily.
RoxBox:
The RoxBox adds color to the makerspace and dampens the noise made by the rock tumbler. When testing the box, Devin, the representative of our client, was there for feedback. To test the RoxBox, for the sound dampening function, we placed the RoxBox over the rock tumbler while it was rotating the tubs. When we placed the RoxBox over the rock tumbler Devin Ketchum exclaimed “Thank God!” This was used as the indicator for the sound dampening of the RoxBox. The testing of communication for the different rock stages was done with fellow students. They were able to clearly understand that the rocks under the indicated grit stage were associated with that stage. It was also clear that the name, start date and grit stage were to be indicated within the area on the top of the box with the chalk pen.
Prusa i3 MK3S+ 3D Printer:
The final designs for the Prusa 3D-printers consist of the V8 and jet engine models. With the finished designs, this will showcase how engineering students can develop models using the 3D-printers to help them understand certain engineering concepts and create their own models for their design projects. These engines will inspire and create new ideas for current and future students to come. The final results from the Prusa 3D-printers consist of changing the filament color to green, gold, and black to match Humboldt’s school colors and assembling engine parts together.
Stratasys F370:
The final design for the Stratasys F370 consists of a 3D-printed little robot man. This finished product will demonstrate the unique capabilities of the Stratasys by making ball-joints to create motion without the need of another machine. The little robot man will inspire current and future engineering students to create and design engineering-related projects using Stratasys. The final results consist of 3D-printing the little robot parts and assembling them together.
CNC Router:
The final design from the CNC router is a 1 feet by 4 feet Cal Poly Humboldt sign. The sign is a great example of showcasing what the CNC router can perform with its excellent drilling and precise cutting of images on materials. The Cal Poly Humboldt Sign will help inspire current and future students of the strong capabilities the CNC router can perform. This inspiration will create new ideas and future projects involving the CNC router.
Next steps[edit | edit source]
Enjoy the stellar exciting examples that were created from the Makerspace at Cal Poly Humboldt University.
Troubleshooting[edit | edit source]
Possible problems and suggestions for solutions of each design created.
| Problem | Suggestion |
|---|---|
| Vacuum Former: | |
| Plastic rips | Grab another plastic sheet |
| Object gets stuck in plastic | Reduce the time of heating the plastic and do not vacuum for too long |
| 3-D Prints: | |
| Object collapes | Change infill density and apply supports in settings before reprinting |
| Not aesthetically pleasing | Change filament color |
| Difficulty assembling | Reprint with a different scale size |
| Rock Box: | |
| Loose Rocks | Refluxing |
| Insulation comes undone | Reinstall |
| Splinters | Sanding down rough parts |
| Slickers fall off | Replace with new ones |
| CNC Router: | |
| Router bit breaks | Replace with new one |
Team[edit | edit source]
Introduce team and semester in the following format:
- Jennifer Alfaro, Fall 2023
- Celsie Martin, Fall 2023
- Adrian Lopez, Fall 2023
- Sam Blechel, Fall 2023
References[edit | edit source]