
This is STEMwear: A durable and stylish work apron created by Team Drip Lab of Engineering 205: Introduction to Design in collaboration with the Cal Poly Humboldt Makerspace during the Fall 2023 semester. STEMwear was created to showcase the broad capabilities of the Makerspace, inspire other student to make things, and to provide protection and function for users in the space.
Background[edit | edit source]
The Makerspace at Cal Poly Humboldt is brand new as of the Fall 2023 semester. The class of Engineering 205collaborated with the Makerspace to design and implement a variety of projects to improve the overall experience for current and future students. Team Drip Lab worked on a workwear design project that brings awareness, functionality, and user protection to the space. The product needed to promote the Makerspace and provides a way for students to engage with the space. Additionally, the product needed to be functional and durable to wear while working in the space. Ultimately, a tool apron, dubbed 'STEMwear', was chosen as the type of workwear.
Problem statement[edit | edit source]
The objective is to design, test, and manufacture a single piece of unique and awesome workwear that is both functional and representative of the Cal Poly Humboldt Makerspace.
Criteria[edit | edit source]
After meeting and discussing with the client, there were few restrictions on the design. The following table outlines key components identified. The client requested an article of clothing that can be utilized within the makerspace while also upholding the concern of safety. The article of clothing should be replicable so that future students would be able to recreate the clothing as an experience within the fabrication course. The article of clothing must also be deemed appropriate not only for the makerspace but for the university as well.
| Criteria | Description | Weight (1-10) |
|---|---|---|
| Safety | Must meet the safety standards of the Makerspace, the university, and each tool in space. | 10 |
| Functionality | Protective, tool accessibility, and convenience for the users. | 9 |
| Durability | Must last at least a year of daily use. | 8 |
| Reproducibility | Can be reproduced by other engineering students. | 8 |
| Comfort | Can be worn for at least 4 hours, in varying temperatures and levels of activity. | 7 |
| Influentiality | The product should excite and encourage students to use and learn about the Makerspaces’ capabilities and possibilities. | 7 |
| Inclusivity | Fits 99% of Cal Poly Humboldt Students | 6 |
| Cost | The client’s budget is $150. Additionally, each Drip Lab team member will allocate $75. | 5 |
| Sustainability | Materials must meet the standards of the Global Organic Textile Standard (GOTS). | 5 |
| Aesthetic | Must align with the University dress code, and the client requests. | 4 |
Prototyping[edit | edit source]
While the team learned how to sew, the first prototype was created using of an old cotton t-shirt. The shirt was cut into a general apron-like shape and pocket shapes were cut from the excess fabric. Different pocket shapes and sizes were placed on the apron to test where they best fit. Once the pockets were sewn on, straps were roughly placed so the apron could be worn. Along with allowing for the team to learn their first sewing techniques, this first prototype gave good insight for future decisions of pocket shapes, placement, and overall fit of the apron on the body.
-
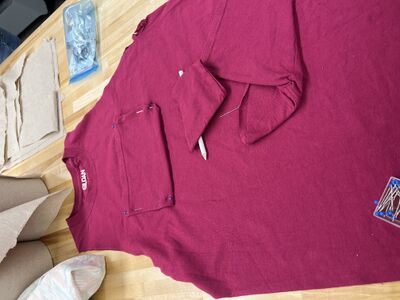
Our first prototype, cut from an old cotton t-shirt.
-
Wearing our first apron prototype.
-
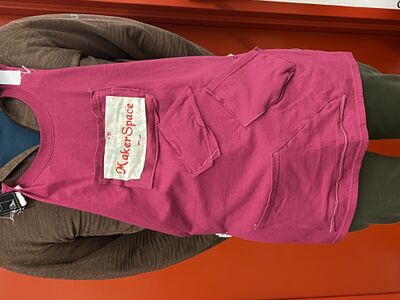
Our second prototype apron with functional pockets.
-
Prototype 2 laid flat with tools.


When creating the second prototype, more functional pockets and sizing were able to be implemented. Duck fabric, a thicker and more durable fabric than the cotton shirt used in the first prototype, as used to construct the second prototype. Pockets used include multi-use tool pockets, angled pencil pockets, hand sleeve pocket, and a phone pocket. Webbing was used to make straps. Once the prototype was constructed, the apron was tried on to test for ideal sizing and length. It was discovered that this prototype was too long and needed better structured straps. It was also determined that the duck fabric was an improvement from the t-shirt, however an even thicker fabric would be preferable for the final product.
Final product[edit | edit source]
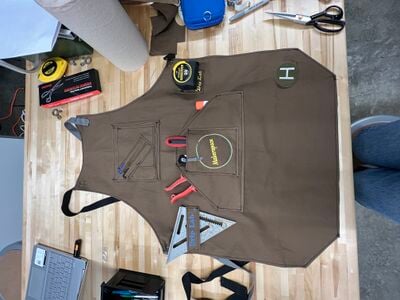
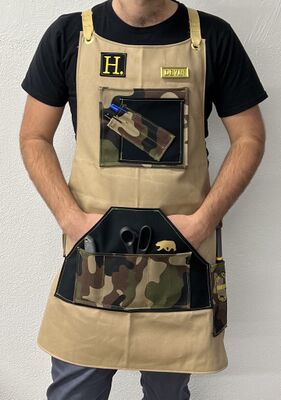
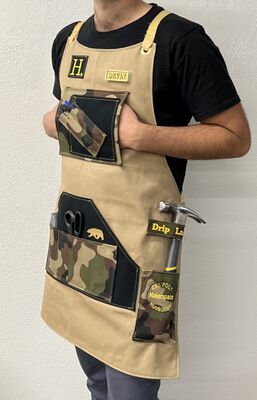
The final product, STEMwear, is a maker apron built with durable, thick waxed canvas that is both water-repellent and stain resistant. STEMwear has adjustable straps that allow the product to be a universal fit for a wide variety of body sizes. The straps feature a cross-webbing brace on the back for support and all-day comfort.
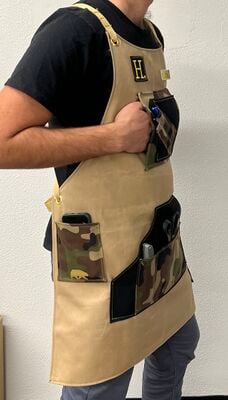
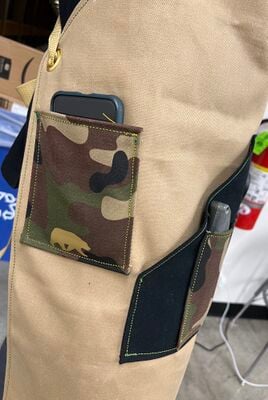
STEMwear features a variety of pockets that provide comfort and function. A "hand-sleeve" is located on the chest with a smartphone pocket and angled pencil pocket layered on top. A sweatshirt pocket is located around the mid-section with a 3-tool pocket layered on top of it. Flanking each side of this main pocket are a smaller hip pocket for tool or phone storage and on the other side, a multi-purpose loop for a hammer or speed square with a lower pocket that can be used to secure the hammer handle or other tool storage.
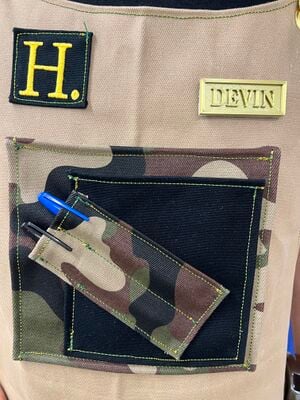
STEMwear has achieved that inferentiality through attention to detail and bold design choices. Black and camouflage color blocking is used for the main pockets. Green and gold two-tone stitching is also used throughout. Three embroidered logos decorate the piece featuring a Cal Poly Humboldt "H", a Humboldt Makerspace logo, and a team logo. STEMwear features a 3D printed nameplate that is secured with Velcro. The velcro attachment for nameplates allow the Makerspace user wearing the apron to customize it by using their own nameplate. There are two vinyl pressed golden bears decals on the apron.
With a multitude of tool storage, protection from debris, and aesthetic appeal for days, STEMwear is practical, protective, and stylish.
- Views of STEMwear
-
Front view of STEMwear
-
Left side view of STEMwear
-
Right side view of STEMwear
-
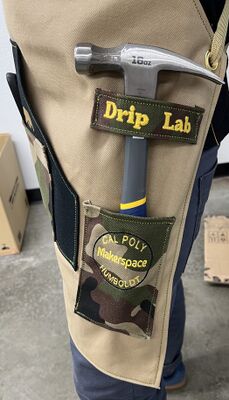
Hammer/tool loop and multi-purpose pocket
-
Hip pocket for phone or tools
-
'Hand-sleeve' with multi-purpose black pocket and angled camo pencil pockets


Construction[edit | edit source]
Materials list[edit | edit source]
- 0.5 yard of waxed duck canvas or other heavy-duty canvas in the 10-12 oz range for the body of the apron
- 1 yard total of similar waxed or regular heavy-duty canvas of different colors for pockets and color-blocking (we used 0.5 yard of camo waxed canvas and 0.5 yard of black regular canvas)
- 4 yards of thick 1-inch wide webbing for straps
- Heavy-duty bonded nylon thread Tex 135 or similar size and strength thread. (we used green & gold thread for a two-tone look)
- Buckle that fits 1-inch webbing
- Grommet kit (1/2")
Optional:
- If using 3D printer, PLA filament
- If using embroidery machine, additional thread in various colors will be needed.
- If using vinyl designs, heat press vinyl in desired color will be needed
Tool list:[edit | edit source]
- Industrial sewing machine (such as the Sailrite Fabricator)
- Janome Memory Craft 500E Embroidery Machine (or any other self-embroidery machine)
- Large fabric scissors
- Small thread snips
- Fabric measuring tape and tape measure
- Yard stick
- Pencil/markers
- Grommet tool
- Hammer
Optional:
- 3D printer
- embroidery machine
- vinyl cutter & heat press
- CAD software
Construction Instructions:[edit | edit source]
(Note, these instructions are not a guide on how to use each machine or tool. Please refer to a video tutorial or seek a qualified instructor if you need training)
Cut a 28” x 36” rectangle out of the body material. Fold the rectangle in half so that it measures 14”x36”. Next, mark and cut out the curved section for the arms and neck according to the video below. Our team used the template in the video below for the main body of our apron. We did not follow this video for the pocket templates.

2. A paper or cardboard template may be used to experiment with different pocket shapes, sizes, and locations. Cut out pockets. It is is important to factor in 1/2” extra all the way around the perimeter of each piece for hemming. For STEMwear, our pocket size cut-outs were as follows: (please adjust to meet your needs) Main sweatshirt pocket = 10"x16", Outer tool pocket = 5.5" x 11", Hand sleeve = 7.5" x 8.5", multi-purpose 6" x 6", pencil pocket 3" x 6", Hammer loop = 2" x 5", lower pocket 4" x 7", Hip pocket = 4.5" x 5.5", H logo "2.5 x 2.5", (Note: Add 0.5" to all sides for hemming)

3. Based on the desired length, trim the apron. We trimmed 3 inches off the total length of our apron body for a mid-thigh length on most users. Once you have all of your material cut to size it is time to hem. The body of the apron can be hemmed all the way around at once. Fold and crease a 1/2” margin around the perimeter. If you are more comfortable, you can use pins to hold it in place. We found that the thick waxed canvas would crease and stay put while we hemmed. For the pockets, only the openings should be hemmed at this point. The sides that will be attached to the apron will be hemmed as they are attached.

4. Determine placement of the pockets. We placed our upper hand sleeve pocket centered 4.5 inches from the top. The main sweatshirt pocket is centered 4-5 inches below that depending on preference for hand comfort. The multi-purpose loop is located slightly above and to the right of the sweatshirt pocket. The large side pocket is a few inches below that. The opposing hip pocket should be placed where it can be comfortably reached. Note, any embroidery or vinyl that will be attached to the pockets should be completed before the pockets are attached to the apron body.

Remember to back-stitch at the beginning and end of every stitch line. For layered pocket, make sure to think through which pieces should be attached first. For example, our layered chest pocket required the pencil pocket to be partially sewn to the phone pocket, then the phone pocket sewn to the hand-sleeve pocket, then the remaining edge of the pencil pocket sewn, and finally the hand-sleeve sewn to the body. The sweatshirt pocket required the outer tool pocket to be attached to the main pocket first, then the whole piece attached to the body. At this time, attach any logos or nameplates that are not part of the pockets as well.

6. Trim excess thread from each stitch line. If desired, use a thread sealer or similar tool to singe the loose fiber to prevent the thread from unraveling.

7. Install four grommets. Two grommets should be placed at the top corners where the shoulder straps will attach. The other two grommets should be placed at the corners of the sweeping arm line to receive the straps. Follow the instructions of the grommet tool kit you are using.

Using the 1 inch webbing, feed it through the upper grommets, fold it over itself by 2 inches and then sew to secure the straps to the apron body.

9. Create the cross-webbing brace for the back by cutting two 4x4 inch squares of canvas and sewing the perimeter. Orientating the square like a diamond, cut four diagonal slits for the straps to feed through. Sew around the slits to prevent fraying. Feed the straps through the brace and then through the lower grommets. Finally, feed the webbing through the buckle to on each side. Test fit the apron and trim excess webbing, leaving enough excess for adjustability based on different sized users. Fold over the ends of the strap and sew to prevent the buckle from coming off the end.

Please enjoy STEMwear responsibly!
Video instructions[edit | edit source]
Bill of materials[edit | edit source]
| Item | Use | Quantity | Cost | Phase |
|---|---|---|---|---|
| T-shirt | Apron base & Pockets | 1 | Free courtesy of CCAT | Prototype 1 |
| Thread | Stitched to hold the pieces together | 1 Spool | Free courtesy of the Makerspace | Prototype 1 |
| Embroidery Thread | Used for an early logo design | 1 Spool | Free courtesy of the Makerspace | Prototype 1 |
| Webbing | Straps to support the apron | 4 Yards | Free courtesy of the Makerspace | Prototype 1 |
| Thick Webbing | Additional shoulder support | 2 x .5-inch segments | Free courtesy of the Makerspace | Prototype 1 |
| Additional Fabric | Base for the embroidery design | 2x2 inch segment | Free courtesy of CCAT | Prototype 1 |
| Prototype 1 Total | $0.00 | |||
| Item | Use | Quantity | Cost | Phase |
|---|---|---|---|---|
| Duck Canvas (Brown) | Apron Base | 1 Yard | Free courtesy of the Makerspace | Prototype 2 |
| Thread | Stitching for the entire apron | 1 Spool | Free courtesy of the Makerspace | Prototype 2 |
| Embroidery Thread | Logo design | 1 Spool | Free courtesy of the Makerspace | Prototype 2 |
| Webbing | Strapping | 4 yards | $13.98 | Prototype 2 |
| Buckles | Fastening the straps | 2 | $7.98 | Prototype 2 |
| Prototype 2 Total | $21.96 | |||
| Item | Use | Price |
|---|---|---|
| Waxed Canvas (Brown) | Base | $38.33 |
| Duck Canvas (Black) | Pockets & Color blocking | $26.55 |
| Duck Canvas (Camo) | Pockets & Color blocking | $19.16 |
| Webbing | Straps | $11.96 |
| Eyelets | Looping for the straps | $8.39 |
| Parachute Buckle | Fastener | $5.49 |
| Heavy Duty Thread | Stitching | $11.99 |
| Embroidery Thread | Final logo | $4.99 |
| Final Design Total | $126.86 | |
| Item | Use | Quantity | Unit as sold | Price per Unit | Final Price |
|---|---|---|---|---|---|
| Waxed Canvas (Brown) | Base | 0.5 | Yards | $59.99 | $30.00 |
| Duck Canvas (Black) | Pockets & Color blocking | 0.375 | Yards | $29.99 | $11.25 |
| Duck Canvas (Camo) | Pockets & Color blocking | 0.375 | Yards | $59.99 | $22.50 |
| Webbing | Straps | 3.5 | Yards | $2.99 | $10.47 |
| Eyelets | Looping for the straps | 1 | 10 Pack | $13.99 | $3.50 |
| Parachute Buckle | Fastener | 1 | Per Piece | $5.49 | $5.49 |
| Heavy Duty Thread | Stitching | 750 | Yards | $19.99 | $0.20 |
| Embroidery Thread | Final logo | 220 | Yards | $4.99 | $0.50 |
| Total Cost to Reproduce | $83.89 | ||||
Operation[edit | edit source]
Operation of STEMwear is very simple. The user should put their head and arms through the straps, adjust the straps to the desired tightness and clip the buckle in the back. The user can adjust the fit based on personal preference.

Begin by holding the apron straps wide with a head opening on the top and two arm openings on the left and right side. Make sure your arms are inside the straps.

Place ones head through the top opening and arms through the side openings

Find the waist strap and prepare to buckle

Clip the buckle and adjust the fit by tightening or loosening the buckle.

You're done! Now it's time to make things!
Maintenance[edit | edit source]
Maintenance of STEMwear is simple and minimal. Waxed canvas should not be machine washed but can be spot cleaned with a damp cloth and mild detergent, then air dried. Spot cleaning should only be done as needed.
Waxed canvas develops a beautiful patina with use that makes it unique to the user and the space.
If a repair is needed due to a rip or tear, canvas patch kits are available, or a leftover scrap can be used. If stitching is ripped or coming undone it can be restitched to reinforce the area. Other basic repairs can be made in the same fashion.
Maintenance schedule[edit | edit source]
As needed cleaning, perhaps once a semester or every 6 months.
Conclusion[edit | edit source]
Testing results & Discussion[edit | edit source]
The methodology used for testing the apron was all based-on user feedback. Users throughout the prototyping stages and final design were given the apron to try on and give criticisms on what could be implemented or changed. User feedback was not written down, but instead worked on and implemented. However, there are multiple testimonials collected throughout the process of designing the apron.
Testers loved the style, colorway, and overall look of STEMwear. The color-blocking with tan, black, and camo was very popular. The attention to detail with green & gold stitching, the embroidered logos, angled pencil pockets, and vinyl pressed golden bear was widely praised by users. Many users loved the addition of the California golden bear instantly praising the choice to add the bear. The yellow/gold embroidery thread was noted as a great choice against the camo waxed canvas as the distinct colors stood out. The positive user comments satisfy the aesthetic and inferentiality criterion.
A multitude of testers, when discovering the ‘hand-sleeve’, would break into a big smile and let out an audible sigh of satisfaction. Users commented on how odd yet comforting this location was for a handrest.
A local industrial woodworking expert was very enthused about the project. The woodworker’s experience using and designing items with straps led him to affirm the choice to use cross-webbing brace on the back for the shoulder straps. The woodworker mentioned that it really helps support and takes the pressure off the shoulders. This demonstrates how the product has met the comfort and functionality criterion.
A local mechanical engineer and maker was very interested in STEMwear. The engineer mentioned that he would like to make one for himself. This indicated that the inferentiality criterion has been met. The engineer also asked if the product was going to be available for purchase.
Testers, so far, have found STEMwear to be functional in its tool carrying capabilities. There are enough tool pockets for the needs of the Cal Poly Humboldt Makerspace. The apron itself is protected from sawdust and being very easy to clean off with the use of the air compressor provided in the makerspace. Offering generalized protection from paint and stain, the users' clothing is protected while in use. These results indicate that the functionality criterion has been met.
Further long-term testing needs to be completed to determine the longevity and durability of the piece. STEMwear will continue to be used by the Cal Poly Humboldt makerspace team. Long-term use and testing will inform design changes that could be implemented for future versions.
Team Drip Lab hopes that future students and makers will be inspired to create a custom apron for themselves. STEMwear can serve as a jumping off point for the continued evolution of this design as the apron can be ultimately improved upon with each iteration. As the Cal Poly Humboldt makerspace evolves, so will the students and their STEMwear.
Lessons learned[edit | edit source]
If this project were to be recreated, it is recommended to order materials online, where there is more variety and allows for the ability to choose a more sustainable material such as Global Organix Textile Standard certified cotton canvas.
Next steps[edit | edit source]
STEMwear will continue be used by the Cal Poly Humboldt Makerspace team. Long-term use will inform any design changes that should be implemented for future versions.
The team hopes the future students and makers will be inspired to make a custom apron for themselves. STEMwear can serve as a jumping off point for the continued evolution of this design as it is ultimately improved upon with each iteration.
Troubleshooting[edit | edit source]
| Problem | Suggestion |
|---|---|
| Needle breaking | Canvas/fabric used may be too thick, upgrade to thicker needle or reduce layers of fabric used. |
| Vinyl not sticking | Check that you’re using heat press vinyl or use fabric glue before heat pressing. Check to see the recommended temperature and time of the specific vinyl. |
| Grommet difficult to insert | Use more force or place item on floor to apply more force. |
| Bobbin/spool color not appearing on stitching | Redo the bobbin/spool as it may be too loose and check that it is inserted right. |
| Threading coming undone | Check to see if back-stitching was done. Undo threading and re-sew. |
| Embroidery on machine | Check to see if it is saved as a .jef file or any file type read by embroidery machine. |
| Thread broke off during embroidering | Thread not strong enough or use lower speed of stitching. |
| Threading getting tangled during embroidery | Tread on spool or top threading is too thick, use a thinner thread. |
| Need a new 3D nameplate | File:Ian Nameplate.stl |
Team[edit | edit source]
Team Drip Lab Fall 2023 Cal Poly Humboldt Engr205 Introduction to Design
References[edit | edit source]
}}