
The Cal Poly Humboldt Makerspace in the Forestry building needed a solution to the management of M18 Milwaukee batteries. The solution was formulated and constructed within a 12 week period in the Fall 2023 semester of the ENGR 205 Intro to Design class at Cal Poly Humboldt.
Background[edit | edit source]
Team Tryhards were contracted to assist the Cal Poly Humboldt Makerspace Administrators. Members of the team noticed the organizational problem with the batteries early into the semester so the team was eager to take on this project. Team Tryhards wanted to improve the flow and aesthetic of the Makerspace for the engineering students and client representatives.
Problem statement[edit | edit source]
The objective of this project was to provide a solution to organize, store, and charge M18 Milwaukee batteries. The design solution is based on the input criteria given by the client representatives.
Criteria[edit | edit source]
The battery management project must meet the given criteria which is weighted based on the client representative's preferences. Top priorities were to make sure the project is safe, durable, and functioned as requested.
| Criteria | Constraint | Weight (1-10) |
|---|---|---|
| Safety | Must follow general safety guidelines | 10 |
| Durability | Must last the lifetime of M18 battery and charger | 9 |
| Functionality | Must charge 12 batteries and store 30 batteries at once | 8 |
| Adaptability | East of customization and rearrangement | 7 |
| Flow | Know where to put dead/charged batteries | 6 |
| Ergonomics | Must be easily accessible | 6 |
| Reproducible | Must be able to be reproduced by staff | 5 |
| Aesthetic | Must be pleasing to the eye | 4 |
| Cost | Final system must cost ≤ $400 | 4 |
Prototyping[edit | edit source]
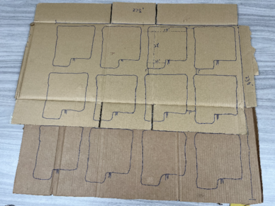
Prototyping went through many different stages throughout the entire project. The team wasn't impressed with the Milwaukee charger hanging capabilities that were tested with the charger hanging on screws or hooks. To get inspiration, the team looked at past DIY projects and different STL files to decide on how the charger holder and battery shoe were going to look. The first component that started the prototyping process was the battery shoe. The improved battery shoe does not have locks down the shaft to stop Engineering students from being too forceful with the battery. Something that was discovered from the previous prototype was that the super glue holding the magnet to the holder could become unfused. From this point, the team researched other bonding agents between PLA and metal, and found that epoxy resin was sufficient. The team also learned from this battery shoe print that it was possible for a single holder design to fit all three batteries. Adjustments were made after 3-D printing the designs to eventually create the final product. The charger holder went through a number of prototypes in which fit and locking mechanisms were tested. The team was going to use a pin lock for the top detachable lock, but this idea was scrapped because it was thought that the pin would eventually be misplaced. The lock that made our final design stays in place by being a tight fit, and it was assumed that this was sufficient because it took effort to pull it out. As for the wall mount, the team wanted to get a sense of how big this project was going to be, so charger holders were outlined on cardboard in a 3 x 4 grid. Our next prototype was made in photoshop, and then properly dimensioned in AutoCAD. The final wall mount is made out of plywood and a redwood tree perimeter that was cut out using the CNC machine.
-
Front view of 3-D printed battery shoe prototype
-
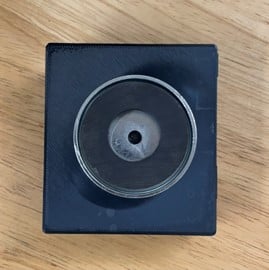
Back view of 3-D printed battery shoe prototype with magnet
-
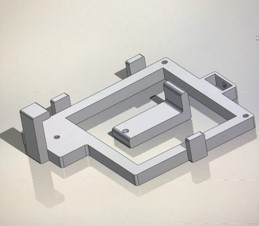
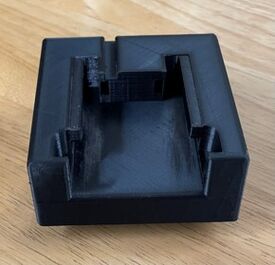
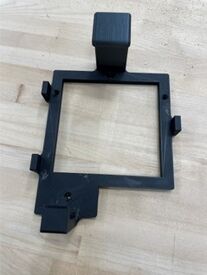
Custom charger holder design
-
Wall mount for battery charger holders


Final product[edit | edit source]
The solution mounts the battery chargers onto the wall mount using custom 3-D printed holders and mount the batteries on the inside of the Makerspace tool carts also using custom, 3-D printed battery shoes. The final product consists of 4 main components. In the photos below, one of the final products is the 3-D magnetic battery shoes. The advantage of the shoes being magnetic is that they can be placed anywhere in or around the tool carts as long as they are attached to a magnetic surface.
-
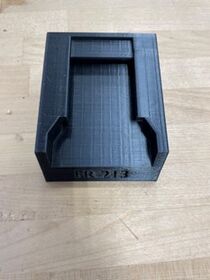
A top view of the battery shoe with the Makerspace room number
-

A back view of the battery shoe that shows the magnets
-
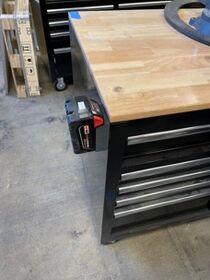
Testing battery shoe with battery by hanging on tool cart


The images below shows the 3D-printed bracket, a Milwaukee M12/M18 charger in the bracket, and an assembled charging board using these brackets.
-
Close view of charger holder
-

Front view of charger in charger holder
-
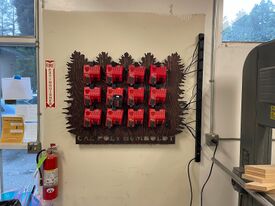
Wall mount with battery charger holders


File:FinalBatteryMagnetShoe.stl
Construction[edit | edit source]
Team Tryhards started the first steps of creating the battery management solution with the design of the battery shoe and charger holder. The custom design of the battery shoe and charger holder is done using 3-D Auto Computer-aided Design software such as Blender and SolidWorks respectively. The wall mount is cut 3' x 4' x 3/4" plywood, stained, and used a 4' x 4' bed CNC machine to cut a redwood tree perimeter and cut out the name of Cal Poly Humboldt. The French cleat technique is used to mount the plywood board with chargers to the wall. The CNC also cut 12 1.25" diameter holes 8" above and to the side of each other. These holes were used to space the charger holders while drilling them to the board. To assemble a magnetic battery shoe, simply download our STL file, and print the design. The holes for our design are for 1.26" diameter magnets with a nominal width of 0.32". Then, put epoxy resin on the back of each magnet and push firmly into the sunken hole. It should take 1-2 days for the resin to fully set.
-

Hobbyist 3D printer making battery shoes
-
Hobbyist 3D printer making charger holder


Video instructions[edit | edit source]
Displayed here is the process of taking a battery from the charging board and being placed in a battery shoe.
Bill of materials[edit | edit source]
Listed is the cost of materials used for building the Battery Management system.
| Item | Amount | Cost per unit | Total |
|---|---|---|---|
| 4' x 4' 3/4" Thick Plywood Board | 1 | USD 41.00 | USD 41.00 |
| Magnets 95 lb Strength 1.26" D .26" W | 50 | USD 2.06 | USD 103.00 |
| Black PLA Filament (ounces) | 77.84 | USD 0.43 | USD 33.47 |
| 12 Outlet 15A Power Strip | 19.99 | USD 1.00 | USD 19.99 |
| 8' 2 x 4 | .375 | USD 10.99 | USD 4.12 |
| 7 x 1" Wood Screws | 48 | USD 0.37 | USD 17.76 |
| 14 x 3.5 Wood Screws | 3 | USD 0.59 | USD 1.77 |
| 7 x 2" Wood Screws | 7 | USD 0.50 | USD 3.50 |
| 7 x 1" Sheet Metal Screws | 4 | USD 0.38 | USD 1.52 |
| 2 Part Epoxy | 2 | USD 0.00 | USD 0.00 |
| Minwax Red Mahogany Stain (1 qt) | .1875 | USD 15.99 | USD 3.00 |
| 6" x 18" Magnetic Sheet Metal | 1 | USD 14.93 | USD 14.93 |
| 6' 15A Extension Cord | 1 | USD 8.49 | USD 8.49 |
| Grand total | USD 252.550575EUR 217.19 <br />GBP 184.36 <br />CAD 313.16 <br />MXN 5,265.68 <br />INR 18,903.41 <br /> | ||
Operation[edit | edit source]
When the students in the Makerspace are ready to use power tools they need to open the bottom drawer of the tool cart and grab the tool and a battery out of a holder. When the student uses the power tool long enough and the battery dies then either they or the client supervisors can place the battery on the wall-mounted chargers. Once the batteries are charged the Makerspace supervisors place the charged batteries back in the tool carts.

Remove the tool that requires a battery. On the insides of the drawer the batteries will be in their holders.

Take the magnetic shoe with you to your workspace and attach it to any magnetic surface

Walk to the wall of chargers and place dead battery in charger
Maintenance[edit | edit source]
The battery management system is low maintenance. The charger holders and battery shoes have been tested to be durable enough to withstand reasonable use. Although, it is common for tools to break in a Makerspace and the 3-D printed parts are even more likely to break. Team Tryhards is sharing the STL files with the Makerspace supervisors so if anything is 3-D printed it can be easily replaced. The plywood is stained so it's recommended to apply a new coat of stain every 3-5 years.
- Routine observation of the products can prevent future failure especially with the electrical components.
- Maintenance and observations should be done by the makerspace supervisors and students who notice anything wrong with a component of the system.
Maintenance schedule[edit | edit source]
This is the schedule of maintaining the components of the battery management system.
- Daily
- Make sure the power strip is turned off if none of the chargers are in use.
- Monthly
- Check the status of the battery holders and charger holders.
- Every 3-5 years
- Stain the plywood board as needed.
Conclusion[edit | edit source]
Testing results[edit | edit source]
After vast amounts of testing it is concluded that the product is ready for real world use. The charger board is sturdy with the attached French cleat Our holders screwed into board, they have a little bit of side to side movement however they are secure and cannot be removed unless the upper lever is removed. The electrical power strips works and the extension cord reaches the power outlet so there are no electrical issues. Our magnetic holders are very sturdy especially when attached to a magnetic metal surface. Large amounts of force are required to move the holders against the magnetic surface so they securely hold the batteries inside the tool cart.
Discussion[edit | edit source]
Team Tryhards and the Cal Poly Makerspace supervisors are both very satisfied with the end result. The final product meets all established criteria and is more than capable of handling the power tool batteries for the Cal Poly Humboldt maker space.
Lessons learned[edit | edit source]
Lessons learned include the tediousness of 3-D printing finished products. Many minor adjustments had to be made to the charger holder in order for it safely hold the chargers and hold the top lever. We learned that
Next steps[edit | edit source]
There are no future steps for the product.
Troubleshooting[edit | edit source]
Here is a list of potential problems and ways to fix them.
| Problem | Suggestion |
|---|---|
| Broken Battery Holder | Discard of broken battery holder. Print out a new one and glue in magnets. |
| Broken Charger Holder | Discard of broken charger holder and take out screws to reuse them. Print new
charger holder and screw it into the charger board. |
| None of the chargers have power. | Potential causes include a broken power strip or major electrical problem in the main outlet. If the power strip is the cause, take it off the wall, buy a new one and install it. If it is due to the main outlet, alert the maintainence stuff have the outlet inspected. |
Team TryHards Fall 2023[edit | edit source]
- Ben Allen
- Tyler Bravo
- Zane Husome
- Dylan McKee
References[edit | edit source]