
Hexayurt project/Hexayurt H13 Plywood
Available in other languages: /fr /ja
This page is currently UNDER CONSTRUCTION ((with missing stuff signaled with double brackets like this)). Don't trust for building unless you make a CARDBOARD + PINS model first. Contribute questions and clarity if you can, maybe in the Discussion page. See you in a month, and good luck! LucasG 11:07, 28 July 2011 (PDT)
H13 Plywood
[edit | edit source]- Vinay Gupta invented the basic shape in 2003. The H13 was designed by Scott Davis and Dylan Toymaker (design published in November 2010). The H13 adds one panel to the “classic” H12 hexayurt, but that one extra sheet of plywood gets an 8′ roof line and 2-3 times the walkable space inside the hexayurt.
- The H13 has been built with polyiso panels and there's even a design to make it folding. This page describes the specificities for a H13 built with wood. This means:
- The connectors need to be stronger than with lighter panels.
- Fixing the hexayurt to the ground is probably needed only if there's risk of earthquakes or landslides (see the Haiti pdf below).
- Water-proofing and insect-proofing need to be considered, asking the local experts.
- Portability will most likely need a group of synchronised carriers (or mechanical help of some sort).
Before you start
[edit | edit source]Do watch the videos, and have a look at the links
[edit | edit source]- Plywood Hexayurt and more
- H13:
- VIDEO Cloughjordan ecovillage ((direct link to blip video))
- PICTURES Dark Mountain 2011
- H12:
- Haiti http://vinay.howtolivewiki.com/blog/other/the-hexayurt-in-haiti-a-technical-description-1678 and http://files.howtolivewiki.com/hexayurt_in_haiti_v1.1.pdf
- Sketchup by jumplogic here.
- VIDEO Engineers Without Borders (Sheffield, UK) http://web.archive.org/web/20110424135209/http://hexayurt.blip.tv:80/file/5012769 and text at http://web.archive.org/web/20170505182759/http://piratepad.net:80/jYVkXNdy3n
- VIDEO Video (English)
- Construction details
- Video (Spanish subtitles)
- Another video, with some construction details: http://www.youtube.com/watch?v=-fwlIxWomyw
((I've taken some snapshots from some of the videos in order to have still pictures for this wiki page.))
Tools
[edit | edit source]If power tools are available, use them. You'll need them to:
- Cut some of the panels: 5 diagonals, Sri Lankan corners, trimming.
- Cut the block: at 90 degrees, at 120 degrees and at 150 degrees.
- Screw ((about 200)) ((a more precise number? at most 4 screws per block so count the blocks)) 2" deck screws.
Naming the pieces
[edit | edit source]- A "panel" cut through the diagonal gives us 2 "triangles". Please refer to this chart to name the "panels" and "triangles". (By the way, you can use this chart to print it on paper, then cut and fold it, and just cello-tape the walls (1a to 2a to 3a to 3b to 2b to 1b to 1a).

- The "wall" has 6 "wall sides": 1a, 2a, 3a, 1b, 2b and 3b. Each has a small triangle cut off. The triangle is a rectangle triangle: measure 6 inches for each leg of the triangle, then cut through the hypothenuse. This is called the Sri Lankan corner, because it was invented in Sri Lanka ((V has the details, tells them in the Cloughjordan video)).
- The "wall sides" are joined together with 12 wooden blocks, 2 at each angle (one close to the ground, the other closer to 4' height), which are made from 2"x4" wood, cut at a 120º angle.
- The "roof" has 2 "classic roof sides" (4a+5a and 4b+5b), 2 "big roof sides" (6a+7a and 6b+7b), and 2 "horizontal-vertical roof sides" (8a+9a and 8b+9b). ((Not sure if the "big roof sides" are 6+7+8, and then we have "front walls" which would be 3+9. Looks simpler this way, no?))
- There will be "blocks", cut off 2"x4" lumber: some are cut at 120º angle, others at 150º angle and others are used "flat" (signalled with different colors). ((Someone please double-check the blocks with video. I think they are right.LucasG 10:57, 28 July 2011 (PDT)))

Understand overlapping
[edit | edit source]Polyiso panels are used full-size with no overlapping, but plywood is different.
((The following needs to be checked visually against the video above. "With enough eyes, all bugs are shallow" - Linus Torvalds. So thanks for double-checking!))
As for the normal roof cone - obey the normal order ((this needs further clarification, but for the moment look at the pictures, the video, and try with cardboard models and pins)), until you get to panel 7. 7a and 7b both go *over* 6a and 6b, then 8a and 8b go over 7a and 7b. At the top, along the roof line, 6a-7a-8a extend over 6b-7b-8b.
If the boards are trimmed, a little slot taken out of 7b and 8b, the whole thing should fit tightly at the roof line. The slot is analogous to the roof cone trimming. Let me try to explain.
Basicaly, where 6a overlaps 7a, there's a section where the wood is two layers thick. 7b is pressed against 7a, but at that point of overlap, 6a gets in the way. 7b is trimmed so that 6a doesn't get in the way. You wind up cutting a piece the thickness of one piece of plywood, and as wide as that overlap, out of the top right corner of 7b so that 7b can fit tight against 7a, basically.
This will probably make sense in a model if you overlap the pieces in the model ((this is what Vinay says - do so while further clarification and pictures are brought into this page - or better still, you bring the pictures and the clarity, thanks! LucasG 11:01, 28 July 2011 (PDT))).
-

-

-
 Exterior view from left-behind. Where "left" is the grey half, not the light-blue half of the building
 -
 Exterior view from left. Where "left" is the grey half


Buy
[edit | edit source]Wood
[edit | edit source]- 13 panels of plywood or OSB3. Each is 4" by 8".
- 2" by 4" lumber. ((how much)) ((about 50 blocks of different size, say 3" per block, that would be 12.5 feet, but you also need extra for the "door angle". To be safe, some 20 feet?))
- Also ... no, that's it regarding wood.
Screws
[edit | edit source]((number)) 2" deck screws. Any head is fine. Non-countersinking screws are better because they don't weaken the plywood wood where the screw is by crushing it or cutting into it. "Wafer head" seems to be the name for these, but I (V) have never found them locally, so I use regular deck screws!
Other stuff
[edit | edit source]- Glue. ((how much))
- See insulation, door, etc.
Cost
[edit | edit source]Very local, but let's say it's ... ((18.9€ or less buys a 10 mm thick panel of "Chinese plywood" in a location placed at the very end of many supply lines.))
Build it
[edit | edit source]Cut wood
[edit | edit source]Sri Lankan corners: cut off one 6-inch corner of each of the 6 panels that will make the walls. This is called the "Sri Lankan corner" because it was invented in Sri Lanka. ((picture))
If you want to cut a window or two in one of the panels, this is when you do it, but make sure you don't cut through the edge of the panel, so that structural integrity is retained.
Cut triangles: 5 panels, through the diagonal.
Trim off the point of each (?) of the 10 triangles. This is done cutting 2 small triangles off the point. The first ... and the second ... See the figure ((Haiti pdf)).
Trim panels. ((see below))
Cut blocks with different angles:
- flat/straight ((number)) ((size)) ((method))
- 120º ((number)) ((size)) ((method))
- 150º ((number)) ((size)) ((method))
Prepare the building site
[edit | edit source]Place the walls as an hexagon. To do this, you start by marking the hexagon with a string: place a peg at the center and draw a circle that's 7.5 feet radius, then use the radius from one point in the circle to mark the six corners of the hexagon. Each wall doesn't begin where the previous one ends, but 6 inches before (see figure).
Maybe place blocks and make sure they are aligned with the horizontal plane, with communicating vessels?
Make walls
[edit | edit source]Start with 6 panels, each 4'x8' (120 cm by 240 cm).
Start with 2-inch by 4-inch wood and cut 12 blocks. Each of the blocks has a 120º angle. There will be 2 blocks in each corner, one near the ground and the other near the roof.
Screw the blocks to join the walls together. ((XXX-number)) of 2" deck screws are needed for each block.

Make roof
[edit | edit source]The roof is built from the back forwards.
Because we have the nice vertical boards, 9b goes in last, and can be screwed into place from the outside, so nobody is left stuck inside of the hexayurt in the same way as you get with the normal roof cone construction. This is very important and it's a much easier build because we don't have the same problems getting to the last two boards.
When the roof is lifted and put on the walls, however, 9a/9b tends to fall over 3a/3b because, well, there's nothing to stop it! On the rest of the sides, the roof cannot fall past the walls because the roof is at an angle. But these two wall pieces are both vertical, so it falls straight past. I think the answer is to put an 8' high 2x4 piece inside the roof, wedged up against the point to hold it up while the walls are lined up, then screw 9b/3b and so on (ah, that will be 3 more flat blocks each), and then screw the 8' 2x4 piece of wood into the vertical part to hold the point of the roof stable. ((V, please chech that the names of the panels and triangles referred to in this paragraph are okay! Thanks, LucasG 11:04, 28 July 2011 (PDT)))
This is just my (V's) best guess, of course, we're going to need to build a few more before we're completely sure! But the key is that it's actually easier than the regular version.
Also we haven't figured out the best way to do a door yet.
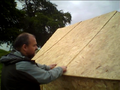
Figure: Near the hand there's the head of a screw, and symetrical to that there's another screw. Both are screwed through the panels to the 150º block. Three blocks per seam.


Put roof on top
[edit | edit source]Gang carry! ((see video of H12 in EWB))
Beyond the very basics
[edit | edit source]Door and windows
[edit | edit source]Windows are easy: cut them before building the walls, don't cut the edge of the panel or you'll lose structural integrity.
Doors haven't been tried on a H13 yet ((as far as I know)).
Insulation
[edit | edit source]((That's very local. As usual, have a go at it, ask the locals, document your solutions, thank you very much.))
Permanent H13 (ferrocement)
[edit | edit source]Toilet etc
[edit | edit source]Help improving the documentation
[edit | edit source]Suggestion: Get IKEA to sponsor a designer to create visual sequence of assemply instructions (multi-lingual, does not assume literacy)
- raw footage
- pictures ((from video, or taken specifically to show each roof part from outside and from outside - someone in Cloughjordan? (hint, hint)))
| Authors | LucasG |
|---|---|
| License | CC-BY-SA-3.0 |
| Cite as | LucasG (2011–2026). "Hexayurt project/Hexayurt H13 Plywood". Appropedia. Retrieved July 25, 2026. |