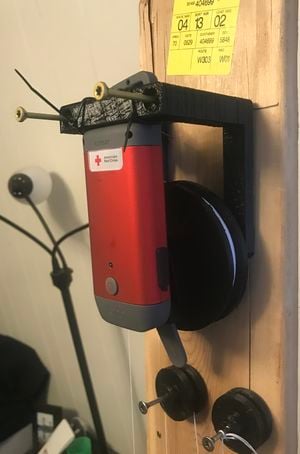
Gravity Light Attachment for Crank Flashlight. This is a attachment device that utilizes the American Red Cross Clipray Crank-Powered Flashlight that turns the crank device into a gravity light. The need that this fulfills is to provide light to any area without the need for a power/electrical hookup, as well as possibly providing a way to charge a phone in a certain situation. There is a commercial production of this item, but it is a bit expensive and does not allow you to charge your phone.
Pictures of the black light frame are V1, when printing, utilize V2, which is the working model in the youtube video
Bill of Materials[edit | edit source]
- PLA Filament
- Three #10 x 2.5" Wood Screws
3a. If using Light Frame V1
Two #10 x 5" Wood Screws
3b. *If using Light Frame V2
Four #10 x 2.5" Wood Screws
- Ten to Fifteen Feet of String, twine, or fishing line
- 2 Zipties to attach flashlight to frame
Link to 2.5" Wood Screws [1]
Tools needed[edit | edit source]
- MOST Delta RepRap or similar RepRap 3-D printer
- Screwdriver
Skills and knowledge needed[edit | edit source]
This device can be used by simply applying a single weight to the string, however the utilization of pulleys and gear ratio's could allow the user to design a more efficient system. The YouTube video gives the idea of mechanical advantage and furthermore the idea of input distance to output distance. Video of Intro to Pulleys
Technical Specifications and Assembly Instructions[edit | edit source]
FreeCad Files and STL Files for all Components are Located on Thingiverse
Link Here for STL and FreeCAD Files
- Print out all necessary files (Attachment_Arm, Arm_Wheel, and Light_Frame)
- Print out necessary pulleys for your desired application, don't need if you do not want to create a mechanical advantage in system.
- Tie a not in the hole along the outside of the Arm_Wheel and spool the desired wire/string around the spool, image 1.
- Press fit the Attachment Arm to the Arm Wheel, image 2.
- Remove the handle of the crank flashlight and cut off the plastic piece underneath, image 3
- Attach the Crank flashlight via two zip ties to the top of the Light_Frame, image 4.
- Slide the Attachment Arm onto the crank arm of the flashlight and then place the wheel on the cylinder on the Light_Frame, image 5.
- Screw the Light Frame into the wall, tree, or post desired, image 6
- Either tie a weight to the end of the string on the Arm Wheel or utilize the Vertical Spool and Spool Rods to create a pulley system, image 7.
- Attach weight and adjust accordingly to how fast the arm is spinning.
- Finished Product, image 8.
- Assembly of Gravity Light
-
Image 1
-
Image 2
-
Image 3
-
Image 4
-
Image 5
-
Image 6
-
Image 7
-
Image 8
Common Problems and Solutions[edit | edit source]
- For the Light Frame and the Wheel Spool, make sure these fit smoothly and rotate freely. If these are not, file down print to verify smooth contact.
- If using twine or string, make sure all the spool is free of sharp plastic edges that will catch the string and prevent rotation.
Cost savings[edit | edit source]
Plastic Used in Printing =~ $3.00
Wood Screws: 6 Screws =~ $2.40
String or Twine: Negligible $0.00
American Red Cross Clipray Crank-Powered Flashlight: Ordered 2 at $7.50 a piece
Total: $14.90
Commercial Equivalent Gravity Light on Amazon [2]
Cost: $80.00
Total Savings: $64.90 (~80% Savings)
Benefited Internet Communities[edit | edit source]
Engineers without Boarders [3]
References[edit | edit source]
</nowiki>


