Many of these instructions are found in the microSD card USB adapter. If you have access to a computer and this, it is highly recommended to use those files to get a good feel for the Ender 3.
Turning the knob clockwise scrolls down/right, counter-clockwise scrolls up/left, and pressing the knob down selects the current highlighted option.
All temperatures are in celsius.
Also, there is a handy document inside the microSD card usb adapter under 1. User Manual_Ender-3_EN V.2.1>User Manual_Ender-3_EN V.2.1.pdf that has a lot of good info. It also has the LCD interface all on the Screen Information, so it is highly recommended to look at that documentation.
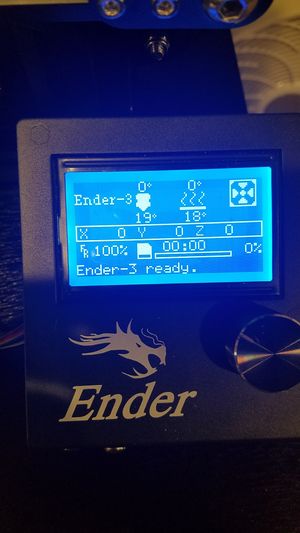
Ender 3 startup/info screenStartup the Ender 3 print, and you are greeted with the Info Screen. This screen shows the current x,y,z positions during printing, the temperatures of the extruder head and the bed, progress of the print, time taken for the print, and text that can warn you of errors.
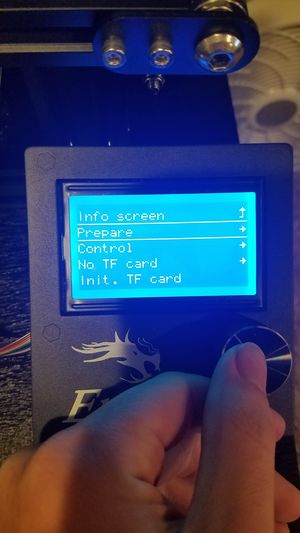
The main menuPressing the knob brings you to the Main menu. From here the options for each path are listed below.
Pressing the top button will bring up a level. For example, pressing the Info Screen option brings you back to the info screen. This is always the top option in each menu and signified by the up arrow.
Prepare brings to multiple options to move the extruder head, homing the head, offset, disabling the stepper motors so they can be freely moved, (useful for calibration) preheating the extruder head for your type of plastic (PLA or ABS) and bed, and a cooldown option for the extruder head and bed.
Control brings you to a menu that can control the temperature by setting it to a specific value.
No TF card/Init TF card shows up if the microSD card is either not inserted, or not recognized. Inserting the TF card should change these into Print from TF and Change TF card. If that did not work, pressing Init TF should have the printer recognize the TF card.
Print from TF brings you into the microSD directory. Pressing any .gcode file should launch the printer to start printing.
The Tune option will not appear until you start printing. This section can change any of the parameters while you are printing, such as speed, nozzle temperature, bed temperature, fan speed, filament flow speed, and even changing the filament.
About Printer gives any information needed about the printer.
The extruder motor will not run unless the end of the extruder is heated.
Again, there is a handy document inside the microSD card usb adapter under 1. User Manual_Ender-3_EN V.2.1>User Manual_Ender-3_EN V.2.1.pdf that has a lot of good info. It also has the LCD interface all on the Screen Information, so it is highly recommended to look at that documentation.
Access the Prepare option from the main menu. Select the Preheat PLA option, and finally enable the Preheat PLA End option. This will let you have filament come out of the nozzle. Wait until the nozzle hits the required temperature.
Put paper underneath the nozzle head to catch the plastic that comes out of the extruder motor.
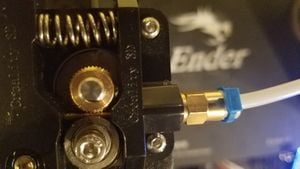
Pressing the spring to feed filament through On the extruder motor, there is a gold ring you feed the filament through. While squeezing the compression spring, keep feeding the plastic through the hole until you see plastic come out of the nozzle.
Filament that has been fed throughFeeding filament can sometimes be frustratingly finicky. If the filament is not lining up correctly, try releasing some pressure from the compression spring to guide the filament through the hole. Once it is in, you keep forcing filament through until you feel resistance/see plastic coming out of the extruder.
Select the Cooldown option under the Prepare menu to cool down your extruder head and the bed.
Access the Prepare option from the main menu. Select the Preheat PLA option, and finally enable the Preheat PLA End option. This will let the filament be unstuck from the extruder head.
While the temperature of the extruder head is rising, squeeze the compression spring on the extruder motor, and gentle force, slowly pull on the filament until it starts moving. Keep pulling on it until it all comes out of the teflon tube.
To re-insert it, it is highly recommended to cut of the end that is deformed.
Again, there is a handy document inside the microSD card usb adapter under 1. User Manual_Ender-3_EN V.2.1>User Manual_Ender-3_EN V.2.1.pdf that has a lot of good info. It also has the LCD interface all on the Screen Information, so it is highly recommended to look at that documentation.
DO NOT MOVE THE HEAD VERTICALLY DURING CALIBRATION, ONLY HORIZONTALLY
Access the Prepare screen, and select the Auto home option. When this finishes, select the Disable steppers option. This will allow you to manually control the bed and extruder head.
Attach Ender bed plate to the Ender bed with the four clips.
Attach them like you see in the photo below. If you attach them on the left and right sides instead of the top and bottom, the clips will hit the beams, and cause the printer to error out.
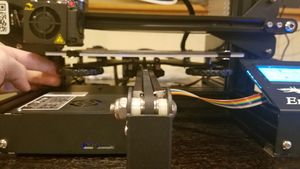
The four wheels underneath the bed that control the level of the bedUnderneath the bed, turn the wheels clockwise to lower the bed. Do this until the nozzle can move over the bed without nozzle grazing the bed.
Take a piece of A4 paper (8x11 standard paper) and place it onto the bed. Move the extruder head horizontally across until it is over the one of the four knobs underneath. Turn the knob counter-clockwise to bring the bed up until the nozzle lighthty touches the paper.
Another option is to move the paper instead of the head.
Do this for all corners, and make sure the head can go across the middle of the bed without grazing the bed. If it does graze the center of the bed, redo all the corners until it does not graze the center.
Final time, but there is a handy document inside the microSD card usb adapter under 1. User Manual_Ender-3_EN V.2.1>User Manual_Ender-3_EN V.2.1.pdf that has a lot of good info. It also has the LCD interface all on the Screen Information, so it is highly recommended to look at that documentation.
Download a slicer, either Cura, Slic3r, or the one on your microSD in the 2.Software and Drive>Creality Slicer_X.X.X.msi.
These programs convert an STL file into G-Code, which is how the printer reads and prints objects.
For this guide, it will be using Cura from here on out.
After downloading and installing, start Cura. It will show the First Start Wizard. If it doesn't, you can manually start the wizard by choosing Add new machine from Settings>Printer>Add Printer...
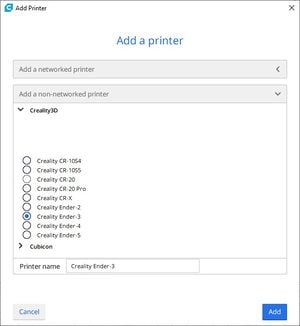
Selecting Ender 3 as a non-networked printerSelect Add a non-networked printer and scroll down and select Creality3D. Fill in the circle that says 'Creality Ender 3' and click Add in the bottom right. Then select Next in the new window and you Ender 3 printer should be ready to go in Cura.
Plug the microSD to usb converter into your computer.
When this is downloaded, press the folder button in the top left of Cura and import it. Click the Slice button in the bottom right. Then click Save to Removable Drive in the bottom right.
Inserting the microSD into the Ender 3Eject the microSD from the usb converter, and push it into the front of the Ender 3. You should hear a quiet click noise when it is inserted.
To take the microSD card out of the Ender 3, press the microSD in, and it should pop out, like a ballpoint pen.
Make sure your printer is calibrated before you do this next step, also that the filament is fed through, and the base plate is attached using clips on the top and bottom and not the left and right.
Navigate to the Main menu by pressing the knob. Then, select Print from TF option. Find your save file in the microSD directory, and select it. Your printer should start preheating the nozzle and the bed. When the everything is heated up to the right temperature, the printer will start automatically.
If something bad starts happening, you can pause/stop the print in the Main menu screen.