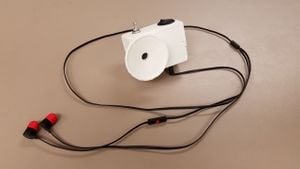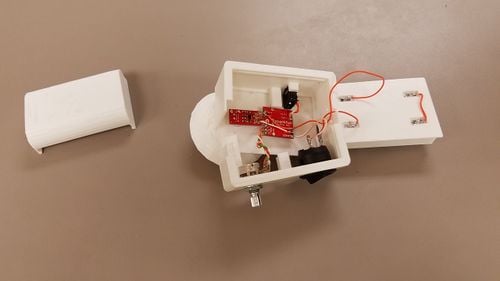
Stethoscopes are a critical tool used by doctors on a daily basis for amplifying the body's functions. Primarily, heartbeats and breaths are the primary target of listening. Usually, stethoscopes work by using a large diaphragm and a tiny pipe to transmit the audio to the ears. In the past, 3D printed stethoscopes have been attempted, and failed to work well. This is due to the large reduction in area from the diaphragm to tubing that is required to get a large amplification. This stethoscope avoids that by using an electret microphone and audio amplifier to drive a pair of earbuds. This allows for high amplification, flexibility in listening as two or more people can listen to the audio, and potentially even recording and transmission to remote doctors.
Bill of Materials[edit | edit source]
- Parts from YouMagine: Total: 67 grams at $22/kg = $1.47
- Pickup
- Battery Box
- Battery Box Cover
- Jack Case
- Power Case
- Microphone: $5.95 x1
- Amplifier: $7.95 x1
- Power Switch: $0.50 x1
- Potentiometer: $0.95 x1
- Battery Clips: $0.50 x4
- Audio Jack: $1.50 x1
- 8 cm Filament
- Thin Wire (18 to 24 AWG): 30 cm ~$1
- Headphones/Earbuds: ~$1
- AA Batteries: ~$0.50 x2 (Note: Rechargeable AA batteries will work as well as disposable AA batteries)
Total Cost: $23.32
Tools needed[edit | edit source]
- MOST Delta RepRap or similar RepRap 3-D printer
- Wire Cutter
- Wire Stripper
- Soldering Iron and Solder
- Optional: X-Acto knife, box cutter, straight-blade knife for part cleaning
Skills and Knowledge Necessary to Make an Electronic Stethoscope[edit | edit source]
Soldering is required for this project. Reprap has an electronics assembly guide, and Hackaday.com has a soldering tutorial.
RepRap Electronics Assembly Guide Hackaday Article on Soldering
Technical Specifications and Assembly Instructions[edit | edit source]


- All parts were printed at 0.25 mm layer height, 80 mm per second and between 5 and 10 percent infill. No support was needed on the prints. The parts should be oriented with the largest flat surface on the print bed. For instance, the battery lid should be printed with the flanges up. Each part will take about 1 hour to print at 60 mm per second.
- Once all of the parts have been printed, all threads should be removed. Pay specific attention to the grooves where the case assembles together. If there are strings or other debris in there, the case may not assemble.
- Following the wiring diagram, connect up everything excluding the battery connectors and power switch. The microphone and audio jack should have the shortest possible wires between them to reduce the amount of noise that enters the system. The potentiometer should have a slightly longer wire to allow for the case to be assembled. Twist the wires of the potentiometer to reduce the noise on the audio.
- Push the battery clips into the holes in the battery box, and bend the tabs down as far as possible on the other side.
- Solder a wire between the positive of one battery and the negative of the other. Use the markings on the bottom of the battery case to check your polarities.
- Connect a wire from the unconnected negative terminal to the ground of the amplifier and microphone. This wire should be slightly longer than necessary to allow the case to be assembled.
- Solder a wire on the last positive terminal of the battery box, and a separate wire on the power line of the amplifier and microphone. Feed these wires through the hole for the power switch.
- Put the soldering iron down for a moment.
- Push the battery box into the top slot of the jack side case. This is the slot on the speaker side. Put the microphone in the hole in the pickup, and the headphone jack into the slot in the pickup. Push the entire assembly into position in the jack side case. The headphone jack might not fit at first. Carefully scrape down the slot on the pickup until the jack fits tightly.
- Take the power side case, and align it with the pickup and battery lips. Remove the nut and washer from the potentiometer. Put the potentiometer through the hole, and put the washer and nut back on.
- Insert two AA batteries into the battery box, ensuring the polarity is correct using the markings. Strip the wires on the power connections, and short them together as a test. You should see a red light near the pickup if everything is working. If not, check your connections. Plug in a pair of headphones and slowly increase the volume knob. The gain is very abrupt, so go slowly, and start low. If you hear audio, it is working. Split up the power wires, and remove the battery.
- Solder the wires onto the terminals of the power switch, ensuring the wires go through the hole for the power button.
- Push the case together, ensuring the microphone is under the bracket for it, and the amplifier will be held down by its bracket. You can use a small stick or screwdriver to adjust the position through the gaps in the case.
- Once the case is fully together, push the power switch into position.
- Reinsert the battery and check to see that it works. Check someone for a heartbeat. The next step involves sealing the case, which will restrict access.
- Take 4 pieces of filament approximately 3 cm long and insert them through the holes in the edges of the case. Push them in deep enough where at least 1 cm of filament is on the inside of the case. Cut the excess filament off the outside so that there is approximately 1 mm outside the case.
- Heat up your printer and move the head up as far as it will go.
- Push the filament into the bottom of the hotend and melt the plastic down into the wall. Repeat for each hole.
- Test again.
- Push the battery cover over the top of the battery box.
To Use:
- Turn down the potentiometer to zero.
- Turn on the power switch.
- Push pickup against surface to listen to.
- Turn up gain until audio is heard.
Note, there is no protection against feedback or loud noises in this version of the stethoscope. Be careful with the gain.
Common Problems and Solutions[edit | edit source]
- Headphone Jack Doesn't fit in it's place: Carve out the bottom and walls of the slot on the pickup side. Tolerances in printing can make it hard to fit. It needs to be a tight fit to ensure that the jack stays in position.
- Filament holes do not align: Make sure that the case is fully together. There should be no gaps in the case. Try cleaning up the edges of the pickup and battery box with a knife, and ensure the slots in the case are clear.
- Filament doesn't fit through holes in the case: If you have a drill available, drilling out the filament hole is fine. If a drill is not available, an X-Acto knife works to widen the hole or pushing a piece of filament through each hole individually.
Cost savings[edit | edit source]
The closest equivalent to this stethoscope is a Littman Digital Stethoscope:
BOM Cost: $23.32
Comparable Device: Littman Digital Stethoscope $429
Savings: $405.68
Percent Savings: 94.56%
Future Improvements[edit | edit source]
There are multiple improvements that could be made to improve this stethoscope:
- Reduce the amplifier gain to reduce noise on output
- Shield the case to reduce noise
- Pack the case with foam to reduce noise
- Safeguard the output with a low-pass filter at about 20 kHz to reduce ear-damaging pops and clicks.
References[edit | edit source]
Images in Wiring Diagram:[1][2][3][4][5][6][7]
- ↑ web page: AA Battery Available: https://www.sparkfun.com/products/9100
- ↑ web page: Mono Amplifier Available: https://www.sparkfun.com/products/11044
- ↑ web page: Electret Microphone Available: https://www.sparkfun.com/products/12758
- ↑ web page: Power Switch Available: https://www.sparkfun.com/products/11138
- ↑ web page: Potentiometer Available: https://www.sparkfun.com/products/9939
- ↑ web page: Battery Clip Available: https://www.sparkfun.com/products/7949
- ↑ web page: Audio Jack Available: https://www.sparkfun.com/products/8032