Why Use Thermal Curtains? In most homes, windows are the single largest avenues of heat loss. Glass is a very poor insulator, having an R-value of 1 (for single panes). Older windows can loose heat where the seal is degraded around the frame. Typical curtains alone provide little insulation from the cold outside, but using thermal curtains can increase the insulative value of your windows by up to 7 times (R-value of 7), keeping more heat in your home. Compared to other heat saving features, thermal curtains give the best bang for your buck.
Cost comparison of window treatments[edit | edit source]
- Homemade thermal curtain-$40-70
- Custom made curtain (installed) $70-200
- Double paned window (installed) $150-500
To understand how window insulation works, it is helpful to know the roles of the thermodynamic principles of conduction, convection, and infrared heating. Concerning windows in a house, a pane of glass will conduct (lose) heat through the pane to the cold outside air. Conduction occurs due to heated (high energy) air particles naturally seeking to move to lower energy states (colder, less energetic air particles). When heat is lost by conduction from the air next to windows, the cooled air then sinks and pulls more warm air against the window. This process, called convection, establishes a continual current that will cool your home throughout the night. Infrared is heat from the sun that comes from light shining through your windows and warms your home. Even on a cloudy day, letting light shine through your windows will collect solar heat energy inside your home.
How to Make Thermal Curtains[edit | edit source]
Typical thermal curtain design is fairly simple, the materials involved are affordable, and you will also save resources used in heating your home. Thermal curtains achieve the goal of effectively insulating your windows through both efficient and clever design and assembly. Making thermal curtains entails combining an insulative material, a vapor barrier material, and a cover material (this part is optional). The material needs to be attached to a hanging mechanism and sealed against the window frame to avoid air leaks around the curtain. This can be done using one of three designs: side draw, roman shade, or roll-up.
Materials Needed[edit | edit source]
- Fabric scissors
- Needle and thread or sewing machine
- Fabric for curtain shades: either Warm Windows pre-assembled fabric (available at CCAT for sale) or a homemade curtain fabric. See preparing curtain shades.
- Thin weight bar.25"-.5" in diameter: can be wood, metal, or even a stick. (not needed for a side draw design).
- Materials for sealing curtains to sides of windowsill: either magnetic strips and super glue, side shutter boards with cabinet hinges, or Velcro.
- Materials for hanging and rolling up curtain. (Varies depending on which design you choose.)
- Mounting board: same horizontal length as curtain, 1" x 2"s work well (not needed with side draw design)
- Cap: this part of the curtain serves to prevent a convection current from developing by keeping air from flowing around the top of the window (only needed if using a side draw design)
Preparing Curtain Shades[edit | edit source]
The best already assembled thermal curtain fabric is a product called Warm Windows from The Warm Company (954 East Union St, Settle Wa. 98122, (www.warmcompany.com)). Their product combines several thin insulative layers (synthetic batting), a mylar vapor barrier layer and a thin canvas-like lining material all in one. To complete fabric for the curtain shade, just sew a decorative cover fabric over Warm Windows on the side, which faces the room (this is only for aesthetic purposes, and will not affect the performance). Warm Windows costs approximately $22/yard and comes in widths of 3.75 and 5 feet. It is for sale at CCAT, and sometimes available at major fabric stores.
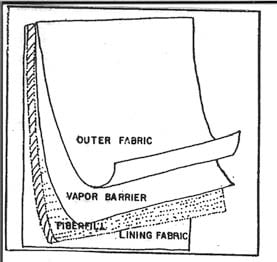
Alternately, you can make your own curtains using a combination of insulative synthetic material (such as old quilting batting or sleeping bag filler), coupled with a material that reflects heat and prevents water absorption (such as plastic sheeting), and a cover layer of fabric of your choosing.
Don't try to add a mylar layer yourself. It is extremely difficult to work with on a sewing machine, tears very easily, and is hard to find. Instead, find something that already has reflective material in it, (a good sleeping bag that someone is through with) and use plastic sheeting to prevent water absorption.
Always use synthetic material for the layer that comes in contact with the windows. This will prevent mildew caused by condensation on the window.
Cutting your fabric[edit | edit source]
When measuring your window, make sure to include the frame that holds the glass, and then add 2" to each side. If using the roll-up or roman shade design, add 6" to the top and 4" to the bottom (for the weight bar). This important step will ensure enough shade fabric to adequately seal your curtain to the wall in order to prevent heat loss thorough conduction and convection.
After you have acquired and cut your fabric, assemble it in a fashion so that the insulative layer of your curtain fabric would be facing the outside of the house and the vapor barrier layer would be facing the inside of the room. If you have several layers of insulation available, a layer may be placed on either side of the vapor barrier material. Sew lines of stitching through the fabric at 4" intervals, and then sew the edges clean on all sides. Sew in a weight bar pocket at the bottom of the curtain, if needed, and sew the weight bar into the pocket so that the bar does not fall out. Finally, sew your cover fabric onto the curtains onto the side facing the room.
Hanging your Curtains[edit | edit source]
Side draw is the most traditional design and involves the least hardware and sewing skill. They can be attached either in a shower curtain fashion, using a curtain rod and rings, or with a purchased pulley system. This design requires a wooden framed cap to prevent air from circulating behind the top of the curtain.
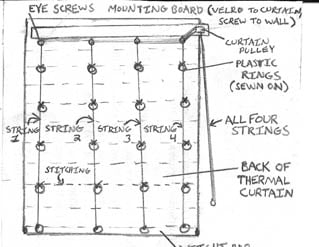
Roman shades are often considered to be the best-looking curtain type. They are more difficult to assemble because they require the following steps. Sew enough "O" rings to your shade so that each quilting line gets an evenly spaced row of rings 8"-12" apart. Eye-screws (one for each vertical line of rings) and a curtain pulley are screwed into the mounting board, eyescrews matching up with the lines of "O" rings and the pulley on one side. Individual strings are tied to the lowest "O" rings on the curtain, fed up through the line of rings, through the eye-screws, and then down through the pulley. This allows the curtain to be drawn up with a pull of the strings. Wrapping the string around a curtain cleat on the wall holds up the curtain. Roman shades are attached to a 1x2 mounting board with either a staple gun or with Velcro. Velcro allows removal for periodic cleaning.
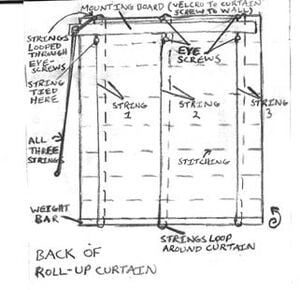
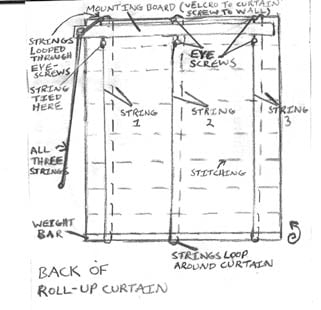
Roll-up curtains can be really easy or slightly difficult, depending on the method you choose. The curtain needs to be attached to a 1x2 mounting board with either a staple gun or with Velcro (Velcro allows removal for periodic cleaning). The easy way to install this design is to screw a small hook into the wall above the mounting board, and attach a loop of material to the back of the curtain (at the top center). In order to put the curtains up, you just roll them up by hand and put the loop over the hook to hold the curtain in place. The other method is nice looking and easier to pull up, although somewhat harder to install. First screw 2-3 eye-screws into the top of the mounting board and 2-3 into the bottom. Then screw a curtain pulley into the board on one side. Tie individual strings to each of the lower eye-screws. These strings wrap around the bottom of the curtain, up the front, and then through the eye-screws at the top of the mounting board. From there, they are fed through the curtain pulley. It is important to measure all of the strings with the curtain down. The curtain can now be pulled up with a pull of the strings. Wrapping the string around a curtain cleat on the wall holds up the curtain.
To clean your curtains you can dry clean, "wet"dry clean, hand wash, or use upholstery cleaners that spray on and vacuum off.
Don't ever dry clean thermal curtains if you make them with magnets as their backing glue will dissolve.
Sealing your Curtains[edit | edit source]
To be effective, your thermal curtain needs to be sealed tightly to the wall in order to stop air movement around the window. Sealing can be accomplished by using magnets, Velcro, sliding metal tracts, or small boards on hinges that clamp the curtain to the wall. Adding a weight bar, Velcro, or magnets to the base of the curtain will help hold it to the window.
Magnets need to be glued or sewn into the curtains, which can be very difficult to do. However, magnets can be painted the color of walls to be inconspicuous. Velcro has worked well for some and can be unobtrusive if the same color as paint, though it will eventually need to be replaced.
At CCAT, thermal curtains are sealed on the sides of the window frame with matching painted 1x2" boards that are about 2/3 the vertical length of the curtain. These boards are mounted on spring-loaded cabinet hinges, and close against the curtain to seal air circulation around the window. This last method has worked well at for years at CCAT.
For side-draw curtains, there is one last step to completing your thermal curtains. A cap must be created above your curtains in order to stop convection currents. This is typically made of wood, but could be plastic or sheet metal.
Glossary[edit | edit source]
Cap:
- Used for side-draw curtains; this is a frame (usually wooden) the width of the curtain that extends from the wall above the curtain, over the top of the curtain, and 12" of the front. It stops convection currents from forming around your curtain.
Conduction:
- The flow of heat through a material.
Convection:
- The flow of heat through currents in the air. Forms loops where cooled air falls and warm air replaces it; the warm air cools and falls, drawing in more warm air.
Reflective Vapor Barrier:
- An aluminized plastic that reflects infrared heat and blocks water vapor.
R-value:
- A measure of how well a material resists the flow of heat, a common measure of insulation is a hole in the wall, is about 6" of fiberglass insulation.
Resources[edit | edit source]
- Moveable Insulation, William Langdon. Rodale Press, Emmaus, PA. 1980
- Thermal Shutters and Shade, William A. Shurcliff, Brick House Publishing Co. 1980
- Insulating Window Shades, Ray Wolf. Rodale Press, Emmaus, PA. 1980
- Window Insulation, Bruce Anderson.
- www.warmcompany.com
Credits[edit | edit source]
By Lisa Murgatoryd, edited by eddie, Kendra and krystal
Sendog6913 17:30, 2 March 2008 (PST) Cal Poly Humboldt - CCAT


