
Abstract[edit | edit source]
The objective of this project is to improve CCAT's current method of sifting compost. CCAT uses a 3 bin compost system. The current sifting process is laborious and time consuming. We wanted to design a system that would be efficient, easy to use, durable, and easy to maintain while keeping the cost relatively low. We had multiple design options and decided to build a vibrating sifting screen. Before we built our final design, we had a prototype that allowed us to learn the motor was too loud and we needed more stability. In our final design we incorporated a dial to control the strength of the motor, as well as rope to reduce nosie. The maintenance for the sifting screen is minimal and requires to be checked after a few uses to ensure everything is still working correctly. Project is not complete.
Background[edit | edit source]
WHO[edit | edit source]
The Campus Center for Appropriate Technology (CCAT) is non-profit organization headquartered at Cal Poly Humboldt in Arcata, California. CCAT is co-directed by three students who employ, lead, and teach both students and volunteers about appropriate technology. Maximizing utilized space and living with the land, the CCAT property improves yearly by incorporating student-led appropriate technology projects on their grounds– promoting creative solutions, while allowing sustainable projects to be actualized and the benefits realized.
WHAT[edit | edit source]
CCAT composts organic material to amend their planting and crop soils. The current system employed is a 3-bin system. These separated bins accommodate the different stages of decaying material in the composting process. The first bin stores newly acquired organic material. The second bin stores organic material which has decayed but not fully matured into usable compost. The final bin is where the almost ready organic material fully matures into usable compost soil.
The organic material entering the first bin is whole or in large pieces. As the material breaks down and decomposes, it must be rotated to promote decomposition, and eventually separated from that of the larger pieces that need further time to decompose. This process of separation is conducted manually through the usage of sifters. The process is labor and time intensive, and must be performed two times, once for each subsequent bin transfer.
WHY[edit | edit source]
The current composting system in use at CCAT is outdated, laborious, and time consuming. CCAT is in need of a system that is more functional and accessible. CCAT has tried a number of composting systems over the years, but all have failed or been discontinued for one reason or another. In addition to the aforementioned 3-bin system, CCAT recently employed a hand-cranking compost system, along with a vertical compost tumbler. The hand-cranking for rotation, and the tumbler for sifting. The hand-cranking system is missing the cover doors, while the vertical tumbler is missing the sifting screens.
WHEN & WHERE[edit | edit source]
The 3-bin composting system and process will be redesigned and implemented Spring Semester 2023. The project will be installed alongside (or replace) the current system at the CCAT property, Cal Poly Humboldt, Arcata, California.
- Background images of existing composting systems at CCAT
-
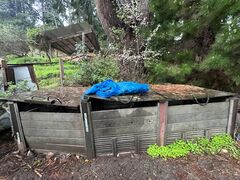
3 Bin Compost System. Top(s) open like a hatch. Front panels can be pulled upward, and removed, for easy shovel access.
-
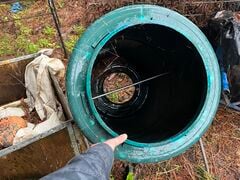
CCAT Decommissioned Vertical Compost Tumbler. Used to tumble and sift organic material. (No Screens)
-
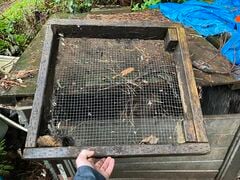
CCAT Handheld Compost Sifter. Made with 2x4's and wire mesh. Primitive and labor intensive.
-

First bin in the CCAT 3-bin compost system. Here the decomposition process for whole organic material begins.
-
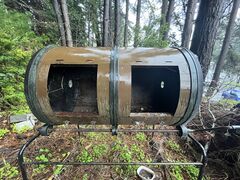
Decommissioned 2-Step Hand-Cranked Compost Bin and Tumbler. (No Front Panels)


Problem statement[edit | edit source]
The objective of this project is to improve the functionality, efficiency, durability, and accessibility of the compost system at CCAT. The current system is aged, missing components, and labor intensive to operate.
Criteria[edit | edit source]
The criteria for the system we are designing is supposed to solve some of the shortcomings of the existing system, especially by making the system easier to use and perform upkeep. The system will be located outdoors, so it must be able to withstand the natural elements of the surrounding area, including wildlife and the moist climate. A good design for a system, especially if designed with costly components, should last long enough to be considered a good investment.
| Criteria | Constraint | Weight |
|---|---|---|
| Efficiency | The designed system will be at least twice as efficient as the existing system | 10 |
| Ease of Use | The designed system will be at least twice as easy to use as the existing system | 9 |
| Durability | The system will persist without major failures for a minimum for 3 years | 9 |
| Labor Force | Operable by one person | 9 |
| Cost | Total cost is less than $500 | 8 |
| Education | The project presentable as an educational tool | 7 |
| Construction Complexity | The complexity of the project is not too immense that the project budget would be exhausted. Replicable. | 7 |
| Maintainability | There will be no more than 10 minutes of maintenance per week to keep the system running properly | 5 |
| Aesthetics | Must look functionally well designed | 3 |
Literature Review[edit | edit source]
This sections contains information about composting.
Composting basics[edit | edit source]
Composting helps restore the soil by converting organic wastes to rich fertilizers. Compost feeds microorganisms that help plants to grow and improve the structure of the soil. Composting helps suppress solid diseases. Before compost is added to the soil, it undergoes the first stages of decomposition so it can be more effective once it is added to the soil.[1]
Composting concerns[edit | edit source]
Compost piles contain lots of fungi, molds, mildew, and bacteria. It is important to practice safe composting methods to avoid health problems. Wearing gloves and a mask when composting is recommended especially if it is dry compost. Small compost piles are at a higher risk of not becoming hot enough and allow pathogens to survive. It is important to manage the compost pile to ensure it gets warm enough to reduce pathogens.[2]
Optimal Compost Mixture[edit | edit source]
Ratio[edit | edit source]
The ideal compost mixture is a carbon/nitrogen ratio of 30:1. Carbon provides an energy source and makes up about fifty percent of the mass of microbial cells. Nitrogen is crucial to the proteins, nucleic acids, enzymes, and coenzymes that are necessary for cell growth. Oxygen is also an important component. Insufficient oxygen will cause undesirable odors like a rotten egg smell. Oxygen concentrations of ten percent or more are considered optimal for composting. Oxygen availability in mixtures is usually determined through porosity, free air space, and bulk density. Nutrients such as phosphorus, potassium, calcium, iron, boron, and copper are essential for microbial metabolism. These nutrients are usually easy to maintain since they are present in the compost source materials. A pH range of 5.5 and 8.5 is optimal for composting microorganisms.[3] The growth of fungi and the breakdown of cellulose results in the pH level dropping which occurs because of organic acids accumulating. The organic acids accumulate from bacteria and fungi digesting the organic matter. Moisture is another important component because water allows for enzyme activities and nutrient exchanges. The optimal moisture is between fifty and sixty percent. Lower moisture levels reduce microbial activity and higher moisture levels favor anaerobic conditions. Anaerobic conditions occur when there is a decrease in oxygen.[4]
Maintenance[edit | edit source]
To aerate the pile and speed up decomposition, turning and mixing the compost pile is necessary. It’s important to monitor the pile for odor, moisture, and temperature. If the pile has a bad odor then it might be wet or need more air circulation. To fix this you can add more dry material.
Screens and Mesh Size for Sifters[edit | edit source]
Hardware cloth is usually used for the screens on sifters. Mesh sizes of ½ or ¼ are commonly used. If you want finer compost then a mesh size of ⅛ would be used but that would also be more time-consuming.
Easy Compost Systems[edit | edit source]
There are multiple things to consider when choosing one of the many methods of composting. CCAT currently has a three bin method.
Three bin method[edit | edit source]
This method is useful because it is “ideal to facilitate turning”[5] and allows the user to store compost in different phases of decomposition. However the turning process is still strenuous.
Raised bed method[edit | edit source]
In this method the compost sits on top of a grill allowing airflow to come from the bottom and therefore eliminating the need for turning however it can cause the compost to dry out.[6]
Compost turner[edit | edit source]
Makes turning easier however, “The main drawback is that once the drum has reached capacity, you have to wait 2 weeks until that batch is finished before adding fresh materials.”[6]
Shoveling[edit | edit source]
The current system requires shoveling in order to turn and move the compost.
Improper shoveling techniques can lead to serious injury.[7]
Hot composting[edit | edit source]
Heat is essential to speeding up decomposition in composting. Ideal temperatures are 100-120 degrees Fahrenheit. Some important factors in retaining heat are particle size, oxygen supply, size of the pile, carbon to nitrogen ratio, weather and season.[8]
Automatic Compost Turner Topics[edit | edit source]
Automatic compost turners and sifters can come in a variety of shapes and forms. These systems can be designed to turn compost, sift compost, or both. These systems are less labor intensive then manual compost turning alternatives, as the system only needs to be filled with compostable material. Automatic compost turning systems have many related topics, as broadly categorized below.
Trommel, Rotary Screen, Rotary Sieve, Rotating Drums[edit | edit source]
These rotating cylindrical systems are utilized in a variety of industrial processes, with a common functional application of sorting and sifting materials through screens. The main body of the machine, the cylinder, is typically made out of some sort of screening material fitted to a sturdy frame. The enclosed material is mixed and sifted as the cylinder rolls. In the case of the rotating drum, there is no screen, but the drum rotates similarly, tossing the mixture within.
DC Motors[edit | edit source]
Direct current (DC) motors would be relevant to a system which is powered by Photovoltaics (PV), because PVs product DC energy. DC motors have very adjustable and variable speeds, thus providing a variety of torque options. For the purposes of a creating a low RPM compost tumbler, most DC motors, with their default high speeds, would need to be geared down to serve our purposes.
Gears[edit | edit source]
Gears, and gear reductions make motors functionally purposeful. Gears can be classified by the number of teeth that they have. Gear ratios can be created utilizing the number of teeth that each gear has. Rotational speed can be reduced by gearing down, which would involve a smaller gear (4 tooth gear) turning a larger gear (12 tooth gear). The output gear (12 tooth) will turn slower than the input gear (4 tooth) in this case at a 3:1 ratio. This relationship relationship can be reversed. It is important to note that torque can be generated by reducing rotational speed, and vice versa, as rotational speed can be created by reducing torque. You can have several connected gears, to create high gear ratios, with the only drawback being friction, reducing the amount of speed or torque that is present in the system. The gears must rub against each other...
Clutch gears are notable type of gear, because they will never produce more torque than what the gear is rated for. They will "slip" instead of producing more torque. This can be useful if you want a specific amount of torque in your system.
Alternative Concepts[edit | edit source]
-
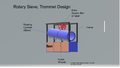
Initial variation of trommel design alternative
-
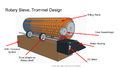
Variation of trommel design alternative
-
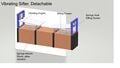
Vibrating Sifting Screen Alternative Design Concept
-
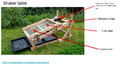
Reciprocating Shaker Table Design Alternative Approach- Credit: https://uncharteddiy.com/shaker-table-details/
-
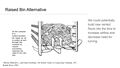
Raised bin method. Can reduce moisture in the compost, making it easier to sift.


Prototyping and Testing Results[edit | edit source]
We have created one screen prototype. The first one we created was not built to our actual measurements. We used the first prototype to see how well the compost would be sifted. From this prototype, we were able to learn that the motor was very loud and we needed to brainstorm ways to decrease the loudness. From the first screen prototype, we knew that for the final project we would need wood glue for more stability, a pocket hole screw, staple the screen onto the wood, and to cut the rough edges of the screen off. The second screen we built will be used in our final product.
-
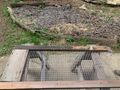
This image shows our first screen prototype before the motor is attached.
-
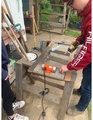
This image shows us attaching the motor to our first screen prototype.
-

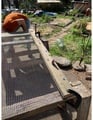
This image shows our first prototype after we tested it.
-

This image shows our first prototype with the motor attached.
-
This image shows our final screen.

Watch the video of our prototype sifter here: [1]
Construction[edit | edit source]
- PREPARE and ORGANIZE THE TOOLS
- Lay out the smaller tools on a large flat surface, making them organized and easily accessible.
- Pencil, corner, handsaw, Kreg jig, drill bits, pocket screws, glue, wood clamps, thread locker, and wooden screws.
- Lay out the smaller tools on a large flat surface, making them organized and easily accessible.
-

Lay out the tools that you will be using for the day.

- STABILIZE the WOOD PLANKS
- Required materials- wood planks, wood clamps, horse saw
- Secure your planks to a stabilized source. In our case, we stabilized the wood planks to two horse-saws using wood clamps.
- Required materials- wood planks, wood clamps, horse saw
-
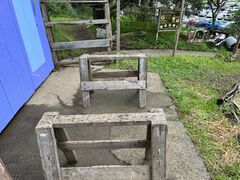
Saw horses in position for planks to lay accross.
-
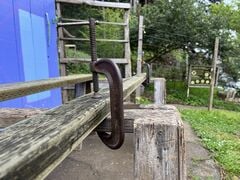
Secure your planks to a stable source, such as a saw horse, work bench, or vice.


- PREPARE the WOODEN PLANKS-
- Required materials- pencil, corner, handsaw,
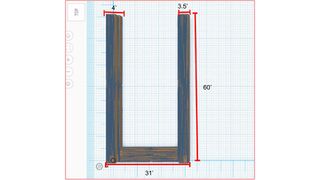
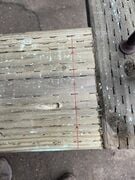
- Cut four (4) 4x4 wood planks to identical lengths. The determined length should be slightly larger than the surface of which you want the sifted compost material to land.
- In our case, the first bin in the 3-bin composting system is 48 inches wide, so the length of the four 4x4 wood planks was 60 inches in total length.
- Required materials- pencil, corner, handsaw,
-
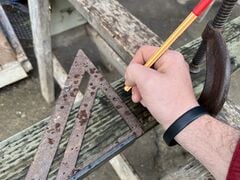
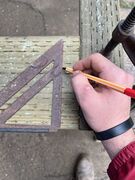
Corner your plank to size. This is where you will saw the piece to the desired size.
-
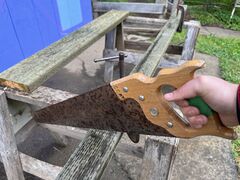
Saw your wooden planks to size along the cornered line that was drawn across the board.
-
Ariel View
-
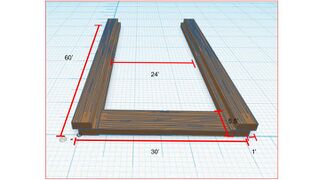
Sifting Frame with Measurements


.jpg)
- Cut one (1) 2x6 wood plank to size. The determined length will determine the width of your sifting screen surface. In our case, we cut the 2x6 piece to be 24 inches in length, so that our sifting screen is 24 inches/ 2 feet wide.
-
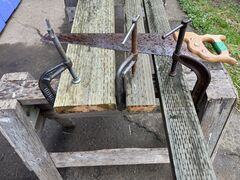
Clamped planks. Two have been cut to size. One board remaining.

- CORNERING and MEASURING CONTINUED
- Required materials- pencil, corner, kreg jig
- Grab a pencil.
- Using the corner, draw a cross section across the width of the 2x6 wood plank.
- Ensure that the line is as close to 90 degrees as possible.
- The line should coincide with the correct placement of the Kreg jig, as according to the instructions provided within the Kreg jig manual that comes with the kit upon purchase. A helpful resource guide to using the Kreg Jig can be found at https://youcanmakestuff.com/kreg-pocket-hole-jig-mini/.
- Required materials- pencil, corner, kreg jig
-
Corner where the drill bit guide will be set back. In this case, it is 1.25 set back.

- In the case of our 2x6 wood board, drilling a pilot hole into a 2x4 wood board, we retreat the jig 1.25’’ from the butt end of the board. This is where we want the penciled line.
-
The set back where the drill guide will be clamped.

- POCKET HOLE PLACEMENT
- SECURING the KREG JIG GUIDE
- Required materials- wood clamp, Kreg jig guide, 2x6 wood plank, horsesaw
- Align the end of the Kreg jig to the penciled line.
- Using the wood clamp, secure the Kreg jig to the plank and horse saw.
- Required materials- wood clamp, Kreg jig guide, 2x6 wood plank, horsesaw
-
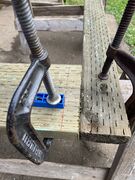
Clamped drill guide along cornered line.

- PREPARING the KREG JIG DRILL BIT
- Materials- Electric drill, Kreg jig drill bit, Kreg jig washer, Kreg jig allen wrench
- Fasten the Kreg jig washer to the correct placement on the Kreg jig drill bit….
- Materials- Electric drill, Kreg jig drill bit, Kreg jig washer, Kreg jig allen wrench
-
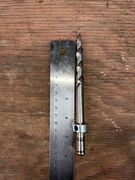
Measure and set depth collar on pocket hole drill bit.
-

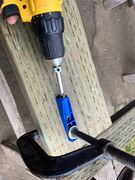
We measure from the "shelf" of the drill bit. In this case, the collar is set at 4.5 from the shelf o the drill bit.


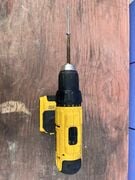
- Attach the drill bit to the electric drill.
- Dial the drill to drill mode, this will aid in drilling the pilot holes.
-
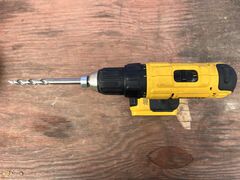
Attach the pocket hole drill bit to the drill. Set the drill to the pilot hole setting. (DRILL MODE)

- DRILL POCKET PILOT HOLES
- Materials- Electric drill, Kreg jig
- With the drill bit attached, dial down the electric drill, increasing the torque, lock the resistor.
- While running the drill forward at full speed, wide open, full throttle, insert the drill bit into the Kreg jig guide.
- Penetrate the 2x6 wood plank slowly, allowing the drill bit to work its magic. Too fast, and the bit will become clogged with wood. The wood shavings will exit the Kreg jig as the drill bit moves further through the wood.
- Materials- Electric drill, Kreg jig
-
Drill the pocket hole using a high rotational speed. Do not drive the bit into the wood too fast. Allow the wood to leave the drill guide.

- Drill at full speed until the Kreg jig washer is flush against the Kreg jig guide.
- Remove the drill bit from the guide.
- MORE POCKET PILOT HOLES
- Materials- drill with bit secured, guide, pencil
- Repeat steps 6-8 to prepare as many pilot holes as desired for the wood planks of choosing.
- In our case, we prepared 3 pilot holes for each end of the 2x6 board.
- The pilot holes should be more than .75’’ away from the edge of the board. The pilot holes should be roughly 1’’ away from each other, so as to not cause any splitting of the wood. Refer to the images in step 5 for proper pocket hole placement.
- Repeat steps 6-8 to prepare as many pilot holes as desired for the wood planks of choosing.
- Materials- drill with bit secured, guide, pencil
- GLUE PIECES to be JOINED
- Materials- wood glue, clamps, planks
- Glue the end grain of your 2x6 board and wait 15 minutes. Stand the board up vertically, so the glue can seep into the end grain.
- Wait 15 minutes
- Apply more glue to the end grain of the board.
- Apply glue to the edge of the 2x4, where the 2x6 will be joined.
- Securely clamp the 2x4 to the saw horse.
- Put the pieces together, and prepare to drill the pocket screws into the pocket hole
- Materials- wood glue, clamps, planks
-

Glue the edge of the wooden plank that will be joined screwed into.
-
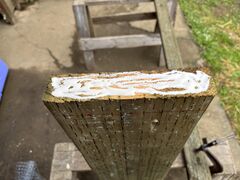
Glue the end grain of the board that will be joined. Wait 15 minutes, and apply more glue. The end grain can absorb a lot of glue.


- PREPARE DRILL for POCKET SCREWS
- Materials- Electric drill, pocket screws, pocket screw drill bit
- Put the proper drill bit into the drill that pairs with the pocket screws
- Turn the clutch setting of the drill to a lower number. You can increase it later if necessary. A lower number will help prevent the screws from being stripped.
- Materials- Electric drill, pocket screws, pocket screw drill bit
-
Attach drill bit that fits pocket screw. Set the drill to a low clutch setting, and low torque setting. This will help prevent the screw from becoming stripped.
-
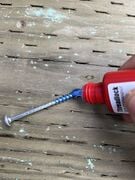
Apply thread locker to pocket screws. (Not necessary)...


- DRILL POCKET SCREWS
- Materials- Electric drill, pocket screws, pocket screw drill bit
- Insert the screw into the pocket hole
- Insert the drill bit into the screw
- Drive the screw forward at a LOW speed, applying great pressure against screw.
- Increase the clutch number if necessary. Keep speed (trigger) low.
- Materials- Electric drill, pocket screws, pocket screw drill bit
-
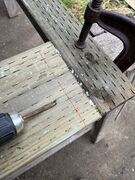
Drive the pocket screw into the pocket hole. The boards are now joined. The joining acts as a clamp for the wood glue to work effectively.
-
Drive the pocket screw into the pocket hole. The boards are now joined. The joining acts as a clamp for the wood glue to work effectively.
-
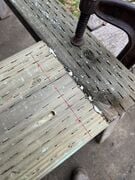
Drilled pocket hole.


- REPEATING FOR THE OTHER SIDE
- Repeat steps 4-12 for the other side of the board.
- CUT HARDWARE CLOTH TO SIZE
- Materials- Wire cutters, Hardware Cloth, Tape Measure
- Unravel and flatten out the hardware cloth as best as possible
- Measure the desired size of your hardware cloth by taking measurements of the frame
- The size should span across the center of your frame and rest upon the 2x4 planks and 2x6 plank.
- Using the wire cutters, cut the hardware cloth to size
- Materials- Wire cutters, Hardware Cloth, Tape Measure
- SECURE HARDWARE CLOTH to FRAME
- Materials- Hardware cloth, staple gun, rubber mallet, wood planks
- Secure the sized hardware cloth to the frame, by stapling it into place.
- If necessary, use rubber mallet to drive staples into the board
- You want the stables as flush with the wood as possible, so that in the next step, the wood glue can work effectively.
- Materials- Hardware cloth, staple gun, rubber mallet, wood planks
- GLUE and CLAMP SECOND 2x4’s
- Materials- Wood clamps, wood glue, sawhorse, planks
- Lay frame across saw horses
- Generously apply glue across the top face of the 2x4 wood planks on the frame
- Generously apply glue across the face of the 2x4 wood planks to be layered on top of the frame
- Clamp the pieces of wood together
- Materials- Wood clamps, wood glue, sawhorse, planks
- SCREW 2x4’s TOGETHER
Video instructions[edit | edit source]
Tying Knots for Suspension Rope[edit | edit source]
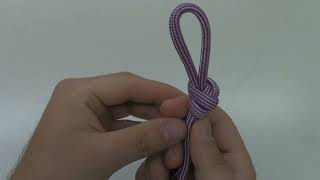
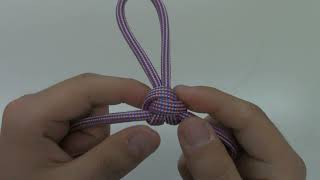
CCAT Sifter Intro: https://www.youtube.com/shorts/_pCeFWELdJU

Timeline[edit | edit source]
The following table displays our timeline for our compost project.
| Date | Description | Status |
|---|---|---|
| March 1 | Timeline and alternative solutions due | Complete |
| March 2-5 | Choose which solution we are doing and make a list of materials that need to be purchased | Complete |
| March 6 | Purchase and collect necessary materials. Begin prototyping | Complete |
| March 7-10 | Protoyping | Complete |
| March 11 | Turn in prototyping | Complete |
| March 12-18 | SPRING BREAK; NO WORK DONE | --- |
| March 19 | Begin building | Complete |
| March 20-25 | Building and budget working | Complete |
| March 26 | Project budget and first photos due | Complete |
| March 27-31, April 1 | Building | Complete |
| April 2 | Second photos due | Complete |
| April 3-8 | Building and working on appropedia | Complete |
| April 9 | Third photos | Complete |
| April 10-15 | Building and working on Appropedia page | Complete |
| April 16 | Appropedia draft due | Complete |
| April 17-29 | Work on video/other final project elements and Appropedia page | In progress (5/3/23) |
| April 30 | Final Appropedia page done | In progress (5/3/23) |
| May 1-4 | Finalizing | In progress (5/3/23) |
| May 5 | Final project videos due | Brainstorming ideas (5/3/23) |
| May 6 | Finalizing | In progress (5/3/23) |
| May 7 | Evaluations and timesheet due | In progress (5/3/23) |
| May 8 | Final presentation | Will complete day of |
Bill of materials[edit | edit source]
| Item | Amount | Cost per unit | Total |
|---|---|---|---|
| Router Speed Control | 1 | USD 17.99 | USD 17.99 |
| Thread Locker | 1 | USD 2.49 | USD 2.49 |
| Gorilla Glue | 1 | USD 5.49 | USD 5.49 |
| Electrical Tape | 1 | USD 8.20 | USD 8.20 |
| Drillbit 5/32 | 1 | USD 2.59 | USD 2.59 |
| 1/2 inch Hardware Cloth (4'x5') | 1 | USD 15.89 | USD 15.89 |
| 3-Prong Adapter | 1 | USD 4.99 | USD 4.99 |
| Hardware washers | 1 | USD 2.00 | USD 2.00 |
| Hardware Rubber Washers | 1 | USD 0.80 | USD 0.80 |
| Lag Screws | 1 | USD 2.36 | USD 2.36 |
| Hardware Cloth .25" (2'x5') | 1 | USD 14.99 | USD 14.99 |
| Corner Brace | 1 | USD 6.99 | USD 6.99 |
| Pocket Screws | 1 | USD 17.99 | USD 17.99 |
| Vevor AC vibrating motor | 1 | USD 44.99 | USD 44.99 |
| Mill Yard wood | 1 | USD 15.95 | USD 15.95 |
| Kreg Jig Guide | 1 | USD 50.53 | USD 50.53 |
| 8" Sonotube | 1 | USD 12.36 | USD 12.36 |
| Post Footing | 2 | USD 7.99 | USD 15.98 |
| Pier Block | 2 | USD 6.89 | USD 13.78 |
| Rubber Washers | 8 | USD 0.99 | USD 7.92 |
| 7/32" 6" Speeddemon Drillbit | 1 | USD 6.59 | USD 6.59 |
| 3" 1/4" Eyebolt | 2 | USD 7.99 | USD 15.98 |
| 4" 1/4" Eyebolt | 2 | USD 7.99 | USD 15.98 |
| Snap-spring Carabiners | 2 | USD 7.99 | USD 15.98 |
| Rope | 1 | USD 0.00 | USD 0.00 |
| Grand total | USD 318.81EUR 274.18 <br />GBP 232.73 <br />CAD 395.32 <br />MXN 6,647.19 <br />INR 23,862.93 <br /> | ||
Note: The rope and some other materials we used for this project were either found, donated, or already on site so the cost is listed as $0.00. Also, not all materials were used up; leftover parts/pieces to be expected.
Maintenance[edit | edit source]
The frame requires little maintenance, but should be checked every few uses to ensure that no fasteners have become loose. To increase cleanliness, and reduce odors, the frame should be brushed off after use. Special care of the electrical cords should be taken so that they are not damaged. Storing the frame in a safe covered location, away from the rain, will increase the longevity of the frame. The cords should be placed out of harms way. CCAT Co-Director informed us that it would be best to store the carabiners in a safe location, as they would be an item that would be desired to be taken by users.
Daily (After Use)[edit | edit source]
- Using a brush, wipe off the screen mesh of the sifter, clearing away any remaining compost material.
- Using a brush, wipe any remaining compost off the frame of the sifter.
Weekly[edit | edit source]
- Ensure that electrical cords are protected from harm.
Monthly[edit | edit source]
- Inspect the vibrating motor
- Ensure that the motor is securely mounted to sifting frame
- If loose, tighten the lag screws with an impact drill.
- Ensure that the electrical cord is in good condition, and stored properly
- Ensure that the motor is securely mounted to sifting frame
- Inspect the sifting frame
- Check for loose bolts
- If loose, tighten bolts by turning by hand and tighten the nuts with wrench
- Feel if the pocket screws are holding up
- Feel if the frame feels firmly assembled
- If not firm, tighten screws
- Apply mending plate if necessary
- Feel if the frame feels firmly assembled
- Check for loose bolts
- Inspect the suspension frame
- Check for loose bolts
- If loose, tighten bolts by hand tighten nuts with wrench
- Inspect the base of the frame
- The footholds should tightly secured to the pier blocks
- If loose, tighten or replace the screws that are driven into the piece of wood on the pier block, which secure the post footing.
- Inspect the screws driven into wooden posts
- The posts are currently designed with a forward sway, this is not necessarily problematic, if the screws on the side are secured.
- If loose, tighten or replace the screws that are driven into the wooden posts, and the post footing.
- The footholds should tightly secured to the pier blocks
- Check for loose bolts
Yearly[edit | edit source]
Ensure that the monthly inspection steps have been conducted, and respond accordingly.[edit | edit source]
- Inspect components for rust
- Inspect the quality of metal components, look for rust. Replace if necessary. Components included:
- Eye bolts, and associated nuts
- Carabiners
- Lag bolts securing motor
- Screws securing the frame
- Suspension frame foundation footing and screws
- Inspect the quality of metal components, look for rust. Replace if necessary. Components included:
- Inspect rope quality
- Look for frays in rope, replace the rope if necessary
- Check electrical components
- See if the motor and turn dial are working.
- Replace cords if desired.
- Inspect the painted display on sifting frame and associated components
- If slightly worn
- Apply oil layer
- If the display paint has faded and become visually incomprehensible
- Repaint as needed
- If slightly worn
Instructions/ Operation[edit | edit source]
The following are steps on how to operate the compost sifter.


.jpg)


Conclusion[edit | edit source]
Discussion/ Lessons learned[edit | edit source]
The main lesson we learned was the importance of testing and trouble shooting. For example learning that the motor was very loud on the first prototype and fixing it with a dial that lessens the power of the motor. Another example would be the wood coming out of our pure block concrete foundation which we fixed by cutting a new wood block and screwing it in with concrete screws as well as adding extra concrete screws to the other block as a precaution.
Next steps[edit | edit source]
Some potential next steps for the project as it goes on into the future are:
- Add solar panels. Instead of the long extension cord someone could create s solar system nearby for it to plug into.
- More signage. Unfortunately we were not able complete our sign so it would be good to add signage about how the compost sifter works, what can and cant be composted and maybe a chalk board component letting people know what bin they should put their compost in.
- Better storage. As of now we are just putting the frame in the tool shed but it would be good if there was a designated place for it.
- Weatherproofing. Something to protect the motor and the wiring, something to prevent rust on the screen, something to prevent the wood form rotting or being damaged by pests.
- Improving the compost bins. The compost bins are fairly outdated the lids and front panels are hard to remove. maybe creating a mechanized turner.
- Add hooks for the cord to wrap around so they are not hanging.
If we were to make this project again, many of the metal components can be made with rope and knots and it would be more sustainable and less expensive.
Troubleshooting[edit | edit source]
This is only how to troubleshoot basic operation. For complex issues, contact Hunter by email hfb11@humboldt.edu .
| Problem | Possible solution |
|---|---|
| Does not turn on | Make sure it is plugged in |
| The Motor Will Not Start | Motor Not Plugged into Speed Control Dial - Plug into the dial
Dial switch not flipped to "var" control or "full" - Flip the switch on |
| The Motor Will Not Start | Extension cords not plugged in - Plug in the extension cords
Extension cords not connected to each other- Connect the extension cords |
| The Motor Will Not Start | The cord joining has been damaged - Cut the motor cord down, below the electrical tape, and replace the 3-prong adapter. |
| Noisey Rattling | The motor has come loose - tighten the lag screws holding the motor
other fasteners have come loose - tighten the fasteners |
| Compost Material Is NOT Falling off the End of the Screen | The screen end has been bent - Bend the screen down to desired place |
| Large Compost Pieces are Flying Off the Screen into the Sifted Compost (Not Wanted) | The motor is operating at too high a speed - Add more compost material
|
| The Compost is Not Being Sifted | The Compost is Stuck in Place - Spread the compost out by hand to facilitate sifting. |
Team[edit | edit source]
Introduce team and semester in the following format:
- Hunter Blocchi
- Ashlie Reifer
- Leah Hoffmann
- Jude Romagnino
References[edit | edit source]
ADEYEMI, Hezekiah Oluwole, Adekunle Olorunlowo DAVID, Olasunkanmi Oriola AKINYEMI, Omobolaji Taofeek OPAFOLA, and Ayoola Abiola BABALOLA. “Sand Shovelling and Related Injuries among Sand Mine Workers in Nigeria.” Scientific African 8 (2020). https://doi.org/10.1016/j.sciaf.2020.e00313.
AuthorRob. “Homemade Compost Sifter Screen Sieve.” NiftyStuffcom, February 28, 2018. https://www.nifty-stuff.com/compost-sifter-screen-sieve.php.
Balz, Michelle. Composting for a New Generation: Latest Techniques for the Bin and Beyond. United States: Cool Springs Press. 2017.
Compost Chemistry.” Compost Chemistry - Cornell composting. Accessed February 17, 2023. https://compost.css.cornell.edu/chemistry.html.
Composting At Home.” EPA. Environmental Protection Agency. Accessed February 17, 2023. https://www.epa.gov/recycle/composting-home.
Composting Health Hazards.” GardenersNet.Com. Accessed February 17, 2023. https://www.gardenersnet.com/composting/compost-health-hazards.htm#:~:text=A%20compost%20pile%20contains%20lots,a%20cut%20on%20your%20hand.
Culpepper, John. “Rotating Drum Composter Design Guide.” Issuu. Camp Treetops North Country School Rock-E House and Basecamp, January 8, 2020. https://issuu.com/jtllp/docs/composter_design_guide.
Culpepper, John. “Rotating Drum Composter Operating Manual.” Issuu. Camp Treetops North Country School Rock-E House and Basecamp, January 8, 2020. https://issuu.com/jtllp/docs/manual_print.
Delp, Rachel. “Pros & Cons of Composting.” Home Guides|SF Gate, October 7, 2016. https://homeguides.sfgate.com/pros-cons-composting-41835.html.
Dudley’s Handbook of Practical Gear Design and Manufacture, 4th Ed.” Reference & Research Book News. Portland: Ringgold, Inc, August 25, 2021.
Ferrari, Ferrari, and Hempel. “Gear Trains.” Accessed February 16, 2023. https://www.cs.unca.edu/bruce/Spring13/180/Geartrain.ppt.
Gliessman, Stephen R., Eric Engles, and Robin Krieger. Agroecology: Ecological Processes in Sustainable Agriculture. Boca Raton, FL: Lewis Publishers, 2000.
How to Calculate Motor Torque. YouTube, 2021. https://www.youtube.com/watch?v=4r_jqiEOl3Q.
Kim, Sang-Hoon. Electric Motor Control: DC, AC, and BLDC Motors. Saint Louis: Elsevier Science & Technology, 2017.
MacEarchen, Diane. Save Our Planet: 750 Everyday Ways You Can Help Clean up the Earth. S.l.: s.n., 1990.
Martin, Deborah L., and Grace Gershuny. The Rodale Guide to Composting. Emmaus , PA: Rodale Press, 1992.
Minnich, Jerry, and Marjorie Hunt. The Rodale Guide to Composting. Edited by Marjorie Hunt. N.p.: Rodale Press. 1979.
Nguyen, Van-Truc, Thi-Hieu Le, Xuan-Thanh Bui, Trong-Nghia Nguyen, Thi-Dieu-Hien Vo, Chitsan Lin, and Thi-Mai-Hien Vu. “Effects of C/N ratios and turning frequencies on the composting process of food waste and dry leaves.” Bioresource Technology Reports 11 September 2020. https://doi.org/10.1016/j.biteb.2020.100527.
Proietti, Primo, Roberto Calisti, Giovanni Gigliotti, Luigi Nasini, Luca Regni, and Andrea Marchini. “Composting Optimization: Integrating Cost Analysis with the Physical-Chemical Properties of Materials to Be Composted.” Journal of Cleaner Production 137 (2016): 1086–99. https://doi.org/10.1016/j.jclepro.2016.07.158.
Solomon, Steve. Organic Gardener's Composting. Van Patten Publishing Portland, Oregon, 1993.
Trommel Screen.” Wikipedia. Wikimedia Foundation, November 1, 2022. https://en.wikipedia.org/wiki/Trommel_screen.
Vanderlinden, Colleen. “Make a Screen to Sift Compost for Your Garden Soil.” The Spruce. The Spruce, September 12, 2022. https://www.thespruce.com/how-to-make-a-compost-screen-2539615.
Zhao, Shulan, Xiaobo Liu, and Lian Duo. “Physical and Chemical Characterization of Municipal Solid Waste Compost in Different Particle Size Fractions.” Polish Journal of Environmental Studies 21 (2): 509-515. 2012.
|}]]