
The CCAT Small Pond Revitalization project has been inducted into Cal Poly Humboldt's Engineering 305 class in order to provide the surrounding community and students with an educational hydroponics experience. After being damaged and under-constructed in recent years, Spring of 2022 is promoting the long-lasting and successful rehabilitation of the pond on CCAT property. In design, a small 20 Watt solar panel system, with no battery, is being used to power an aeration system to keep the pond oxygenated and easily maintainable. This pond has been constructed and designed while consulting with the client (CCAT) with several key criteria in mind, such as education, safety, and sustainability. Being three students at Cal Poly Humboldt, the interest in the pond came from our educational basis in solar and rainwater catchment. With interest in agriculture and sustainable living as well, the project speaks to us with great authority and excitement. The following project is credited to Rose Maxwell, Charles Ricci, and Alexa Ramirez in the planning, designing, construction, and education that surrounds the pond project at CCAT.
Abstract[edit | edit source]
The objective of the pond revitalization project is for students to work with a local client and utilize appropriate technology techniques learned during the class while self directing an insight experience based project. As is described in further detail throughout this page, this project requires forward panning, client collaboration, material sourcing, designing and construction elements that challenge students to be creative and resourceful while problem solving and gaining real world experience. The CCAT pond revitalization project first addresses the client needs and hopes for the finalized pond. It is found that education and ease of maintenance takes precedence over aesthetics, with safety being a key feature as well. Research is conducted regarding the technical and scientific components of the pond for the Pacific Northwest area, with data found to promote the need for limited aeration for the overall pond to reduce eutrophication. Several designs and prototypes are carefully conducted, and described below, in order to meet client needs and to meet basic construction and building standards. Using sustainably acquired resources to build the pond, the goal is set to create a carbon-low pond to meet the overarching theme of CCAT. Construction of the pond is dependent on local resources, therefore, showing aspects of locality and sustainability. Maintenance of the pond and solar components are described below to meet the client's need of "ease of use and maintenance". Construction and budgeting documentation throughout the entirety of the project creates for a sense of professionalism and the long-lasting health of the pond at CCAT.
Background[edit | edit source]
Several years ago, a group of students constructed a fairly complicated aquaponics system located in the frontal section of the Campus Center for Appropriate Technology (CCAT). This Center, also commonly referred to as "CCAT", has been known among Cal Poly Humboldt for its exceptional work and experimentation among solar power, rainwater catchment, and other sustainable ventures. In the case of this small aquaponics pond, years of neglect due to Covid-19, constant leadership role changes, and lack of funding has been its downfall. Beyond the point of rehabilitation, this pond will require a complete re-do in order to make it a viable option for hydroponic and aquaponic educational purposes. Previously used for vegetables, more precisely leafy greens, our goal is to have this as our future plan and framework. Since recent role changes among the directors at CCAT, much of the previous pond construction information lies with the facilities and management crew, as well as hidden among the small CCAT library. With this in mind, previous construction and modeling plans for the pond may be lost, leaving our new student crew to entertain the idea of an entire remodel, as opposed to a revitalization. This new student crew of Cal Poly Humboldt, Engineering 305 students, consists of the following: Rose Maxwell, Charles Ricci, and Alexa Ramirez. This project of the "CCAT Small Pond Revitalization" will be composed of a 12 week venture concerning the Spring 2022 semester at Cal Poly Humboldt, with the goal of calculating, planning, and building the pond in that timeframe.
.jpg)

Problem statement[edit | edit source]
The objective of this project is to create a viable aquaponics ecosystem that can be used for future educational purposes at CCAT. As opposed to a small rehabilitation process, we plan on doing a complete remodeling processes which will entail interviewing, planning, demolition, construction, sourcing water, solar panel connectivity, and possibly permitting. The overall goal of this project is to create a functioning pond that reflects the appropriate technology and values of CCAT and and provides a source of education and enjoyment for students and visitors.
Criteria[edit | edit source]
These criteria look at the wants and needs of CCAT and the surrounding community. CCAT (the Campus Center for Appropriate Technology) is part of California State Polytechnic University, Humboldt, located in the city of Arcata in Humboldt County (Northern California). This criteria section breaks down what the students running CCAT, who initiated this project, found to be important guidelines for revitalizing this pond. They weighed these criteria based on their level of importance to the project and to the ideals of CCAT.
| Criteria | Description and Constraints | Weight (low
1 to 10 high) |
|---|---|---|
| Educational | It is very important that the pond meets the ideals of CCAT (the Campus Center for Appropriate Technology). It should be as sustainable as possible— including recycled and repurposed materials with the importance that it is easy to use. This includes documentation and signage that is easy to understand and access for the community | 10 |
| Documentation | It is extremely important that the entirety of the project is thoroughly documented, as CCAT's ability to do maintenance over the years is a major concern. The CCAT pond has to have easy-to-understand directions and maintenance protocols, clear history, and specific instructions. | 10 |
| Safety | This is a public area, so safety of the pond is needed. CCAT looks to keep a fence around the perimeter of the pond to deter accidental injury, preferably made from recycled materials. Correct application and maintenance of solar electronics will also be of great importance regarding safety. | 10 |
| Budget | It is a must that the CCAT pond revitalization stays within the proposed budget. | 10 |
| Maintainable | The pond needs to be easily maintained and easily passed on to the next generation of CCAT directors, as well as easy to understand. Ease of maintenance will mostly revolve around the electronic components of the the pond, as they are the most fragile. | 9 |
| Sustainable | Since education and sustainability is the purpose of CCAT, the revitalization will demonstrate sustainability with appropriate tech involved. The pond will incorporate the use of solar to run the aeration for the average daily Arcata insolation hours. The incorporation of reused, repurposed, and sustainable materials will be observed as well. | 9 |
| Water Quality and Health of the pond | Water quality will be determined by the success of the pond aeration, as this will prevent eutrophication within the pond. Once aeration has been installed, water quality and nutrient parameters will be addressed by CCAT at a later date, separate from the pond revitalization project. | 8 |
| Accessible to the Client | The pond must be simple for CCAT to access any floating vegetation, clean the pond, and maintain its overall quality. This goes for visiting community members as well, with emphasis on ease of access and understandability. | 7 |
| Aesthetics | CCAT is not concerned with aesthetics, but more about how well the pond functions, its sustainability, and the educational aspect. | 4 |
Literature Review[edit | edit source]
The following literature review will dive into the research needed to provide the correct forms of solar, pond materials, substrates, plants, aeration, water quality, and various other needs. Being research-based, this review will not provide any incites to our project design, construction, or other plans. All research and citations will follow APA format.
Client[edit | edit source]
CCAT, or the Campus Center for Appropriate Technology, has implored us to reconstruct, and downsize, the current aquaponics pond located in the front of the building. This building, roughly located on Union and 11th Street in Arcata California, is composed of directors who have certain wishes for their pond. Downsizing, liner replacement, underlayment rehabilitation, and aeration and solar implementation are all key factors to their goals. Considering they are fairly new directors, within the past year, we have little information on the past pond review, however we will follow their wishes as best as we can do in our timeframe.
Plant Substrates and Growing Requirements[edit | edit source]
Porous substrates[edit | edit source]
This study compares the growing speed and needs of hydroponically grown leeks. With leeks being an easy and disease resistant crop, they are comparable to the growing of long-term perennials and other leafy greens. In the case of CCAT, the client is after a hydroponics system that can support plant life through floating vessels. These vessels will have their own growing medium and fertilizer, leaving the pond to act strictly as a water source. This study found that evenly mixed and porous substrate was ideal for plants that were submerged in water. In the case of leeks, needing a sandy soil, a floating hydroponics technique was perfect for this application. The ability to have loose soil limits the possibility for fungal, bacterial, and root rot to occur. Although this study was based on the growing habits and needs of leeks, it is applicable to the needs of all major leafy crops, as over-watering is a very real concern.[1]
Looking at potting substrate for the future pond's vegetables and native plants, the following was found: "The results showed that a pot system performs better in terms of management of the systems. With regard to substrates, horticultural grade coconut fiber and horticultural grade mineral wool outperformed other substrates."[2]
Plant Options and California Natives[edit | edit source]
Since the client is concerned with perennial California Natives as a major option for the floating hydroponics system, current research shuts down this possibility. Most, if not all California Natives thrive as drought tolerant plants. There are very few options that pose the necessary water requirements to be able to thrive in a pond system. According to the following collegiate studies, these natives do not like to have wet feet, and in many cases prefer no water during the summer months. Being drought tolerant, they enter a dormancy period of little growth and water conservation during the hotter months, with their main growth period being in early winter and spring. Being very prone to rot, major temperature changes, and over-watering, an aquaponics system will not be advisable for California Native Perennials.[3][4]
Possible Edible Aquatic Plants to Use in the Pond[5][edit | edit source]
- Arrowroot (sagittaria): Aesthetically pleasing leaves and flowers. Edible starchy low nutrient roots. Benefits from regular thinning[5]— Endemic to CA[7].
- Cattails— (Typha latifolia): Six parts are edible, However, they can take over a bit and get quite large[5] — Native to CA[8].
- Another option for an aquatic plant that could also provide some surface cover and add to cooler water temperatures are water lilies— this area needs further research and consideration…Further information is also needed on the suggested plants.
Proposed Client Crop: Watercress[edit | edit source]
Our CCAT clients are considering watercress (Nasturium officinale)[9] a possible crop for the pond, in order to make use of the mass amounts of water that will be available. Being a river, pond, and other water-based habitat plant, this will prove to a be a great choice. "Characterizing the Cultivation Practices and Microbiological Quality of Watercress" looks at the viability of watercress as a aquaponics crop. Being grown mostly wild in various contaminated freshwaters, it is very susceptible to E.coli and other bacterial ailments. In many cultures and regions this crop is consumed raw, and without ample washing, leading to increased rates of E.coli. Growing water cress in a biologically safe area, such as a man-made small pond, could prove to be a major solution to possible bacterial illnesses and other ailments that come from the crop.[10]
- Watercress generally "prefers slow flowing, clean water 5-10 cm deep in cool growing conditions"[9]
- It is generally tolerant of a large range of conditions, however its preferred range for optimal production is water temperatures between 10-18°C (50-64.4°F) and daytime air temperatures between 20-26°C (68-78.8°F) and at night between 15-20°C (59-68°F). The limits of their optimal production air temperature range is a minimum of 10°C (50°F) and maximum of 28°C (~82.4°F)[9][11]
- They prefer shadier environments especially in summer temperatures, and often require shade cloth when grown outdoors. "... shading with 57% saran shade significantly reduced moderately severe tipburn that occurred in non shaded plants..."[9]
- "Hydroponic watercress is grown using a complete and balanced nutrient solution which contains all essential nutrient ions at a pH range of 5.5 - 6.5. EC [(electrical conductivity)[12]] levels in the nutrient solution are dependent on climate and are recommended to be in the range 0.8 - 1.5 mS.cm^-1."[9] (brackets and source added for clarification). watercress can be grown on lower EC solution, but produce better when within the recommended range.[9]
- "A clean high quality product can be produced using NFT, DFT, float or pond systems, ebb and flow or continued flow gravel beds. Outdoor gravel beds are usually 15-20cm deep, lined with plastic and filled with at least 100mm of free draining media such as clean gravel or river sand."[9]
Pond Linings and Pond-Base Substrates[edit | edit source]
Pond Underlayment[edit | edit source]
The following study, "Assessment of Calcareous Soil Linings for Seepage Reduction from Farm Ponds under Dryland Ecosystems", looks at possible base substrates for below standard pond lining. In this case, the use of calcareous soils, or limestone-based soils, proved to allow less seepage as a base for aquaponics ponds. Consisting of crushed up shells and limestone, this medium out-competed other soils in limiting pond drainage.[13]
Regarding underlayment, "Clay soil or not, a clay liner still has to be formed. This generally requires about thirty centimeters' worth of compacted clay. That, of course, means digging out an extra foot's worth of hole, everywhere."[14]
Substrate Options Added on Top of Clay or Limestone Base[edit | edit source]
- Sand: Sand is a cheap and easy way to fill the base of your pond before the liner is added, however it will not stick to the sides of your pond, and it could hide potential future sharp spots that may puncture the liner.
- Old Carpet: Carpet can be acquired used, as many demolition services rip it out, and it works as a forgiving pond base. It will stick to the sides, however it is important to use polypropylene base carpet, as wool will rot quite quickly.
- Both: A thin layer of sand, with carpet on top provides the best option, as it allows for the most forgiving base.[15]
Types of Pond Liners[edit | edit source]
HDPE (High Density Polyethylene)
- Pros: Durable, Long lifespan, Performs well in cold temperatures, Chemically resistant
- Cons: Poor at high temperatures, Poor flexibility, Prone to cracking, Must be welded on installation
LLDPE (Low Density Polyethylene)
- Pros: Flexibility, Durability, Easy installation, Inexpensive
- Cons: Susceptible to lengthwise tears, Must be welded, Can expand in high temperatures
RPE (Reinforced Polyethylene)
- Pros: Very durable, Puncture resistant, Foldable, Inexpensive shipping
- Cons: Stiff, Very little research on Lifespan
FPP (Flexible Polypropylene)
- Pros: Easily foldable and fits unique pond shapes, Long lifespan, Resistant against punctures and tears
- Cons: Can degrade with oil and chemical contaminants, Susceptible to stress cracking
EPDM (Ethylene Propylene Diene Monomer)
- Pros: Soft and Flexible, High strength, Long lifespan, Great in high and low temps, Low levels of leaching
- Cons: Must be seamed together, Low chemical resistance, Heavy (expensive shipping costs)
Butyl
- Pros: Flexible, Great in high and low temperatures
- Cons: Very hard to find to purchase, Susceptible to tears, Expensive, Poor chemical resistance[16]
Pond Lining Adhesive[edit | edit source]
*In the case of our pond project, being 1X1 meter in size, pond adhesive or tape will not be necessary due to the small pond size. If larger, the joining of two liners would be necessary. If plans change, this section will be updated.
Berms and Pond Containment[edit | edit source]
Berm Cores and Clays[edit | edit source]
The project and study concerning the "Environmental Implications of the use of Sulfidic Back-bay Sediments for Dune Reconstruction", takes a look at reconstructed dunes with clay cores in hopes to find evidence of heavy metal leaching in the ecosystem. The study found that major leaching had occurred due to where they sourced the clay for the rehabilitation efforts. This not only shows that the CCAT small pond will need to have major thought into the core of its berms for structural integrity, but also gives incite to where we source our clays, sands, and other materials in order to limit chemical and metal leaching.[17]
Water and Water Quality Factors to Consider[edit | edit source]
- Water has several types and conditions that determine its quality, and its ability to support life.
- Oligotrophic water is characterized by low nutrients and high oxygen levels. These bodies of water— tend to have clearer water with very little plant or animal ecosystems.[18][19]
- Eutrophic water is the opposite of oligotrophic water, it is characterized by high nutrients and lower oxygen levels (this varies with and is dependent on eutrophication levels). Eutrophic waters often have abundant algal and plant growth. Due to high eutrophication levels water can be depleted of oxygen through excessive algal or plant death—Eutrophication can support life, however excessive nutrients leading to eutrophication and even Hypoxia[20] can threaten aquatic life. "The addition of nutrients to oligotrophic water bodies from natural or anthropogenic sources will make them more nutrient rich and less oligotrophic."[18][21]
- Hypoxia: "Hypoxia means low oxygen and is primarily a problem for estuaries and coastal waters. Hypoxic waters have dissolved oxygen concentrations of less than 2-3 mg… excess nutrients can promote algal overgrowth and lead to eutrophication. As dead algae decompose, oxygen is consumed in the process, resulting in low levels of oxygen in the water."[18][21]
pH (Potential Hydrogen or Potential of Hydrogen)[22][edit | edit source]
- pH is a measure of hydrogen ions in water which can be indicative of chemicals in water "pH is really a measure of the relative amount of free hydrogen and hydroxyl ions in the water. Water that has more free hydrogen ions is acidic, whereas water that has more free hydroxyl ions is basic."[23]
- pH is measured from 0-14 and has two classifications; Acidic and Basic. 7 is the middle ground known as a neutral pH, while values below 7 indicate acidic pH, and above 7 indicate a basic pH.
- With each increase or decrease in pH value there is a 10-fold difference in pH."The scale is logarithmic, and each unit represents a 10-fold change…. For example, a value of 7 is 10 times higher than 6 and 100 times higher than 5. In general, the optimal pH range for growing vegetables hydroponically is 5.0 to 7.0."[23][24]
- Plants and animals are sensitive to pH, both in soils and water— pH can determine an organism's suitability to that environment. Among other factors that affect organisms, pH can affect chemical solubility and availability of nutrients.[23][24]
Alkalinity and pH[edit | edit source]
- According to USGS Water Science School Water Science School. (2018b, August 7). Alkalinity and Water | U.S.
Geological Survey. Www.usgs.gov; USGS. https://www.usgs.gov/special-topics/water-science-school/science/alkalinity-and-water and Michigan State University Fernandez, T. (2018, April 12). Water alkalinity and pH: What they mean in regards to water quality. MSU Extension; Michigan State University. https://www.canr.msu.edu/news/water_alkalinity_and_ph_what_they_mean_in_regards_to_water_quality\, a common misconception is that the Alkalinity of water is how basic it is, when in fact they are different. As explained by Fernandez at Michigan State University, Alkalinity levels indicate the buffering capacity, or how resistant the water (or compound) is to changes in pH levels.
- Knowing how alkaline water is, is important when trying to adjust pH levels to know how much of a given additive will be needed. For example, how much acid will be needed to lower the pH level on more basic water.
- How does this affect an ecosystem? According to USGS "A sudden shift in pH is not healthy for the fish and organisms living in the water. Aquatic organisms benefit from stable pH values, and waters with a high alkalinity are better able to maintain a fairly constant pH.
Dissolved Oxygen & Temperature[edit | edit source]
- An important element to water quality and aquatic ecosystem health is dissolved Oxygen levels or DO. "Dissolved oxygen (DO) is a measure of how much oxygen is dissolved in the water - the amount of oxygen available to living aquatic organisms"[25]
- Temperature affects oxygen levels in water— colder water tends to hold more DO while warmer waters lose DO. Dissolved oxygen is critical to the survival of aquatic life that utilizes it to function.[25]
- Another factor that affects DO is movement— moving water usually contains more oxygen, while stagnant waters can be very low in DO.[25]
- Further information is needed on Temperature factors.
Nutrients[edit | edit source]
- Nutrients "a substance or ingredient that promotes growth, provides energy, and maintains life"[26]
- Three of the most important, and commonly known nutrients in plant growth are NPK (Nitrogen phosphorus and potassium). These nutrients, especially nitrogen, can come from many sources including decomposing debris in the water, runoff from the surrounding land, organism waste, and more— an excess of these nutrients, and others can promote algal growth.[24]
- In book, Building natural ponds, Pavlis advises against adding any nutrients to a natural pond as nature will add nutrients over time and additional nutrients could promote algae problems. Low nutrients may slow the plants down which is fine, however if the plants really struggle, small amounts of nutrients can be added.[27] However, this may vary with pond size, location and the type and number of plants added.
- Other nutrient issues include accumulation of salts through evaporation and other factors. The common form of phosphorus is phosphate (PO4) which is a salt and accumulates in ponds as nutrients are added and water evaporates, similar issues arise with calcium and magnesium.[28]
- More information is needed on topics such as "Nutrient Antagonism and Interactions".[24]
Plants[edit | edit source]
- Plants in any body of water can be crucial to keeping nutrient levels in check, keeping oxygen levels up and generally keeping the water clean and healthy.[27]
- According to Pavlis in "Building Natural ponds",[27] plants serve a few key purposes— especially in natural ponds— "Aesthetically, they make the pond look natural. They remove excess nutrients. They increase oxygen levels."[27][29]
- Pavlis goes on to explain the issue with an ecosystem in a pond; the addition of waste and other additions to the water can lead to accumulated nutrients (such as NPK nutrients: Nitrogen, Phosphorous and Potassium)— which could lead to eutrophication. Established plants help absorb that nutrients before it has the chance to create eutrophic water conditions.[27]
- The balance between plants and water space to control algae levels depends on many variables. However, according to Pavlis, to be algae free, "I have found that if one-third to one-half of the pond's surface are filled with established plants, the pond will be algae-free. This will be augmented with some floating lilies."[27]
- For planting— if the pond is lined, planting water loving plants around the edges is almost pointless, since the liner will keep the water contained and the plants won't have access to the pond water.[27]
- For planting in the water, Pavlis advises against using soil, since soil adds nutrients. Aquatic plants should get nutrients from the water, not soil. Traditional planting, aside from planting directly into the ground, uses a pots— however, in water pots creates more maintenance when plants outgrow them, and need to be separated, etc… Instead water loving plants either need something to anchor to or nothing at all. To anchor the plants all that's needed are small stones on floor of the pond and a large stone to hold the root ball in place until the plant establishes itself. (More information can be found in Ch. 7 of Building Natural Ponds by R. Pavlis.[27]
- As with most new gardens, ponds, especially natural ponds, can look bare until plants become established— they also may not absorb nutrients as efficiently as they will once established and algae may grow for the first couple years and may require some establishing maintenance.[27]
Solar Power as the Obvious Answer[edit | edit source]
As we begin the process of building the pond, we take into account the needs and desires of the customer. The purpose of the pond is to line up with Appropriate Technology. Already a highly utilized source of reusable energy, solar energy will be most appropriate and sustainable for this project.
A source that greatly helps in these sorts of projects involving small scale solar is To Catch the Sun.[30]
Geography and Solar Radiation[edit | edit source]
It is important that we take into account the geographical region of where the pond will be built as well as calculations or looking up the average solar radiation in Arcata and the monthly variation, which can be found through NASA. The article also mentions the importance of "design[ing] the optimum sizing of electric power design to support the electricity demand of … [the] pond aeration system." Luckily there are already solar panels onsite, it is our job to incorporate applied methodology to fulfill the requirement. The example used in the article was HOMER software (Hybrid Optimization Model for Electric Renewables).[31]
Solar Photovoltaic (SPV) Water Pumping Systems[edit | edit source]
The efficiency of using photovoltaic as a power source for pumping water, a component crucial to the pond. "The solar photovoltaic (SPV) water pumping systems are usually composed of a PV generator, power converter and an electric motor which is usually coupled with a centrifugal (moving or tending to move away from a center) pump load." (Photovoltaic: relating to the production of electric current at the junction of two substances exposed to light.) Advantages of using these specific systems "include low maintenance cost, ease of installation, high reliability, no environmental pollution, and the absence of noise." Efficiency is reliant on factors such as insolation, ambient temperature, which is temperature relating to the immediate surroundings, module temperature, the average of the indication of all sensors, and the state of the solar panels.[32]
In the book, "Harnessing Solar Power The Photovoltaics Challenge," the author makes note of despite how simple a PV use may be, electrical storage may be required to remain efficient, this is one thing to think about prior to the construction of the pond when thinking about the weather patterns in Arcata.[33]
Solar water pumping[34][edit | edit source]
3 basic components of solar water pumping systems[34][edit | edit source]
- Power source (photovoltaic solar modules)
- Motor/pump (or motor/compressor) assembly
- Power controllers for matching the changing electrical output of the array to suit the motor/pump
"The power from a solar system and the volume of water pumped varies with the amount of solar radiation. This means that the system must be designed to work efficiently over a range of voltage and current levels."[34]
Available solar water pumps use an array of different electric motors[34][edit | edit source]
- AC synchronous motors
- AC asynchronous induction motors
- DC series motors
- DC permanent magnet motors
- DC permanent magnet brushless motors
"The permanent magnet DC motor achieves higher efficiencies, whilst the use of an AC motor in a solar pump requires an inverter."[34]
Centrifugal pumps[34][edit | edit source]
- Designed for a fixed head
- Water output increases with rotational speed
- Not self-priming ("Self-priming pumps are a specific type of liquid pump designed to have the required liquid inside the cavity or pump body necessary to start the pumping process.")[35]
- Rarely used for suction lifts greater than 4 to 5m
- At low heads, they are usually more efficient than positive displacement pumps
Positive displacement pumps[34][edit | edit source]
- Water output is directly proportional to speed
- Have helical (helix) shaped rotor pumps with a small number of moving parts
- Operate at low speeds
- Can handle dirty water
- Non pulsating flow ideal for long distance pumping
- Efficiency of pump increases with head
- Higher heads can be more efficient that centrifugal pumps
Air lift pumps[34][edit | edit source]
- Use an air compressor driver by an electric motor
- compressed air is piped to the bottom of the bore, the rising bubbles then 'pump' the water to the surface
- Useful in dirty or sediment-rich water
- Least efficient type of pump
Solar pumping[34][edit | edit source]
Factors that need to be considered when choosing a solar pump
- The amount of solar energy available in the location proposed
- The total dynamic head of the system
- The amount of water required
- The quality of water to be pumped
Searching for the Appropriate Solar Water Pumping System[34][edit | edit source]
- Asking manufacturers and suppliers
- We will need experts' advice to figure out the sizing of the solar power pumping system to accurately predict performances from the different systems.
"The amount of solar energy available will give an indication of the number of solar modules needed to provide the power to pump the required quantity of water at the calculated head.
The available energy and the amount of water pumped varies during any season. In order to avoid oversizing, ask [them] to predict performance, so you can choose the system size for your needs."[34]
Water supply[34][edit | edit source]
The total available water supply must exceed our suggested pumping requirements.
Power Required for Water Pumping[34][edit | edit source]
The amount of power required for the solar water pumping system is dependent on how much water is going to be pumped, the rate of the pumping, and the total head at which the system must operate.
The Head[34][edit | edit source]
"Total head consists of two parts:
(i) the static head (the height through which the water must be lifted), and
- Easily determined by measurement
(ii) the dynamic head (the pressure increase caused by friction through the pipework and expressed as an equivalent height in meters).
- Depends on flow rate (which must be based on the maximum pump performance in peak sunlight intensity)
- Depends on pipe sizes and pipe material
- the smaller the pipes and the greater the flow rate, the higher the pressure required to force water through the pipe"[34]
Prototyping[edit | edit source]
Image 1 Shows the area is relatively flat and may cause issues with the spillway— especially if the client wants to direct the water into some catchment system later. This will require soil grading and the use of gravel in order to direct the flow of water downhill. This will entail making this spot the lower part of the pond, but also a bit higher than the surrounding ground to give it some gravitational direction. These signage (Sgn) spots seem reasonable, as they are relatively out of the way, but still accessible— we could possibly put another smallish sign next to the solar panel for educational purposes on the PV system.
Image 2 Models the shade cloth how the shade cloth, at this position, has no cast shadow on the pond area— the angle doesn't work with the sun's position. (2:30 pm).
Image 3 Demonstrates how after modeling the shade cloth we realized the sun position is an issue with how we wanted to angle the shade cloth with the post.
Image 4 Shows how we discovered that positioning the shade cloth lower and flatter, and/or angled away from the sun gave better results. Where the shadow is casted also gives us an idea of where CCAT will want to position their watercress in future months.
Image 5 Illustrates how, once the pond floor is leveled, it will allow for better bubbler spacing.
The bowls represent the two aeration bubblers that will be fixed to the bottom of the pond. Based on our research, 2 bubblers would provide the best habitat for plant life, as otherwise turbidity would occur. The two ropes connecting the bubblers to the pump signify the aeration tubing that would need to be installed. Since floating is a problem, these will need to be secured with small stones, which will also allow for easy maintenance. The retaining wall in the image signifies the downsizing of the pond to meet clients desires, which will be made with cinder blocks and rebar.
Image 6 Shows how we figured out potential solar panel positioning. It gives more access to the full arch of the sun throughout the day and mimics the other nearby solar panel positioning. However, it is on the opposite side of the pond from the aeration system (the load). It could be moved next to the panel, however the purpose in its positioning is to limit access and make it less likely to be stolen. (in theory the angle of the panel would be more horizontal). If secured to the fencing, this could be a plausible set up for the wiring— however, further investigation is needed.
-
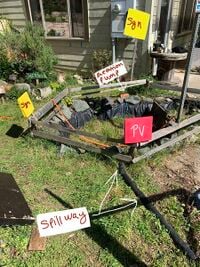
Image 1: Pond modeling the retaining wall, spillway, aeration system, possible signage (yellow) and solar panel (red) positioning.
-
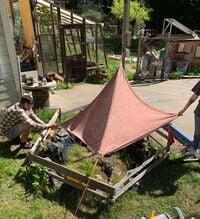
Image 2: Modeling shade cloth— issues include the angle of the cloth vs the sun at peak sun hours.
-
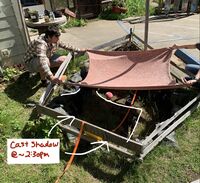
Image 3: Lower angle of Shade cloth— more flat.


-
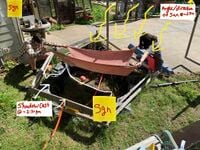
Image 4: Lower positioning of shade cloth angled away from the sun.
-
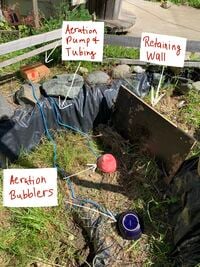
Image 5: Shows aeration system pump and bubblers with tubing and retaining wall.
-
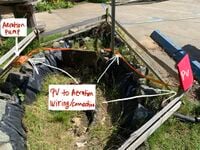
Image 6: Shows a possible path for wiring from panel to pump.


Construction[edit | edit source]
(Pt. 1)[edit | edit source]
A "draft" of our construction endeavors throughout the pond revitalization:
— Consult local facilities management and get an audit of the lines and other important infrastructure in your building area before you start deconstruction.
—If lines are present (such as electrical, sewage, water or gas lines)— be careful when looking for them-- consult with facilities management and follow their guidelines for construction. We marked them with Red dyed concrete then cover the concrete with a clay layer, a sand/gravel layer a carpet layer and then the pond liner. Do your best to build around existing lines/infrastructure.
— Excavate the pond area— we didn't expand the pond, we dug a bit deeper to account for the layers we put in later and shaped it a bit on the sides and where the retaining wall was constructed.
— Make sure the area is cordoned off when not working on it for safety reasons. Use caution tape or anything else that works. Cover with a tarp to keep the majority of rain off the soil in the pit to make working in it easier later.
— Build a berm: Shovel off excess clay to create flat shelf for the berm to be constructed. The berm can be made of clay— or cobb, or rocks and clay… Ours was made from the leftover clay shoveled out of the pond.
— Scoop the clay into the desired shape and size of the berm, pack it as tight as you can and then create a clay slurry and seal the berm in with the slurry.
— Further instructions are continued below in Construction Pt. 2.
-
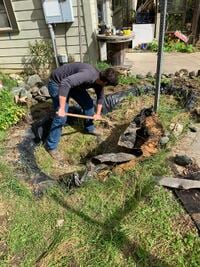
Image 1: Pond Deconstruction began with digging out the grass, clay, and rocks from the bottom of the pond.
-

Image 2: After digging out the soil and other debris from the bottom of the pond, the liner was gathered up to in preparation to be removed.
-
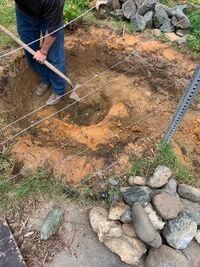
Image 3: After removing the liner, we began to dig out the layer of clay from the previous construction, in order to level the bottom of the pond and make it a bit deeper.
-
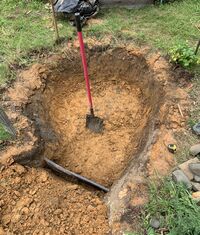
Image 4: Pond was excavated until the bottom of the was flat, and shaped a bit more on the sides and where the retaining wall will go.


-
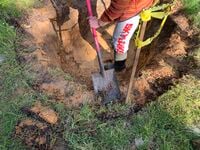
Image 1: Berm area was leveled and cleared of debris and excess clay to prepare for berm construction.
-
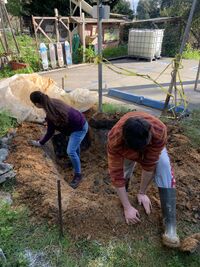
Image 2: Excess clay from the excavation was used to build up the berm. We packed it in and molded it to our desired shape.
-
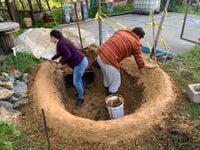
Image 3: A clay slurry was made to smooth out the berm and seal it into place.
-
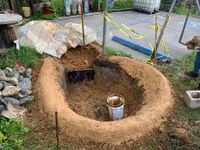
Image 4: Nearly finished berm with clay slurry layer applied.
-
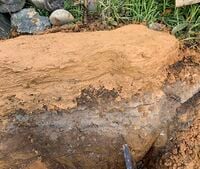
Image 5: Fun Snake head detail added to the berm to make the whole berm a clay snake.


Construction (Pt. 2)[edit | edit source]
— At this point, all lines that were marked by Facilities management should be found (with approval and supervision), and covered with cement/concrete that is dyed red— for future digging safety.
— The wall separating the smaller old pond section from the new main pond section should be built. due to the wall being directly over the electrical line we could not use rebar to give it a more supportive structure. we instead used cinder blocks, rocks and clay to built our wall. In hindsight we could have make it more sturdy by possibly adding in a more cobb-like mix.
— Once the wall is built-- add a berm on top and connect it to the previous berm. Build up a layer of clay and rocks on the inner side of the wall and make it sloped to match the rest of the pond. Make sure it is not saggin inward toward the pond.
— We filled the smaller section with a Hugelkultur-like structure. we put onl logs, sticks and clippings into the bottom and filled the rest in with soil.
— Add a layer of clay to pond interior. Smooth it out into your desired shape— If using RPE liner note that the bottom of the pond should be sloped since RPE is very stiff and hard to shape into corners.
— Put in the layer of gravel (about 1/2-1 inch), then the layer of sand (also ~1/2— 1 inch— we ended up doing shallower layers than this). Just make sure the gravel is not exposed and is not in danger of ruining the liner.
— The original plan was to lay out a carpet layer— However this didn't happen— we had already put in the liner and we decided it was fine as it was.
— Make sure the liner is evenly distributed once laid into the pond-- if is not forming to the pond, throw in a sand back to help— get into the pond and start folding and shaping the liner to fit the pond— this could take 2-3 people to do.
—Before the liner goes on (or just before you bury the edges), cut out a section of the berm for the spillway. And dig a channel for th pipe to rest in in the direction you want it to drain-- preferably down hill-- if it is not down hill, make the drainage pipe slanted down a bit to give the water a gravity based direction to flow. widen the challe at the end of the pipe and fill wit gravel and sand for better drainage and water dispersal-- block the opening with medium to small rocks to deter debris flowing back into the pipe and creating blockages.
—Put the liner in and shape it to fit the pond as desired-- use sandbags and eventually water to hold the liner in place and keep any folds down. Shape it over the spillway divit as best you can-- make sure it is fitted for the spillway pipe being used. Dig around the outside of the berm until the edges of the liner can be buried-- cut of (carefully) any corner that are too long (the scraps can by tucked under the liner for extra padding).
— Fill the pond with water-- and guide any folds into place as it fills. Don't fill it all the way.
— Bury the edges of the liner with the soil you dug up/left over clay around the outside of the berm (or topsoil)-- pack it tight and make the liner is as tight and secure as you can get it.
— Once the liner is in place, make sure the pond is clean of debris and dirt, as well as small rocks that could puncture the liner.
— Place rocks around the perimeter to hold the edges and soil down and minimize water infiltration — Also for aesthetics.
— Secure your spillway pipe using a waterproof sealant (we used waterproof caulking). Make sure to cover it until it dries, especially if it will rain or plan ahead and do it during a few days fo dry weather.
-
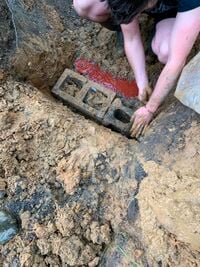
Image 6. Constructing Pond wall & Covering the electrical line with red dyed cement.
-
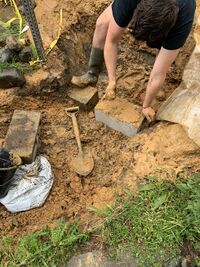
Image 7. Pack in the cinder blocks with rocks, gravel, and clay-- seal and build it all with a clay mixture.
-
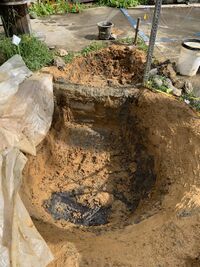
Image 8.
-
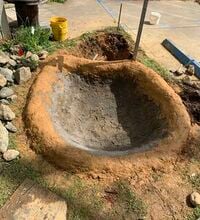
Image 9. Pond during clay, gravel and sand layering
-
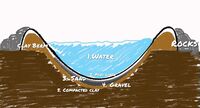
Image 10. Diagram of the Pond Layers-- Drawn by Alexa R.
-
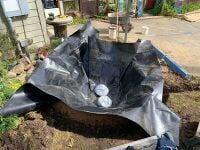
Image 10. Settling the liner in the pond using sandbags to weigh it down and make the process easier.
-
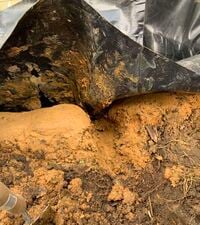
Image 11. Spillway/overflow divit cut into berm to fit spillway pipe.
-
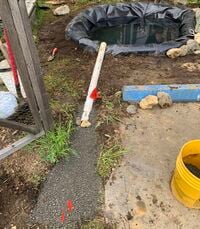
Image 12. Spillway channel with water dispersal gravel field and pipe in place.
-
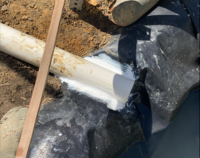
Image 13. Waterproof Sealant to Secure Spillway Pipe
-
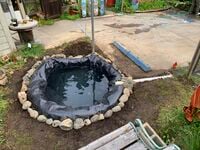
Image 14. Pond with all needed components, besides the fencing and solar aeration system.


.jpg)


Construction (Pt. 3)[edit | edit source]
—Start the fence and solar system post.
— Plan out how the fence will fit around the pond— this can depend on the fence post shape-- if they are square, make sure to place your posts in a way so that the right angles work together and with the shape of the pond. If cylindrical, this is less of an issue.
— Dig holes with a post digger— bury posts until only about a foot or so is above ground-- or at the desired height. Fill the holes with the excavated clay and soil, then some cement, and top with more soil.
— Do the same for the solar system post— we used a sturdy pressure treated 4x4 post. We figured out which way the solar panel needs to face based on where the most sun is coming from (south- southwest) where the other solar panels at CCAT were facing and at what angle— Diagonally cut the top of the post to the optimal angle depending on your longitudinal location, in this case between 42 and 45 degrees. Be mindful of where things like trees or a building block the sun, and account for that as best you can.
— Cut the fence panels the appropriate length and sand any rough parts, measure out and drill pilot holes. Make sure everything is reasonably level.
— Make a solar panel bracket. We initially planned for an adjustable bracket-- however the materials we had at the time were not working for that plan and we decided to do a non adjustable wood bracket due to time constraints.
— We secured the panel to the post with 2 L-shaped metal corner braces on each side of the post and screws, and ended up using some wood glue to seal a gap we found. Make sure to sand down any sharp corners— the solar panel's aluminum frame had very sharp corners that we were able to smooth out a bit.
— Attach the Solar Aeration System Wiring Box to the solar post. (Build a bracket if needed— we had to do this inorder make the box fit the post better).
— Drill 1/2" hole on the top and bottom and secure the 1/2" glands (scrape out the hole more to make it a bit bigger if needed to fit the threading of the glands through— Follow the Gland link on the budget table for details on what this is). The top hole is for the Solar panel cord and the bottom hole is for the aeration system air stone tubing.
—Solder the system once its threaded through glands and attach it to the back grid in the box so nothing moves around inside. Make sure the stone is aerating the pond properly and the system is working correctly.
— Set the combination code for the lock and lock the box. And you're done! Sit back, let the sun do it's thing, and enjoy your handiwork.
-
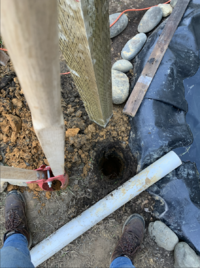
Image 15. Fence Post Hole Digging
-
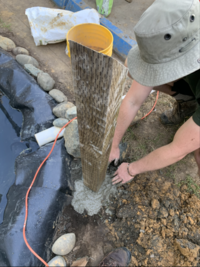
Image 16. Solar Panel Post Installation
-
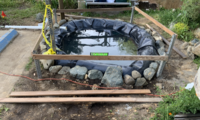
Image 17. Solar Panel Post and Fence posts installed.
-
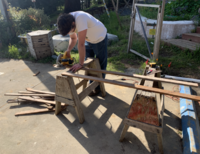
Image 18. Cut Fence panels to the appropriate length.
-
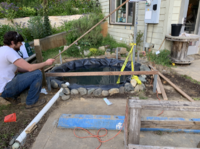
Image 19.
-
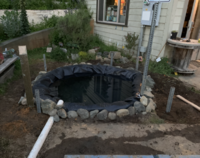
Image 20. Use a Level.
-

Image 21.


-
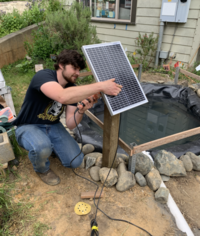
Image 22.
-
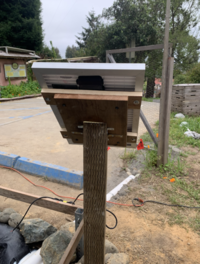
Image 23.
-
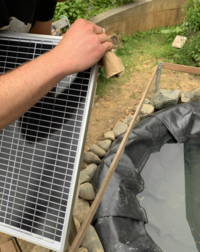
Image 24.
-

Image 25.
-
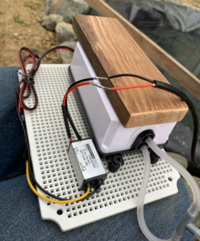
Image 26.
-
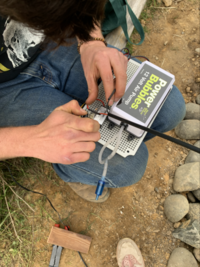
Image 27.
-

Image 28.
-
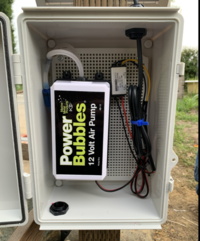
Image 29.
-
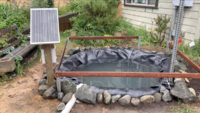
Image 30.


Inspirational, Instructional & Educational Videos of the Pond and It's Construction and Care Process[edit | edit source]
(The end product of the Pond Revitalization project is meant to be enjoyed by anyone, to be educational and contribute to CCAT activities. (Pond Project Videos edited by Alexa Ramirez. Images contributed by Rose M)).File:Inspirational Video 1.mov
Short Inspirational Video[edit | edit source]
- 0:01 Enjoying the Pond
- 0:10 Full System View with Solar Panel
- 0:11 Aeration Bubbles and Inspirational Quote
- 0:20 Bye
File:Instructional Video 1.mov
Short Educational Video[edit | edit source]
- 0:04 About the Electrical Enclosure
- 0:09 Solar Panel
- 0:11 Posts and Fencing
- 0:15 RPE Pond Liner
- 0:17 Air Stone
- 0:23 Inside the Electrical Enclosure
- 0:25 Cleaning Instruction
- 0:27 More Sun= More Bubbles (Aeration)
- 0:32 Bye
Short Instructional Video[edit | edit source]
- 0:04 How to go from Disrepair to Revitalization.
- 0:10 Step 1: Clear it out.
- 0:17 Step 2: Build the Berm.
- 0:26 Be Creative and Have Fun!
- 0:28 Layering Diagram
- 0:32 Be Collaborative
- 0:34 Cover Up and Keep the Pond Dry
- 0:39 Step 3: Be Mindful of Infrastructure that is already in Place
- 0:42 Step 4: Build a Wall
- 0:46 Step 5: Clay, Gravel and Sand Layers.
- 0:50 Step 6: Get Your Liner Ready
- 0:54 Step 7: Add Water
- 0:57 Step 8: Add Spillway/Overflow Divot and Pipe
- 1:01 Step 9: Bury the Liner Edges
- 1:04 Step 10: Add Rocks
- 1:06 Step 11: Test the Solar Aeration System
- 1:14 Step 12: Build the Solar Bracket.
- 1:18 Step 13: Dig Post Holes, Build the Fence and Solar Post Structures.
- 1:22 Step 14: Secure the Spillway Pipe (you can do this step earlier).
- 1:24 Step 15: Secure the Solar Aeration system Wiring.
- 1:31 Be Proud of Your Accomplishments!
- 1:38 Thank You. Bye
Tentative Timeline[edit | edit source]
This is a tentative timeline of the project from start to finish. It includes important dates by which certain steps in the project need to be completed to keep things on track. This timeline will be updated at the end of the project to compare our progress-- the project status will be updated weekly.
Due Week 3: (Jan 31- Feb 6) Status: Complete[edit | edit source]
- Team formed, contract completed, Trello page created and other team related assignments turned in.
- Opportunity definition posted to Appropedia.
Due Week 4: (Feb 7- 13) Status: Complete[edit | edit source]
Begin material listing, sourcing, and cost effective research
- Meet with Client and review project site
- Literature Review.
- Timesheet #1 submitted
- Using sustainability and reusability as a guide, researching with this in mind
- Begin documentation of materials and local re-use options
- Keep cost effectiveness in mind for the entirety
- Create documentation of data regarding pond, solar, and plant necessities
Due Week 5: (Feb 14-20) Status: Complete/in Revision[edit | edit source]
- Project Criteria: Developed criteria and specifications in accordance to the client's preferences. Posted in Appropedia in table format.
- Interviews and observations of the site, clients and other related people and places. (Noah Jenkins: Hatchery Technician and Assistant interview and observation, Client interview and CCAT observation).
Due Week 6: (Feb 21-27) Status: Complete[edit | edit source]
- Proposed Tentative Timeline to Appropedia
- Pond alternative solution design sketches.
Due Week 7: (Feb 28- March 6) Status: Complete [edit | edit source]
Alternative Solutions Due: 3-12 Project Designs (prototypes):
- Low, moderate, high pricing and difficulty design options.
- Quality and costly options vs barebones and inexpensive options. 3-12 alternate solutions that meet our criteria, but are loose and not totally dialed with exact fittings and sizes.
- "Relatively heavy" will be used to illustrate weight instead of exact pounds.
- Present design options to the client— and document feedback. Figure out with the client which one works best for their needs
- Talk to CCAT about future issues (that will take time), like getting an educational sign done.
Due Week 8: (March 7-13) Status: Complete[edit | edit source]
Point positive Due: Discuss how to incorporate this concept into the designs that we proposed and that were approved by the client.
- Client approval of best design, materials, and rough costs:
- Secondary interview and observations will be conducted during this process
- 3 designs relating cost differences will be discussed, regarding best material options
- Project Budget
- Need to buy or source materials
—Spring break (March 14-18) —[edit | edit source]
Due Week 9: (March 20-27) Status: Complete/In Progress[edit | edit source]
Tentative project budget approval, physical prototyping, pre-existing pond demolition, discuss educational plaque and sign:
- Prototyping of approved design (Using ropes and cardboard, etc,...)
- Demolition of existing pond site (take record of reusable materials)
- Need a way to cordon off the site while under reconstruction for safety and tampering reasons.
- Discuss possible plaques and design options, implementing the Cal Poly Humboldt design team.
- Inventory collected and purchased materials before construction (still in progress).
- Material collection and inventory (either this week or next week depending on where we are in the schedule at this point).
Due Week 10 (March 28- April 3) Status: Complete[edit | edit source]
Inventory, construction of pond:
- Use documented sources in order to sustainably collect pond materials
- Tidy up the site and begin construction, starting with underlayment
- Complete underlayment, begin liner and fence construction
Due Week 11 (April 4-10) Status: Complete[edit | edit source]
Material inventory on solar needs, solar construction, educational sign inclusion:
- Aeration and solar needs (reusable solar panel and battery at CCAT-- Battery was stolen-- we are not using this solar system)
- Begin construction of sign framing, include university-made sign into construction process
- Solar panel, battery, and aeration testing
Due Week 12 (April 11-17) Status: Completed (completed around weeks 14-15)[edit | edit source]
Project photos and video documentation:
- Create collaborated document with shared videos and pictures of construction
- Document pictures, materials, etc. on Appropedia
- Everything should be built and tested, but not fully documented yet.
Due Week 13 (April 18-24) Status: Completed (Around week 13, 14 & 15)[edit | edit source]
Final draft project report, end construction section, finalize signage:
- Finalize construction in preparation for pond testing
- Everything should be documented by this time and built
- Build-in some flex time
Due Week 14 (April 25-May 1) Status: Complete (weeks 14 & 15)[edit | edit source]
→ (Everything is pretty much due)
Finalize report, video documentation, Appropedia upkeep, maintenance discussion and draft
- Entirety of the physical construction of the project is completed
- Completed draft of Appropedia page, including documented photos
- Draft up maintenance and upkeep requirements for pond and solar system
Due Week 15 (May 2-8) Status: Complete[edit | edit source]
Maintenance and project testing:
- Finalize maintenance documentation for pond and solar requirements and post to Appropedia
- Project is completely built and tested, including solar
- Turn in final timesheets
- Complete Peer evaluations.
Due Week 16 (May 9-13) Status: Complete (most of these last couple weeks were done in weeks 14-15)[edit | edit source]
Video reflection document:
- Project revisions and final editing
- Re-test all project components
- Video and reflection document editing and completion
- Final Project Page and write-up posted to Appropedia.
- Final project review, presentations, class feedback
Update[edit | edit source]
- Overall we were about a week to 2 weeks behind schedule. One thing that largely got in the way of our progress was issues with infrastructure that was already in place. The previous pond's construction was not documented and they did not go through official channels to get digging permission— and so there was a danger of our team digging up important lines-- like the electrical line, sewage line, gas and water lines. If we had been carefless, not gone through Facilities Management to get an inspection done, or used heavy machinery, someone could have gotten seriously injured. If they had dug, or hammered rebar into the electrictrical line it could have been really bad. It put our plans back quite a ways but it was important that we did it.
- We will discuss this in more detail in the Lessons Learned section of this page.
- Another reason we were a bit behind is we needed better planning. This was partially due to not fully understanding the project and what our next steps needed to be. Also ordering things as soon as possible-- we did run into some issues with orders coming late or issues with team scheduling and getting the orders in on time-- or trouble finding materials. For many of the materials we tried to find less traditional/mainstream ways of sourcing them, but ended up having to order them online more traditionally or we would have fallen very far behind schedule.
Bill of materials[edit | edit source]
The following table displays our Tentative Budget for the pond project materials: CCAT is funding this project with an approximate $600 budget. The table lists the materials, quantities and costs necessary for this project-- while keeping within the set budget. The table and its contents are a proposal that is subject to change over the course of the project as we do further research and consult with the client. Several materials listed have been sourced at no cost-- such as materials already on CCAT grounds or through personal connections or donations.
| Material Notes | Quantity | Materials | Sources | Costs | Totals |
|---|---|---|---|---|---|
| (Needs to be at least 11'x11') | 1 | RPE Pond Liner | Sourced through Beneficial Living Center | $197.00 | $197.00 |
| 3 | Labeling and Signage: lamination | Staples | $4.00 | $12.00 | |
| Only need ~4 | 4 | Cinder Blocks and Rocks | CCAT Reclamation | $0.00 | $0.00 |
| 1 | Aeration | Amazon | $40.13 | $40.13 | |
| 24v to 12v | 1 | DC Stepdown Converter | Amazon | $10.99 | $10.99 |
| (smaller panel) (Amazon-- Price paid $24.40) traded for a larger panel (hqsolarpower.com) <-- Price of the panel we used $37.99-- 20W, 12v. | 1 | Solar Panel | Amazon | $24.40 | $24.40 |
| ~4 metal right angle brackets,1 wood panel, and two wood crossbars ~14 screws of differing sizes depending on the wood and where it goes | 1 | Solar panel Bracket Materials | Build ourselves/CCAT Reclamation | $0.00 | $0.00 |
| You need a lighter to shrink it on the soldered wiring-- self-sourced. | 2 | Shrink tubing for soldered wires | Sourced from class Lab materials | $0.00 | $0.00 |
| 1 | Shade Cloth | Amazon | $30.37 | $30.37 | |
| 20lbs | 1 | Gravel | Powell Landscaping | $10.00 | $10.00 |
| To carry the gravel | 1 | Trail Mix-- Garbage Can | Powell's Landscaping | $16.93 | $16.93 |
| 1/3 sq yard- To fill in the pond section that was separated out and is intended for planting in. | 1 | Top Soil | Miller Farms | $18.86 | $18.86 |
| From site and previous pond | 1 | Clay | Sourced on site | $0.00 | $0.00 |
| 4 (1"x4", 6' laterals) and 4 (~1.5 ft) Perforated square metal sign post scraps | 8 | Fencing Materials | Pearson Lumber | $4.00 | $24.00 |
| (post) 4x4 pressure treated post | 1 | Panel Mounting Materials | CCAT Reclamation | $0.00 | $0.00 |
| 1 | Electrical Tape | Hensel's Ace Hardware | $1.07 | $1.07 | |
| 10 oz | 1 | Red Cement Dye | Hensel's Ace Hardware | $9.75 | $9.75 |
| 2 | Cement + Quick Dry Concrete | Self Sourced + from Ace | $11.92 | $11.92 | |
| With tax: 7.42+1.845=9.265 | 1 | Pad lock for Securing Case | Amazon | $9.27 | $9.27 |
| (Waterproof, lockable, weather-resistant). | 1 | System Wiring Storage Case | Amazon | $37.84 | $37.84 |
| (came in a 5 pack-- only needed 2) | 2 | 1/2" Glands | Amazon | $8.67 | $8.67 |
| 4-5 ft section (or full pipe) (~3-4" diameter) | 1 | PVC (drainage) | CCAT Reclamation | $0.00 | $0.00 |
| (came in a 5 pack-- only needed 2) | 1 | Sealant-- caulking | CCAT | $0.00 | $0.00 |
| (12) (3" long, 1/4 diameter bolts) (quite expensive-- make sure they are all the right sizes) | 1 | Bolts, Nuts, Washers for Fencing | Ace | $32.29 | $32.29 |
| (for easy removal of shade cloth) | 1 | Carabiner and Chain | Self Sourced | $0.00 | $0.00 |
| Yet to purchase or source (aim to get it for~$20 or less) | 1 | Pond Cleaning Net |
|
|
|
| Grand Total | $488.12 | ||||
| Alloted Budget | $600.00 | ||||
| Left Over | $111.88 | ||||
Solar Aeration System Costs[edit | edit source]
This table only includes the costs for items purchased or sourced for the aeration solar system itself.
| Material Notes | Quantity | Materials | Sources | Costs | Totals |
|---|---|---|---|---|---|
| 1 | Aeration System Pump | Amazon | $40.13 | $40.13 | |
| 1 | DC Stepdown Converter | Amazon | $18.96 | $18.96 | |
| (smaller panel) (Amazon-- Price paid $24.40) traded for a larger panel (hqsolarpower.com) <-- Price of the panel we used $37.99 | 1 | Solar Panel | Amazon | $24.40 | $24.40 |
| (--> 2--34.5cm long aluminum right angle bars and 1 wood panel) | ~2 | Solar Panel Bracket | Build ourselves/CCAT Reclamation | $0.00 | $0.00 |
| 2 | Shrink tubing for soldered wires | Sourced from class Lab materials | $0.00 | $0.00 | |
| (Waterproof, lockable, weather-resistant). | 1 | System Wiring Storage Case: | Amazon | $37.84 | $37.84 |
| (came in a 5 pack-- only needed 2) (some cases come with glands- ours didn't). | 2 | 1/2" gland | Amazon | $8.67 | $8.67 |
| Total | $131.66 |
Operation[edit | edit source]

File:(Vid of Aeration Bubbles) IMG-9988.mov
This is the brief outline and documentation for how to properly operate our pond and solar system with ease:
— Step One: Make sure the system is on and all the connections are sound (if operating after an extended period of non-use).
— Step Two: Make sure there is enough sunlight to power the system. If not enough sunlight, reposition the panel.
— Step Three: Angle the panel (if necessary) to face the path of the sun for the current time of year. Keep in mind the differing sun angles and average insolation in order to properly provide the aerator with enough wattage.
— Step Four: Let the sun power the aeration system, and clean/maintain when needed in order to achieve longevity.
— Step Five: After proper setup, check for general maintenance issues such as clogging and connection issues.
— Step Six: Watch the plants grow with the power of the sun and aerator!
— Step Seven: Keep the water as clean as you can and make sure the spillway is clear of debris.
Maintenance[edit | edit source]
This project should require very little maintenance, as that was an important criterion emphasized by the client. However, only time will tell how much maintenance is really needed.
Check the aeration stones every so often, according to the manufacturer recommendations and depending on how the pond looks. If it is clear/clean and the bubbles look like they are being properly produced when there is available sun powering it, it is working properly. If the water is mucky, or the bubblers aren't producing bubbles (even with sufficient sun), check the stones and change them if needed. If that isn't the problem, check the tubing for kinks, blockage, etc… If that is not the issue check to make sure the aerator is working and is blowing air. If that isn't the problem check the solar system connections in depth.
If there is a build up of debris, dirt, or rocks on the bottom of the pond it may need to be swept or scooped with a net to remove the debris. This should be done regularly so that nutrients don't build up in the water, or so the aeration stones don't lose efficiency. This should only need to be done 1-2 times a month or less depending on the time of year or the frequency of pond use (i.e. if plant pots are being soaked in the pond).
Depending on the time of year or weather, the panel surface itself may need to be cleared off or wiped clean once in a while so the solar cells are able to function as efficiently as possible.
Schedule[edit | edit source]
Scheduled maintenance times for the pond and solar equipment:
- Daily/ Weekly
- Check that the bubbler is functioning properly (only needs a cursory inspection in passing while there is sufficient sun available to power the aeration system).
- Remove debris from the pond (using a net or any other convenient method). Weekly or monthly, depending on the weather or time of year.
- Monthly
- Remove debris from the pond (using a net or any other convenient method).
- Make sure the solar panel is clear of any obstructions.
- Check the water level. (Eyeball it-- If it's noticeably low, figure out why, if it's not a structural issue then just add some water if needed.)
- Make sure the spillway is clear of debris before wet seasons begin or before heavy rain forecasts. (If it is overflowing check the spillway for blockage or investigate for any other causes).
- (Bi-monthly or less, depending on conditions) After heavy rains, or if plants are not doing well in the water, check the pH and correct for any issues. (Ideally it should be around 6.0 to 8.5<ref>How to Lower Pond pH (Advice & Best methods). (2017, June 24). Pond Informer. https://pondinformer.com/how-to-lower-pond-ph/#:~:text=In%20regards%20to%20garden%20ponds<ref>, however it is up to you how well the pH is balanced).
- Yearly
- Wipe the Solar Panel glass.
- Check for wear and tear of the pond liner and overall aeration and solar system.
- Check that the fencing and posts around the pond are stable and safe.
- Check the quality/legibility/wear and tear of the signage-- replace if needed.
- Every Couple Years
- Check for any general wear and tear.
- Check condition of electrical systems.
- Check the structural soundness of fencing/posts/solar mount and retaining wall.
- Replace signage if needed.
Instructions[edit | edit source]
- This is a plan to maintain your project. The step by step how to template {{Steps}} is most likely the best way to display a process, which will look like this.
- We don't have images yet for all the ways to maintain the pond. The main one is keeping it aerated, and using a net to remove debris from the water. If plants are added they may help to clean the water. Additionally, as it rains there may be overflow which removes water and adds new water to the pond, cycling it a bit.
- Another method could be to use a scrub brush on a long pole t disturb the settled debris and finer much and then scoop it with a fine mesh net.
- There will be a build up of debris that may need to either stay and create a silty layer on the bottom, or will require one or two deeper cleaning endeavors over the years. If CCAT later has access to a filter, that may improve the cleanliness of the pond as well, however, for the pond's intention, that is not yet a priority.
Step 1: Let The Sun Do Its Thing.[edit | edit source]
- Let the aeration function as it was intended and aerate the pond. The oxygenated water will help prevent eutrophication of the water and keep the water moving.

Step 2: Use a Net to Clean Debris From the Pond.[edit | edit source]
- There will inevitably be a build u of debris in the pond, use a net to scoop it out. This not only clears the pond of potential muck, it also removes nutrients from the-- pond further prevents eutrophic conditions.

Step 3: Use the Shade Cloth.[edit | edit source]
- Set up the shade cloth over the pond to keep plants in the pond (when using it to grow them) cool and shaded. THis also keeps the pond water cooler and more oxygen retentive. It may also work to block falling debris from falling in the pond-- this may be more effective during certain parts of the year-- like fall.

Conclusion[edit | edit source]
Testing results[edit | edit source]
See testing results below. More testing was planned, but the testing below was useful.
- The system was tested using the original panel purchased (10 watt- 15 volt) and the larger panel (20 watt- 12 volt) we exchanged with our instructor. The larger panel predictably performed better and we decided it would be a better option for our system.
- The day of solar panel testing and comparison was relatively overcast and was later in the day-- around 4pm. We connected the system as it would be connected in its final form and put the aeration stone in a tub of water to observe its performance with each panel.
- Initial testing was only utilizing half the aerator's capacity since we hadn't yet hooked up the double hose system.
- In Video 1 the full setup is shown using the larger 20 Watt panel, which we immediately noticed yielded much more powerful bubbling. The aeration tubing was only hooked up to one-half of the available aeration.
File:Aeration System Testing Vid 1.mov
-
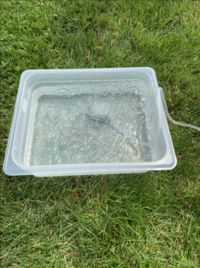
Image 1. Bubbles Show the System working to Aerate the Water.
-
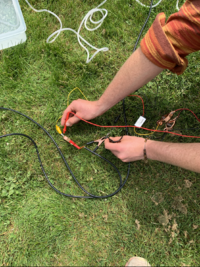
Image 2. Testing the DC Convertor's Output Using a Multimeter.
-
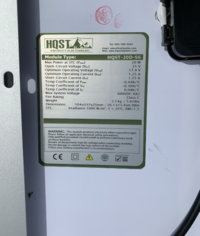
Image 3. Larger 20 Watt Panel Details.
-
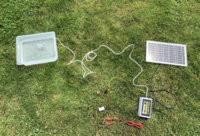
Image 4. View of full system with the smaller panel as the power source.


Testing the System in the Pond[edit | edit source]
- We had planned to test the system with the shade cloth to get more accurate percentages on how much shade yields what results for aeration intensity, however we weren't able to due to overcast weather and scheduling conflicts. We had already done some tests with tilting, or covering the panel different amounts to simulate different sun conditions and the results can be seen in the below images and video.
-
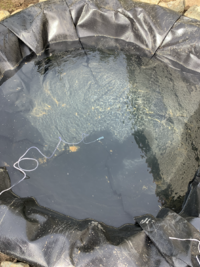
Image 5. No sun-- or full shade.
-
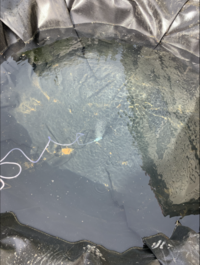
Image 6. Partial Sun/Partial shade
-
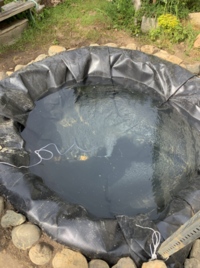
Image 7. More sun than image 6, but still not full sun.
-
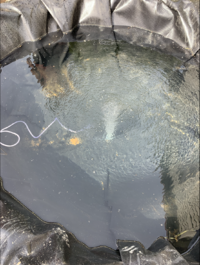
Image 8. Full Sun
-
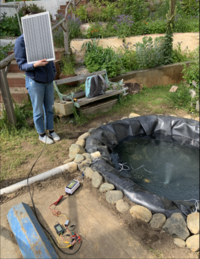
Image 9. Full system at full sun.
-
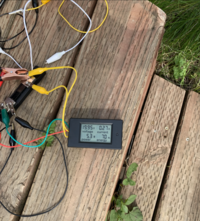
Image 10. Using a DC Energy Monitor set to 50 to test the system.


-

Video 2. Testing the aeration system by gradually exposing the panel to full sun and watching the progression of the bubbles. Download to view the video.
-
Video 3. Low Aeration on an Overcast Day at Around 7pm.
-
Video 4. High Aeration on an Overcast Day at Around 4:30pm
Assessing the Aeration and Panel Results[edit | edit source]
Discussing the testing results. The test for our solar system and pond equipment will follow shortly.
- In the earlier tests we were determining which panel to use-- the smaller 10 watt- 15 volt panel we bought, or the larger 20 Watt- 12 volt panel we could trade for our smaller one. We found that the smaller panel was not powerful enough in overcast conditions to be relied on and that the larger panel would be more appropriate.
- In addition to this, the output of the smaller panel was about 9 volts in overcast conditions which was determined to be way too low to work with this system.
- For aeration we were unable to get a dissolved oxygen testing kit, so we had to resort to qualitative observations.
- We observed that without the aeration on, the pond was very still and no water was moving. With a little bit of aeration bubbles, like is seen in the above image 6, there was some water movement, but not enough to disturb the surface of the pond very much. We are calling this 25% sun.
- In images 7 and 8, we think there is enough aeration to oxygenate the pond enough through the day to deter things like mosquitos and eutrophic conditions (assuming that nutrient inputs are controlled to an extent). We are calling image 7, 50-60% sun, and Image 8, 100% sun. The video gives another good visual on what these different conditions may look like.
- Image 10 shows the DC monitor hooked up to the system and set to 50. This measurement was taken at sunny but still overcast conditions. The display shows the system readings: Voltage: 19.95V, Current: 0.27A, Power: 5.3W, Energy: 70Wh.
- The watts were relatively low at 5.3, however the voltage was almost at its top range. The current was bringing down the overall power.
- Final testing still has yet to be done-- due to weather and scheduling issues.
Lessons learned[edit | edit source]
Discussing lessons were learned during this project and what we would do different next time.
- If you don't get a response via email (especially after several attempts)— call them and don't wait too long. Make sure to have written records of agreements on task responsibilities. This can help avoid miscommunications.
- Get approval (or a consultation) from the local Facilities or Grounds Management entity as soon as possible, because the process can take a while, and you will most likely run into roadblocks that take time to navigate. Maybe you can't even do your project where or how you initially planned. It can also be extremely dangerous to not go through proper channels when constructing something, especially near another structure where connection lines like electrical, sewage and gas are most likely present— especially when digging.
- CCAT had one of the solar system batteries stolen in the past and so, although we aren't' using a battery we wanted to make sure our system stayed safe and intact. So, lock your electrical devices like batteries and other system components or they could be stolen. We are hoping the lock on our electrical box deters theft, but only time will tell.
- We realized after the system was installed that we should have probably installed an off switch. However we didn't have the opportunity to do so at the time. If it does need to be "turned off" a dark/thick cloth draped over the panel will turn the system "off" (without solar input)-- However this is something we should have planned better.
- Take lots of pictures and videos of each step, and takes notes on each step so you remember-- or regularly update the place where the process is being documented. We did this, but we still had a few hiccups in images or videos we needed and did have some instances where more notes would have been helpful-- especially notes on what each section of pictures is specifically for. Mapping out what footage we need better (based on the project requirements) would have also helped.
- Create a group schedule or calendar that is both visual and accessible to everyone, so that scheduling conflicts are easy to foresee and avoid.
- Look at the weather more and plan based on it-- but keep your options flexible-- the weather isn't always predictable! This is super important to plan around, especially depending on which step in the process you are at, or what project you are doing.
- Establish group roles or at least the group dynamic early on. Get to know each other, how everyone works, their strengths, weaknesses and how to best work with those characteristics.
- Communicate with your group mates-- even if something seems minor-- be transparent and keep everyone on the same page. And hold people accountable.
Next steps[edit | edit source]
The following are next steps for the CCAT group:
- The spillway could be converted into a water catchment system.
- The smaller section of the previous pond area that was separated from the new pond with the retaining wall can be converted into a planter box.
- The pond can be used to grow plants hydroponically, water plants, be a catchment area for rainfall— especially if the spillway is redesigned and fitted to catch the overflow.
- The shade cloth can be used once it starts becoming hotter and there are plants in the pond that need more shade.
- Only time will tell if the maintenance list will be enough to keep the pond running. An assessment of how the pond is running should be done in a couple months and next year to see if there are any other steps that should be taken to keep this pond running smoothly-- or if any issues arise.
Troubleshooting[edit | edit source]
This is only how to troubleshoot basic operation:
| Problem | Suggestions and Maintenance Options |
|---|---|
| Most issues can be resolved through contacting: | CCAT:
Phone: (707) 826-3551 Email: ccat@humboldt.edu And/Or Cal Poly Humboldt Facilities and Management. Emergency or urgent requests: 707-826-4475 Customer Service Request information: fmservice@humboldt.edu |
| Wire connectivity faults | Check the soldering connections located as offshoots of the voltage regulator. If faulty, cut, rewire, and solder accordingly. Re-check the connection through the usage of a meter to test voltage and current output from the panel, and through the aerator load. |
| Aerator does not activate | Relate the problem back to the positioning of the panel. Since this is a battery-less circuit, cloud cover and time of day will influence the activation of the aerator. Expect 3-5 hours per day in Arcata of active aeration in the pond. If in full sun, check aerator lines and air stone for clogging or leaks; these can be repaired inexpensively through the use of tubing patches an careful cleaning. Check connections along the circuit if other aerator faults continue, and revert back to the "Wire connectivity faults". |
| Excess pond over-flow following rain events | If substantial rain or flooding occurs, look towards the overflow PVC piping located on the downhill side of the pond. This pipe will help to regulate the volume of the pond and should not allow for flooding. If flooding occurs, check PVC for clogging and/or clay compaction. If uncontrolled flooding occurs without relief, contact: CCAT and/or Cal Poly Humboldt Facilities and Management |
| Mosquito Presence in the Pond | We encountered this issue after installing the aeration. We believe it was due to the water sitting still for about a week before aeration was turned on. We used a Larvaecide and it worked within 24 hours and then purchased environmentally friendly/organic mosquito bombs for any future issues. It is yet to be seen if they will continue to be an issue with the aeration running. |
Team[edit | edit source]
Introduce team and semester in the following format:
References[edit | edit source]
- ↑ Os, E. A., Wilms, J. A. M., Verhoeven, J., van Wijk, K., Bruins, M. A., & van Weel,,P.A. (2017). Hydroponically grown leek: Slowly growing to maturity. Acta Horticulturae, (1176), 79-86.
- ↑ Khandaker, M., & Kotzen, B. (2018). The potential for combining living wall and vertical farming systems with aquaponics with special emphasis on substrates. Aquaculture Research, 49(4), 1454-1468.
- ↑ Planting California natives- the do's and don'ts. ANR Blogs. (n.d.). Retrieved February 15, 2022.
- ↑ Developing irrigation guidelines for... - ccuh.ucdavis.edu. (n.d.). Retrieved February 15, 2022.
- ↑ 5.0 5.1 5.2 5.3 Bardach, J. E., Ryther, J. H., & Mclarney, W. O. (1972). Aquaculture: the farming and husbandry of freshwater and marine organisms (pp. 815–819). John Wiley-Intercience, Cop.
- ↑ Nasturtium officinale Calflora. (2022). Www.calflora.org; Berkeley, California: The Calflora Database. https://www.calflora.org/app/taxon?crn=9597#:~:text=Nasturtium%20officinale%2C%20a%20dicot%2C%20is Calflora: Information on California plants for education, research and conservation, with data contributed by public and private institutions and individuals, including the Consortium of California Herbaria.
- ↑ Home > Sagittaria (all) for California. (n.d.). Www.calscape.org; Calscape. Retrieved February 15, 2022, from https://www.calscape.org/loc-california/Sagittaria(all)/vw-list?view_style=list#:~:text=Sagittaria%20sanfordii%20is%20an%20uncommon
- ↑ Calflora. (2022). Typha latifolia Calflora. Www.calflora.org; Berkeley, California: The Calflora Database [a non-profit organization]. https://www.calflora.org/app/taxon?crn=8178 Calflora: Information on California plants for education, research and conservation, with data contributed by public and private institutions and individuals, including the Consortium of California Herbaria.
- ↑ 9.0 9.1 9.2 9.3 9.4 9.5 9.6 Lennard, S., Christian, M., & Cornellisen, K. (2012). Hydroponic salad crop production (Dr. L. Morgan PhD, Ed.; pp. 49–55). Suntec (Nz.
- ↑ Googoolee, A. M., Neetoo, H., Takooree, S. D., & Goburdhun, D. (2020). Characterizing the cultivation practices and microbiological quality of watercress. Journal of Agriculture and Food Research.
- ↑ Celsius to Fahrenheit conversion | °C to °F. (2018). Metric-Conversions.org. https://www.metric-conversions.org/temperature/celsius-to-fahrenheit.htm
- ↑ Holland Horticulture. (2017, September 22). Why EC Is Important In Hydroponics. What's on the Grow...; Holland Horticulture. https://hollandhorticulture.co.uk/news/why-ec-is-important-in-hydroponics/
- ↑ Jat, M. L., Bairwa, P. C., Summuria, R., Balyan, J. K., & Laddha, K. C. (2011). Assessment of calcareous soil lining for seepage reduction from farm pond under dryland ecosystem. Indian Journal of Soil Conservation, 39(3), 202-206.
- ↑ Engels, J. (2016, November 10). Building Ponds & Talking liners. The Permaculture Research Institute.
- ↑ Www.edwardrobertson.co.uk. (n.d.). Pond liner underlay - what about using sand, old carpet, or newspaper? Retrieved February 15, 2022.
- ↑ Frankie, Dankaka, H., & James. (2021, May 30). Comparison of different pond liner materials (which is best?). Pond Informer. Retrieved February 14, 2022.
- ↑ Plumlee, G. S., Berry, C. J., Fisher, I., Fischer, J. M., Adams, M., Hageman, P. L.,... Benzel, W. M. (2016). Environmental implications of the use of sulfidic back-bay sediments for dune reconstruction — lessons learned post hurricane sandy. Marine Pollution Bulletin, 107(2), 459-471.
- ↑ 18.0 18.1 18.2 Boyd, C. E. (2019). Water Quality: An Introduction. In Google Books (p. 312). Springer Nature. https://books.google.com/books?hl=en&lr=&id=h0mvDwAAQBAJ&oi=fnd&pg=PR5&dq=water+quality&ots=YHpDWH4IWB&sig=KOXKzdvEJdNbvdvyhTQL8whNnSU#v=onepage&q=water%20quality&f=false
- ↑ Oligotrophic lake | geology | Britannica. (n.d.). Www.britannica.com. Retrieved February 14, 2022, from https://www.britannica.com/science/oligotrophic-lake
- ↑ US EPA, O. (2015, March 24). Hypoxia 101. US EPA. https://www.epa.gov/ms-htf/hypoxia-101#:~:text=Hypoxia%20means%20low%20oxygen%20and
- ↑ 21.0 21.1 Water Science School. (2018a, June 5). Dissolved Oxygen and Water | U.S. Geological Survey. Www.usgs.gov; USGS. https://www.usgs.gov/special-topics/water-science-school/science/dissolved-oxygen-and-water
- ↑ Britannica. (2019). pH | Definition & Uses. In Encyclopædia Britannica. https://www.britannica.com/science/pH
- ↑ 23.0 23.1 23.2 Water Science School. (2019, October 22). pH and Water | U.S. Geological Survey. Www.usgs.gov. https://www.usgs.gov/special-topics/water-science-school/science/ph-and-water
- ↑ 24.0 24.1 24.2 24.3 Hydroponics Systems and Principles Of Plant Nutrition: Essential Nutrients, Function, Deficiency, and Excess. (2020, July 10). Penn State Extension. https://extension.psu.edu/hydroponics-systems-and-principles-of-plant-nutrition-essential-nutrients-function-deficiency-and-excess
- ↑ 25.0 25.1 25.2 Water Science School. (2018a, June 5). Dissolved Oxygen and Water | U.S. Geological Survey. Www.usgs.gov; USGS. https://www.usgs.gov/special-topics/water-science-school/science/dissolved-oxygen-and-water
- ↑ Definition of NUTRIENT. (n.d.). Www.merriam-Webster.com. Retrieved February 15, 2022, from https://www.merriam-webster.com/dictionary/nutrient
- ↑ 27.0 27.1 27.2 27.3 27.4 27.5 27.6 27.7 27.8 Pavlis, R. (2017). Building natural ponds: create a clean, algae-free pond without pumps, filters, or chemicals (p. 91). New Society Publishers.
- ↑ Pavlis, R. (2017). Building natural ponds: create a clean, algae-free pond without pumps, filters, or chemicals (pp. 7–8). New Society Publishers.
- ↑ Masters, B. (2012, February 7). The ability of vegetated floating Islands to improve water quality in natural and constructed wetlands: A... ResearchGate; IWA Publishing. https://www.researchgate.net/publication/274679194_The_ability_of_vegetated_floating_Islands_to_improve_water_quality_in_natural_and_constructed_wetlands_A_review
- ↑ To Catch the Sun
- ↑ Prasetyaningsari, I., Setiawan, A., & Setiawan, A. A. (2013). Design optimization of solar powered aeration system for fish pond in Sleman Regency, Yogyakarta by HOMER software. Energy Procedia, 32, 90-98. https://pdf.sciencedirectassets.com/277910/1-s2.0-S1876610213X00025/1-s2.0-S1876610213000143/main.pdf?X-Amz-Security-Token=IQoJb3JpZ2luX2VjEGkaCXVzLWVhc3QtMSJGMEQCIBoJ7JDLDy%2BnjY%2F55i6BoBQcKzr6TFFwD0682OXqUv64AiAhx6Lv39mmzjHzXcg%2FT0avOhfpqz9Thk1dg8iozhShqyqDBAix%2F%2F%2F%2F%2F%2F%2F%2F%2F%2F8BEAQaDDA1OTAwMzU0Njg2NSIM6FteGuVR0bH1f3mHKtcDvtEaqvo%2FYAn1kZhis0z2r%2FGy9KcUwS21LK%2BuPK0YH4PvE3tpKl9G%2Fs3rf15u0t7IfGqTYXq32%2FoCy5TMUG4v3RdEmcdjZiMAYxb6N6Bsbpq55TU8iGPoDAfEiqBqSUlBcOat0aeB7XAjkHzXA9hAwtRI8Jgmk453TPDCpyGAS4Ci6GlyNOH8raPN3y6P0Q9WFqXQevfM%2F4EN7K5p9OwXrfkTShExu9qi6e1QWNb2u4edQHyZvT1hdXn%2F96w3Nwr95IGSDx413G0ZJvddLba7Prb9UEdhR9QenrD7AbtRLlx0%2FFjcYgy0%2FXMowSprHI6zn0P4w8NQjGsoQd1S3n8Q8o9sKj2blQJYj54g4OnYlZ1E97fseozzk4g7IlrfkAe6rQa34XO5h4BMkpsm84UbbluZ4j0NXEVlNCjbKiloEFWHmlGmRQCJj3ZsFJ%2BwiwOJ0fgPIy3WCJxXE2Tg3%2FX7Wn0plvzScYtw8E1Wfrb3mKqvq9QD6qPlUov5IAIAfCah74mQXB4t4fPFBpjGgHFz84UfbhP6E0hwQdywHRTZxbqlHGuu2SanGfVA6jbAoi6W9akG2yZX0%2BryUQkmgCLDxod3pDhvCJsYcItnYtj%2B8eezomCFIIxoMJiAsZAGOqYBa80vA7jn8z3XkGRM%2BWXWU7qryuK1JygE7MqyhmhBrrnLOCg5Dsed1hHoLxJZ8JBFjGI6AjLC%2B3LyBY%2FTKCDQs6IQ8gztmVfoGjpCvLh%2BvK0iHmZaIZP5gFVv2ULDlxEIklKpGN8H5Cr143JK1XYqnWqJEamjgckuAU276yXOxkl0quBRDx0efmt%2BJmMWMQHJ8AEk0NIAExdDCQJ49CvurjwCfWMkTg%3D%3D&X-Amz-Algorithm=AWS4-HMAC-SHA256&X-Amz-Date=20220216T020548Z&X-Amz-SignedHeaders=host&X-Amz-Expires=300&X-Amz-Credential=ASIAQ3PHCVTYTEZSYG43%2F20220216%2Fus-east-1%2Fs3%2Faws4_request&X-Amz-Signature=9bc2d2bee293ea07ff94781faa02699a74539498483dfa618053b06e78f3f19f&hash=0b7555282cc1012e28fcce8d0322941adbc65b317197a92885fb487af25c0fd6&host=68042c943591013ac2b2430a89b270f6af2c76d8dfd086a07176afe7c76c2c61&pii=S1876610213000143&tid=spdf-ff76653e-3cf6-45b6-9207-5e0aa4436b1b&sid=0f9675495bceb14bce8a18637aec73acea04gxrqa&type=client&ua=58020a5550555d0406&rr=6de3368abd4a641c
- ↑ Eltawil, M. A., & ElSbaay, A. M. (2016). Utilisation of solar photovoltaic pumping for aeration systems in aquaculture ponds. International Journal of Sustainable Energy, 35(7), 629-644. http://ezproxy.humboldt.edu/login?url=https://search.ebscohost.com/login.aspx?direct=true&db=aph&AN=113395131&site=ehost-live
- ↑ Zweibel, K. (1990). Chapter 3. In Harnessing solar power: The photovoltaics challenge (p. 30). Berlin: Springer Science+Business Media.
- ↑ 34.00 34.01 34.02 34.03 34.04 34.05 34.06 34.07 34.08 34.09 34.10 34.11 34.12 34.13 34.14 Solar water pumping. (1989). Melbourne: Victorian Solar Energy Council.
- ↑ Self-priming pumps: What they are and how they work. (2021, February 22). https://www.csidesigns.com/blog/articles/self-priming-pumps-what-they-are-and-how-they-work