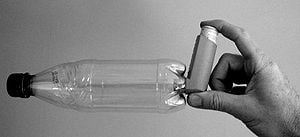
Asthma is one of the fastest growing urban health problems throughout the world. It affects children in low income areas more than others and can contribute to early mortality and delayed development. Inhaled medications are the mainstay of asthma therapy. Plastic tubes, called “spacers” are used to make delivery of the medication more efficient by allowing more of the medication to go where it is needed. This also makes the inhaler to be more cost effective.
Inhalers can cost as much as $60 each and an individual using multiple inhalers can spend as much as $150 per month on inhalers.
Spacers are also expensive, costing the patient between $10 and $30 each. Spacers are often not covered by insurance plans. Providers may not prescribe spacers and parents often forego the purchase of a spacer because of the expense already incurred for expensive inhalers.
An asthma spacerW is used with an asthma inhaler to make the medicine more effective by slowing down the spray and allowing the patient to coordinate their breath with the medication delivery. It can improve the efficiency of an inhaler by 70%.
Production[edit | edit source]
Equipment and Supplies[edit | edit source]
Tools Needed
- Drill press
- Laser printer
- 15/16" flat drill bit
- Utility Knife
Supplies Needed
- 4" PVC tubing and 2 pair hinges
- wood and hardware needed for mounting brace to your type of drillpress
- 8 1/2" x 11" all weather laser print labels for sticker
- 8 1/2" x 11" paper for instructions
- 500 cc plastic water bottles. This size was used in the published trials. Several characteristics make the Metromint 500 cc mint water bottle a good choice. It is clear which makes it easier to see medicine in chamber. It has a smooth surface so that the sticker can be applied and is thicker and more durable than other brands. Metromint has recently agreed to donate clean empty bottles to this project. (Please contact Steve McCrosky if you wish to build spacers with these bottles.)
- 3/8" OD clear vinyl tubing
- Panel fasteners (ITW Fastex Christmas Tree Clip, part number 354-125300-00.)
Costs[edit | edit source]
| Quantity | Material | Source | Cost ($) | Total ($US) |
|---|---|---|---|---|
| 21 cases | 24 x 500 cc MetroMint plastic bottles | Soma Beverage Co. | Donated | 0.00 |
| 4 boxes | 5.5" x 8.5" Avery Waterproof Labels (15516) | Staples | (2 boxes donated) 15.00 | 30.00 |
| 84 ft | 5/8" clear vinyl tubing | HomCo Hardware | 0.42 | 35.28 |
| 1000 | Fastex Christmas Tree Panel Fasteners | Fastex | 0.10 | 100.00 |
| Total Cost | $165.28 | |||
| Total Spacers | 504 | |||
| Cost per Spacer | $0.33 | |||
Step by step production[edit | edit source]
- Building the brace:I used two strips of the 4" PVC to allow for extra thickness where the hinges and latches are attached to the body of the brace. The PVC brace was then attached to a wood frame that is bolted to the base of the drill press and the drilling platform.
- Remove label from bottle:Do this before drilling as it is easier to remove the label when the bottle is full. Do not remove the cap. The cap is to be removed for the first time by the end user to indicate that they are the first user. This step does not pertain to the new Metromint spacer construction, see section below for Metromint construction.
- Place bottle in brace and close brace.
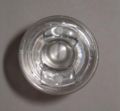
- Drill hole in center of base of bottle. You may wish to try different RPM settings on the drill press for the best results.
- Drain out water and save it for watering plants or other purpose. Because it will have residual plastic fragments, it is not recommended for drinking. Make sure that the larger pieces are out, including the hole center. (Does not pertain to Metromint spacer.)
- Using a utility knife or other method, carefully remove all the burs that remain at the drilled opening.
- At this point you may rinse the bottle thoroughly using a detergent solution (see below) or instruct the patient on careful cleaning and rinsing at home before the first use.
- Place instructions sticker on body of bottle, covering the patches of glue used to attach the original label.
For new Metromint spacer:
- Drill two additional 1/8" holes, ~1/2" from the edge of the center hole.
- Cut 15/16" pieces of vinyl tubing and slice open along the outside curve.
- Drill 1/8" holes in one side of the vinyl tubing pieces, perpendicular to the outside curve, (90 degree angle form the sliced opening).
- Place Fastex clip in hole in vinyl tubing.
- Work the sliced edge of the vinyl tubing furthest from the drilled hole into the inside the center hole.
- Push Fastex clip into the 1/8" hole in the base of the bottle.
- Repeat steps 4-6 on the other side.
- Clean and rinse the bottle thoroughly using a detergent solution (see below) and place cap on bottle.
Instructions[edit | edit source]
Using a bottle spacer with your asthma medication[edit | edit source]
These instructions are also available by download.
What is a spacer? A spacer is an empty chamber that can be attached to some asthma inhalers. Spacers make the medicine more effective while reducing side effects.
How does the spacer work? When a dose of medicine is sprayed from an inhaler, it is moving very fast. When a spacer is not used, much of the medicine sticks to the inside of the mouth and throat instead of the lungs. A spacer slows the medicine down so the user can inhale the medicine slowly and get more medicine to the lungs where it is needed.
Why should I use a spacer? Spacers make inhalers up to 70% more effective. This saves money and reduces the need for medicine. Spacers also reduce side effects like thrush, nervousness, bad taste, and sore throat that can be caused by inhaled medicine.[1]
Why is this spacer made out of a bottle? Commercial spacers can cost $20-$40 each and are not always paid for by health insurance. Several studies have shown that bottle spacers are as effective as commercial spacers. By providing this simple, low-cost spacer to our patients, we can improve your asthma treatment while saving you money.[2][3]
What should I do the first time I use the bottle spacer?
- Remove the cap. Because each spacer is made from an unused water bottle, removing the cap for the first time should break the seal between the cap and the bottle.
- Rinse the bottle and look inside the bottle, making sure that there is nothing inside.
- Fill a pot (or other container large enough to hold the entire spacer) with cool water. Stir in a few drops of household dish detergent and soak the bottle for at least 5 minutes. The detergent helps reduce a static charge that makes the spacer less efficient.[4] Allow the spacer to drip-dry for at least 12 hours.
- Clean your spacer this way at least once a month.
How do I use the bottle spacer?
- Shake your inhaler and insert it into hole in base of bottle.
- Put mouthpiece of spacer in your mouth.
- Close your lips around the mouthpiece and make a tight seal.
- Press down on the inhaler, spraying a dose into the spacer.
- Take a slow, deep breath.
- Hold your breath for 10 seconds.


