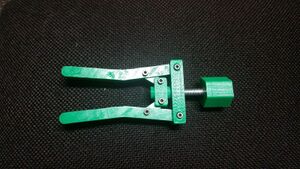
This technology is an OSAT appropriate technology as it will provide a medical tool for others to use that may not have this technology available to them. The parts of this tool are easily printed and the hardware is nowhere near excessive for someone who has a 3D printer. 3DPrint.com has an article about using 3D printed surgical tools in low income countries but only include the most simple retractor. As far as I can tell nobody has made a 3D printed Alm retractor before this.
Bill of Materials[edit | edit source]
STL Files[edit | edit source]
- 1x File:Retractor Bolt Handle.stl
- 2x File:Retractor Bolt Retainer.stl
- 1x File:Retractor Expander Mount.stl
- 1x File:Retractor Screw Mount.stl
- 2x File:Retractor Arm.stl <-- Need to mirror this part for one arm
- 2x File:Retractor Extending Arm.stl
SCAD Files[edit | edit source]
- File:Retractor Bolt Handle.scad
- File:Retractor Bolt Retainer.scad
- File:Retractor Expander Mount.scad
- File:Retractor Screw Mount.scad
- File:Retractor Arm.scad
- File:Retractor Extending Arm.scad
Additional Hardware[edit | edit source]
- 2x M3x0.5 10mm screw cost=$0.13
- 2x M3x0.5 12mm screw cost=$0.15
- 2x M3x0.5 16mm screw cost=$0.16
- 1x M8x1 50mm bolt cost=$0.39
- 1x M8x1 nut cost=$0.09
Tools needed[edit | edit source]
- MOST Delta RepRap or similar RepRap 3-D printer
- 2.5mm Allen Wrench
- Pliers
Skills and knowledge needed[edit | edit source]
- Only standard 3D printing skills are needed for this project
Technical Specifications and Assembly Instructions[edit | edit source]
- Including drawings or pictures of the device at stage of assembly at minimum. (Upload)
Printing[edit | edit source]
- Print parts at quantities indicated on left - approximate print time is 6 hours at 40 mm/s and 100% fill
- 1x File:Retractor Bolt Handle.stl
- Print with hex pocket upward, low fill can be used
- 2x File:Retractor Bolt Retainer.stl
- Print with hole upwards, 100% fill is recommended
- 1x File:Retractor Expander Mount.stl
- Print with large hole pointed upwards, medium fill is recommended
- 1x File:Retractor Screw Mount.stl
- Print with hex pocket upwards, medium fill is recommended
- 2x File:Retractor Arm.stl <-- Need to mirror this part for one arm
- Print with tissue grips upward, medium fill recommended, 25% support structure is necessary for slot
- 2x File:Retractor Extending Arm.stl
- Print with holes upward, 100% fill is necessary
- 1x File:Retractor Bolt Handle.stl
Assembly[edit | edit source]
- Approximate assembly time is 30 minutes
- Place small extension arms into large retractor arms
- Use M3x10mm screws to hold into place
- Place other end of extension arms into the expander mount
- Secure arms with the M3x12mm screws
- Push bolt head into hex pocket on handle
- Push hex nut into hex pocket on bolt mount
- Insert bolt through hole in bolt mount and thread into nut until bolt is flush with nut face
- Take one bolt retainer and hold it flush against the nut face
- Rotate the bolt by hand until the bolt is through the retainer and about 15 mm of bolt is protruding
- Attach the retractor arm assembly to the bolt mount
- Use the two M3x16mm screws to secure the arms, make sure the bolt head sits in the pocket
- Push expander mount onto bolt and thread last expander mount onto bolt
- Tighten up the first bolt retainer so that the expander mount cannot twist but the bolt rotates freely
- Verify range of motion is not inhibited
- If range of motion is fine then retractor is ready to use
- Assembly Images
-
Retractor Arm to Extender Arm
-
Extender Mount
-
Pocket for nut
-
Handle
Cost savings[edit | edit source]
- Total Cost = $2.32
- Hardware cost = $0.92
- Plastic Cost- 61 grams at $23/kg = $1.40
- Commercial Equivalent Alm Retractor
- Cost=$191
- $188.68 savings
- 98.8% savings


