Creating a print file from a 3D model Using RapMan frontend v. 1.0.0


- Ensure your units are set to millimeters in your model file
- Save your model as an STL file, <filename>.stl
- Open skeinforge RapMan front-end program by clicking on Rapman.exe in the folder C:\Program Files\Rapman content&view=article&id=80&Itemid=100009#Software available as Skeinforge Frontend Beta
- Click the Settings tab.
- Optional: If you would like to save changes to settings that you make now, click Create Profile and give it a name.
- Ensure the following are set (see further details about Settings) (do this even if you are using a saved profile of settings, as not all settings are loaded properly all the time)
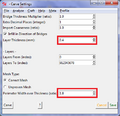
- raft thickness matches your machine
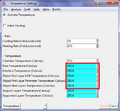
- temperatures match your machine
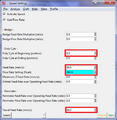
- speeds match your machine
- Optional: If you would like to save the changes you made to the profile shown in the top bar, click Save Changes.
- Go back to the Main tab.
- Load your model into the RapMan front-end program by clicking Load STL File and selecting the stl file created in step 2.
- Click Skeinforge to process the stl into gcode, using your settings. This will take anywhere from 30 seconds to 15 minutes - it hasn't hung. When it is complete, the Download to SD Card, Skeinview viewer and Behold viewer buttons will become active. Skeinview viewer and Behold viewer display the part as it will be constructed, layer by layer.
- Close Skeinforge RapMan front-end program.
- Using a text editor program, such as Notepad or gedit, open the file named <filename>_export in the same folder as your <filename>.stl model file
- Check the file to ensure there are no Gcode lines with F (speed) values too high for your machine (960 is good, equivalent to 16mm/s head speed). F values state how fast to move the extruder head.
- Change all M108 lines (extrusion motor speed) to read "M108 S350" or similar for your extruder speed, as this is usually not set properly by the Rapman front-end program (S450 is 45.0 RPM; 37.5RPM is S375)
- Search for all M104 lines (hotend temperature setting) and remove any repeated ones, ensure the values are set correctly.
- Save the file as XXXXXX.bfb (6 characters) on your SD card (see SD Card Information and Warnings)
Creating a print file from a 3D model Using Skeinforge[edit | edit source]
- Ensure your units are set to millimeters in your model file
- Save your model as an STL file, <filename>.stl
- Use any of these tutorials to guide you on how to open skeinforge and set settings to get optimal prints:
Installing Skeinforge[edit | edit source]
- Install skeinforge, following the directions here.
- (OPTIONAL) Edit your environment variables to include python and skeinforge, and the *.py extension - this will allow the command prompt to use them by simply typing python or skeinforge; there may be problems if you do not add python to the environment variables
- Open the environment variables on Windows 7.
- Click on the Windows icon
- Type environment variables into the windows search bar
- Select the your account variables under Control Panel
- Select PATH in the user variables (top list) and click Edit.
- Add the install directory of python (generally C:\Python26) and the install directory of skeinforge (C:\Program Files\Skeinforge\skeinforge_application); the PATH variable should now read %PATH%;C:\Python26;C:\Program Files\Skeinforge\skeinforge_application;
- Click OK
- Select PATHEXT in the user variables and click Edit
- Edit the variable to read: %PATHEXT%;.py;.pyw
- Click OK
- Open the environment variables on Windows 7.
Using Skeinforge[edit | edit source]


This guide and all screenshots will be for Skeinforge version dated June 29 2010. A test shape is in this forum post, reprap-hollow-square.aoi with about 4 layers of perimeter in 0.4mm layer thickness, or build your own using AoI or another program. See also nopheads skeinforge techniques
- Start skeinforge by typing skeinforge into a command prompt (to start a command prompt type cmd into the windows search bar, and select cmd.exe) or double-clicking on skeinforge.py.
- Modify settings if desired.
- Select Skeinforge at the bottom of the main window.
- Select your *.stl file to process; it starts immediately. This can be a lengthy process. It has not hung, even if it says not responding
- In the command prompt, check name of file that is being exported (first line of output). Skeinforge occasionally skeins the previously selected file, instead of the present one.
- Read over the output from the command prompt to ensure there are no error messages; there are also details about the print displayed and what the machine will be doing in the Analyze section. Notable information is Extent (size of part), build time, build cost (only accurate if set up through the Analyze tool) and amount of material for the print.
- Open the output file and check it over, same procedure as for using the RapMan frontend.
- Save the file as XXXXXX.bfb (6 characters) on your SD card (see SD Card Information and Warnings)
Present Issues[edit | edit source]

These are slowly being addressed in the ABS_mendel_tweak profile. Changes are being tracked here.
- Changes for RepRap: turn on Dimension? (5D firmware); "ABS mendel tweak" profile has Kristens dogbone settings; "ABS mendel restore" has mendel printing settings, except print order is now infill->loops->perimeter
- nozzle lift is variable - this causes delamination between layers, and poor raft adhesion. Possible causes: z-axis stop button does not always trigger at the same height; bending of the plastic lower frame of the building platform, especially after pushing the board down during head dives; reading wrong values from the SD card; build platform warping C Blair 18:07, 11 August 2010 (UTC)
- When printing small objects such as pulley.bfb, the plastic does not cool enough between layers; looks VERY wobbly. Should perhaps use Cool plugin. C Blair 23:49, 28 July 2010 (UTC)
- When printing grub-pulleys, nozzle lift for raft was too high; homed machine, found bed was not level; leveled it, and set home position; in process moved the bed away form the head; printing fine now (seems to be reading the first line intermittently)C Blair 23:37, 28 July 2010 (UTC)
- More extra shells would likely make parts more resistant to extruder jamming causing delamination. However, the fine details would be lost, and there would likely be no fill on small bridges in parts; maybe this is what a "bridge" is.
- Tall objects are being knocked off, bumped by head, or wiggled loose as head deposits material. C Blair 01:23, 22 July 2010 (UTC) Turn on cool? Over-extruding, recalibrate? Rotate parts and print sideways? Having a more solid interface layer may fix this. Also printing in finer detail perhaps, with slower speed.
- Temperature Error displayed - directly after printing a part, went into tool setup (no shutdown) and had a temperature error displayed.C Blair 21:32, 20 July 2010 (UTC)
- Header (and ender?) files not being used by Preface plugin C Blair 20:14, 19 July 2010 (UTC)
- Too slow! fast prints here. Changed surface layers to 4, testing with part 11 C Blair 20:25, 16 July 2010 (UTC) Seems ok! C Blair 19:58, 19 July 2010 (UTC).
Old Issues[edit | edit source]
- Interface layer is coming off base layer of raft as parts warp; if we up the interface temperature we can sand the interface layer off of the parts; upped interface temperature to 252 C Blair 20:35, 21 July 2010 (UTC). Changed the nozzle lift for the interface layer (raft module) to 0.35, as the interface layer is still being ripped up.C Blair 00:42, 22 July 2010 (UTC) Still not sticking fully (as of printing the interface layer). We'll see if parts rip off. Changed interface nozzle lift to 0.30; temperature to 253 C Blair 20:12, 22 July 2010 (UTC) Seems ok.
- Temperature change function is activating on the first layer of the object; its messing up the print (effect lasts first 5 layers of gears) by pulling threads and adding threads as it comes and goes. Stops doing it after first layer. Cool is off - may just be because its printing at 251 and cant hold that temperature C Blair 22:52, 21 July 2010 (UTC) Parts are not stuck well enough to interface layer - probably as a result of this temp change function. When manually adding the M106 code to turn on the extruder fan, do so after the M104 250.0 of the 2nd layer. Actually, the real cause was probably that the first layer fill and first layer perimeter were at 251 and 250 respectively; hence it would go and change the temperature. Changed them both to 251.C Blair 01:32, 22 July 2010 (UTC)
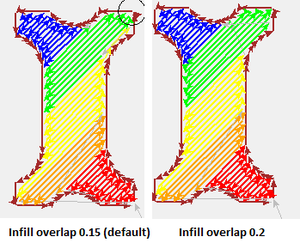
Skeinforge is not filling thin holes;a solution here turned off extra shells 17:48, 16 July 2010 (UTC).- Infill is not connected to perimeter; perimeter is not close enough to walls. Changed Fill->infill perimeter overlap to 0.2; test with next object.C Blair 20:18, 16 July 2010 (UTC). Seems to still not be enough on the base layer - add extra shells to base layer? or turn up infill if its an issue on all layers C Blair 19:49, 19 July 2010 (UTC). Effect seen on all layers; upping this may also help with delamination; upped infill perimeter overlap to 0.4, base extra shells to 1, fill to %40. C Blair 21:28, 19 July 2010 (UTC) Seems fixed on parts #9.C Blair 20:04, 20 July 2010 (UTC)
- Raft seems non-ideal. Changed Nozzle lift to 0.6, moved z=0 on bed screw; testing on part 11; seems great C Blair 20:21, 16 July 2010 (UTC) Seems to not be gripping enough, warping parts are pulling the raft up; changed to 0.5 nozzle lift and 5mm border, 251 degrees C Blair 21:28, 19 July 2010 (UTC). Still being lifted; changed to 15mm border, 70% raft infill C Blair 20:04, 20 July 2010 (UTC). Still not sticking enough to the print board, but is holding together with itself very well though. Changed "base layer thickness over layer thickness" to 2, temperature to 253, base layer nozzle lift to 0.35 C Blair 21:26, 20 July 2010 (UTC) Seems ok now. C Blair 23:00, 20 July 2010 (UTC)
- Seems to be more delamination between layers C Blair 19:58, 19 July 2010 (UTC). See if this is fixed with higher infill perimeter overlap C Blair 21:28, 19 July 2010 (UTC). Changed infill to 40%, surface layers at 4.(before part #9). First and second layer of part is delaminating in the infill for part number 22. Change nozzle lift to 0.45 from 0.5,
turn up extruder RPM,(its calibrated properly still), print two interface layers, turn the temp up (havnt done these two)? Turned up object first layer flow rate multiplier to 1.1 C Blair 20:04, 20 July 2010 (UTC) Seems ok now. C Blair 23:00, 20 July 2010 (UTC) - Check hole diameters and use Stretch plugin to fix bodans stretch; also this is a post about printing mendel, useful turned this on, 17:48, 16 July 2010 (UTC) measureing 4.05 to 4.11 mm for 4 mm hole - too big? on both part with and without stretch (part #21 and #11) read about stretch C Blair 21:28, 19 July 2010 (UTC). Seems ok, if anything its 0.5mm too bigC Blair 03:47, 21 July 2010 (UTC)
- Extruder motor is HOT. Taped a CPU heatsink fan to the motor and connected to the fan wires; voltage may be too high, fan motor is also hot - add resistor, or get a different fan?. Cool plugin can be used to turn fan on - but this may also move the head around, turned it to "minimum layer time" of 99999 seconds - hopefully with this it doesnt change the GCODE movement and just turns the fan on (ie go to the corner and back after every layer) C Blair 21:55, 16 July 2010 (UTC). Cool seemed to affect the speed of skeinforging, took about 10 minutes; behold could not analyze print. Turned it off, will add in fan GCODE manually (M106) into the header file (rapstart.gcode).C Blair 19:17, 19 July 2010 (UTC).; header file seems to not be being used: added M106 manually to start of file. C Blair 01:25, 22 July 2010 (UTC)Motor is cool at the end of a 3.5 hour print - seems ok.
Settings[edit | edit source]
Detailed information on setting up your machine and obtaining optimal settings can be found on the Rapman protocol page.
- Non-default skeinforge settings (modified July 16, see image upload date for setting capture date)
-
Carve
-
Clip
-
Fillet
-
Inset
-
Jitter
-
Speed
-
Temperature
The following skeinforge settings presently work best for our RapMan (last modified July 15 2010):
- carve->layer thickness 0.4
- raft thickness 0.7
- head speed 16.00 mm/s
- Speed->extruder speed 36.5 RPM
(has to be set manually after skeinforge) - print temperature 250 C
- Fill -> infill solidity is the percent of solid fill 0.3; solid surface thickness layers 5; grid hexagonal is strongest per plastic;
- nozzle diameter is 0.5mm
- Preface -> change start and ending code to match Bogdans test object script File:Skeinforge-queens-preface.odt
The following skeinforge settings are using the default setting, and are presently open to being modified:
- extrusion width; presently set to have extrusion width/thickness ratio at 1.5, recommended here
raft & first layer temperatures- raft base fill %
- carve->perimeter width over thickness 1.8
- clip stops bumps from loops, havnt run across this yet, though the corners of square test objects are higher
- comb makes the head move around holes instead of across them; if we use it, it may reduce the amount of cleaning, at the expense of increasing vibration
- cool can perhaps be used if we have warping issues
- Fill-> extra shells are the outlines around shapes, these set the layer thickness of vertical walls; infill perimeter overlap ratio determines how much bonding there is between infill and the perimeter outlines (perhaps adjusting this will fill in our screw holes);
- Fillet -> the options are not well documented on the BFB wiki, but this can be used to reduce corner bulbing
- Inset -> the options are not well documented on the BFB wiki, but this can be used to set where orphan areas appear in the print
- Raft -> complicated! fill in later
- Speed -> duty cycle at beginning may cool our extruder motor; feed rate and travel feed rate may be reduced or increased in future
- Stretch -> compensates for hole radius; may use to make our holes more precisely sized
- Unpause -> use this for skeinforge with RepRap
Settings not mentioned here should be left at their default values.
Historical and present settings have been:
| Dates | Layer Thickness (mm) | Raft Base Fill % | Raft Thickness | Head Speed (mm/s) | Extruder Speed (RPM) | Temperatures (C) |
|---|---|---|---|---|---|---|
| present | 0.40 | 70% | 0.8 I believe (2x thickness) | 16.00 | 36.5 | 250 part, 251 part first layer (and 1.1 flow rate), 253 raft, 252 interface |
| July 15 to July 19 approx | 0.40 | 30% | 0.7 | 16.00 | 36.5 | 250 |
| July 1 to July 14 | 0.40 | 50% | 0.7 | 16.00 | 35 | 250 |
| May to June 2010 | 0.4 | 50% | 0.7 | 16.00 | 45 | 235 to 245 |
Some more notes about settings[edit | edit source]
Compare settings to these ones for ABS from BFB (except for temperatures), bogdans mendel settings, this forum post, this wiki, unfold posted settings (may not be able to open this), zipped posted settings from many people,bogdan and unfolds ABS settings
The initial settings were set as follows, with some settings still needing researching (this is outdated, from July 12 2010):
- Check over the starting and ending code: Preface -> Name of Alteration files
- Raft -> experiment with these settings to see what works best for us
- De-activate Chamber
- Cool - research to leave on/off before big prints; turned off for now; reduced build time from 1 hr to 18 minutes for square test object
- Export - change extension to BFB
- Fill -> extra shells, grid - research; change pattern to grid hexagonal to save plastic and keep strength; change settings here if inside of part isnt bonding well to walls
- Inset -> change settings here if inside of part isnt bonding well to walls
- Jitter -> leave on; turn off for very small parts perhaps, will have a line on one spot (like the calibration object)
- Preface -> turn on Start at Home.. I think, check this; Change start.gcode and end.gcode to match calibration objects code
- Speed -> Duty cycle:sets motor current to full at 1.0.... research this; Change Flow Rate (float) to 360.0; Perimeter -> can strengthen outer edges, experiment with this (look up other peoples posted settings, ABS settings)
- Temperature -> change all to 250.0 C
Creating an STL file[edit | edit source]
There is a thorough discussion of the options available on the bits from bytes wiki, a list on Appropedia as well as a list of CAD/CAM software and a list of modelling software on the edutech wiki.
The most promising open-source software useful to us appear to be
- Art of Illusion: RepRap tips here
- To enable import/export STL files:
- Start AoI
- Click Tools->Scripts & Plugins Manager
- Click the Install tab
- Open the Plugins folder and scroll down to STLTranslator
- Click the Selected checkbox, and then the Install all selected files button
- If there is an error in install (couldn't rename or copy STLTranslator.jar) you must move the file by hand (I believe this is a file permission error):
- Select all the text (CTRL+A) in the error box and copy it to a text editor where you can see the whole message.
- Navigate to the folder it specifies in the error, ie C:\Users\UserOne\AppData\Local\Temp\spmanager-temp-RepRap-8079219412912993710\Plugins\STLTranslator.jar.upd
- Copy STLTranslator.jar.upd to C:\Program Files\ArtOfIllusion\Plugins and remove the.upd extension
- Restart AoI
- To export an STL:
- Open your CAD file in AoI.
- Select File->Export->STL
- Fill in the filename and location in path
- File type: ASCII
- Max decimal digits: 12
- Max surface error: 0.05
- Ignore errors off
- File compression off
- Click OK.
- To enable import/export STL files:
- OpenSCAD
- MeshLab
To create an exploded view of an assembly in SolidEdge (not open-source) (which is useful for putting together RepRap, or for checking your parts) see tips.
SD Card Information and Warnings[edit | edit source]
- Do not delete anything on your SD card. If it becomes full, format it (see below)
- Do not modify files directly on your SD card. Copy them to a location on your computer, save them as a different file name after the modifications, and then copy this new file back onto the card.
- The largest supported SD card size is 2GB
- To format your SD card (necessary if you have faults when printing, seen by the machine doing unexpected things, and on first usage): Note: all files will be deleted from the card
- Insert SD card into computer
- Select format from the list of options for the SD card
- Select FAT32 or FAT16 as the type of format
- Ensure "Quick Format" is NOT selected; this will ensure your operating system searches for bad blocks
- Click format
Things You will Need[edit | edit source]
RapMan beta frontend for skeinforge from Bits From Bytes
Assembled RapMan machine
Sources and Citations[edit | edit source]
Further infomation here: How to videos for classroom on the file management


