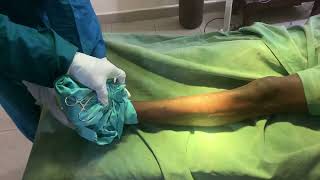
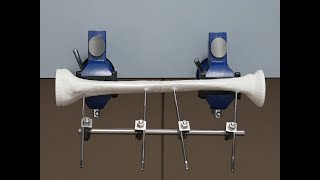
This skills module allows medical officers, junior orthopedic surgery residents, and surgeons who are not orthopedic specialists to become confident and competent in performing irrigation and debridement, power and manual drilling, proper positioning and insertion of Schanz screws, construction of the uniplanar frame, and fracture reduction and stabilization as part of external fixation procedures for open tibial shaft fractures performed in regions without specialist coverage. To maximize patient safety, this module teaches learners to use a powered drill to insert self-drilling Schanz screws through the near cortex and then manually advance Schanz screws into the far cortex to avoid plunging.
Learning Objectives
Training Objectives
By the end of this module, learners will be able to perform the following procedural steps:
1. Place patient in the supine position, prep the injured leg from the midthigh to below the ankle, and drape the injured leg in a sterile fashion.*
2. Perform irrigation using an average of 3L of irrigation solution for each successive Gustilo Type (i.e., 6L for Gustilo Type II open tibial fracture and 9L for Gustilo Type III open tibial fracture) to reduce the risk of infection.*[1][2][3]
3. Debride all foreign material and non-viable tissue to prevent infection and minimize wound complications.*[3][4]
4. If required, extend the open wound to directly visualize the fracture.*
5. While directly visualizing the fracture, apply manual longitudinal traction to the distal lower extremity to reduce the fracture.*
6. Use bone reduction forceps to manually reduce the fracture, compress the fragments together, and restore alignment:
7. Confirm restoration of rotational alignment by visually checking the position of the big toe and the alignment of the middle of the second toe with the center of the patella.*[10]
Rotation < 10 degrees (at 0 degrees of rotation, the big toe is pointing straight up towards the ceiling and the middle of the second toe is aligned with the center of the patella)
8. Palpate the medial malleolus of both limbs under sterile conditions to estimate and compare the length of the reduced limb to the uninjured limb.*[11]
Length discrepancy < 2 cm shortening
No distraction (lengthening)
9. If required, adjust the fragments to achieve an alignment within acceptable parameters:*
10. Apply bone holding forceps to maintain the reduced fracture.
11. Position the “far” Schanz screw (furthest from the fracture line) in the proximal fragment in the anteromedial tibial wall medial or distal to the tibial tuberosity while avoiding traumatized soft tissues to avoid tethering of the patellar ligament and penetration into the knee joint.[12]
12. Place the "far" Schanz screw (furthest from the fracture line) in the distal fragment in the anteromedial tibial wall at least 2 fingers’ breadth proximal to the medial malleolus while avoiding traumatized soft tissues to avoid entry into the ankle joint.*
13. Position the 2 “far” Schanz screws as widely spaced as possible into each fragment while avoiding traumatized soft tissues and entry into knee and ankle joints to permit better control of displacing forces and optimize stabilization of the reduction.[13][14][15][16]
14. Use a scalpel to make a stab incision into the soft tissue overlying the anteromedial wall of the tibia for insertion of each "far" Schanz screw.*[17]
15. Use dissecting scissors to spread the soft tissue apart in each stab incision to expose the bone for drilling of each "far" Schanz screw.*
16. Prepare the powered surgical drill for use by placing the Schanz screw into the 3-jaw chuck, inserting the chuck key into the circular opening in the chuck body, turning the chuck key clockwise to tighten the 3-jaw chuck over the Schanz screw, and then engaging the switch for forward drilling direction.
17. Test the powered surgical drill is ready for use by pressing the on/off trigger and confirm that the Schanz screw tip is rotating clockwise when the drill is pointing forward.
18. Use the properly sized drill sleeve and place the drill sleeve directly on the near cortex in the stab incision to protect the surrounding soft tissues when drilling each "far" Schanz screw.*
19. Insert the Schanz screw into the drill sleeve and place the screw tip directly on the near cortex of the anteromedial tibial wall and not on the tibial crest to reduce the risk of thermal osteonecrosis and reduce the risk that the screw tip may slip and injure the soft tissues.[18]
20. Insert both "far" Schanz screws in the proximal and distal fragments using an identical drill trajectory angle between 30°-60° relative to the tibial crest to avoid injury to neurovascular structures.[19][20]
21. Direct an assistant to perform irrigation while drilling to reduce the risk of thermal osteonecrosis.*[21]
22. Start drilling with the Schanz screw tip rotating in a clockwise direction and ensure that the tip did not slip medially or laterally on the near cortex which could injure the soft tissues.[17][19]
23. Power drill each Schanz screw through the near cortex of the anteromedial tibial wall and use tactile feel and acoustic feedback to stop drilling after passing through the near cortex and before or when the inner surface of the far cortex is reached to avoid plunging through the far cortex and damaging underlying soft tissues.[17][22]
24. Insert the chuck key into the circular opening in the drill chuck body and turn the chuck key anticlockwise to detach the drill from the Schanz screw.
25. Remove the drill sleeve from each "far" Schanz screw.
26. Slide the universal chuck with T-handle over the Schanz screw and tighten the 3-jaw chuck over the Schanz screw by manually rotating the chuck sleeve clockwise or by inserting the chuck key into the circular opening in the chuck body and turning the chuck key clockwise.
27. Use the universal chuck with T-handle to turn each Schanz screw manually for one to two 360 degree rotations to anchor the screw tip into the far cortex without exiting the far cortex to avoid injuring underlying soft tissues.[17][22]
28. Detach the universal chuck with T-handle from the Schanz screw by manually rotating the chuck sleeve anticlockwise or by inserting the chuck key into the circular opening in the chuck body and turning the chuck key anticlockwise.
29. Insert 4 pin-to-rod clamps to a 300 mm uniplanar rod.[17]
30. Apply the 2 outer pin-to-rod clamps to connect the 2 "far" Schanz screws in each fragment to the 300 mm uniplanar rod.
31. Tighten the 2 outer pin-to-rod clamps initially by hand.
32. Leave the pin opening of the 2 inner pin-to-rod clamps loosened.
33. Place the 2 “near” Schanz screws (closest to the fracture line) at least 2.0 cm (a finger breadth) from the fracture line while avoiding traumatized soft tissues to help prevent the placement of the Schanz screw within the fracture hematoma and reduce the risk having a pin site infection spread within the fracture.[23][13]
34. Position the "near and far" Schanz screws as widely apart as possible into each fragment while avoiding traumatized soft tissues and entry into knee and ankle joints to permit better control of displacing forces and optimize stabilization of the reduction.[13][14][15][16]
35. Use a scalpel to make a stab incision into the soft tissue overlying the anteromedial wall of the tibia for each "near" Schanz screw.*[17]
36. Use dissecting scissors to spread the soft tissue apart in each stab incision to expose the bone for drilling of each "near" Schanz screw.*
37. Place the Schanz screw into the 3-jaw chuck of the powered surgical drill, insert the chuck key into the circular opening in the chuck body, turn the chuck key clockwise to tighten the 3-jaw chuck over the Schanz screw, and then engage the switch for forward drilling.
38. Test the powered surgical drill is ready for use by pressing the on/off trigger and confirm that the Schanz screw tip is rotating clockwise when the drill is pointing forward.
39. Insert each "near" Schanz screw into the loosened pin opening in the rod-to-pin clamp attached to the 300 mm rod.
40. Place the Schanz screw tip directly on the near cortex of the anteromedial tibial wall and not on the anterior tibial crest to reduce the risk of thermal osteonecrosis and reduce the risk that the screw tip may slip and injure the soft tissues.[18]
41. Insert both "near" Schanz screw at an identical drill trajectory angle to all the other Schanz screws and between 30°-60° relative to the tibial crest to avoid injury to neurovascular structures.[19][20]
42. Direct an assistant to perform irrigation while drilling to reduce the risk of thermal osteonecrosis.*[21]
43. Place the "near" Schanz screw tip on the anteromedial tibial wall, start drilling with the screw tip rotating in a clockwise direction, and ensure that the tip does not slip medially or laterally on the near cortex which could injure the soft tissues.[17][19]
44. Power drill each Schanz screw through the near cortex of the anteromedial tibial wall and use tactile feel and acoustic feedback to stop drilling after passing through the near cortex and before or when the inner surface of the far cortex is reached to avoid plunging through the far cortex and damaging underlying soft tissues.[17][22]
45. Insert the chuck key into the circular opening in the drill chuck body and turn the chuck key anticlockwise to detach the drill from the Schanz screw.
46. Slide the universal chuck with T-handle over the Schanz screw and tighten the 3-jaw chuck over the Schanz screw by manually rotating the chuck sleeve clockwise or by inserting the chuck key into the circular opening in the chuck body and turning the chuck key clockwise.
47. Use the universal chuck with T-handle to turn each "near" Schanz screw manually for one to two 360 degree rotations to anchor the screw tip into the far cortex without exiting the far cortex to avoid injuring underlying soft tissues.[17][22]
48. Detach the universal chuck with T-handle from the Schanz screw by manually rotating the chuck sleeve anticlockwise or by inserting the chuck key into the circular opening in the chuck body and turning the chuck key anticlockwise.
49. Apply and turn the 11 mm spanner with T-handle wrench clockwise for final tightening of the 4 pin-to-rod clamps.
50. Verify the reduction visually and with gentle palpation of the tibial crest at the fracture line to confirm that the alignment is still within acceptable parameters:
51. Confirm restoration of rotational alignment by visually checking the position of the big toe and the alignment of the middle of the second toe with the center of the patella.*[10]
Rotation < 10 degrees (at 0 degrees of rotation, the big toe is pointing straight up towards the ceiling and the middle of the second toe is aligned with the center of the patella)
52. Palpate the medial malleolus of both limbs under sterile conditions to estimate and compare the length of the reduced limb to the uninjured limb.*[11]
Length discrepancy < 2 cm shortening
No distraction (lengthening)
53. Remove the bone holding forceps once fracture is stabilized with external fixator frame and acceptable alignment is confirmed.*
54. Inspect the pin sites for skin tenting and if present, the stab incision should be widened to release any soft tissue tension around the pin site to reduce the risk of inflammation and pin site infection.*[24]
55. Clean the extremity and apply sterile gauze dressings to all 4 pin sites at the end of the procedure.*
56. Use a measuring tape to measure and compare the limb length (from the anterior superior iliac spine to the medial malleolus) of both legs to confirm acceptable length discrepancy in the injured leg after dressings have been applied.*[11]
Length discrepancy < 2 cm shortening (compared to uninjured, contralateral leg)
No distraction (lengthening)
57. Re-evaluate the Gustilo open-fracture classification for the open tibial fracture in the operating room and update the antibiotic regimen and surgical treatment plan accordingly.*[3][25][26][27][28][29]
The steps above highlighted with an asterix (*) cannot be performed during simulation-based skills training but must be performed during the actual clinical procedure.
Knowledge Objectives
By the end of the module, the learner should know to perform the following steps in the actual clinical procedure:
1. Place patient in the supine position, prep the injured leg from the midthigh to below the ankle, and drape the injured leg in a sterile fashion.
2. Irrigate a Gustilo Type II open tibial shaft fracture with an average of 6 L of irrigation solution and Gustilo Type III open tibial shaft fracture with an average of 9 L of irrigation solution to reduce the risk of infection.
3. Debride all foreign material and non-viable tissue to prevent infection and minimize wound complications.
4. If required, extend the open wound to directly visualize the fracture.
5. While directly visualizing the fracture, apply manual longitudinal traction to the distal lower extremity to reduce the fracture.
6. Confirm restoration of rotational alignment by visually checking the position of the big toe and the alignment of the middle of the second toe with the center of patella.
Rotation < 10 degrees (at 0 degrees of rotation, the big toe is pointing straight up towards the ceiling and the middle of the second toe is aligned with the center of the patella
7. Palpate the medial malleolus of both limbs under sterile conditions to estimate and compare the length of the reduced limb to the uninjured limb.
Length discrepancy < 2 cm shortening
No distraction (lengthening)
8. If required, adjust the fragments to achieve an alignment within acceptable parameters:
Bone apposition > 50%
Rotation < 10 degrees
Angulation < 10 degrees in any plane
Length discrepancy < 2 cm shortening
No distraction (lengthening)
9. Place the "far" Schanz screw (furthest from the fracture line) in the distal fragment in the anteromedial tibial wall at least 2 fingers’ breadth proximal to the medial malleolus while avoiding traumatized soft tissues to avoid entry into the ankle joint.
10. Use a scalpel to make a stab incision into the soft tissue overlying the anteromedial wall of the tibia for insertion of each Schanz screw.
11. Use dissecting scissors to spread the soft tissue in each stab incision to expose the bone for drilling of each Schanz screw.
12. Use the properly sized drill sleeve and place the drill sleeve directly on the near cortex in the stab incision to protect the surrounding soft tissues when drilling each "far" Schanz screw.
13. Direct an assistant to provide irrigation while drilling is performed to reduce the risk of thermal osteonecrosis.
14. Confirm restoration of rotational alignment by visually checking the position of the big toe and the alignment of the middle of the second toe with the center of the patella.
Rotation < 10 degrees (at 0 degrees of rotation, the big toe is pointing straight up towards the ceiling and the middle of the second toe is aligned with the center of the patella)
15. Palpate the medial malleolus of both limbs under sterile conditions to estimate and compare the length of the reduced limb to the uninjured limb.
Length discrepancy < 2 cm shortening
No distraction (lengthening)
16. Remove the bone holding forceps once fracture is stabilized with external fixator frame and acceptable alignment is confirmed.
17. Inspect the pin sites for skin tenting and if present, the stab incision should be widened to release any soft tissue tension around the pin site to reduce the risk of inflammation and pin site infection.[24]
18. Clean the extremity and apply sterile gauze dressings to all 4 pin sites at the end of the procedure.
19. Use a measuring tape to measure and compare the limb length (from the anterior superior iliac spine to the medial malleolus) of both legs to confirm acceptable length discrepancy in the injured leg after dressings have been applied.
Length discrepancy < 2 cm shortening (compared to uninjured, contralateral leg)
No distraction (lengthening)
20. Re-evaluate the Gustilo open-fracture classification for the open tibial shaft fracture in the operating room, and update the antibiotic regimen and surgical treatment plan accordingly.
Materials and Equipment
1
Uniplanar External Fixation Sterile Prepping and Draping Supplies
Bone reduction forceps
Sponge stick
Gauze pad
Sterile preparation solution*
Surgical drapes, Quantity: 3
Towel clamps
Surgical towel
Gauze roll
The items above highlighted with an asterix (*) are not used in this simulation-based skills training but are used during the actual clinical procedure.
2
Uniplanar External Fixation Hardware Courtesy of Medical Aid International and Dr. Habila Umaru
Uniplanar External Fixation Hardware
Bone reduction forceps
Bone holding forceps, medium size
300 mm rod, 11 mm diameter for clamps designed for 4.5 mm and 5.0 mm Schanz screws
Pin-to-rod clamps for 11 mm diameter rods and 4.5 mm and 5.0 mm Schanz screws, Quantity: 4
Self-drilling Schanz screws, 4.5 mm or 5.0 mm diameter, Quantity: 4
Chuck key for universal chuck with T-handle
Universal chuck with T-handle for 5.0 mm Schanz screws
11 mm spanner with T-handle wrench
Drill sleeve, properly sized for 4.5 mm or 5.0 mm Schanz screws (not shown)
3
Surgical Supplies
Surgical Supplies
Eye protection
Gloves
Irrigation solution (not shown)*
50 mL syringe*
Scalpel handle with 22 blade*
Sharps container (not shown)
Dissecting scissors*
Chuck key for powered drill
Any powered drill compatible with 4.5 and 5.0 mm diameter self-drilling Schanz screws
Measuring tape*
The items above highlighted with an asterix (*) are not used in this simulation-based skills training but are used during the actual clinical procedure.
4
Tibial Shaft Transverse Fracture Simulator Secured In Vise Clamps
The bulleted steps below highlighted in bold and with an asterix (*) are considered as critical for the procedure and for which only essential conversations and activities in the operating room should occur to avoid distracting the surgical practitioner from their performance of his or her duties.[30]
1
Prep and Drape Patient
1. Place simulated patient in the supine position.
2. Direct assistant #1 to use both gloved hands to support the simulated patient's foot to lift up the injured leg. Normally, assistant #1 will wear gloves during sterile preparation and draping. However, assistant #1 can skip wearing gloves to reduce material costs during this simulation-based skills training.
3. The surgical practitioner uses a sponge stick and folded up gauze pad to simulate the circumferential prepping of the injured leg three times in a distal-to-proximal direction from below the ankle to the mid-thigh.
Normally, the surgical practitioner will wear a sterile gown and sterile gloves during sterile preparation and draping. However, the surgical practitioner can skip wearing a sterile gown and sterile gloves to minimize material costs during this simulation-based skills training.
Normally, the surgical practitioner will use 3 sterile sponge sticks and 3 sterile folded up gauze pads dipped in sterile preparation solution during sterile preparation and draping. However, the surgical practitioner can use 1 non-sterile sponge stick and 1 non-sterile folded up gauze pad and skip using the sterile preparation solution to minimize material costs during this simulation-based skills training.
4. While the prepped leg is held up by assistant #1, the surgical practitioner and assistant #2 will place the first drape on the inferior (caudal) section of the simulated operating table to cover the simulated patient's contralateral leg, and the simulated operating table underneath the patient's prepped leg to above the mid-thigh region.
Normally, the surgical practitioner and assistant #2 will wear sterile gowns and gloves during sterile preparation and draping. However, the surgical practitioner and assistant #2 can skip wearing sterile gowns and sterile gloves to minimize material costs during this simulation-based skills training.
5. While the prepped leg is held up by assistant #1, the surgical practitioner and assistant #2 will place a second drape over the first drape, wrap the superior (cephalad) section of this second drape underneath and over the mid-thigh of the prepped leg, and secure this wrapped drape with a towel clamp over the anterior aspect of the leg.
Normally, the surgical practitioner and assistant #2 will use sterile drapes and sterile towel clamps during sterile preparation and draping. However, the surgical practitioner and assistant #2 can re-use non-sterile materials and equipment to minimize material costs during this simulation-based skills training.
6. While the prepped leg is held up by assistant #1, the surgical practitioner and assistant #2 will place a third drape over the superior (cephalad) section of the simulated operating table to cover the patient's body from the mid-thigh to the torso, wrap the inferior (caudal) section of the third drape over and underneath the mid-thigh of the prepped leg, and secure this wrapped drape with a towel clamp over the lateral aspect of the leg.
7. While the prepped leg is held up by assistant #1, the surgical practitioner will place a towel centred underneath the patient's foot on the second drape.
Normally, the surgical practitioner will use a sterile towel during sterile preparation and draping. However, the surgical practitioner can re-use non-sterile materials and equipment to minimize material costs during this simulation-based skills training.
8. The assistant #1 gently lowers the foot onto this towel.
9. The surgical practitioner wraps this towel around and over the patient's foot to cover the entire foot to just above the ankle and secures this towel with a towel clamp.
Normally, the surgical practitioner will use a sterile towel clamp during sterile preparation and draping. However, the surgical practitioner can re-use non-sterile materials and equipment to minimize material costs during this simulation-based skills training.
10. The surgical practitioner wraps a roll of gauze around the wrapped foot to help ensure the towel does not slip off and then secures the gauze by tucking the end of the gauze underneath itself.
Normally, the surgical practitioner will use a sterile gauze roll during sterile preparation and draping. However, the surgical practitioner can re-use non-sterile materials and equipment to minimize material costs during this simulation-based skills training.
Annotations:
00:00 Loosen Right Vise Clamp Securing Distal Fragment to Simulate a Displaced Fracture
00:09 Irrigate and Debride Open Wounds
00:17 Use Bone Reduction Forceps to Manually Reduce Fracture Note: It May Be Necessary To Extend the Wound to Directly Visualize the Fracture
00:28 Apply Bone Holding Forceps to Maintain Reduction
00:44 Tighten Right Vise Clamp and Remove Bone Reduction Forceps Once Fracture is Stabilized
01:01 Position Far Schanz Screw in Proximal Fragment Medial or Distal to the Tibial Tuberosity
01:17 Power Drill Far Schanz Screw Into Proximal Fragment at a Drill Trajectory Angle Between 30 - 60 Degrees
01:51 Manually Advance Far Schanz Screw Into Far Cortex of Proximal Fragment
02:18 Position Far Schanz Screw in Distal Fragment At Least Two Fingers' Breadth Proximal to the Medial Malleolus (Not Shown)
02:36 Power Drill Far Schanz Screw Into Distal Fragment At Identical Drill Trajectory Angle to Other Schanz Screw
03:12 Manually Advance Far Schanz Screw Into Far Cortex of Distal Fragment
03:34 Use Pin-To-Rod Clamps to Attach Uniplanar Rod to Both Far Schanz Screws
03:45 Position Near Schanz Screw in Distal Fragment At Least 2 cm From the Fracture Line
03:59 Power Drill Near Schanz Screw in Distal Fragment At Identical Drill Trajectory Angle to Other Schanz Screws
04:29 Manually Advance Near Schanz Screw Into Far Cortex of Distal Fragment
04:53 Position Near Schanz Screw in Proximal Fragment At Least 2 cm From the Fracture Line
05:08 Power Drill Near Schanz Screw in Proximal Fragment At Identical Drill Trajectory Angle to Other Schanz Screws
05:34 Manually Advance Near Schanz Screw Into Far Cortex of Proximal Fragment
05:59 Stabilize and Inspect Reduced Fracture
06:51 Remove Bone Holding Forceps
06:59 Confirm Adequate Reduction
2
Irrigate and Debride Open Wounds
1. Start this procedure with the simulator fragments slightly distracted by 2.0 - 3.0 mm but otherwise properly aligned to simulate a fracture with restored angulation, and rotation.
2. Wear proper eye protection and gloves.
3. Loosen the right vise clamp securing the distal fragment to simulate a displaced fracture during this simulation-based skills training.
4. Normally, an average of 3L of irrigation solution (distilled water or isotonic saline) is used for each successive Gustilo Type (i.e., 6L for Gustilo Type II and 9L for Gustilo Type III) for wound lavage of an open tibial fracture to reduce the risk of infection.[1][2][3] However, an empty syringe can be used to simulate wound lavage during this simulation-based skills training.
5. Normally, all foreign material and non-viable tissue is debrided to reduce the risk of infection and minimize wound complications.[3][4][31] However, the simulator does not display foreign material or non-viable tissue so this step is skipped during this simulation-based skills training.
3
Reduce and Stabilize Fracture
1. Normally, if required, the wound is extended to directly visualize and access the fracture. However, the simulator does not have simulated soft tissue so this step is skipped during this simulation-based skills training.
2. Normally, manual longitudinal traction can be applied to the distal lower extremity to reduce the fracture while directly visualizing the fracture. However, the simulator does not have a simulated distal lower extremity so this step is skipped during this simulation-based skills training.
3. Use bone reduction forceps to manually reduce the fracture, compress the fragments together, and restore alignment:
Bone apposition > 50%
Angulation < 10 degrees in any plane
Rotation < 10 degrees
Length discrepancy < 2 cm shortening
No distraction (lengthening)*
4. Normally, restoration of rotational alignment is confirmed by visually checking the position of the big toe and the alignment of the middle of the second toe with the center of patella.[10] However, the simulator does not include a foot or patella so the tibial crest will be visually inspected and palpated instead to verify restoration of rotational alignment during this simulation-based skills training.
At 0 degrees of rotation, the big toe is pointing straight up towards the ceiling and the middle of the second toe is aligned with the center of the patella. If the distal lower extremity is rotated > 10 degrees, it should be described as externally or internally rotated. External rotation is when the foot is turned outward (outtoeing) and internal rotation is when the foot is turned inwards (intoeing).
5. Normally, the medial malleolus of both limbs is palpated under sterile conditions to estimate and compare the length of the reduced limb to the uninjured limb. Then a measuring tape is used to measure and compare the limb length (from the anterior superior iliac spine to the medial malleolus) of both legs to confirm acceptable length discrepancy in the injured leg after dressings have been applied.[11] However, the simulator does not display the contralateral limb, anterior superior iliac spine, or medial malleolus so the fracture line will be visually inspected for shortening or distraction to confirm that the fracture has been adequately reduced during this simulation training.
6. Apply and tighten bone holding forceps to maintain reduction.
7. Tighten right vise clamp and remove bone reduction forceps once fracture is stabilized during this simulation-based skills training.
4
Position "Far" Schanz Screws For Each Fragment
1. Position the “far” Schanz screw (furthest from the fracture line) in the proximal fragment in the anteromedial tibial wall medial or distal to the tibial tuberosity while avoiding traumatized soft tissues to avoid tethering of the patellar ligament and penetration into the knee joint.*[12]
2. Normally, the "far" Schanz screw in the distal fragment should be placed at least 2 fingers’ breadth proximal to the medial malleolus while avoiding traumatized soft tissues to avoid entry into the ankle joint.* However, the simulator does not display the medial malleolus so this step is skipped during this simulation-based skills training.
3. Position the “far” Schanz screws as widely spaced as possible into each fragment while avoiding traumatized soft tissues and entry into knee and ankle joints to permit better control of displacing forces and optimize stabilization of the reduction.*[13][14][15][16]
4. Use a 22 blade scalpel to make a stab incision for insertion of each Schanz screw in the soft tissue overlying the anteromedial tibial wall and not on the tibial crest to reduce the risk of thermal osteonecrosis and reduce the risk that the screw tip may slip and injure the soft tissues during drilling.*[17] However, the simulator does not have simulated soft tissue so this step is skipped during this simulation-based skills training.
5. Use dissecting scissors to spread the soft tissue apart in each stab incision to expose the bone for drilling of each Schanz screw.* However, the simulator does not have simulated soft tissue so this step is skipped during this simulation-based skills training.
5
Cross-Section View of Drill Trajectory Angles of Schanz Screws in Proximal Fragment
Insert "Far" Schanz Screws Into Safe Zones of the Tibia
1. Insert a 4.5 or 5.0 mm diameter self-drilling Schanz screw into the 3-jaw chuck of the powered surgical drill.
2. Insert the chuck key into the circular opening in the chuck body of the surgical drill (watch video from 1:11 to 1:15).
3. Turn the chuck key clockwise to tighten the 3-jaw chuck of the surgical drill over the Schanz screw.
4. Engage the switch for forward drilling direction on the drill.
Different drills have different locations for the switch that controls drilling direction.
5. Confirm that the drill is ready for use by pressing the on/off trigger and observing that the Schanz screw tip is rotating clockwise when the drill is pointing forward.
6. Place the properly sized drill sleeve directly on the near cortex in each stab incision to protect the surrounding soft tissues when drilling. Use a 5.0 mm drill sleeve for a 5.0 mm diameter Schanz screw and a 4.5 mm drill sleeve for a 4.5 mm diameter Schanz screw.
7. Slide the Schanz screw into the properly sized drill sleeve and place the screw tip directly on the near cortex of the anteromedial tibial wall and not on the tibial crest to reduce the risk of thermal osteonecrosis and reduce the risk that the screw tip may slip and injure the soft tissues during drilling.[23]
8. Insert both "far" Schanz screws in the proximal and distal fragments at an identical drill trajectory angle between 30°-60° relative to the tibial crest to avoid injury to neurovascular structures.*[19][20]
9. Normally, the properly sized drill sleeve is kept directly on the near cortex in each stab incision to protect the surrounding soft tissues when drilling.[17] However, the drill sleeve should be pulled back and kept at least 3.0 mm above the near cortex only during this simulation-based skills training to prevent plastic strands from getting stuck inside the drill sleeve while drilling.
6
Oscillogram of Bicortical Drilling of Tibial Fracture
Power Drill "Far" Schanz Screws Into Near Cortex
1. Normally, irrigation should be provided when drilling is performed to reduce the risk of thermal osteonecrosis.[21] However, an assistant can simulate irrigation with an empty syringe while drilling is performed during this simulation-based skills training.
2. Start drilling with the Schanz screw tip rotating in a clockwise direction and ensure that the tip does not slip medially or laterally on the near cortex which could injure the soft tissues.*
3. When power drilling each Schanz screw through the near cortex of the anteromedial tibial wall, pay attention to the sound changes and tactile feel as the Schanz screw penetrates the near cortex.*
The drilling sound will decrease in volume and a loss of resistance ("give") can be felt when the screw tip passes through the near cortex into the cancellous bone.
4. To prevent plunging through the far cortex and damaging underlying soft tissues, stop power drilling after passing through the near cortex and before or when the inner surface of the far cortex is reached, which can be easily felt by a sudden resistance to the screw tip.*
5. Insert the chuck key into the circular opening in the drill chuck body (watch video from 1:23 to 1:27), turn the chuck key anticlockwise, detach the drill, and remove the drill sleeve from each "far" Schanz screw.
7
The chuck consists of a sleeve, body, and 3 jaws.
Manually Advance "Far" Schanz Screws Into Far Cortex
1. Slide the 3-jaw chuck of the universal chuck with T-handle over each Schanz screw.
2. Tighten the 3-jaw chuck over each Schanz screw by manually rotating the chuck sleeve clockwise (click here to watch 20 second video) or by inserting the chuck key into the circular opening in the chuck body and turning the chuck key clockwise (click here to watch 19 second video).
3. Use the T-handle to turn each Schanz screw clockwise for one to two 360 degree rotations to anchor the screw tip into the far cortex without exiting the far cortex to avoid injuring underlying soft tissues.*[32] Resistance can be felt when the Schanz screw is being anchored into the inner side of the far cortex.
When manually advancing each Schanz screw into the far cortex, a loss of resistance ("give") should not be felt because this signifies that the Schanz screw has perforated the far cortex.
4. Detach the universal chuck with T-handle from each Schanz screw by manually rotating the chuck sleeve anticlockwise (click here to watch 23 second video) or by inserting the chuck key into the circular opening in the chuck body and turning the chuck key anticlockwise (click here to watch 13 second video).
The protruding tip of the self-drilling Schanz screw can injure the underlying soft tissues.[32] Manual advancement of the Schanz screw reduces the risk of a Schanz screw perforating the far cortex and plunging into underlying soft tissues.
8
Use Pin-To-Rod Clamps to Fix Uniplanar Rod
1. Insert 4 pin-to-rod clamps on a 300 mm uniplanar rod.
2. Apply the 2 outer pin-to-rod clamps to connect the 2 "far" Schanz screws in each fragment to the 300 mm rod.[17]
3. Tighten the 2 outer pin-to-rod clamps initially by hand.
4. Leave the 2 inner pin-to-rod clamps loosened.
9
Position "Near" Schanz Screws For Each Fragment
1. Place the 2 “near” Schanz screws (closest to the fracture line) at least 2.0 cm (a finger breadth) from the fracture line while avoiding traumatized soft tissues to help prevent the placement of the Schanz screw within the fracture hematoma and reduce the risk of having a pin site infection spread within the fracture.*[13][23]
2. Position the "near" and "far" Schanz screws as widely spaced as possible in each fragment while avoiding traumatized soft tissues to permit better control of displacing forces and optimize stabilization of the reduction.*[13][14][15][16]
3. Use a 22 blade scalpel to make a stab incision for insertion of each Schanz screw in the soft tissue overlying the anteromedial tibial wall and not on the tibial crest to reduce the risk of thermal osteonecrosis and reduce the risk that the screw tip may slip and injure the soft tissues during drilling.*[17] However, the simulator does not have simulated soft tissue so this step is skipped during this simulation-based skills training.
4. Use dissecting scissors to spread the soft tissue apart in the stab incision to expose the bone for drilling of each Schanz screw.* However, the simulator does not have simulated soft tissue so this step is skipped during this simulation-based skills training.
10
Cross-Section View of Drill Trajectory Angles of Schanz Screws in Distal Fragment
Insert "Near" Schanz Screws Into Safe Zones of the Tibia
1. Insert a 4.5 or 5.0 mm diameter self-drilling Schanz screw into the 3-jaw chuck of the powered surgical drill.
2. Insert the chuck key into the circular opening in the chuck body of the surgical drill (watch video from 1:11 to 1:15).
3. Turn the chuck key clockwise to tighten the 3-jaw chuck of the surgical drill over the Schanz screw.
4. Engage the switch for forward drilling direction on the drill.
Different drills have different locations for the switch that controls drilling direction.
5. Confirm that the drill is ready for use by pressing the on/off trigger and observing that the Schanz screw tip is rotating clockwise when the drill is pointing forward.
6. Slide each "near" Schanz screw into the pin opening of a loosened pin-to-rod clamp attached to the 300 mm uniplanar rod and place the screw tip directly on the near cortex of the anteromedial tibial wall and not on the tibial crest to reduce the risk of thermal osteonecrosis and reduce the risk that the screw tip may slip and injure the soft tissues during drilling.[23]
7. Insert each "near" Schanz screw at an identical drill trajectory angle to all the other Schanz screws and between 30°-60° relative to the tibial crest to avoid injury to neurovascular structures*[19][20]
11
Oscillogram of Bicortical Drilling of Tibial Fracture
Power Drill "Near" Schanz Screws Into Near Cortex
1. Normally, irrigation should be provided when drilling is performed to reduce the risk of thermal osteonecrosis.[21] However, an assistant can simulate irrigation with an empty syringe while drilling is performed during this simulation-based skills training.
2. Start drilling with the Schanz screw tip rotating in a clockwise direction and ensure that the tip does not slip medially or laterally on the near cortex which could injure the soft tissues.*
3. When power drilling each Schanz screw through the near cortex of the anteromedial tibial wall, pay attention to the sound changes and tactile feel as the Schanz screw penetrates the near cortex.*
The drilling sound will decrease in volume and a loss of resistance ("give") can be felt when the screw tip passes through the near cortex into the cancellous bone.
4. To prevent plunging through the far cortex and damaging underlying soft tissues, stop power drilling after passing through the near cortex and before or when the inner surface of the far cortex is reached, which can be easily felt by a sudden resistance to the screw tip.*
5. Insert the chuck key into the circular opening in the drill chuck body (watch video from 1:23 to 1:27), turn the chuck key anticlockwise, and detach the drill from each "near" Schanz screw.
12
The chuck consists of a sleeve, body, and 3 jaws.
Manually Advance "Near" Schanz Screws Into Far Cortex
1. Slide the 3-jaw chuck of the universal chuck with T-handle over each Schanz screw.
2. Tighten the 3-jaw chuck over each Schanz screw by manually rotating the chuck sleeve clockwise (click here to watch 20 second video) or by inserting the chuck key into the circular opening in the chuck body and turning the chuck key clockwise (click here to watch 19 second video).
3. Use the T-handle to turn each Schanz screw clockwise for one to two 360 degree rotations to anchor the screw tip into the far cortex without exiting the far cortex to avoid injuring underlying soft tissues.*[32] Resistance can be felt when the Schanz screw is being anchored into the inner side of the far cortex.
When manually advancing each Schanz screw into the far cortex, a loss of resistance ("give") should not be felt because this signifies that the Schanz screw has perforated the far cortex.
4. Detach the universal chuck with T-handle from each Schanz screw by manually rotating the chuck sleeve anticlockwise (click here to watch 23 second video) or by inserting the chuck key into the circular opening in the chuck body and turning the chuck key anticlockwise (click here to watch 13 second video).
13
Stabilize and Inspect Reduction
1. Apply and turn the 11 mm spanner with T-handle wrench clockwise for final tightening of the 4 pin-to-rod clamps attached to the 300 mm rod.*
2. Verify the reduction visually, and with gentle palpation of the tibial crest at the fracture line to confirm whether the alignment is still within acceptable parameters
Bone apposition > 50%
Rotation < 10 degrees
Angulation < 10 degrees in the coronal (frontal) and sagittal planes
3. Normally, restoration of rotational alignment is confirmed by visually checking the position of the big toe and the alignment of the middle of the second toe with the center of patella.[10] However, the simulator does not include a foot or patella so the tibial crest will be visually inspected and palpated instead to verify restoration of rotational alignment during this simulation-based skills training.
At 0 degrees of rotation, the big toe is pointing straight up towards the ceiling and the middle of the second toe is aligned with the center of the patella. If the distal lower extremity is rotated > 10 degrees, it should be described as externally or internally rotated. External rotation is when the foot is turned outward (outtoeing) and internal rotation is when the foot is turned inwards (intoeing).
4. Visually inspect the fracture line to confirm that the reduction is adequate
Length discrepancy < 2 cm shortening
No distraction (lengthening)
5. Normally, the medial malleolus of both limbs is palpated under sterile conditions to estimate and compare the length of the reduced limb to the uninjured limb. Then a measuring tape is used to measure and compare the limb length (from the anterior superior iliac spine to the medial malleolus) of both legs to confirm acceptable length discrepancy in the injured leg after dressings have been applied.[11] However, the simulator does not display the contralateral limb, anterior superior iliac spine, or medial malleolus so the fracture line will be visually inspected for shortening or distraction to confirm that the fracture has been adequately reduced during this simulation training.
6. The bone holding forceps are removed once the reduced fracture is stabilized with the external fixator frame and acceptable alignment is confirmed.
7. Normally, the pin sites are inspected for skin tenting. If skin tenting is present, the stab incision should be widened to release any soft tissue tension around the pin site to reduce the risk of inflammation and pin site infection.[24] However, the simulator does not have simulated soft tissue so this step is skipped during this simulation-based skills training.
14
Normally, a measuring tape should be used to measure and compare the limb length (from the anterior superior iliac spine to the medial malleolus) of both legs to confirm acceptable length discrepancy in the injured leg after dressings have been applied.[11]
Apply Dressing and Evaluate Extremity
1. Normally, the extremity should be cleaned and sterile gauze dressings applied to all 4 pin sites at the end of the procedure. However, this step is skipped during this simulation-based skills training.
2. Normally, a measuring tape should be used to measure and compare the limb length (from the anterior superior iliac spine to the medial malleolus) of both legs to confirm acceptable length discrepancy in the injured leg after dressings have been applied.[11] However, the simulator does not display the contralateral limb, anterior superior iliac spine, or medial malleolus so this step is skipped during this simulation-based skills training.
3. Normally, the Gustilo open-fracture classification for the injury should be re-evaluated after debridement in the operating room and the antibiotic regimen and surgical treatment plan updated accordingly.[25][26][27][28] However, the simulator does not have simulated soft tissue so this step is skipped during this simulation-based skills training.
An open fracture with a wound less than 1 cm long and clean.
Gustilo Type II:
An open fracture with a laceration more than 1 cm long without extensive soft tissue damage, flaps, or avulsions.
Gustilo Type IIIA:
Adequate soft-tissue coverage of a fractured bone despite extensive soft-tissue laceration or flaps, or high-energy trauma irrespective of the size of the wound.
Gustilo Type IIIB:
Extensive soft-tissue injury loss with periosteal stripping and bone exposure. This is usually associated with massive contamination.
Gustilo Type IIIC:
Open fracture associated with arterial injury requiring repair.
If the injury is re-classified to a Gustilo Type IIIB or Type IIIC, then referral to a tertiary center with specialist care is warranted. A Gustilo Type IIIC injury is a surgical emergency.
Self-Assessment Framework
Self-assessment
After the reduced fracture has been stabilized with the uniplanar external fixator, please go to this link to follow the instructions on how to use the learner's cellphone to take 5 post-operative photos ("digital X-rays"), and complete the Training Logbook
Acknowledgements
This work is funded by a grant from the Intuitive Foundation. Any research, findings, conclusions, or recommendations expressed in this work are those of the author(s), and not of the Intuitive Foundation.
References
1 2 Olufemi OT, Adeyeye AI. Irrigation solutions in open fractures of the lower extremities: evaluation of isotonic saline and distilled water. SICOT J. 2017;3:7. doi: 10.1051/sicotj/2016031. Epub 2017 Jan 30. PMID: 28134091; PMCID: PMC5278649.
1 2 3 Haonga BT, Liu M, Albright P, Challa ST, Ali SH, Lazar AA, Eliezer EN, Shearer DW, Morshed S. Intramedullary Nailing Versus External Fixation in the Treatment of Open Tibial Fractures in Tanzania: Results of a Randomized Clinical Trial. J Bone Joint Surg Am. 2020 May 20;102(10):896-905. doi: 10.2106/JBJS.19.00563. PMID: 32028315; PMCID: PMC7508278.
1 2 3 Merchant TC, Dietz FR. Long-term follow-up after fractures of the tibial and fibular shafts. J Bone Joint Surg Am. 1989 Apr;71(4):599-606. PMID: 2703519.
1 2 3 4 Greene, W.B., Heckman, J.D., & American Academy of Orthopaedic Surgeons. (1994). The clinical measurement of joint motion. Rosemont, Ill: American Academy of Orthopaedic Surgeons.
1 2 3 4 5 6 7 Sabharwal S, Kumar A. Methods for assessing leg length discrepancy. Clin Orthop Relat Res. 2008 Dec;466(12):2910-22. doi: 10.1007/s11999-008-0524-9. Epub 2008 Oct 4. PMID: 18836788; PMCID: PMC2628227.
1 2 Nayagam S. Safe corridors in external fixation: the lower leg (tibia, fibula, hindfoot and forefoot). Strategies Trauma Limb Reconstr. 2007 Dec;2(2-3):105-10. doi: 10.1007/s11751-007-0023-7. Epub 2007 Dec 4. PMID: 18427752; PMCID: PMC2322836.
1 2 3 4 5 6 Giotakis N, Narayan B. Stability with unilateral external fixation in the tibia. Strategies Trauma Limb Reconstr. 2007 Apr;2(1):13-20. doi: 10.1007/s11751-007-0011-y. PMID: 18427910; PMCID: PMC2321723.
1 2 3 4 Briggs BT, Chao EY (1982) The mechanical performance of the standard Hoffmann-Vidal external fixation apparatus. J Bone Joint Surg Am 64:566–573.
1 2 3 4 Huiskes R, Chao E (1986) Guidelines for external fixation frame rigidity and stresses. J Orthop Res 4:68–75.
1 2 3 4 5 6 7 8 9 10 11 12 13 Höntzsch D. Modular External Fixator [Internet]. AO Foundation Surgery Reference. AO Foundation Surgery Reference; 2021 [cited 2021 Nov 28]. Available from: https://surgeryreference.aofoundation.org/orthopedic-trauma/adult-trauma/tibial-shaft/simple-fracture-transverse/modular-external-fixator#principles-of-modular-external-fixation.
1 2 3 4 Höntzsch D. Safe Zones In The Tibia for Pin Insertion [Internet]. AO Foundation Surgery Reference. AO Foundation Surgery Reference; 2021 [cited 2021 Nov 28]. Available from: https://surgeryreference.aofoundation.org/orthopedic-trauma/adult-trauma/tibial-shaft/approach/safe-zones-of-the-tibia-for-pin-insertion.
1 2 3 4 Timon C, Keady C. Thermal Osteonecrosis Caused by Bone Drilling in Orthopedic Surgery: A Literature Review. Cureus. 2019 Jul 24;11(7):e5226. doi: 10.7759/cureus.5226. PMID: 31565628; PMCID: PMC6759003.
1 2 3 4 Khokhotva M, Backstein D, Dubrowski A. Outcome errors are not necessary for learning orthopedic bone drilling. Can J Surg. 2009 Apr;52(2):98-102. PMID: 19399203; PMCID: PMC2663499. URL: https://pubmed.ncbi.nlm.nih.gov/19399203/.
1 2 3 4 Encinas-Ullán CA, Martínez-Diez JM, Rodríguez-Merchán EC. The use of external fixation in the emergency department: applications, common errors, complications and their treatment. EFORT Open Rev. 2020 Apr 2;5(4):204-214. doi: 10.1302/2058-5241.5.190029. PMID: 32377388; PMCID: PMC7202044.
1 2 3 Gustilo RB, Anderson JT. Prevention of infection in the treatment of one thousand and twenty-five open fractures of long bones: retrospective and prospective analyses. J Bone Joint Surg Am. 1976 Jun;58(4):453-8. PMID: 773941.
1 2 3 Gustilo RB, Mendoza RM, Williams DN. Problems in the management of type III (severe) open fractures: a new classification of type III open fractures. J Trauma. 1984 Aug;24(8):742-6. doi: 10.1097/00005373-198408000-00009. PMID: 6471139.
1 2 Garner MR, Sethuraman SA, Schade MA, Boateng H. Antibiotic Prophylaxis in Open Fractures: Evidence, Evolving Issues, and Recommendations. J Am Acad Orthop Surg. 2020 Apr 15;28(8):309-315. doi: 10.5435/JAAOS-D-18-00193. PMID: 31851021.
↑ Zhu H, Li X, Zheng X. A Descriptive Study of Open Fractures Contaminated by Seawater: Infection, Pathogens, and Antibiotic Resistance. Biomed Res Int. 2017;2017:2796054. doi: 10.1155/2017/2796054. Epub 2017 Feb 20. PMID: 28303249; PMCID: PMC5337837.
↑ Federal Aviation Administration. Code of Federal Regulations - Sec. 121.542 - Part 121 Operating Requirements: Domestic, flag, and Supplemental Operations. [Internet]. Washington (DC): Federal Aviation Administration; 2014 Feb 2 [cited 2021 Aug 17]. Available from: https://rgl.faa.gov/Regulatory_and_Guidance_Library/rgFAR.nsf/0/7027DA4135C34E2086257CBA004BF853?OpenDocument.
↑ Cross WW 3rd, Swiontkowski MF. Treatment principles in the management of open fractures. Indian J Orthop. 2008 Oct;42(4):377-86. doi: 10.4103/0019-5413.43373. PMID: 19753224; PMCID: PMC2740354.
1 2 3 Höntzsch D. Modular External Fixation, 2. Pin Insertion [Internet]. AO Foundation Surgery Reference. AO Foundation Surgery Reference; 2021 [cited 2021 Nov 28]. Available from: https://surgeryreference.aofoundation.org/orthopedic-trauma/adult-trauma/basic-technique/basic-technique-modular-external-fixation#pin-insertion.