| Line 65: | Line 65: | ||
For this layer we mixed batches of river sand and clay at a 2:1 ratio and water until each particle of sand was thoroughly covered with clay. We knew the mix was ready after performing a "drop test" several times. For this test we took a fist full of the material and molded it into a packed ball, held it up at shoulder height and dropped it to the ground below. If it went flat and "pancaked" we knew there was too much water and so continued to mix, adding more sand sparingly; we were looking for the ball to hold together, smooshing out only halfway or so. Once we reached the consistency we were looking for we made balls of all the material and started building our first layer. | For this layer we mixed batches of river sand and clay at a 2:1 ratio and water until each particle of sand was thoroughly covered with clay. We knew the mix was ready after performing a "drop test" several times. For this test we took a fist full of the material and molded it into a packed ball, held it up at shoulder height and dropped it to the ground below. If it went flat and "pancaked" we knew there was too much water and so continued to mix, adding more sand sparingly; we were looking for the ball to hold together, smooshing out only halfway or so. Once we reached the consistency we were looking for we made balls of all the material and started building our first layer. | ||
This layer should be a uniform 4 inches thick. Starting at the bottom and building around the base, pushing down instead of instead of in, we built up, completely encompassing the sand mound inside. After we finished we took a two-by-four and rocked it back and fourth all over the mound to ensure cohesion and uniformity; we then pockmarked the entire mound to provide a rough surface for the next layer to stick to. | This layer should be a uniform 4 inches thick. Starting at the bottom and building around the base, pushing down instead of instead of in, we built up, completely encompassing the sand mound inside. After we finished we took a two-by-four and rocked it back and fourth,using the same "tamping" technique used to create the sand dome, all over the mound to ensure cohesion and uniformity; we then pockmarked the entire mound to provide a rough surface for the next layer to stick to. | ||
We let this layer dry for a couple of days. | We let this layer dry for a couple of days. | ||
Revision as of 21:19, 7 May 2011

Abstract
This cob oven was built in spring of 2011 at the up and coming Manilla Hostel just west of Arcata, CA. The Humboldt Bay Center for Sustainable Living and DANCO are jointly restoring a house to serve as an alternative hostel that is renovated using sustainable and energy efficiency principles. We built a wood fired cob oven out of recycled and locally harvested materials that will eventually be integrated with a fully functioning outdoor kitchen. We intend this oven to serve as a learning and experiential opportunity for travelers and to of course be used to cook delicious breads, pizzas, cakes and other baked goods.
Cobb basics
Earthen homes are an old building material and can be found in various forms around the world. Cob was widely used in Europe in the 16th through the 19th centuries and many of the structures continue to stand and are still in use today.
Cob is a simple mixture of clay, sand, straw and water and is mixed wet enough to shape and dry enough to layer up without the use of forms or skeletal structures. Generally it is mixed together by foot but can also be mixed by machine. The material is ideal for moulding into any shape, lending itself to curves and sculpturing. Cob is incredibly durable and with a solid roof possesses a resilient ability to withstand fluctuations of weather.
The thick walls provide excellent thermal mass and insulation to hold heat and therefore provide an ideal building material for an outdoor oven. A large wood fire is built inside the domed oven and burned to coals. The coals are pushed aside or removed and the oven remains hot for hours. You can cook anything in it that a "normal" oven can cook.
Cob Concerns
Mixing the proper ratios of material is important for stability and strength as well as ease of construction. Controlling the drying process of each layer is crucial to the integrity of the final product. It is important to let each applied layer dry enough before putting on an additional layer so that sagging doesn't occur, but also not letting it dry out so much that the next layer wont adhere to the previous. Clay is made up of microscopic particles that act as a binder."Norton, J. (1997) Building with earth a handbook. Intermediate Technology Publications, Southampton Row, London" Advantage: As clay dries it becomes stronger due to its increase in bond . This makes for a wonderful building material in dry climates. Disadvantage: A cob structure in moist environments may need a shelter built to slow environmental deterioration. "Smith, M. The history of cobb. http://www.networkearth.org/naturalbuilding/history.html"
How to Construct
Base
Materials: urbanite (reclaimed concrete, sand, rubble, bricks, mortar clay, recycled glass bottles
Foundation: Leveled ground and laid 3 inches of small rock.
To construct our base we went to the local recycling center and found chunks of urbanite. We made a circular base with an outer circumference of 43-46 inches using large pieces of urbanite (Fig.1-2) and left a jagged empty core that we filled with a mixture of sand and rubble of small to medium size rocks (Fig.3) also found for free at the recycling center. We built up the base like this, with urbanite and rubble, till about 32 inches tall and leveled off as flat as possible (Fig.4).
At this point we added a circumference of two layers of reclaimed bricks (5" total), laying them in mortar clay and fine sand. To fill this space we first made an insulation layer that consisted of sawdust from the local mill, sifted clay, and enough water to make a thick clay slip (Fig.5). We put an inch of this material on top of the urbanite and rubble layer and smooshed recycled glass bottles one inch or so apart (laying flat) and filled in around the bottle with just the ridges of the bottles showing (Fig.6).
On top of this layer we immediately mixed a dense layer of a 1:1 ratio of sand and sifted clay (Fig.7). Our clay already contained a lot of sand and often the ratio for this ratio is 2 sand to 1 clay. We let this layer dry for 4 days.
After it had dried somewhat we laid fire bricks on top of this dense layer (Fig.8-10).
-
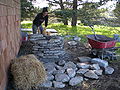
Fig.1 Constructing the base out of urbanite and rubble
-

Fig.2 Making the base circular takes patience
-
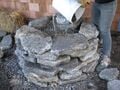
Fig.3 Pouring rubble and sand in the foundation to give it support
-

Fig.4 A look at our finished foundation before laying the top bricks
-
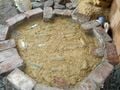
Fig.5 Insulative sub-floor with sawdust slip and recycled bottles
-
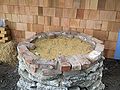
Fig.6 Another perspective of our work on the sub-floor
-
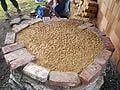
Fig.7 Thermal mass sub-floor consisting of sand/clay mixture
-

Fig.8 spreading a fine layer of sand on top of the Thermal mass sub-floor before laying the fire bricks
-
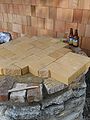
Fig.9 A look at our fire brick pattern
-
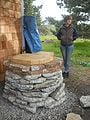
Fig.10 Our finished foundation with neatly laid firebricks.


.jpg)
.jpg)


Sand Dome
We drew a circle with a circumference of 27 inches to encompass the fire bricks and constructed a moist sand dome that was 16 inches tall at the center; sand should be moist enough to pack together and hold form (Fig.11-12). After a uniform structure is reached the form is covered in damp newspaper to enable a clear division with the first layer of cob when digging out the inner sand dome to leave a hollow space (Fig.13).
Sand is to bricks as clay is to cement. Essentially, sand particles are the building blocks when creating a cob structure. The sand you choose should be very coarse. The rougher the sand the more sturdy the structure "Bee, B. (1997) The cob builders handbook: you can sculpt your own home. Groundworks, Murphy, Oregon". The kind of sand used in successful cob structures can be purchased at a concrete supply place. Ask for builders sand, for it is coarse and fairly inexpensive (depending on the quantity of purchase).
-
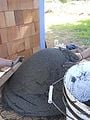
Fig.11 Creating a sand dome will give the first oven layer support while it dries
-
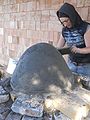
Fig.12 The sand dome is almost done. Jodi is compressing the sand by "tamping" it
-
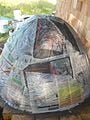
Fig.13 After the sand dome was created, we covered it with Newspaper. When we excavate the sand from the finished oven the newspaper will be an indicator of when we reached the inside layer


Thermal Mass Layer
For this layer we mixed batches of river sand and clay at a 2:1 ratio and water until each particle of sand was thoroughly covered with clay. We knew the mix was ready after performing a "drop test" several times. For this test we took a fist full of the material and molded it into a packed ball, held it up at shoulder height and dropped it to the ground below. If it went flat and "pancaked" we knew there was too much water and so continued to mix, adding more sand sparingly; we were looking for the ball to hold together, smooshing out only halfway or so. Once we reached the consistency we were looking for we made balls of all the material and started building our first layer.
This layer should be a uniform 4 inches thick. Starting at the bottom and building around the base, pushing down instead of instead of in, we built up, completely encompassing the sand mound inside. After we finished we took a two-by-four and rocked it back and fourth,using the same "tamping" technique used to create the sand dome, all over the mound to ensure cohesion and uniformity; we then pockmarked the entire mound to provide a rough surface for the next layer to stick to.
We let this layer dry for a couple of days.
Straw is the plant structure between the root and the grain head after the leaves have been removed “King, B. (1996) Buildings of earth and straw: Structural design for rammed earth and straw-bale architecture. Ecological Design Press, Sausalito, California” “Bee, B. (1997) The cob builders handbook: you can sculpt your own home. Groundworks, Murphy, Oregon”. The internal structure of a piece of straw is tubular, tough, and efficient “King, B. (1996) Buildings of earth and straw: Structural design for rammed earth and straw-bale architecture. Ecological Design Press, Sausalito, California”. When choosing straw opt for fresh straw over old. Why? Fresh straw is stronger! Be sure to stay away from hay it has a faster decomposition rate. Advantages: If your sand supply is limited, using a larger clay to straw ratio is acceptable “Bee, B. (1997) The cob builders handbook: you can sculpt your own home. Groundworks, Murphy, Oregon”. Disadvantages: If your mix is very sandy, refrain from using too much straw “Bee, B. (1997) The cob builders handbook: you can sculpt your own home. Groundworks, Murphy, Oregon”.
Insulate Layer
Aka "woolly mammoth layer." This layer consists of straw, clay and water. We made a soupy clay slip by de-solving sifted clay in water and dunked fistfuls of straw in. Making sure the straw was thoroughly coated we then lightly packed it on top of the previous thermal mass layer, again starting at the base, working around and up, and building a 2 inch thick layer. With this layer it is important that the straw not get to mushed, it is its ability to hold structure and air that allows it to perform as the insulate layer. After completion we allowed it to dry for about a week.
Plain water works best for cob mixes. Advantages: If you are in a rainy environment, pull out some buckets and capture your project water! The Cobb builder's handbook notes that a bit of lime putty mixed with the water will strengthen the cob “Bee, B. (1997) The cob builders handbook: you can sculpt your own home. Groundworks, Murphy, Oregon”. Disadvantages: Too much water mixed with your other ingredients will make a soupy mess. Not all cob recipes are one-size-fits-all. Be sure to make test batches with your chosen materials to insure proper ratios!!
Plaster Layer
Designing interpretive materials
The first thing to consider when you are building a cobb oven is the location. There are many things to consider when choosing the location. It's convient to build your oven close to where you will be preparing the food that goes into your oven. Some people even choose to build a prep station right next to their oven, which could be a great idea for us. You also need to figure out which way the wind blows, and make sure the opening of your oven is facing the opposite direction of the wind. You need to be concerned about fire/smoke issues and saftey. The level of the land you are building on is also a consdieration, and the weather where you are building might determine whether or not you want to build a shelter over your oven.
Once you have done some prep work and come up with a design plan it's time to start building!
The materials you will need are first and foremost are enthusisim! You can build an oven by yourself but we think that the more people you have ivolved the more fun it will be! Kids are great for helping with cobb, as well as adults, who doesn't like to play in the mud!?
Materials: You need to find good subsoil for building your oven. Subsoil is the soil underneath the topsoil full of composted material which is best for your garden. However for your oven, subsoil works best. You are looking for subsoil that contains enough clay so that it's hard and strong when dry and sticky when wet. Sand is the next material on the list. Beach sand usually makes poor building material, because it tends to be smooth and rounded and you are looking for "sharp" sand. Building supply companies usually sell "concrete sand" which tends to work well for cobb. Or you can go to a local river or creek with gravel sand bars, where sand tends to be more sharp and fine. Your "dense oven mud" is your subsoil and sand mixed together. Usually consists of one part building soil and 2-3 parts sand. Next is insulation. You can use any natural material that will mix with liquid clay. It's important for the insulation to have lots of small holes and pores. Some suggestions are woodshavings, very fine sawdust, or bark mulch. You will also need sub-floor insulation. The cheapest way to do this is recycled beer bottles. Straw is needed for making sculptural and structual mixes. Bricks are helpful to build a hearth floor beneath your oven. Firebricks are meant for use in fireplces so it's best if you use them. Newspaper is needed to use as a layer between your sand form and the oven mix. You can also use leaves if you choose to be more natural, but it can become more tricky. You will also need scrap lumber, and metal parts to make a door & oven tools you wish to make.
Building Tools: shovel wheelbarrow 5 gallon plastic buckets Tape measure Big Tarps spoons, spatulas, dull knices old clothes to get dirty & boots Basic carpentary tools: saw, hammer, drill, fastners, screws, nails etc
Costs
The cost to build a cobb oven will vary depending on the source of the materials used. We have free access to straw, bricks, clay, and urbanite (broken slabs of concrete). Our clay and urbanite will be coming from a construction site. The straw and bricks are items group members have free access to. All together our cobb oven materials should run us less than $40. Bellow you will find an organized chart of proposed project expenses.
| Quantity | Material | Source | Cost ($) | Total ($) |
|---|---|---|---|---|
| 50 lb bag | River sand/fine sifted | Pierson, Eureka | 12.00 | 12.00 |
| 50 lb sack | Hydrated Lime | Ace Hardware | 10.00 | 10.00 |
| 1 | Straw bale | Three G's Hay and Grain | 7.00 | 7.00 |
| 26 | bricks | on site | donation | 0.00 |
| 18 | fire bricks | Thomas Home Center, McKinleyville | 3.50 | 63.00 |
| 2 | fire bricks | CCAT | donation | 0.00 |
| 15-5gal buckets | Clay | CCAT | donation | 0.00 |
| 1 bag | Mortar Clay | CCAT | donation | 0.00 |
| 30-40 slabs | urbanite | Arcata Recycling center in Samoa, ca | donation | 0.00 |
| 2 bags | black copper and yellow oxide | Phoenix Clay Supply, Arcata ca | 10.00 | 10.00 |
| Total Cost | $102 | |||
Evaluation Criteria
This section includes all possible criteria & constraints thought up by the group members for this project as well as the site manager, Sean Armstrong.
| Criteria | Constraints | Our weight (0-10) |
|---|---|---|
| Maintainability | Must be able to use properly without repairs for five years. | 8 |
| Safety | The proper materials must be used during construction that allow the oven to function safely. | 10 |
| Effectiveness | Must be able to distribute and contain heat properly. | 10 |
| Ease of Use | Must be able to figure out with instructions and or supervision. | 8 |
| Longevity/Sustainability | Must be able to withstand in Humboldt County's climate and continue to function properly. | 8 |
| Accessibility | Must be in close enough range to the hostel for easy access. | 6 |
| Cost | must be less than or equal to our budget of 500 dollars. | 10 |
| Aesthetics | Must be inviting without compromising the functionality of oven | 9 |
Proposed time line
-March 11 Go to Blue Ox @ 3pm to meet w/ Eric.
-March 25 Material gathering day. Bring to site.
-March 28 Meet with Jessica Lamb at CCAT.
-March 30 POTENTIAL work day at CCAT with class
-April 1/2 Construct base of cobb oven
-April 8 Construct layer 1, inner shell of cobb oven
-April 15 Construct layer 2, mid section of cobb oven
-April 23 Construct layer 3, outer shell of cobb oven
-May 6/13 Test cob oven for efficiency
Testing Results
Next Steps
What could be done? Maintenance?
Conclusion
Lessons Learned
References
Bee, Becky. "WebLife: Cob Builders Handbook: Contents." weblife.org :: t h r i v e !. N.p., n.d. Web. 14 Feb. 2011. <http://weblife.org/cob/>.
Denzer, Kiko and Hannah Field. "Build Your Own Oven." 3rd Edition.
Evans, Ianto. "Building with Cob." The Rainforest Information Centre. N.p., n.d. Web. 14 Feb. 2011. <http://www.rainforestinfo.org.au/good_wood/cob.htm>.
Freed, E.C. (2008) Green building and remodeling for dummies. Wiley Publishing, Inc., Hoboken, New Jersey
King, B. (1996) Buildings of earth and straw: Structural design for rammed earth and straw-bale architecture. Ecological Design Press, Sausalito, California
Bee, B. (1997) The cob builders handbook: you can sculpt your own home. Groundworks, Murphy, Oregon
Smith, M. The history of cobb. http://www.networkearth.org/naturalbuilding/history.html
Norton, J. (1997) Building with earth a handbook. Intermediate Technology Publications, Southampton Row, London
Wojciehowska, P. (2001) Building with earth: a guide to flexible-form earthbag construction. Chelsea Green Publishing Company, White River Junction, Vermont