Russellddn (talk | contribs) No edit summary |
Sophivorus (talk | contribs) m (Rename "affiliations" parameter to "organizations", to unify terminology throughout Appropedia) |
||
| (103 intermediate revisions by 15 users not shown) | |||
| Line 1: | Line 1: | ||
[[File:P1020014.jpg|thumb]] | |||
{{Project data | |||
| authors = User:Russellddn | |||
| status = Deployed | |||
| made = Yes | |||
| cost = USD 210.10 | |||
| uses = gardening | |||
| instance-of = Vertical garden | |||
| location = Arcata, California | |||
}} | |||
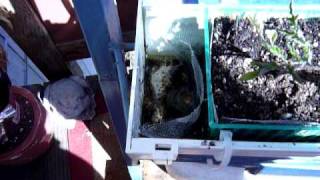
[[File:P1010906.jpg|thumb|May 6, 2010]] | |||
*The Vertical Garden is a unique indoor/outdoor modular planter with multiple levels of vertically spaced pots/planters. Its superior vertical design saves space and water. With a flow through irrigation system, when you water the top plants it will water all the lower pots, with no waste of water. | |||
*You can create different size racks to fit your garden needs. It can be tall with five levels of plants for a larger garden, or it can be built lower to the ground and longer if one so desires. With the Vertical Garden you use vertical space to stack, hang and plant, saving your horizontal space. | [[File:P1020014.jpg|thumb|June 30, 2010]] | ||
* | |||
* The Vertical Garden is a unique indoor/outdoor modular planter with multiple levels of vertically spaced pots/planters. Its superior vertical design saves space and water. With a flow through irrigation system, when you water the top plants it will water all the lower pots, with no waste of water. | |||
* You can create different size racks to fit your garden needs. It can be tall with five levels of plants for a larger garden, or it can be built lower to the ground and longer if one so desires. With the Vertical Garden you use vertical space to stack, hang and plant, saving your horizontal space. | |||
* Using the vertical space instead of horizontal space is an important feature for those short of planting area in condos, or apartments with small balconies. | |||
== Video == | |||
{{Video|W6gLFN78CIQ}} | |||
== Various Vertical Gardens == | |||
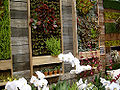
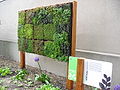
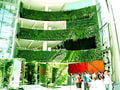
* As you can see from the photos below, there are many variations of 'vertical gardens', also known as 'green walls.' From small simplistic gardens to large structures with aesthetic design; vertical gardens are adaptable to whomever wants to create them and designed for their own individual goals. | |||
*As you can see from the photos below, there are many variations of 'vertical gardens', also known as 'green walls.' From small simplistic gardens to large structures with aesthetic design; vertical gardens are adaptable to whomever wants to create them and designed for their own individual goals. | |||
<gallery> | <gallery> | ||
File:Vertical garden today.jpg|Small wall mounted garden for outside decoration. | |||
File:Verticalgardentoday.jpg|Large mounted garden on outside of building. | |||
File:Asdfjalksdnfasdf.jpg|Medium green wall on inside of building for decoration. | |||
File:Aaaaaaaaaaaaaa.jpg|Small board mounted garden for display and educational purposes. | |||
File:3 level living wall.jpg|Large green wall on inside of building. | |||
File:Cccccccc.jpg|Small wall mounted garden for outside decoration. | |||
</gallery> | </gallery> | ||
== Opportunity Definition == | |||
* WHO: [[User:Russellddn|Deidre Russell]] | |||
* WHAT: I will be building a low cost vertical vegetable garden for a small apartment balcony. | |||
* WHY: I hope to model to those with limited space that they too can enjoy the benefits of healthy home grown food. | |||
* WHEN: Between January 2010 and May 2010 my project will be created. | |||
* WHERE: This garden is located in Arcata, Ca for a Cal Poly Humboldt Appropriate Technology course. | |||
: | : | ||
: | : | ||
: | : | ||
== | == Proposed Idea for Project == | ||
I plan on creating a solar powered vertical vegetable garden. My project will be a version that follows the concept shown in the photo below; where there is a self watering pump that is powered by the sun. I will be creating a low cost and mostly recycled version of the photo below, but also attempt to have a high density crop yield with a solar water pump through a different design. I hope to produce a high density vegetable garden that those on budgets can implement themselves with local resources. | |||
[[File:Container-gardening-hydroponic-solar-vertical-garden-photo.jpg|center]] | |||
== Project Criteria == | |||
: | * Weight based on scale: 0-10 high | ||
{| class="wikitable" | |||
! Criteria | |||
{| class="wikitable | ! Constraint | ||
! Weighted Importance | |||
|- | |- | ||
| Initial Cost | |||
| Cost must not exceed $250.00 | |||
| 10 | |||
|- | |- | ||
| | | Sustainability | ||
| | | At least 30% of resources are recycled | ||
| 10 | |||
| | |||
|- | |- | ||
| Crop Yield | | Crop Yield | ||
| Harvested crops must sustain at least 2 people's consumption for 1 week | | Harvested crops must sustain at least 2 people's consumption for 1 week | ||
|9 | | 9 | ||
|- | |- | ||
| | | Size | ||
| | | Must fit into a floor space of 3'x5' | ||
| | | 8 | ||
|- | |- | ||
| Maintainability | |||
|Maintainability | | No more than 1 human hour per week | ||
|No more than 1 human hour per week | | 8 | ||
|8 | |||
|- | |- | ||
| | | Transportability | ||
| | | Must be collapsable to a reasonable transportable size. | ||
| | | 5 | ||
|- | |- | ||
| Surface Area Saved | |||
|Surface Area Saved | | Assuming that 1 plant requires 1 cubic foot of area, the surface area saved by planting vertically versus horizontally per plant would be at least 0.5 cubic feet (50%) | ||
|Assuming that 1 plant requires 1 cubic foot of area, the surface area saved by planting vertically versus horizontally per plant would be at least 0.5 cubic feet (50%) | | 3 | ||
|3 | |||
|} | |} | ||
== | == Delphi Decision Matrix for Alternative Solutions == | ||
*The Delphi Decision Matrix for Alternative Solutions is a way in which someone can eliminate a bias towards a particular project choice. Maybe the idea of something changing around is cool, but is it the best choice to meet your project criteria? This matrix helps to efficiently decide if a project will meet your criterial standards and be the best choice over all. | |||
* The Delphi Decision Matrix for Alternative Solutions is a way in which someone can eliminate a bias towards a particular project choice. Maybe the idea of something changing around is cool, but is it the best choice to meet your project criteria? This matrix helps to efficiently decide if a project will meet your criterial standards and be the best choice over all. | |||
[[File:Arrow.jpg|thumb|center]] | |||
* The '''Perfect Garden Alternative''' is to the standards of the photo from the' Proposed Idea for Project' section. The framing will be a strong metal such as aluminum, the solar panel will be much larger for a strong pump, and the crop yield will greater due to the larger area over all that it would be built for. Although, these additions will increase the cost and size of the operation. | |||
* The '''Green Thumb Alternative''' will be a middle of the road scenario between the photo from the 'Proposed Idea for Project' section and the cheaper version I have in mind. The frame will be built from PVC piping or reused materials. With a smaller pump we will save on cost but the general size and garden yield will be smaller. With this option the cost and size should be sufficient. | |||
* The '''Veggie Starter Alterative''' is more like a sustainable version of the photo from 'Proposed Idea for Project' section. The size is small and the yield will also be small. Due to the small structure we would not be able to grow large vegetable such as tomatoes. Although, the cost is very low and the size and maintenance will be minimal. | |||
=== -''Equations for Totals'' === | |||
# Rank of superiority for criteria in each alternative is: low 0-50 high. | # Rank of superiority for criteria in each alternative is: low 0-50 high. | ||
# Total superiority for criteria in each alternative is: (Rank #)x(Weighted #) | # Total superiority for criteria in each alternative is: (Rank #)x(Weighted #) | ||
# Overall superiority total for alternative is: (Criteria 1 Total)+(Criteria 2 Total)+(etc.) | # Overall superiority total for alternative is: (Criteria 1 Total)+(Criteria 2 Total)+(etc.) | ||
# Highest superiority total is the best project choice based on established criteria. | # Highest superiority total is the best project choice based on established criteria. | ||
* '''Best Option for Criteria Outlined is the 'Green Thumb Alternative' ''' | |||
{| class="wikitable" | |||
! Criteria | |||
! Weighted Importance | |||
{| class="wikitable | |||
! Criteria | |||
! | |||
! Perfect Garden | ! Perfect Garden | ||
! Green Thumb | ! Green Thumb | ||
! Veggie Starter | ! Veggie Starter | ||
|- | |- | ||
| | | Size | ||
| | | 8 | ||
| Rank: 5 | | Rank: 5 | ||
: Total: 40 | : Total: 40 | ||
|Rank: 30 | | Rank: 30 | ||
: Total: | : Total: 240 | ||
|Rank: 50 | | Rank: 50 | ||
: Total: | : Total: 400 | ||
|- | |- | ||
| | | Transportability | ||
| 5 | | 5 | ||
| Rank: 20 | | Rank: 20 | ||
: Total: 100 | : Total: 100 | ||
|Rank: 40 | | Rank: 40 | ||
: Total: 200 | : Total: 200 | ||
|Rank: 45 | | Rank: 45 | ||
: Total: 225 | : Total: 225 | ||
|- | |- | ||
| | | Crop Yield | ||
| 9 | | 9 | ||
| Rank: 40 | | Rank: 40 | ||
: Total: 360 | : Total: 360 | ||
|Rank: 35 | | Rank: 35 | ||
: Total: 315 | : Total: 315 | ||
|Rank: 10 | | Rank: 10 | ||
: Total: 90 | : Total: 90 | ||
|- | |- | ||
| | | Initial Cost | ||
| 10 | | 10 | ||
| Rank: 10 | | Rank: 10 | ||
: Total: 100 | : Total: 100 | ||
|Rank: 30 | | Rank: 30 | ||
: Total: 300 | : Total: 300 | ||
|Rank: 50 | | Rank: 50 | ||
: Total: 500 | : Total: 500 | ||
|- | |- | ||
| | | Maintainability | ||
| 8 | | 8 | ||
| Rank: 40 | | Rank: 40 | ||
: Total: 320 | : Total: 320 | ||
|Rank: 35 | | Rank: 35 | ||
: Total: 280 | : Total: 280 | ||
|Rank: 15 | | Rank: 15 | ||
: Total: 120 | : Total: 120 | ||
|- | |- | ||
| | | Sustainability | ||
| 10 | | 10 | ||
| Rank: 15 | | Rank: 15 | ||
: Total: 150 | : Total: 150 | ||
|Rank: 45 | | Rank: 45 | ||
: Total: 450 | : Total: 450 | ||
|Rank: 30 | | Rank: 30 | ||
: Total: 300 | : Total: 300 | ||
|- | |- | ||
| | | Surface Area Saved | ||
| 3 | | 3 | ||
| Rank: 25 | | Rank: 25 | ||
: Total: 75 | : Total: 75 | ||
|Rank: 35 | | Rank: 35 | ||
: Total: 105 | : Total: 105 | ||
|Rank: 40 | | Rank: 40 | ||
: Total: 120 | : Total: 120 | ||
|- class="sortbottom" | |||
|- | ! | ||
! Overall Totals: | |||
! 1145 | |||
! 1890 | |||
! 1755 | |||
|} | |} | ||
== | == Budget == | ||
[[ | [[File:Money.jpg|thumb]] | ||
*COST MUST NOT EXCEED $250.00 | * COST MUST NOT EXCEED $250.00 | ||
{| class="wikitable" | {| class="wikitable" | ||
! Quantity | ! Quantity | ||
! Material | ! Material | ||
| Line 361: | Line 353: | ||
| | | | ||
| | | | ||
! Total Cost: | |||
! $210.10 | |||
|} | |} | ||
== | == Time Line == | ||
[[ | |||
[[File:Goals2.gif|center]] | |||
== | == Total Hours on Project == | ||
*'''144 Hours''' | |||
*Open this Excel spreadsheet to view total time spent working on this project: | * '''144 Hours''' | ||
:[[ | * Open this Excel spreadsheet to view total time spent working on this project: | ||
:[[File:Dnr10 vertical vegetable garden TS.xls]] | |||
:(Click the link above, and then click the link again to download the spreadsheet) | :(Click the link above, and then click the link again to download the spreadsheet) | ||
* View a video of the final project at the top of this page. | |||
*'''How Pumps Work-''' A photovoltaic solar panel is placed in the sun and collects the sun's energy. The panel then converts the collected solar energy into electrical energy for use. The panel is attached to a battery where the electrical energy charges the battery and the energy is stored until future use. The battery is connected to a pump. When the pump is switched on, the pump will draw the stored energy from the battery house in order to run itself. The pump will lift the water from the reservoir to the directed location. In our case, the water will be lifted up to a planter above. | == Choosing the Right Pump for You == | ||
*Each pump is chosen specifically for each individual project. If the garden is tall it will need more 'water uplift' than a shorter garden. This means it will be more expensive because it will require a larger solar panel and battery. | [[File:Pump diagramab.gif|thumb|Water Pump Diagram]] | ||
*You will need to measure the height of your garden in order to know around what size pump will be needed for that water uplift height. | |||
*Each pump is manufactured differently at varying sizes. This causes differences in what size pipe will be needed to attach to the pump. | * '''How Pumps Work-''' A photovoltaic solar panel is placed in the sun and collects the sun's energy. The panel then converts the collected solar energy into electrical energy for use. The panel is attached to a battery where the electrical energy charges the battery and the energy is stored until future use. The battery is connected to a pump. When the pump is switched on, the pump will draw the stored energy from the battery house in order to run itself. The pump will lift the water from the reservoir to the directed location. In our case, the water will be lifted up to a planter above. | ||
* Each pump is chosen specifically for each individual project. If the garden is tall it will need more 'water uplift' than a shorter garden. This means it will be more expensive because it will require a larger solar panel and battery. | |||
* You will need to measure the height of your garden in order to know around what size pump will be needed for that water uplift height. | |||
* Each pump is manufactured differently at varying sizes. This causes differences in what size pipe will be needed to attach to the pump. | |||
=== CALCULATIONS: Head Loss Due To Pipe Friction === | |||
* '''What is Pipe Friction and Head Loss?''' The friction created from water running over a surface will cause the water to slow down. With water flowing vertically through a pipe, the friction will cause the water lift to not go as high versus if there was no friction at all. This height difference will be the amount of water lift that will be lost due to the friction caused by the pipe (aka. pipe friction). This height difference number is referred to as 'Head Loss'. | |||
* [http://www.engineeringtoolbox.com/hazen-williams-water-d_797.html This website] allows you to put in your system's measurements and tell you what your loss will be. | |||
=== | === My Pump === | ||
* The height of my tallest planter from the bottom of the water reservoir is 50 inches. I need my water lift height to be at least that height in order to reach the top plants. | |||
*The height of my tallest planter from the bottom of the water reservoir is 50 inches. I need my water lift height to be at least that height in order to reach the top plants. | * IMPORTANT: It is important to take into account the friction caused by the tubing. This will make the water lift less which requires a larger pump than you measured for. | ||
*IMPORTANT: It is important to take into account the friction caused by the tubing. This will make the water lift less which requires a larger pump than you measured for. | * '''PUMP Specifications:''' | ||
:8 Watts Solar Power Water Pump | :8 Watts Solar Power Water Pump | ||
:Solar Module-Amorphour Solar Panel 2 pcs 4W 18V | :Solar Module-Amorphour Solar Panel 2 pcs 4W 18V | ||
:DC Brushless Pump Operation Voltage | :DC Brushless Pump Operation Voltage - DC 12- 20V | ||
:Water lift (Jet Height) | :Water lift (Jet Height) 2.5 Meter (8.13 ft.) | ||
:Large Solar Panel Dimension: 16 inches | :Large Solar Panel Dimension: 16 inches x 14 inches per panel | ||
:Water flow Capacity: | :Water flow Capacity: 800 L / H (211 G/H) | ||
:Cable Length of DC Pump: | :Cable Length of DC Pump: approximate 3 meters (9.8 ft.) | ||
:Price=$99.99 (I found a great deal on EBay.com) | :Price=$99.99 (I found a great deal on EBay.com) | ||
*'''My Head Loss Calculations''' | * '''My Head Loss Calculations''' | ||
:Pipe Length=5' | :Pipe Length=5' | ||
:Material Coefficient=130-150, I averaged to 140 | :Material Coefficient=130-150, I averaged to 140 | ||
| Line 411: | Line 407: | ||
:Diameter=1/2" ID | :Diameter=1/2" ID | ||
*'''Results''' | * '''Results''' | ||
:Head Loss (ft H2O / 100 ft pipe): 33.139 | :Head Loss (ft H2O / 100 ft pipe): 33.139 | ||
:Head Loss (psi / 100 ft pipe): 14.3 | :Head Loss (psi / 100 ft pipe): 14.3 | ||
| Line 418: | Line 415: | ||
:Velocity (ft/s): 5.72 | :Velocity (ft/s): 5.72 | ||
*'''So what do these numbers mean?''' | * '''So what do these numbers mean?''' | ||
:My water lift height will loose 1.6 feet off of the original 8.13 feet due to the friction inside the tubing. This means I will get a water lift height of 6.5 feet. I have enough water lift to reach my top plants. Having the extra foot of water lift above what I need allows for the extra friction that will be created within the pipe when I add adapters to the main water line. | :My water lift height will loose 1.6 feet off of the original 8.13 feet due to the friction inside the tubing. This means I will get a water lift height of 6.5 feet. I have enough water lift to reach my top plants. Having the extra foot of water lift above what I need allows for the extra friction that will be created within the pipe when I add adapters to the main water line. | ||
==== | ==== -Testing the Pump ==== | ||
* Follow manufacture's instructions on how to properly set up your individual solar pump. | |||
* Follow manufacture's instructions on how to properly set up your individual solar pump. | |||
* Once the pump is set-up, follow these steps to test: | * Once the pump is set-up, follow these steps to test: | ||
# Allow the solar panels to charge the battery in full sun for the whole day. This guarantees full battery charge. | # Allow the solar panels to charge the battery in full sun for the whole day. This guarantees full battery charge. | ||
| Line 431: | Line 430: | ||
* Read the manufacture's product description to give you and idea of how much water uplift that particular pump will provide you with. | * Read the manufacture's product description to give you and idea of how much water uplift that particular pump will provide you with. | ||
== | == Design, Construction and Testing Instructions == | ||
*All instructions are how to build the system I made specifically. Each design and alteration will require their own construction needs. Feel free to follow along or build your own using these ideas! | |||
* All instructions are how to build the system I made specifically. Each design and alteration will require their own construction needs. Feel free to follow along or build your own using these ideas! | |||
=== Designing Your Garden === | |||
* There should be a clear idea of what you would like to accomplish with your garden. Original designs are usually inadequate and alterations are necessary. Below are the diagrams of my design changes from original to final design | * There should be a clear idea of what you would like to accomplish with your garden. Original designs are usually inadequate and alterations are necessary. Below are the diagrams of my design changes from original to final design | ||
<gallery> | <gallery> | ||
NOTE: To enlarge a photo, click on the photo itself. | NOTE: To enlarge a photo, click on the photo itself. | ||
File:Img001.jpg|Design 1 | |||
File:Design2.jpg|Design 2 | |||
File:Irrigation_diagram3.gif|Design 3 | |||
</gallery> | </gallery> | ||
:'''-Design 1 Problems:''' The irrigation system does not allow for equal watering. The plants on the top level will have the only water input to the system and will get over-saturated. The lower levels will get less water because the previous planters would take it all. It also does not allow for equal fertilization. The bottom plants will get too much fertilizer because of the water draining through the previously fertilized plants and will accumulate when it reaches the bottom. Having and open reservoir allows too much debris to enter the irrigation system and clog it. | :'''-Design 1 Problems:''' The irrigation system does not allow for equal watering. The plants on the top level will have the only water input to the system and will get over-saturated. The lower levels will get less water because the previous planters would take it all. It also does not allow for equal fertilization. The bottom plants will get too much fertilizer because of the water draining through the previously fertilized plants and will accumulate when it reaches the bottom. Having and open reservoir allows too much debris to enter the irrigation system and clog it. | ||
:'''-Design 2 Problems:''' The center bottle planters were not getting equal watering. Pressure from the main line only reached the first bottle and slightly to the second planter and none to the last two. The top and bottom gutters were either draining too fast or getting over-flowed from too much water. The bottom gutter received too much water from the inflow of the top gutter and the center bottle planters. | :'''-Design 2 Problems:''' The center bottle planters were not getting equal watering. Pressure from the main line only reached the first bottle and slightly to the second planter and none to the last two. The top and bottom gutters were either draining too fast or getting over-flowed from too much water. The bottom gutter received too much water from the inflow of the top gutter and the center bottle planters. | ||
:'''-Design 3 Final:''' Adding over-flow drainage to both gutters fixed any over watering problems. The manifold added to the center bottle planters creates equal water distribution for bottles. Draining the center planters to the reservoir instead of the bottom gutter helped with over watering and overflowing the bottom gutter. | :'''-Design 3 Final:''' Adding over-flow drainage to both gutters fixed any over watering problems. The manifold added to the center bottle planters creates equal water distribution for bottles. Draining the center planters to the reservoir instead of the bottom gutter helped with over watering and overflowing the bottom gutter. | ||
==== | ==== -Testing the Design ==== | ||
*Take these questions into account when designing the garden structure and overall ideas: | |||
* Take these questions into account when designing the garden structure and overall ideas: | |||
# Is it feasible; meaning, can it really be built? | # Is it feasible; meaning, can it really be built? | ||
# Will the cost be within your budget? | # Will the cost be within your budget? | ||
| Line 460: | Line 462: | ||
# How much maintenance is required for my garden? | # How much maintenance is required for my garden? | ||
=== | === Measuring and Framing === | ||
# Draw out main design for garden; including estimated size and possible alternative ideas. | # Draw out main design for garden; including estimated size and possible alternative ideas. | ||
# Measure all parts of the frame and solar panels. | # Measure all parts of the frame and solar panels. | ||
# Draw diagrams of frame and place measurements on them. This helps to visualize the project when looking for parts. | # Draw diagrams of frame and place measurements on them. This helps to visualize the project when looking for parts. | ||
# Estimate lengths of tubing needed based on your design. Over-estimate by a few feet to allow room for adjustments. | # Estimate lengths of tubing needed based on your design. Over-estimate by a few feet to allow room for adjustments. | ||
# Lay out a mock version of your diagram with your materials to check for any changes or additional materials. | # Lay out a mock version of your diagram with your materials to check for any changes or additional materials. | ||
*'''Tools Used:''' Tape measure, Pencil, Paper | * '''Tools Used:''' Tape measure, Pencil, Paper | ||
<gallery> | <gallery> | ||
NOTE: To enlarge a photo, click on the photo itself. | NOTE: To enlarge a photo, click on the photo itself. | ||
File: P1010813.jpg|Fig.1-Donated metal frame from Shafer's Ace Hardware Store. | |||
File: P1010814.JPG|Fig.2-Measuring solar panels to mount to the metal frame. | |||
</gallery> | </gallery> | ||
=== | === Building Frame === | ||
*Since I was donated a pre-existing metal frame with four shelves, there was little building for this step. If you are building your own frame, please find construction information elsewhere. | |||
* Since I was donated a pre-existing metal frame with four shelves, there was little building for this step. If you are building your own frame, please find construction information elsewhere. | |||
# Cut off bottom shelf to make room for reservoir. (refer to Fig. 3) | # Cut off bottom shelf to make room for reservoir. (refer to Fig. 3) | ||
# Cut off center metal bar on each shelf to make room for planters. | # Cut off center metal bar on each shelf to make room for planters. | ||
| Line 481: | Line 486: | ||
# Measure bolt spacing for connecting bolts. | # Measure bolt spacing for connecting bolts. | ||
# Drill bolts through wood reservoir platform and into metal frame to connect and stabilize. (refer to Fig. 5) | # Drill bolts through wood reservoir platform and into metal frame to connect and stabilize. (refer to Fig. 5) | ||
*'''Tools Used:''' Dremel Rotary Tool, Electric Drill, Circular Saw | * '''Tools Used:''' Dremel Rotary Tool, Electric Drill, Circular Saw | ||
==== | ==== -Testing the Frame ==== | ||
*Due to the frame being metal, there was no testing involved. If you built your own frame you would need to test the strength of the frame so that it is strong enough to support the plants weight. | |||
* Due to the frame being metal, there was no testing involved. If you built your own frame you would need to test the strength of the frame so that it is strong enough to support the plants weight. | |||
<gallery> | <gallery> | ||
NOTE: To enlarge a photo, click on the photo itself. | NOTE: To enlarge a photo, click on the photo itself. | ||
File: P1010816.JPG|Fig.3-Using a Dremel Rotary Tool to saw off metal shelves for reservoir space. | |||
File: P1010815.JPG|Fig.4-Cutting a 3/4 inch plywood to make a platform for the reservoir to sit on. | |||
File: P1010827.JPG|Fig.5-Attaching platform to metal frame. | |||
File: P1010823.jpg|Fig.6-Reservoir is now mounted to bottom of the garden frame. | |||
</gallery> | </gallery> | ||
=== | === Building Solar Panel Frame === | ||
*Refer back to measurements and diagrams while building this frame. | |||
* Refer back to measurements and diagrams while building this frame. | |||
# Measure and cut lengths of aluminum to fit solar panels. Use a labeling system to keep track of cut pieces. | # Measure and cut lengths of aluminum to fit solar panels. Use a labeling system to keep track of cut pieces. | ||
# Put aluminum where they will be placed, and measure and mark where the bolts will go. (refer to Fig. 7) | # Put aluminum where they will be placed, and measure and mark where the bolts will go. (refer to Fig. 7) | ||
| Line 506: | Line 513: | ||
# Drill out holes for all-thread to mount through and also lower holes to fasten wood to metal frame with bolts. (refer to Fig. 9 and Fig. 11) | # Drill out holes for all-thread to mount through and also lower holes to fasten wood to metal frame with bolts. (refer to Fig. 9 and Fig. 11) | ||
# Thread the solar panel frame into wood holes and fasten with bolts on each side. | # Thread the solar panel frame into wood holes and fasten with bolts on each side. | ||
*If you would like to make your solar panels adjustable using excess aluminum: | * If you would like to make your solar panels adjustable using excess aluminum: | ||
# Bend the aluminum to make a corner bracket. | # Bend the aluminum to make a corner bracket. | ||
# Drill holes for bolts on each side. | # Drill holes for bolts on each side. | ||
| Line 513: | Line 520: | ||
# Attach bracket to a lower corner bolt on solar panel frame. | # Attach bracket to a lower corner bolt on solar panel frame. | ||
# Bolt lever to bracket at the pivot point and place over the wood fastener bolt. (refer to Fig. 11) | # Bolt lever to bracket at the pivot point and place over the wood fastener bolt. (refer to Fig. 11) | ||
*'''Tools Used:''' Dremel Rotary Tool, Electric Drill, Marker, Wrench | * '''Tools Used:''' Dremel Rotary Tool, Electric Drill, Marker, Wrench | ||
==== | ==== -Testing the Solar Panel Frame ==== | ||
*Testing the frame involves checking for any loose areas so that the frame fits secure and strong, and checking that the weight of the panel is not too heavy so that it will not topple over the garden. | |||
* Testing the frame involves checking for any loose areas so that the frame fits secure and strong, and checking that the weight of the panel is not too heavy so that it will not topple over the garden. | |||
<gallery> | <gallery> | ||
NOTE: To enlarge a photo, click on the photo itself. | NOTE: To enlarge a photo, click on the photo itself. | ||
File: P1010831.JPG|Fig.7-Two separate 4W solar panels ready to mount into custom frame. | |||
File: P1010871.JPG|Fig.8-Top of frame. Bolts to hold aluminum together and eye-bolts to hang all-thread from. | |||
File: P1010835.JPG|Fig.9-Now one unit, the panels are mounted to top of metal frame from extended wood arms. | |||
File: P1010838.JPG|Fig.10-Home-made 'angle-prop' from extra aluminum. | |||
File: P1010840.JPG|Fig.11-Now we can change the angle of the PV panels for best solar accumulation. | |||
</gallery> | </gallery> | ||
=== | === Building Planters === | ||
*Plastic Bottle Planters | |||
* Plastic Bottle Planters | |||
# Cut off bottom of 2 liter plastic bottles. (refer to Fig. 12) | # Cut off bottom of 2 liter plastic bottles. (refer to Fig. 12) | ||
# Tape gorilla tape to cut edges to make it stronger. | # Tape gorilla tape to cut edges to make it stronger. | ||
| Line 534: | Line 543: | ||
# Drill holes into bottle caps and insert drainage tubing. (refer to Fig. 13) | # Drill holes into bottle caps and insert drainage tubing. (refer to Fig. 13) | ||
# Use plastic epoxy around drainage tubing to seal off leaks. | # Use plastic epoxy around drainage tubing to seal off leaks. | ||
*Gutter Planters | * Gutter Planters | ||
# Measure lengths of gutter to size of rack. | # Measure lengths of gutter to size of rack. | ||
# Cut gutters. | # Cut gutters. | ||
# Attach gutter end-caps. (refer to Fig. 14) | # Attach gutter end-caps. (refer to Fig. 14) | ||
| Line 545: | Line 554: | ||
# Cut off threaded side of 'Hose Barb to Pipe Thread' and install them to each drainage and overflow hole. Seal off with plastic epoxy. | # Cut off threaded side of 'Hose Barb to Pipe Thread' and install them to each drainage and overflow hole. Seal off with plastic epoxy. | ||
# Attach gutter to frame with zip-ties through holes on top edges. (refer to Fig. 16) | # Attach gutter to frame with zip-ties through holes on top edges. (refer to Fig. 16) | ||
*'''Tools Used:''' Dremel Rotary Tool, Electric Drill | * '''Tools Used:''' Dremel Rotary Tool, Electric Drill | ||
==== | ==== -Testing the Planters ==== | ||
*Check the stability of them on the frame, the weight distribution of planters on the frame, that planters are level/balanced for equal water flow, and check that the inflow and outflow holes will allow for easy water flow through the planters. | |||
* Check the stability of them on the frame, the weight distribution of planters on the frame, that planters are level/balanced for equal water flow, and check that the inflow and outflow holes will allow for easy water flow through the planters. | |||
<gallery> | <gallery> | ||
NOTE: To enlarge a photo, click on the photo itself. | NOTE: To enlarge a photo, click on the photo itself. | ||
File: P1010842.JPG|Fig.12-Cutting off the bottom of 2L soda bottles for planters. | |||
File: P1010867.JPG|Fig.13-Bottle cap drainage for 2L soda bottles. | |||
File: P1010844.JPG|Fig.14-Gutter has been cut and ends placed on. Ready to mount. | |||
File: P1010868.jpg|Fig.15-Connected tubing to Hose Barb, sealed with plastic epoxy. | |||
File: P1010845.JPG|Fig.16-Attaching gutter planters to metal frame. | |||
File: P1010847.jpg|Fig.17-Garden with no irrigation system or plants. | |||
</gallery> | </gallery> | ||
=== ''Building Irrigation System'' | === ''Building Irrigation System'' === | ||
*Gutter Planter Irrigation System ''(refer to Fig. 18 yellow system)'' | * Gutter Planter Irrigation System ''(refer to Fig. 18 yellow system)'' | ||
# Attach the vinyl tubing from the water pump's output to the top gutter's end-cap hose-barb attachment. (refer to Fig. 15) | # Attach the vinyl tubing from the water pump's output to the top gutter's end-cap hose-barb attachment. (refer to Fig. 15) | ||
# Attach the vinyl tubing from the top gutter's drainage hose-barb attachment to the bottom gutter's end-cap hose-barb attachment. | # Attach the vinyl tubing from the top gutter's drainage hose-barb attachment to the bottom gutter's end-cap hose-barb attachment. | ||
# Attach the vinyl tubing from the bottom gutter's drainage hose-barb attachment and lead the end into the reservoir. | # Attach the vinyl tubing from the bottom gutter's drainage hose-barb attachment and lead the end into the reservoir. | ||
*2L Bottle Planter Irrigation System ''(refer to Fig. 18 purple system)'' | * 2L Bottle Planter Irrigation System ''(refer to Fig. 18 purple system)'' | ||
# On the main water line from the pump to the top gutter, cut the vinyl tubing at the height a few inches above the 2L bottle planters. | # On the main water line from the pump to the top gutter, cut the vinyl tubing at the height a few inches above the 2L bottle planters. | ||
# Install a 'tee-hose-barb' adapter to the main line with the 90 degree offshoot pointing inward towards the planters. | # Install a 'tee-hose-barb' adapter to the main line with the 90 degree offshoot pointing inward towards the planters. | ||
# Attach the vinyl tubing to the 'tee-hose-barb' offshoot. | # Attach the vinyl tubing to the 'tee-hose-barb' offshoot. | ||
| Line 574: | Line 584: | ||
# Install a 'hose-barb to pipe-thread' adapter at the end of the hanging vinyl tubing. | # Install a 'hose-barb to pipe-thread' adapter at the end of the hanging vinyl tubing. | ||
# Screw on the manifold to the threaded end of the adapter. (refer to Fig. 20) | # Screw on the manifold to the threaded end of the adapter. (refer to Fig. 20) | ||
# Attach poly tubing to each manifold emitter and lead them into the planters. ~''NOTE: You should already have the beginning drainage tubing attached to the planter bottle caps from the 'Building Planter's section. If you missed this step, refer back to that section and Fig.13 ( | # Attach poly tubing to each manifold emitter and lead them into the planters. ~''NOTE: You should already have the beginning drainage tubing attached to the planter bottle caps from the 'Building Planter's section. If you missed this step, refer back to that section and Fig.13 ([[#Building Planters]])'' | ||
# With the drainage tubing connected to the bottle caps, take the two left bottles and attach the drainage tubes with a 'tee-hose-barb' adapter. Do the same to the two right bottles drainage tubes. | # With the drainage tubing connected to the bottle caps, take the two left bottles and attach the drainage tubes with a 'tee-hose-barb' adapter. Do the same to the two right bottles drainage tubes. | ||
# Attach vinyl tubing to the two 'tee-hose-barb' adapters and connect those drainage tubes with a final 'tee-hose-barb' adapter with the offshoot facing down. (refer to Fig. 20) | # Attach vinyl tubing to the two 'tee-hose-barb' adapters and connect those drainage tubes with a final 'tee-hose-barb' adapter with the offshoot facing down. (refer to Fig. 20) | ||
# Lead the now single planter drainage tubing down into the reservoir. (refer to Fig. 18 and Fig. 19) | # Lead the now single planter drainage tubing down into the reservoir. (refer to Fig. 18 and Fig. 19) | ||
*'''Tools Used:''' Scissors, Zip-Ties | * '''Tools Used:''' Scissors, Zip-Ties | ||
==== | ==== -Testing the Irrigation System ==== | ||
*This step requires the most testing and re-designing. Test for the following problems: | |||
* This step requires the most testing and re-designing. Test for the following problems: | |||
# Water uplift in main line from pump can reach the top planter. (Head loss from pipe friction calculations will help analyze any problems) | # Water uplift in main line from pump can reach the top planter. (Head loss from pipe friction calculations will help analyze any problems) | ||
# Water flows through planters without overflowing. (We have an overflow spout just in case) | # Water flows through planters without overflowing. (We have an overflow spout just in case) | ||
# Water can easily enter planters and drain without becoming plugged with debris. (Screen is an easy fix) | # Water can easily enter planters and drain without becoming plugged with debris. (Screen is an easy fix) | ||
# Center bottle planters have enough water pressure from the main line. (Changing pump flow rate settings may help) | # Center bottle planters have enough water pressure from the main line. (Changing pump flow rate settings may help) | ||
<gallery> | <gallery> | ||
NOTE: To enlarge the photo, please click on the link below the photo. | NOTE: To enlarge the photo, please click on the link below the photo. | ||
File:Irrigation diagram3.gif|Fig.18-Diagram of water flow through system. | |||
File:Irrigation diagram1.gif|Fig.19-Diagram of irrigation system. | |||
File:Irrigation diagram2.gif|Fig.20-Diagram of irrigation system. | |||
File:P1010893.jpg|Fig.21-Final mounted irrigation system. Back. | |||
File:P1010891.gif|Fig.22-Final mounted irrigation system. Front. | |||
</gallery> | </gallery> | ||
=== ''Installing Soil and Plants'' | === ''Installing Soil and Plants'' === | ||
*Soil Mix | |||
* Soil Mix | |||
# 1/2 potting soil | # 1/2 potting soil | ||
# 1/4 small rocks (about dime size to quarter size) | # 1/4 small rocks (about dime size to quarter size) | ||
# 1/4 native soil from fertile ground | # 1/4 native soil from fertile ground | ||
# Mix all together | # Mix all together | ||
:-Consistency should be that when you make a ball of soil in your fist, the soil is dense and moist; and when you open your fist, the soil will crumble in large chunks and turn soft again. | :-Consistency should be that when you make a ball of soil in your fist, the soil is dense and moist; and when you open your fist, the soil will crumble in large chunks and turn soft again. | ||
*Gutter Planter Planting (refer to Fig. 23) | |||
* Gutter Planter Planting (refer to Fig. 23) | |||
# Line the gutter with wire mesh so that it goes up each side and covers all tubing openings. This prevents large debris getting into the irrigation system. | # Line the gutter with wire mesh so that it goes up each side and covers all tubing openings. This prevents large debris getting into the irrigation system. | ||
# Take green strawberry baskets and line them with wire mesh to hold in the soil. | # Take green strawberry baskets and line them with wire mesh to hold in the soil. | ||
| Line 609: | Line 623: | ||
# Plant vegetable starts or seeds in baskets; whichever the plant requires. | # Plant vegetable starts or seeds in baskets; whichever the plant requires. | ||
# Set baskets in gutter planter. | # Set baskets in gutter planter. | ||
*2L Bottle Planter Planting (refer to Fig. 24) | * 2L Bottle Planter Planting (refer to Fig. 24) | ||
# Place a square of wire mesh at bottom of bottle so that it covers the bottle cap where drainage occurs. | # Place a square of wire mesh at bottom of bottle so that it covers the bottle cap where drainage occurs. | ||
# Fill bottom 1/4-1/2 of bottle with medium and small rocks. (Fill height depends on how deep your plant's roots require.) | # Fill bottom 1/4-1/2 of bottle with medium and small rocks. (Fill height depends on how deep your plant's roots require.) | ||
# Fill rest of bottle with mixed soil, leaving at least 1 inch of space from the top empty. | # Fill rest of bottle with mixed soil, leaving at least 1 inch of space from the top empty. | ||
# Plant vegetable stars or seeds in bottles; whichever the plant requires. | # Plant vegetable stars or seeds in bottles; whichever the plant requires. | ||
*'''Tools Used:''' Scissors, Bucket, Shovel | * '''Tools Used:''' Scissors, Bucket, Shovel | ||
==== | ==== -Testing the Soil ==== | ||
*Once the planters have their soil and planter boxes installed, turn on the water pump. | |||
*Check for the water being drawn up into the soil to water plants. Also, check if the soil is staying together and not just being broken apart and washed away by the flowing water which could clog the irrigation system pipes. | * Once the planters have their soil and planter boxes installed, turn on the water pump. | ||
* Check for the water being drawn up into the soil to water plants. Also, check if the soil is staying together and not just being broken apart and washed away by the flowing water which could clog the irrigation system pipes. | |||
<gallery> | <gallery> | ||
NOTE: To enlarge a photo, click on the photo itself. | NOTE: To enlarge a photo, click on the photo itself. | ||
File: P1010873.JPG|Fig.23-Installed baskets with soil in gutter planters | |||
File:P1010874.JPG|Fig.24-Soil in 2L bottle planters | |||
File:P1010889.JPG|Fig.25-Tomato plants prepared for installation | |||
File:P1010906.jpg|Fig.26-Finished project! | |||
</gallery> | </gallery> | ||
=== ''Fertilizer'' | === ''Fertilizer'' === | ||
* There are many options for fertilizers. I found through my research that bat guano would work best for my size operation. It takes little guano sprinkled over the plant to get the nutrients. It is also able to be mixed with water as a type of nutrient to water the plants by hand if so desired. Also, the pH level of bat guano is fairly neutral, 6.3 to 6.8; and this allows for it to fertilize all types of vegetables. | * There are many options for fertilizers. I found through my research that bat guano would work best for my size operation. It takes little guano sprinkled over the plant to get the nutrients. It is also able to be mixed with water as a type of nutrient to water the plants by hand if so desired. Also, the pH level of bat guano is fairly neutral, 6.3 to 6.8; and this allows for it to fertilize all types of vegetables. | ||
* It would be best to decide which fertilizer you would like to use depending on the maintenance you are willing to put into your garden. | * It would be best to decide which fertilizer you would like to use depending on the maintenance you are willing to put into your garden. Your plant types also have a 'happy' pH level that they like to grow in, and that will also take a role in which fertilizer you will choose. | ||
* Research on your own for this step to get the best personalized success for your garden. | * Research on your own for this step to get the best personalized success for your garden. | ||
<gallery> | <gallery> | ||
NOTE: To enlarge a photo, click on the photo itself. | NOTE: To enlarge a photo, click on the photo itself. | ||
File:Sprouts.jpg|Fig.27-Vegetable sprouts after 1.5 weeks; treated with bat guano | |||
File:P1010888.JPG|Fig.28-Vegetable sprouts after 3 weeks; almost ready for planting | |||
</gallery> | </gallery> | ||
==== | ==== -Testing the Fertilizer ==== | ||
* Create a spread of your vegetables in a green house tray. One row has one of each vegetable in a line. (refer to Fig. 23) | * Create a spread of your vegetables in a green house tray. One row has one of each vegetable in a line. (refer to Fig. 23) | ||
* Keep one row as the control and only use water. | * Keep one row as the control and only use water. | ||
| Line 645: | Line 662: | ||
* Watch the plants for two weeks, watering as needed and fertilizing as instructed to by individual fertilizers. | * Watch the plants for two weeks, watering as needed and fertilizing as instructed to by individual fertilizers. | ||
* By the end, you should see which row of vegetables grew healthier, fuller, and faster by the end of your test run. This is the fertilizer that will best suit your overall garden vegetables. | * By the end, you should see which row of vegetables grew healthier, fuller, and faster by the end of your test run. This is the fertilizer that will best suit your overall garden vegetables. | ||
:- I found that bat guano worked well for all plants because it was a fairly neutral pH so the plants did not get too acidic or basic in their soil. | :- I found that bat guano worked well for all plants because it was a fairly neutral pH so the plants did not get too acidic or basic in their soil. | ||
== | == Infrastructure == | ||
*'''Water:''' | |||
* '''Water:''' | |||
:-Water will be coming from the Mad River in Blue Lake, Ca to my apartment in Arcata, Ca for tap water. | :-Water will be coming from the Mad River in Blue Lake, Ca to my apartment in Arcata, Ca for tap water. | ||
:-Cost: (Basic water service charge is $9.00) + (Personal usage range of 501-1500 cubic feet which costs and additional $1.55) = Total cost is $10.55 | :-Cost: (Basic water service charge is $9.00) + (Personal usage range of 501-1500 cubic feet which costs and additional $1.55) = Total cost is $10.55 | ||
:-With the additional use of water supplied to the garden, I will not exceed the personal usage range of 501-1500. Therefore my normal water bill will not increase. | :-With the additional use of water supplied to the garden, I will not exceed the personal usage range of 501-1500. Therefore my normal water bill will not increase. | ||
:-Externalities include: the cost of pumping the water from the river to my location, environmental damage from the pump, removing water for fish to live, gas used to power the pump, transportation of gas from oil fields in the middle east to the USA. | :-Externalities include: the cost of pumping the water from the river to my location, environmental damage from the pump, removing water for fish to live, gas used to power the pump, transportation of gas from oil fields in the middle east to the USA. | ||
*'''Sewer:''' | |||
* '''Sewer:''' | |||
:-If I was to dump water down my home drain, the Arcata Wastewater Treatment Plant will be handling the extra nutrients from my added fertilizer. | :-If I was to dump water down my home drain, the Arcata Wastewater Treatment Plant will be handling the extra nutrients from my added fertilizer. | ||
:-If I was to dump water outside, the water will drain back into the water column and the fertilizer will provide extra nutrients to the plants around that area. | :-If I was to dump water outside, the water will drain back into the water column and the fertilizer will provide extra nutrients to the plants around that area. | ||
:-Externalities include: energy to treat the fertilizer at the plant | :-Externalities include: energy to treat the fertilizer at the plant | ||
*'''Electrical:''' | |||
* '''Electrical:''' | |||
:-My garden is all solar powered. There is no outside electrical source so there will not be any additional costs. | :-My garden is all solar powered. There is no outside electrical source so there will not be any additional costs. | ||
:-Externalities include: the environmental degradation and energy required to manufacture the solar panels. | :-Externalities include: the environmental degradation and energy required to manufacture the solar panels. | ||
*'''Maintenance:''' | |||
* '''Maintenance:''' | |||
:-Weekly check-up includes: | :-Weekly check-up includes: | ||
# Weeding plants | # Weeding plants | ||
# Change and/or re-fill water in reservoir | # Change and/or re-fill water in reservoir | ||
| Line 669: | Line 696: | ||
# General gardening such as pruning or transplanting, as needed | # General gardening such as pruning or transplanting, as needed | ||
== | == Good and Bad Elements of this Vertical Garden == | ||
*'''Good''' | |||
* '''Good''' | |||
# No external electricity dependance, so you can put your garden anywhere. | # No external electricity dependance, so you can put your garden anywhere. | ||
# Self-watering allows for less maintenance and there are no worries of forgetting to water. | # Self-watering allows for less maintenance and there are no worries of forgetting to water. | ||
| Line 678: | Line 706: | ||
# Each planter is removable so changing the plant layout is simple. | # Each planter is removable so changing the plant layout is simple. | ||
# Compact design makes this garden perfect for small space gardening. | # Compact design makes this garden perfect for small space gardening. | ||
* '''Bad''' | |||
:1. Does not have enough battery power to self-water if there is not enough sun light. | |||
:* Although, in Arcata, Ca, it is assumed that if the sun is not out that it is raining; so the plants will be watered by the rain. | |||
: | :2. The gutter planters are a little small and plants may need to be transplanted to larger pots; but the liter bottles work perfectly to allow full maturity. | ||
== | == Research Literature Review == | ||
[[ | [[File:Book-main Full2.jpg|thumb]] | ||
This is a review of the available literature pertinent to the various components of gardening. | This is a review of the available literature pertinent to the various components of gardening. | ||
* '''References''' | |||
# Hessayon, D.G.. "Soil." The Garden DIY Expert (Expert Series). New York: Sterling, 1993. 6-24. Print. | |||
# JOBBÁGY, ESTEBAN, and ROBERT JACKSON. "The distribution of soil nutrients with depth: Global patterns and the imprint of plants." Biochemistry 53 (2001): 51-77. [https://web.archive.org/web/20100822080039/http://www.springerlink.com/home/main.mpx http://web.archive.org/web/20100822080039/http://www.springerlink.com/home/main.mpx]. Web. 9 Feb. 2010. | |||
# Kaplan, Rachel. "Some Psychological Benefits of Gardening." Environment and Behavior 5.2 (1973): 145-162. Print. | |||
# Kirkby, Ernest A., and K. Mengel. Principles of Plant Nutrition. Fifth Edition ed. New York: Springer, 2001. Print. | |||
# "Life Science Reference - Biology Online." Biology Online Dictionary. N.p., n.d. Web. 12 Feb. 2010. <http://www.biology-online.org>. | |||
# Sargent, S, M Ritenour, and J Brecht. "Welcome to Glades Crop Care Website." Welcome to Glades Crop Care Website. Version HS719. Institute of Food and Agricultural Sciences, University of Florida, n.d. Web. 11 Feb. 2010. <http://www.gladescropcare.com>. | |||
# Splittstoesser, Walter E.. Vegetable Growing Handbook: Organic and Traditional Methods. 3rd ed. New York: Van Nostrand Reinhold, 1990. Print. | |||
=== Benefits of Gardening === | |||
* | * Some Psychological Benefits of Gardening by Rachel Kaplan | ||
* If you would like to read more about benefits of gardening, you can find the journal on Microfilm at the Cal Poly Humboldt Library. Box 1342, V.1-6, Kaplan. | |||
# | # Gardening is an essential component in rest and recovery. Just as art, poetry, and other leisure activities are important to us, the natural environment, such as gardening, is an excellent relief option. | ||
# | # It requires a constant commitment rather than a casual experience with the outdoor environment. This helps to retain focus for rest and recovery rather than focusing on other daily stresses. | ||
# | # We have a basic survival instinct to harvest and provide our own food. This benefits our natural need to be connected to the Earth. | ||
# | # It is a close-at-hand form of leisure activity. | ||
# | # It provides a connection to where our food came from. | ||
# | |||
=== Vegetable Basics === | |||
* [http://books.google.com/books?hl=en&lr=&id=-yByu-GR4eEC&oi=fnd&pg=PR11&dq=small+garden+soil+needs&ots=Aye5NCSmlP&sig=cXeHdbosheytcAwxvt9uS5QIGOY#v=onepage&q=small%20garden%20soil%20needs&f=false Vegetable Growing Handbook: Organic and Traditional Methods]. 3rd ed. by Splittstoesser ISBN 0-442-23971-8 | |||
# Your garden should not have to compete for the sun due to shade by other plants and buildings. | |||
# When planting in containers, make sure the vegetables have enough root space to grow healthy. Do not plant deep rooted vegetables in too shallow of a pot. | |||
# Do research for each plant you wish to grow so that you know the basics of caring for that plant; including pruning, space and water needs. | |||
# Plants growing in containers should not be crowded, thus limit the number of plants per pot. | |||
# Water with cool water, not hot. | |||
# Container plants require frequent watering and fertilization. | |||
# Reduce insect problems by not placing two of the same cultivated type next to one another. Spacing them out is better. | |||
# Spring, summer, and fall crops grow at different rates and require different attention. Do research to further your knowledge on what the seasonal change does to your garden area. | |||
: | [[File:Vegg.jpg|thumb]] | ||
=== | === Nutritional Needs === | ||
* Principles of Plant Nutrition. Fifth Edition ed. by Kirkby and Menge. | |||
* The distribution of soil nutrients with depth: Global patterns and the imprint of plants | |||
* Read the online text | |||
:NOTE: The online text is viewable by purchase or if you are a subscriber to the website. | :NOTE: The online text is viewable by purchase or if you are a subscriber to the website. | ||
====-''Required Minerals''==== | ==== -''Required Minerals'' ==== | ||
:-Needed for | |||
:-Needed for enzymatic processes: C, H, O, N, S | |||
:-Needed for energy transfer reactions: P, B, Si | :-Needed for energy transfer reactions: P, B, Si | ||
:-Needed for enzyme activation and specific functions: K, Na, Ca, Mg, Mn, Cl | :-Needed for enzyme activation and specific functions: K, Na, Ca, Mg, Mn, Cl | ||
:-Needed for electron transport: Fe, Cu, Zn, Mo | :-Needed for electron transport: Fe, Cu, Zn, Mo | ||
====-''Nutrient Transportation''==== | ==== -''Nutrient Transportation'' ==== | ||
*Solid material is used as a main nutrient reservoir for the plant. | |||
*Soil liquid solution helps to transport nutrients from the solid material to the root system. | * Solid material is used as a main nutrient reservoir for the plant. | ||
*Gaseous phase exchanges nutrients between the plant roots, fungi, bacteria and the atmosphere. | * Soil liquid solution helps to transport nutrients from the solid material to the root system. | ||
* Gaseous phase exchanges nutrients between the plant roots, fungi, bacteria and the atmosphere. | |||
==== -''Distribution Ratios'' ==== | |||
Distribution of water, organic material, and minerals in order of magnitude: | Distribution of water, organic material, and minerals in order of magnitude: | ||
=== | # 700 mg water per gram of fresh matter | ||
*The | # 270 mg organic material per gram of fresh matter | ||
# 30 mg minerals per gram of fresh matter | |||
* | |||
=== Planting Mediums === | |||
* The [http://books.google.com/books?hl=en&lr=&id=sFpQHYIi9zAC&oi=fnd&pg=PA6&dq=small+garden+soil+needs&ots=_CwtFXVFbc&sig=PdO_wmmMhSnn_ZvWAuWUeHkJghE#v=onepage&q=small%20garden%20soil%20needs&f=false Garden DIY Expert] (Expert Series) by Hessayon | |||
* http://www.biology-online.org | |||
A planting medium is a surrounding environment in which something functions and thrives, i.e. your plants. The substance in which you plant your vegetables will be the medium in which nutrients and water will enter your plants root system. It also provides a supporting base structure for the plant hold on to. | A planting medium is a surrounding environment in which something functions and thrives, i.e. your plants. The substance in which you plant your vegetables will be the medium in which nutrients and water will enter your plants root system. It also provides a supporting base structure for the plant hold on to. | ||
====-''Top-Soil & Sub-Soil''==== | ==== -''Top-Soil & Sub-Soil'' ==== | ||
* Top-Soil is the fertile and living part of the soil | |||
* Sub-soil lies under the top-soil and is relatively dead and starved | |||
* | |||
====-''Soil | ==== -''Soil Texture'' ==== | ||
* This refers to the proportions of the different size mineral particles which are present. | |||
* | * Ideal soil texture lies between the two extremes to create a medium texture known as ''loam''. | ||
* | |||
====-'' | ==== -''Soil Structure'' ==== | ||
* This refers to the way in which the mineral particles are joined together. | |||
* A ''crumb'' structure is ideal. That is, the soil is loosely bonded to other soil types so that it is constantly reforming itself. | |||
====-''Fertile Soil''==== | ==== -''Poorly-Drained Soil'' ==== | ||
*Soil rich with ''humus''. Humus is organic matter partly or wholly decomposed. Along the lines of adding compost to richen the soil composition. | |||
: | * A condition in which water is removed from the soil so slowly that the soil is saturated periodically during the growing season or remains wet for long periods greater than 7 days. | ||
: | * To get more drainage, create a gravel layer below the garden bed to allow water to escape. | ||
==== -''Acidic Soil'' ==== | |||
* Acidic soils are commonly referred to as "sour." Acidity is the characteristic of soils that have a pH level of less than 7. | |||
* To make your soil more acidic (lower the pH) apply sulfur or commercial fertilizers containing ammonium-N. | |||
==== -''Alkaline Soil'' ==== | |||
* Alkalinity is the characteristic of soils with a pH level that is greater than 7, which is suitable for plants that thrive in a "sweet" (alkaline) soil, as opposed to a "sour" or acid soil. | |||
* To make your soil more alkaline (raise the pH) add lime. | |||
==== -''Fertile Soil'' ==== | |||
* Soil rich with ''humus''. Humus is organic matter partly or wholly decomposed. Along the lines of adding compost to richen the soil composition. | |||
=== Vegetable Quality and Sanitation Post Harvest === | |||
[[File:Washing.jpg|thumb|thumb]] | |||
* Handling, Cooling and Sanitation Techniques for Maintaining Postharvest Quality from the Institute of Food and Agricultural Sciences, University of Florida | |||
* Read the online text [http://www.gladescropcare.com/postharvest_quality.pdf here] | |||
==== -''Quality Reduction Issues'' ==== | |||
# Harvesting at an incorrect maturity age | |||
# Careless handling during transportation or packaging | |||
# Poor sanitation practice | |||
# Delays in cooling of produce (refrigeration) | |||
# Storage above or below optimal temperature | |||
# Lack of proper relative humidity | |||
==== -''Maintaining Water Sanitization'' ==== | |||
* Addition of an approved sanitizer to the water, such as sodium hypochlorite, calcium hypochlorite or liquid chlorine, to prevent the accumulation of pathogens. | |||
:-The main advantages to using ''chlorine'' are that it is effective at killing a broad range of pathogens and that it is relatively inexpensive. It also leaves very little residue or film on surfaces. | :-The main advantages to using ''chlorine'' are that it is effective at killing a broad range of pathogens and that it is relatively inexpensive. It also leaves very little residue or film on surfaces. | ||
:-If there is no use of pesticides, sanitation is still necessary for the consumers own health. | :-If there is no use of pesticides, sanitation is still necessary for the consumers own health. | ||
== | == What I Have Learned == | ||
*How to properly care and maintain vegetables. | |||
*How to design and alter systems without a bias. | * How to properly care and maintain vegetables. | ||
*How to use a Dremel Rotary Tool to cut metal. | * How to design and alter systems without a bias. | ||
*How to find local resources to reduce landfill waste. | * How to use a Dremel Rotary Tool to cut metal. | ||
*How to dumpster dive at the Arcata Recycling Center. | * How to find local resources to reduce landfill waste. | ||
*How to obtain donations from local businesses. | * How to dumpster dive at the Arcata Recycling Center. | ||
*How to create an instructional website to aid other's projects. | * How to obtain donations from local businesses. | ||
*How to think out side of the box in order to solve mechanical problems. | * How to create an instructional website to aid other's projects. | ||
*How to facilitate a timeline so that I would not procrastinate. | * How to think out side of the box in order to solve mechanical problems. | ||
*How to facilitate a budget to possibly write grants in the future. | * How to facilitate a timeline so that I would not procrastinate. | ||
*How to engage the community and students in the details of my project. | * How to facilitate a budget to possibly write grants in the future. | ||
*How to research and display data for others to understand. | * How to engage the community and students in the details of my project. | ||
*How to care for a mechanical system when maintenance is needed. | * How to research and display data for others to understand. | ||
*How to expand my ideas and designs to further develop future projects. | * How to care for a mechanical system when maintenance is needed. | ||
*How to enjoy construction of an appropriate technology. | * How to expand my ideas and designs to further develop future projects. | ||
*How to view different systems and change them to a more sustainable product. | * How to enjoy construction of an appropriate technology. | ||
*Be able to understand the workings of an irrigation system do to physics and mechanical engineering. | * How to view different systems and change them to a more sustainable product. | ||
* Be able to understand the workings of an irrigation system do to physics and mechanical engineering. | |||
== Updates == | |||
=== Ideas === | |||
* I would like to build small green house covers for the planters. This way I can protect the plants from weather damage during a storm and also grow starts in the garden. | |||
* After tasting all the fruits of my labor... I would recommend to NOT grow celery. They take too much water than my garden could supply, and a lot more space for roots because they grew down into the tubing. | |||
=== Gallery === | |||
<gallery> | |||
File: P1010948.JPG|Garden's first bloom, strawberry! 5-16-10 | |||
File:P1010950.JPG|The plants are doing great! 5-25-10 | |||
File:P1010960.JPG|Even bigger! 6-7-10 | |||
File: P1020007.JPG|Strawberries almost ripe! 6-25-10 | |||
File: P1020008.jpg|Huge tomato plants! 6-25-10 | |||
File: P1020009.jpg|Thick celery and deep roots. 6-25-10 | |||
File: P1020125.JPG|First zucchini! 8-11-10 | |||
File: P1020126.JPG|Yellow pear tomatos. 8-11-10 | |||
File: P1020113.JPG|So many strawberries! 8-11-10 | |||
File:P1020129.jpg|The tomato's on the bottom are dominating the project. But they are all very healthy. | |||
</gallery> | |||
=== Notes === | |||
* The garden has gotten bigger than ever imagined. The bottom tomato plants are taller than the top plants! I have NOT replanted any of them. They are that big in small strawberry baskets! | |||
* I have harvested so many beautifully large and ripe strawberries. | |||
* All tomatos are beginning to bloom and ripen. | |||
* My first zucchini from the garden will be ready to pick mid August. | |||
* The garden is a SUCCESS! I am excited to start another garden for next growing season. | |||
{{Page data | |||
| keywords = vertical gardens, gardening, energy, pv, Photovoltaics | |||
| sdg = SDG11 Sustainable cities and communities, SDG12 Responsible consumption and production | |||
| part-of = Engr305 Appropriate Technology | |||
| organizations = Cal Poly Humboldt | |||
}} | |||
[[Category: | [[Category:Appropriate technology videos]] | ||
[[Category:Engineering videos]] | |||
[[Category:Food and agriculture videos]] | |||
[[Category:Gardening]] | |||
[[Category:Energy]] | |||
[[Category:Photovoltaics]] | |||
Latest revision as of 16:44, 29 January 2024


- The Vertical Garden is a unique indoor/outdoor modular planter with multiple levels of vertically spaced pots/planters. Its superior vertical design saves space and water. With a flow through irrigation system, when you water the top plants it will water all the lower pots, with no waste of water.
- You can create different size racks to fit your garden needs. It can be tall with five levels of plants for a larger garden, or it can be built lower to the ground and longer if one so desires. With the Vertical Garden you use vertical space to stack, hang and plant, saving your horizontal space.
- Using the vertical space instead of horizontal space is an important feature for those short of planting area in condos, or apartments with small balconies.
Video[edit | edit source]
Various Vertical Gardens[edit | edit source]
- As you can see from the photos below, there are many variations of 'vertical gardens', also known as 'green walls.' From small simplistic gardens to large structures with aesthetic design; vertical gardens are adaptable to whomever wants to create them and designed for their own individual goals.
-
Small wall mounted garden for outside decoration.
-

Large mounted garden on outside of building.
-

Medium green wall on inside of building for decoration.
-
Small board mounted garden for display and educational purposes.
-
Large green wall on inside of building.
-

Small wall mounted garden for outside decoration.


Opportunity Definition[edit | edit source]
- WHO: Deidre Russell
- WHAT: I will be building a low cost vertical vegetable garden for a small apartment balcony.
- WHY: I hope to model to those with limited space that they too can enjoy the benefits of healthy home grown food.
- WHEN: Between January 2010 and May 2010 my project will be created.
- WHERE: This garden is located in Arcata, Ca for a Cal Poly Humboldt Appropriate Technology course.
Proposed Idea for Project[edit | edit source]
I plan on creating a solar powered vertical vegetable garden. My project will be a version that follows the concept shown in the photo below; where there is a self watering pump that is powered by the sun. I will be creating a low cost and mostly recycled version of the photo below, but also attempt to have a high density crop yield with a solar water pump through a different design. I hope to produce a high density vegetable garden that those on budgets can implement themselves with local resources.

Project Criteria[edit | edit source]
- Weight based on scale: 0-10 high
| Criteria | Constraint | Weighted Importance |
|---|---|---|
| Initial Cost | Cost must not exceed $250.00 | 10 |
| Sustainability | At least 30% of resources are recycled | 10 |
| Crop Yield | Harvested crops must sustain at least 2 people's consumption for 1 week | 9 |
| Size | Must fit into a floor space of 3'x5' | 8 |
| Maintainability | No more than 1 human hour per week | 8 |
| Transportability | Must be collapsable to a reasonable transportable size. | 5 |
| Surface Area Saved | Assuming that 1 plant requires 1 cubic foot of area, the surface area saved by planting vertically versus horizontally per plant would be at least 0.5 cubic feet (50%) | 3 |
Delphi Decision Matrix for Alternative Solutions[edit | edit source]
- The Delphi Decision Matrix for Alternative Solutions is a way in which someone can eliminate a bias towards a particular project choice. Maybe the idea of something changing around is cool, but is it the best choice to meet your project criteria? This matrix helps to efficiently decide if a project will meet your criterial standards and be the best choice over all.

- The Perfect Garden Alternative is to the standards of the photo from the' Proposed Idea for Project' section. The framing will be a strong metal such as aluminum, the solar panel will be much larger for a strong pump, and the crop yield will greater due to the larger area over all that it would be built for. Although, these additions will increase the cost and size of the operation.
- The Green Thumb Alternative will be a middle of the road scenario between the photo from the 'Proposed Idea for Project' section and the cheaper version I have in mind. The frame will be built from PVC piping or reused materials. With a smaller pump we will save on cost but the general size and garden yield will be smaller. With this option the cost and size should be sufficient.
- The Veggie Starter Alterative is more like a sustainable version of the photo from 'Proposed Idea for Project' section. The size is small and the yield will also be small. Due to the small structure we would not be able to grow large vegetable such as tomatoes. Although, the cost is very low and the size and maintenance will be minimal.
-Equations for Totals[edit | edit source]
- Rank of superiority for criteria in each alternative is: low 0-50 high.
- Total superiority for criteria in each alternative is: (Rank #)x(Weighted #)
- Overall superiority total for alternative is: (Criteria 1 Total)+(Criteria 2 Total)+(etc.)
- Highest superiority total is the best project choice based on established criteria.
- Best Option for Criteria Outlined is the 'Green Thumb Alternative'
| Criteria | Weighted Importance | Perfect Garden | Green Thumb | Veggie Starter |
|---|---|---|---|---|
| Size | 8 | Rank: 5
|
Rank: 30
|
Rank: 50
|
| Transportability | 5 | Rank: 20
|
Rank: 40
|
Rank: 45
|
| Crop Yield | 9 | Rank: 40
|
Rank: 35
|
Rank: 10
|
| Initial Cost | 10 | Rank: 10
|
Rank: 30
|
Rank: 50
|
| Maintainability | 8 | Rank: 40
|
Rank: 35
|
Rank: 15
|
| Sustainability | 10 | Rank: 15
|
Rank: 45
|
Rank: 30
|
| Surface Area Saved | 3 | Rank: 25
|
Rank: 35
|
Rank: 40
|
| Overall Totals: | 1145 | 1890 | 1755 |
Budget[edit | edit source]

- COST MUST NOT EXCEED $250.00
| Quantity | Material | Source | Cost | Total Cost |
|---|---|---|---|---|
| 1 | 8 Watt Solar Water Fountain Pump | Ebay.com - JusPal Co. | $99.99 + Shipping | $126.44 |
| 1 | 4 Shelved Metal Rack | Hardware Store | Donation | $0.00 |
| 1 | Rain Gutter (10') | Arcata Recycling Center | $3.00 | $3.00 |
| 1 | Wire Mesh | Hardware Store | $8.72 | $8.72 |
| 1 | Potting Medium | Private Donor | Reused | $0.00 |
| 1 | 1/2" ID Vinyl Tubing (10') | Hardware Store | $0.18 per ft | $1.80 |
| 1 | 3/8" ID Vinyl Tubing (6') | Hardware Store | $0.17 per ft | $1.02 |
| 4 | 1.5" Eye-Bolt | Hardware Store | $0.15 | $0.45 |
| 59 | Hardware Bolts (various) | Hardware Store | $0.09-$0.33 | $9.47 |
| 1 | Metal Water Reservoir | Arcata Recycling Center | $4.36 | $4.36 |
| 1 | 3' X 2.5' X 3/4" Plywood Board | Private Donor | Reused | $0.00 |
| 2 | 1/2" Hose Bard to 1/2" Pipe Thread | Hardware Store | $1.75 | $3.00 |
| 3 | 3/8" Hose Bard to 1/2" Pipe Thread | Hardware Store | $1.75 | $5.25 |
| 1 | 1/2" X 3/8" X 1/2" Hose Barb Tee | Hardware Store | $0.66 | $0.66 |
| 1 | 3/8" Hose Barb Elbow | Hardware Store | $1.75 | $1.75 |
| 1 | Poly Tubing 1/4" (100') | Hardware Store | $4.53 | $4.53 |
| 1 | Four Outlet Manifold 20GPH | Hardware Store | $2.52 | $2.52 |
| 1 | 8" Zip-Ties 100 count | Hardware Store | $1.68 | $1.68 |
| 8 | Strawberry Basket | Eureka Co-Op | Donation | $0.00 |
| 4 | Gutter End-Caps | Hardware Store | $1.41 | $5.64 |
| 2 | 1/8" X 1.5" Flat Bar Aluminum | Hardware Store | $6.78 | $13.56 |
| 1 | 3/8" All-Thread (3') | Hardware Store | $5.29 | $5.29 |
| 2 | Plastic Epoxy | Hardware Store | $1.71 | $3.42 |
| 4 | 2 Liter Plastic Soda Bottles | Private Donor | Recycled | $0.00 |
| 8 | Various Vegetable Seeds | Hardware Store | $0.88 | $7.04 |
| Total Cost: | $210.10 |
Time Line[edit | edit source]

Total Hours on Project[edit | edit source]
- 144 Hours
- Open this Excel spreadsheet to view total time spent working on this project:
- File:Dnr10 vertical vegetable garden TS.xls
- (Click the link above, and then click the link again to download the spreadsheet)
- View a video of the final project at the top of this page.
Choosing the Right Pump for You[edit | edit source]

- How Pumps Work- A photovoltaic solar panel is placed in the sun and collects the sun's energy. The panel then converts the collected solar energy into electrical energy for use. The panel is attached to a battery where the electrical energy charges the battery and the energy is stored until future use. The battery is connected to a pump. When the pump is switched on, the pump will draw the stored energy from the battery house in order to run itself. The pump will lift the water from the reservoir to the directed location. In our case, the water will be lifted up to a planter above.
- Each pump is chosen specifically for each individual project. If the garden is tall it will need more 'water uplift' than a shorter garden. This means it will be more expensive because it will require a larger solar panel and battery.
- You will need to measure the height of your garden in order to know around what size pump will be needed for that water uplift height.
- Each pump is manufactured differently at varying sizes. This causes differences in what size pipe will be needed to attach to the pump.
CALCULATIONS: Head Loss Due To Pipe Friction[edit | edit source]
- What is Pipe Friction and Head Loss? The friction created from water running over a surface will cause the water to slow down. With water flowing vertically through a pipe, the friction will cause the water lift to not go as high versus if there was no friction at all. This height difference will be the amount of water lift that will be lost due to the friction caused by the pipe (aka. pipe friction). This height difference number is referred to as 'Head Loss'.
- This website allows you to put in your system's measurements and tell you what your loss will be.
My Pump[edit | edit source]
- The height of my tallest planter from the bottom of the water reservoir is 50 inches. I need my water lift height to be at least that height in order to reach the top plants.
- IMPORTANT: It is important to take into account the friction caused by the tubing. This will make the water lift less which requires a larger pump than you measured for.
- PUMP Specifications:
- 8 Watts Solar Power Water Pump
- Solar Module-Amorphour Solar Panel 2 pcs 4W 18V
- DC Brushless Pump Operation Voltage - DC 12- 20V
- Water lift (Jet Height) 2.5 Meter (8.13 ft.)
- Large Solar Panel Dimension: 16 inches x 14 inches per panel
- Water flow Capacity: 800 L / H (211 G/H)
- Cable Length of DC Pump: approximate 3 meters (9.8 ft.)
- Price=$99.99 (I found a great deal on EBay.com)
- My Head Loss Calculations
- Pipe Length=5'
- Material Coefficient=130-150, I averaged to 140
- Flow Rate (gal/min)=3.5237, I rounded to 3.5
- Diameter=1/2" ID
- Results
- Head Loss (ft H2O / 100 ft pipe): 33.139
- Head Loss (psi / 100 ft pipe): 14.3
- Head Loss (ft H2O): 1.657
- Head Loss (psi): 0.7
- Velocity (ft/s): 5.72
- So what do these numbers mean?
- My water lift height will loose 1.6 feet off of the original 8.13 feet due to the friction inside the tubing. This means I will get a water lift height of 6.5 feet. I have enough water lift to reach my top plants. Having the extra foot of water lift above what I need allows for the extra friction that will be created within the pipe when I add adapters to the main water line.
-Testing the Pump[edit | edit source]
- Follow manufacture's instructions on how to properly set up your individual solar pump.
- Once the pump is set-up, follow these steps to test:
- Allow the solar panels to charge the battery in full sun for the whole day. This guarantees full battery charge.
- Attach vinyl tubing over the outflow point on the pump and place the pump in water reservoir.
- Hold the vinyl tubing vertical next to your garden and turn the pump on full.
- Check to see that the water uplift height is high enough to reach the top of your garden; with about a foot extra above the top.
- If it does reach the top, you now know that you do have enough uplift to water your garden. If it does not reach the top, you will need to get a larger pump to supply you with more water uplift.
- Read the manufacture's product description to give you and idea of how much water uplift that particular pump will provide you with.
Design, Construction and Testing Instructions[edit | edit source]
- All instructions are how to build the system I made specifically. Each design and alteration will require their own construction needs. Feel free to follow along or build your own using these ideas!
Designing Your Garden[edit | edit source]
- There should be a clear idea of what you would like to accomplish with your garden. Original designs are usually inadequate and alterations are necessary. Below are the diagrams of my design changes from original to final design
-
-
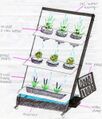
Design 1
-
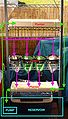
Design 2
-
Design 3


- -Design 1 Problems: The irrigation system does not allow for equal watering. The plants on the top level will have the only water input to the system and will get over-saturated. The lower levels will get less water because the previous planters would take it all. It also does not allow for equal fertilization. The bottom plants will get too much fertilizer because of the water draining through the previously fertilized plants and will accumulate when it reaches the bottom. Having and open reservoir allows too much debris to enter the irrigation system and clog it.
- -Design 2 Problems: The center bottle planters were not getting equal watering. Pressure from the main line only reached the first bottle and slightly to the second planter and none to the last two. The top and bottom gutters were either draining too fast or getting over-flowed from too much water. The bottom gutter received too much water from the inflow of the top gutter and the center bottle planters.
- -Design 3 Final: Adding over-flow drainage to both gutters fixed any over watering problems. The manifold added to the center bottle planters creates equal water distribution for bottles. Draining the center planters to the reservoir instead of the bottom gutter helped with over watering and overflowing the bottom gutter.
-Testing the Design[edit | edit source]
- Take these questions into account when designing the garden structure and overall ideas:
- Is it feasible; meaning, can it really be built?
- Will the cost be within your budget?
- Will water physics (flow rate, head loss, flow direction, etc.) allow my garden to be watered evenly?
- Does this design fully fit my goals for a successful garden?
- Can it fit into my desired area?
- Is it transportable and can be broken down easily?
- How easy will it be to replace any parts?
- Can the system be altered easily for any unforeseen future problems?
- How much maintenance is required for my garden?
Measuring and Framing[edit | edit source]
- Draw out main design for garden; including estimated size and possible alternative ideas.
- Measure all parts of the frame and solar panels.
- Draw diagrams of frame and place measurements on them. This helps to visualize the project when looking for parts.
- Estimate lengths of tubing needed based on your design. Over-estimate by a few feet to allow room for adjustments.
- Lay out a mock version of your diagram with your materials to check for any changes or additional materials.
- Tools Used: Tape measure, Pencil, Paper
-
-
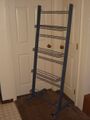
Fig.1-Donated metal frame from Shafer's Ace Hardware Store.
-

Fig.2-Measuring solar panels to mount to the metal frame.


Building Frame[edit | edit source]
- Since I was donated a pre-existing metal frame with four shelves, there was little building for this step. If you are building your own frame, please find construction information elsewhere.
- Cut off bottom shelf to make room for reservoir. (refer to Fig. 3)
- Cut off center metal bar on each shelf to make room for planters.
- Cut off bottom connector bar to install reservoir platform.
- Measure and cut platform board to fit onto bottom frame.
- Measure bolt spacing for connecting bolts.
- Drill bolts through wood reservoir platform and into metal frame to connect and stabilize. (refer to Fig. 5)
- Tools Used: Dremel Rotary Tool, Electric Drill, Circular Saw
-Testing the Frame[edit | edit source]
- Due to the frame being metal, there was no testing involved. If you built your own frame you would need to test the strength of the frame so that it is strong enough to support the plants weight.
-
-
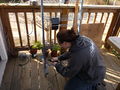
Fig.3-Using a Dremel Rotary Tool to saw off metal shelves for reservoir space.
-
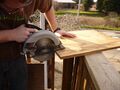
Fig.4-Cutting a 3/4 inch plywood to make a platform for the reservoir to sit on.
-
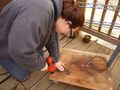
Fig.5-Attaching platform to metal frame.
-
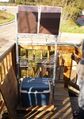
Fig.6-Reservoir is now mounted to bottom of the garden frame.


Building Solar Panel Frame[edit | edit source]
- Refer back to measurements and diagrams while building this frame.
- Measure and cut lengths of aluminum to fit solar panels. Use a labeling system to keep track of cut pieces.
- Put aluminum where they will be placed, and measure and mark where the bolts will go. (refer to Fig. 7)
- Pre-drill holes for bolts.
- Put aluminum where they will be placed and check alignment of bolt holes. Make adjustments as needed.
- Begin installing washers, nuts and bolts to frame. (refer to Fig. 8)
- Install eye-bolts to top holes for mounting purposes. (refer to Fig. 8)
- Thread the all-thread through eye-bolts to hang. (refer to Fig. 9)
- Measure and cut lengths of wood to extend from top of frame to hold solar panels.
- Drill out holes for all-thread to mount through and also lower holes to fasten wood to metal frame with bolts. (refer to Fig. 9 and Fig. 11)
- Thread the solar panel frame into wood holes and fasten with bolts on each side.
- If you would like to make your solar panels adjustable using excess aluminum:
- Bend the aluminum to make a corner bracket.
- Drill holes for bolts on each side.
- Take a long straight piece as your lever and draw out design for multiple levels and one hole for a pivot point. (refer to Fig. 10)
- Cut out design on lever and file down rough edges for safety.
- Attach bracket to a lower corner bolt on solar panel frame.
- Bolt lever to bracket at the pivot point and place over the wood fastener bolt. (refer to Fig. 11)
- Tools Used: Dremel Rotary Tool, Electric Drill, Marker, Wrench
-Testing the Solar Panel Frame[edit | edit source]
- Testing the frame involves checking for any loose areas so that the frame fits secure and strong, and checking that the weight of the panel is not too heavy so that it will not topple over the garden.
-
-
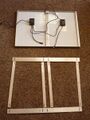
Fig.7-Two separate 4W solar panels ready to mount into custom frame.
-
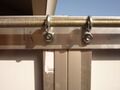
Fig.8-Top of frame. Bolts to hold aluminum together and eye-bolts to hang all-thread from.
-
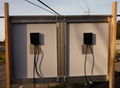
Fig.9-Now one unit, the panels are mounted to top of metal frame from extended wood arms.
-

Fig.10-Home-made 'angle-prop' from extra aluminum.
-
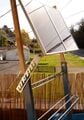
Fig.11-Now we can change the angle of the PV panels for best solar accumulation.


Building Planters[edit | edit source]
- Plastic Bottle Planters
- Cut off bottom of 2 liter plastic bottles. (refer to Fig. 12)
- Tape gorilla tape to cut edges to make it stronger.
- Drill holes into gorilla tape for mounting bottles.
- Drill holes into bottle caps and insert drainage tubing. (refer to Fig. 13)
- Use plastic epoxy around drainage tubing to seal off leaks.
- Gutter Planters
- Measure lengths of gutter to size of rack.
- Cut gutters.
- Attach gutter end-caps. (refer to Fig. 14)
- Drill holes along top edge of gutter for mounting.
- Drill one hole on the bottom of gutter at one end for drainage tubing.
- Drill one hole on opposite side of drain on the gutter end-cap for water delivery. (refer to Fig. 15)
- For both planters, drill one last hole on same end as the drain but on the side of the gutter near the top rim for overflow tubing.
- Install 'Hose Bard to Pipe Thread' to each water delivery hole and seal off with plastic epoxy. (refer to Fig. 15)
- Cut off threaded side of 'Hose Barb to Pipe Thread' and install them to each drainage and overflow hole. Seal off with plastic epoxy.
- Attach gutter to frame with zip-ties through holes on top edges. (refer to Fig. 16)
- Tools Used: Dremel Rotary Tool, Electric Drill
-Testing the Planters[edit | edit source]
- Check the stability of them on the frame, the weight distribution of planters on the frame, that planters are level/balanced for equal water flow, and check that the inflow and outflow holes will allow for easy water flow through the planters.
-
-
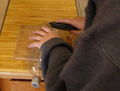
Fig.12-Cutting off the bottom of 2L soda bottles for planters.
-

Fig.13-Bottle cap drainage for 2L soda bottles.
-
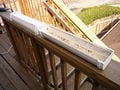
Fig.14-Gutter has been cut and ends placed on. Ready to mount.
-
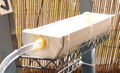
Fig.15-Connected tubing to Hose Barb, sealed with plastic epoxy.
-
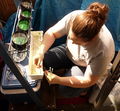
Fig.16-Attaching gutter planters to metal frame.
-
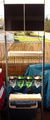
Fig.17-Garden with no irrigation system or plants.


Building Irrigation System[edit | edit source]
- Gutter Planter Irrigation System (refer to Fig. 18 yellow system)
- Attach the vinyl tubing from the water pump's output to the top gutter's end-cap hose-barb attachment. (refer to Fig. 15)
- Attach the vinyl tubing from the top gutter's drainage hose-barb attachment to the bottom gutter's end-cap hose-barb attachment.
- Attach the vinyl tubing from the bottom gutter's drainage hose-barb attachment and lead the end into the reservoir.
- 2L Bottle Planter Irrigation System (refer to Fig. 18 purple system)
- On the main water line from the pump to the top gutter, cut the vinyl tubing at the height a few inches above the 2L bottle planters.
- Install a 'tee-hose-barb' adapter to the main line with the 90 degree offshoot pointing inward towards the planters.
- Attach the vinyl tubing to the 'tee-hose-barb' offshoot.
- Install a 90 degree 'elbow-hose-barb' to the end of the vinyl tubing.
- Attach a short piece of vinyl tubing to the 'elbow' attachment pointing down.
- Install a 'hose-barb to pipe-thread' adapter at the end of the hanging vinyl tubing.
- Screw on the manifold to the threaded end of the adapter. (refer to Fig. 20)
- Attach poly tubing to each manifold emitter and lead them into the planters. ~NOTE: You should already have the beginning drainage tubing attached to the planter bottle caps from the 'Building Planter's section. If you missed this step, refer back to that section and Fig.13 (#Building Planters)
- With the drainage tubing connected to the bottle caps, take the two left bottles and attach the drainage tubes with a 'tee-hose-barb' adapter. Do the same to the two right bottles drainage tubes.
- Attach vinyl tubing to the two 'tee-hose-barb' adapters and connect those drainage tubes with a final 'tee-hose-barb' adapter with the offshoot facing down. (refer to Fig. 20)
- Lead the now single planter drainage tubing down into the reservoir. (refer to Fig. 18 and Fig. 19)
- Tools Used: Scissors, Zip-Ties
-Testing the Irrigation System[edit | edit source]
- This step requires the most testing and re-designing. Test for the following problems:
- Water uplift in main line from pump can reach the top planter. (Head loss from pipe friction calculations will help analyze any problems)
- Water flows through planters without overflowing. (We have an overflow spout just in case)
- Water can easily enter planters and drain without becoming plugged with debris. (Screen is an easy fix)
- Center bottle planters have enough water pressure from the main line. (Changing pump flow rate settings may help)
-
-
Fig.18-Diagram of water flow through system.
-
Fig.19-Diagram of irrigation system.
-
Fig.20-Diagram of irrigation system.
-
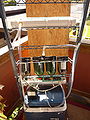
Fig.21-Final mounted irrigation system. Back.
-

Fig.22-Final mounted irrigation system. Front.


Installing Soil and Plants[edit | edit source]
- Soil Mix
- 1/2 potting soil
- 1/4 small rocks (about dime size to quarter size)
- 1/4 native soil from fertile ground
- Mix all together
- -Consistency should be that when you make a ball of soil in your fist, the soil is dense and moist; and when you open your fist, the soil will crumble in large chunks and turn soft again.
- Gutter Planter Planting (refer to Fig. 23)
- Line the gutter with wire mesh so that it goes up each side and covers all tubing openings. This prevents large debris getting into the irrigation system.
- Take green strawberry baskets and line them with wire mesh to hold in the soil.
- Fill with mixed soil.
- Plant vegetable starts or seeds in baskets; whichever the plant requires.
- Set baskets in gutter planter.
- 2L Bottle Planter Planting (refer to Fig. 24)
- Place a square of wire mesh at bottom of bottle so that it covers the bottle cap where drainage occurs.
- Fill bottom 1/4-1/2 of bottle with medium and small rocks. (Fill height depends on how deep your plant's roots require.)
- Fill rest of bottle with mixed soil, leaving at least 1 inch of space from the top empty.
- Plant vegetable stars or seeds in bottles; whichever the plant requires.
- Tools Used: Scissors, Bucket, Shovel
-Testing the Soil[edit | edit source]
- Once the planters have their soil and planter boxes installed, turn on the water pump.
- Check for the water being drawn up into the soil to water plants. Also, check if the soil is staying together and not just being broken apart and washed away by the flowing water which could clog the irrigation system pipes.
-
-
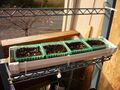
Fig.23-Installed baskets with soil in gutter planters
-
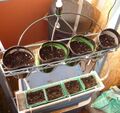
Fig.24-Soil in 2L bottle planters
-

Fig.25-Tomato plants prepared for installation
-
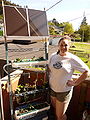
Fig.26-Finished project!


Fertilizer[edit | edit source]
- There are many options for fertilizers. I found through my research that bat guano would work best for my size operation. It takes little guano sprinkled over the plant to get the nutrients. It is also able to be mixed with water as a type of nutrient to water the plants by hand if so desired. Also, the pH level of bat guano is fairly neutral, 6.3 to 6.8; and this allows for it to fertilize all types of vegetables.
- It would be best to decide which fertilizer you would like to use depending on the maintenance you are willing to put into your garden. Your plant types also have a 'happy' pH level that they like to grow in, and that will also take a role in which fertilizer you will choose.
- Research on your own for this step to get the best personalized success for your garden.
-
-
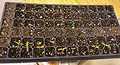
Fig.27-Vegetable sprouts after 1.5 weeks; treated with bat guano
-
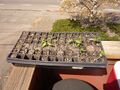
Fig.28-Vegetable sprouts after 3 weeks; almost ready for planting


-Testing the Fertilizer[edit | edit source]
- Create a spread of your vegetables in a green house tray. One row has one of each vegetable in a line. (refer to Fig. 23)
- Keep one row as the control and only use water.
- On the other rows, pick which fertilizers you are interested in and fertilize each row with one option.
- Watch the plants for two weeks, watering as needed and fertilizing as instructed to by individual fertilizers.
- By the end, you should see which row of vegetables grew healthier, fuller, and faster by the end of your test run. This is the fertilizer that will best suit your overall garden vegetables.
- - I found that bat guano worked well for all plants because it was a fairly neutral pH so the plants did not get too acidic or basic in their soil.
Infrastructure[edit | edit source]
- Water:
- -Water will be coming from the Mad River in Blue Lake, Ca to my apartment in Arcata, Ca for tap water.
- -Cost: (Basic water service charge is $9.00) + (Personal usage range of 501-1500 cubic feet which costs and additional $1.55) = Total cost is $10.55
- -With the additional use of water supplied to the garden, I will not exceed the personal usage range of 501-1500. Therefore my normal water bill will not increase.
- -Externalities include: the cost of pumping the water from the river to my location, environmental damage from the pump, removing water for fish to live, gas used to power the pump, transportation of gas from oil fields in the middle east to the USA.
- Sewer:
- -If I was to dump water down my home drain, the Arcata Wastewater Treatment Plant will be handling the extra nutrients from my added fertilizer.
- -If I was to dump water outside, the water will drain back into the water column and the fertilizer will provide extra nutrients to the plants around that area.
- -Externalities include: energy to treat the fertilizer at the plant
- Electrical:
- -My garden is all solar powered. There is no outside electrical source so there will not be any additional costs.
- -Externalities include: the environmental degradation and energy required to manufacture the solar panels.
- Maintenance:
- -Weekly check-up includes:
- Weeding plants
- Change and/or re-fill water in reservoir
- Check for and clean out any debris caught in irrigation system
- Fertilize if needed
- Harvest vegetables if needed
- General gardening such as pruning or transplanting, as needed
Good and Bad Elements of this Vertical Garden[edit | edit source]
- Good
- No external electricity dependance, so you can put your garden anywhere.
- Self-watering allows for less maintenance and there are no worries of forgetting to water.
- Easy to clean, replace parts, and transportable.
- You are not hurting your back by gardening on the ground.
- Each plant has it's own container making transplanting easy.
- Each planter is removable so changing the plant layout is simple.
- Compact design makes this garden perfect for small space gardening.
- Bad
- 1. Does not have enough battery power to self-water if there is not enough sun light.
- Although, in Arcata, Ca, it is assumed that if the sun is not out that it is raining; so the plants will be watered by the rain.
- 2. The gutter planters are a little small and plants may need to be transplanted to larger pots; but the liter bottles work perfectly to allow full maturity.
Research Literature Review[edit | edit source]

This is a review of the available literature pertinent to the various components of gardening.
- References
- Hessayon, D.G.. "Soil." The Garden DIY Expert (Expert Series). New York: Sterling, 1993. 6-24. Print.
- JOBBÁGY, ESTEBAN, and ROBERT JACKSON. "The distribution of soil nutrients with depth: Global patterns and the imprint of plants." Biochemistry 53 (2001): 51-77. http://web.archive.org/web/20100822080039/http://www.springerlink.com/home/main.mpx. Web. 9 Feb. 2010.
- Kaplan, Rachel. "Some Psychological Benefits of Gardening." Environment and Behavior 5.2 (1973): 145-162. Print.
- Kirkby, Ernest A., and K. Mengel. Principles of Plant Nutrition. Fifth Edition ed. New York: Springer, 2001. Print.
- "Life Science Reference - Biology Online." Biology Online Dictionary. N.p., n.d. Web. 12 Feb. 2010. <http://www.biology-online.org>.
- Sargent, S, M Ritenour, and J Brecht. "Welcome to Glades Crop Care Website." Welcome to Glades Crop Care Website. Version HS719. Institute of Food and Agricultural Sciences, University of Florida, n.d. Web. 11 Feb. 2010. <http://www.gladescropcare.com>.
- Splittstoesser, Walter E.. Vegetable Growing Handbook: Organic and Traditional Methods. 3rd ed. New York: Van Nostrand Reinhold, 1990. Print.
Benefits of Gardening[edit | edit source]
- Some Psychological Benefits of Gardening by Rachel Kaplan
- If you would like to read more about benefits of gardening, you can find the journal on Microfilm at the Cal Poly Humboldt Library. Box 1342, V.1-6, Kaplan.
- Gardening is an essential component in rest and recovery. Just as art, poetry, and other leisure activities are important to us, the natural environment, such as gardening, is an excellent relief option.
- It requires a constant commitment rather than a casual experience with the outdoor environment. This helps to retain focus for rest and recovery rather than focusing on other daily stresses.
- We have a basic survival instinct to harvest and provide our own food. This benefits our natural need to be connected to the Earth.
- It is a close-at-hand form of leisure activity.
- It provides a connection to where our food came from.
Vegetable Basics[edit | edit source]
- Vegetable Growing Handbook: Organic and Traditional Methods. 3rd ed. by Splittstoesser ISBN 0-442-23971-8
- Your garden should not have to compete for the sun due to shade by other plants and buildings.
- When planting in containers, make sure the vegetables have enough root space to grow healthy. Do not plant deep rooted vegetables in too shallow of a pot.
- Do research for each plant you wish to grow so that you know the basics of caring for that plant; including pruning, space and water needs.
- Plants growing in containers should not be crowded, thus limit the number of plants per pot.
- Water with cool water, not hot.
- Container plants require frequent watering and fertilization.
- Reduce insect problems by not placing two of the same cultivated type next to one another. Spacing them out is better.
- Spring, summer, and fall crops grow at different rates and require different attention. Do research to further your knowledge on what the seasonal change does to your garden area.

Nutritional Needs[edit | edit source]
- Principles of Plant Nutrition. Fifth Edition ed. by Kirkby and Menge.
- The distribution of soil nutrients with depth: Global patterns and the imprint of plants
- Read the online text
- NOTE: The online text is viewable by purchase or if you are a subscriber to the website.
-Required Minerals[edit | edit source]
- -Needed for enzymatic processes: C, H, O, N, S
- -Needed for energy transfer reactions: P, B, Si
- -Needed for enzyme activation and specific functions: K, Na, Ca, Mg, Mn, Cl
- -Needed for electron transport: Fe, Cu, Zn, Mo
-Nutrient Transportation[edit | edit source]
- Solid material is used as a main nutrient reservoir for the plant.
- Soil liquid solution helps to transport nutrients from the solid material to the root system.
- Gaseous phase exchanges nutrients between the plant roots, fungi, bacteria and the atmosphere.
-Distribution Ratios[edit | edit source]
Distribution of water, organic material, and minerals in order of magnitude:
- 700 mg water per gram of fresh matter
- 270 mg organic material per gram of fresh matter
- 30 mg minerals per gram of fresh matter
Planting Mediums[edit | edit source]
- The Garden DIY Expert (Expert Series) by Hessayon
- http://www.biology-online.org
A planting medium is a surrounding environment in which something functions and thrives, i.e. your plants. The substance in which you plant your vegetables will be the medium in which nutrients and water will enter your plants root system. It also provides a supporting base structure for the plant hold on to.
-Top-Soil & Sub-Soil[edit | edit source]
- Top-Soil is the fertile and living part of the soil
- Sub-soil lies under the top-soil and is relatively dead and starved
-Soil Texture[edit | edit source]
- This refers to the proportions of the different size mineral particles which are present.
- Ideal soil texture lies between the two extremes to create a medium texture known as loam.
-Soil Structure[edit | edit source]
- This refers to the way in which the mineral particles are joined together.
- A crumb structure is ideal. That is, the soil is loosely bonded to other soil types so that it is constantly reforming itself.
-Poorly-Drained Soil[edit | edit source]
- A condition in which water is removed from the soil so slowly that the soil is saturated periodically during the growing season or remains wet for long periods greater than 7 days.
- To get more drainage, create a gravel layer below the garden bed to allow water to escape.
-Acidic Soil[edit | edit source]
- Acidic soils are commonly referred to as "sour." Acidity is the characteristic of soils that have a pH level of less than 7.
- To make your soil more acidic (lower the pH) apply sulfur or commercial fertilizers containing ammonium-N.
-Alkaline Soil[edit | edit source]
- Alkalinity is the characteristic of soils with a pH level that is greater than 7, which is suitable for plants that thrive in a "sweet" (alkaline) soil, as opposed to a "sour" or acid soil.
- To make your soil more alkaline (raise the pH) add lime.
-Fertile Soil[edit | edit source]
- Soil rich with humus. Humus is organic matter partly or wholly decomposed. Along the lines of adding compost to richen the soil composition.
Vegetable Quality and Sanitation Post Harvest[edit | edit source]

- Handling, Cooling and Sanitation Techniques for Maintaining Postharvest Quality from the Institute of Food and Agricultural Sciences, University of Florida
- Read the online text here
-Quality Reduction Issues[edit | edit source]
- Harvesting at an incorrect maturity age
- Careless handling during transportation or packaging
- Poor sanitation practice
- Delays in cooling of produce (refrigeration)
- Storage above or below optimal temperature
- Lack of proper relative humidity
-Maintaining Water Sanitization[edit | edit source]
- Addition of an approved sanitizer to the water, such as sodium hypochlorite, calcium hypochlorite or liquid chlorine, to prevent the accumulation of pathogens.
- -The main advantages to using chlorine are that it is effective at killing a broad range of pathogens and that it is relatively inexpensive. It also leaves very little residue or film on surfaces.
- -If there is no use of pesticides, sanitation is still necessary for the consumers own health.
What I Have Learned[edit | edit source]
- How to properly care and maintain vegetables.
- How to design and alter systems without a bias.
- How to use a Dremel Rotary Tool to cut metal.
- How to find local resources to reduce landfill waste.
- How to dumpster dive at the Arcata Recycling Center.
- How to obtain donations from local businesses.
- How to create an instructional website to aid other's projects.
- How to think out side of the box in order to solve mechanical problems.
- How to facilitate a timeline so that I would not procrastinate.
- How to facilitate a budget to possibly write grants in the future.
- How to engage the community and students in the details of my project.
- How to research and display data for others to understand.
- How to care for a mechanical system when maintenance is needed.
- How to expand my ideas and designs to further develop future projects.
- How to enjoy construction of an appropriate technology.
- How to view different systems and change them to a more sustainable product.
- Be able to understand the workings of an irrigation system do to physics and mechanical engineering.
Updates[edit | edit source]
Ideas[edit | edit source]
- I would like to build small green house covers for the planters. This way I can protect the plants from weather damage during a storm and also grow starts in the garden.
- After tasting all the fruits of my labor... I would recommend to NOT grow celery. They take too much water than my garden could supply, and a lot more space for roots because they grew down into the tubing.
Gallery[edit | edit source]
-
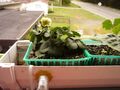
Garden's first bloom, strawberry! 5-16-10
-

The plants are doing great! 5-25-10
-
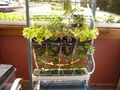
Even bigger! 6-7-10
-
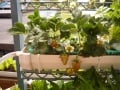
Strawberries almost ripe! 6-25-10
-
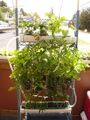
Huge tomato plants! 6-25-10
-
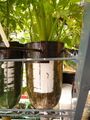
Thick celery and deep roots. 6-25-10
-
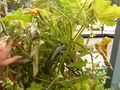
First zucchini! 8-11-10
-
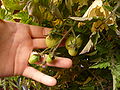
Yellow pear tomatos. 8-11-10
-
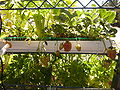
So many strawberries! 8-11-10
-
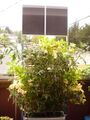
The tomato's on the bottom are dominating the project. But they are all very healthy.


Notes[edit | edit source]
- The garden has gotten bigger than ever imagined. The bottom tomato plants are taller than the top plants! I have NOT replanted any of them. They are that big in small strawberry baskets!
- I have harvested so many beautifully large and ripe strawberries.
- All tomatos are beginning to bloom and ripen.
- My first zucchini from the garden will be ready to pick mid August.
- The garden is a SUCCESS! I am excited to start another garden for next growing season.