It is no secret that, since its invention, photovoltaics has been on the rise over the years. Today, it is one of the most productive renewable energy sources, and the wide distribution of solar power plants is proof of this.
Although photovoltaic energy has infinite applications, agriculture is one of the most useful for human beings. This type of energy has proven to be an innovative and sustainable solution for improving productivity and efficiency in the field. With the growing interest in more environmentally friendly farming practices and the need to diversify energy sources, solar PV systems have become a great tool to meet the energy demands of agricultural operations. From small farms to large agribusiness operations, integrating photovoltaics in agriculture is changing how energy is farmed and managed in the field.
Photovoltaic energy in Ontario, Canada, has experienced significant growth in recent years, becoming one of the province's most relevant renewable energy sources. The abundance of solar resources and the government's commitment to sustainability have been key factors in encouraging the adoption of this technology. Ontario has implemented policies and programs that promote the generation of electricity from solar photovoltaic panels, both at the residential and industrial levels.
In addition, the province has large-scale solar installations that generate clean energy on an industrial scale. Solar farms and parks have been established in suitable areas, taking advantage of Ontario's vast land area and solar exposure.
Similarly, London Ontario has experienced significant growth in the adoption of photovoltaics, and while it is an urban area, the surrounding area is characterized by vast rural and agricultural areas, which contribute to the food production and sustainability of the province, as it is well known that agriculture contributes significantly to the region's economy.
From family farms to large agri-food industries, the region has many aspects when it comes to agriculture. The region is known for its great agricultural diversity, where a wide variety of crops are grown, such as corn, wheat, barley, and horticultural crops, among others.
Ontario has a varied climate throughout the year, which contributes significantly to the agricultural aspect of the province. Ontario is a large region, where climatic conditions are likely to vary according to geographic location.
Spring (March to May): Spring in Ontario is a transitional season. Temperatures begin to rise after winter, but there can still be cool days. In March and April, frequent showers may be experienced. As spring progresses, vegetation begins to bloom, and days become warmer.
Summer (June to August): Summer in Ontario is warm and pleasant. Average daytime temperatures are usually in the range of 20 to 30 degrees Celsius, although there can be heat waves with higher temperatures. Summers are generally humid, with a significant amount of precipitation, especially in the form of thunderstorms and downpours.
Autumn (September to November): Fall is another transitional season in Ontario. Temperatures gradually begin to drop, and fall colors take over the landscapes as the leaves fall from the trees. It is a season known for its beautiful landscapes due to the vibrant colors of the changing leaves. Autumn can also bring rain and some thunderstorms.
Winter (December to February): Winter in Ontario is cold and snowy, especially in the central and northern parts of the province. Temperatures can drop below freezing, and frequent snowfall occurs. Northern regions experience longer and colder winters with subarctic conditions.
Photovoltaic potential and solar resource of London Ontario
Due to its geographic location and climatic conditions, Ontario has remarkable photovoltaic potential. The province has warm summers and cold winters, as well as many solar hours, which help to increase the variety of solar energy production throughout the year.
Other key factors for photovoltaic production in the region are government incentives, as the government has implemented programs such as the feed-in-tariff (FIT) and the microFIT program, programs that promote the introduction and use of renewable energy sources. These types of programs greatly help the second aspect, environmental awareness, and sustainability among the public in the region. Public awareness of climate change and the need to implement the use of alternative energy sources contribute to the interest in photovoltaic energy and consequently the installation of photovoltaic systems in homes, businesses, and industries.
As a university city, London Ontario has research and development institutions dedicated to the advancement of photovoltaic technology, leading to improved efficiency and reduced costs for photovoltaic systems.
According to the Solar Resource Maps of Canada, these are the photovoltaic potential of London Ontarioː
The most used materials are certain metals, which provide strength, durability, and support for the modules:
Aluminum: is the most used as it has characteristics such as corrosion resistance, durability, and lightweight.
Galvanized steel: It is mainly used for floor-mounted structures or large structures (e.g., industrial facilities), since it has optimum strength and support capacity.
Stainless steel: Due to its corrosion resistance and durability, stainless steel is used in environments where there is greater exposure to extreme conditions, such as in coastal areas.
Galvanized iron: It is a more economical option, and its galvanization helps to protect it against corrosion.
Fiberglass: Used in some structures specially designed for installations in corrosive environments or near the sea.
Fiber-reinforced plastics (FRP): These materials are used in some solar tracking structures due to their lightweight and corrosion resistance.
There are several types of structures, their application depends on the conditions of the environment, variants, geographical area, climate, etc. The best-known types are:
Roof-mounted structures: these are the most common for residential and commercial installations. They are mounted directly on the roof using rails, brackets, and clamps to fix the PV modules. These structures adapt to different types of roofs.
Ground-mounted structures: These are used for large-scale installations, such as solar photovoltaic plants. The panels are mounted on metal structures fixed to the ground. These structures are versatile and can be adjustable to optimize the tilt and angle of the panels.
Single-axis solar tracking structures: These structures allow the solar panels to follow the movement of the sun throughout the day, increasing the efficiency of the system. They can be single-axis (north-south tracking) or dual-axis (north-south and east-west tracking).
Floating structures: Designed for solar installations on bodies of water such as reservoirs, lakes, or ponds. The panels are placed on floating platforms that follow the direction of the sun and minimize evaporative water loss due to shading.
Solar shading structures: These systems combine the function of generating electricity with that of providing shade. They are used, for example, in parking lots or rest areas, where the panels also serve as protection from the sun and rain.
3D printing has been booming in recent years, basically, it is the process of creating objects by depositing layers of material on top of each other. In this way, it has applications in any field imaginable, from entertainment to medicine, and energy production is no exception; 3D printing has begun to have a great impact on photovoltaic systems since it offers great advantages for design, manufacturing, efficiency, and cost reduction.
In the design aspect, 3D printing is implemented in the structure of photovoltaic systems, as it allows the creation of parts and components that easily adapt to the needs thanks to the ease of design customization, thus allowing further optimization of components, time reduction, efficiency improvement, and even cost reduction.
Cost reduction ranges from manufacturing costs to savings due to material waste, because the 3D printing process allows the use of the necessary amount of material, reducing waste and thus reducing costs. In addition to this, depending on the printing material, the part can be several times cheaper than a part made with conventional materials (such as aluminum), which means a lower loss in case of failure...
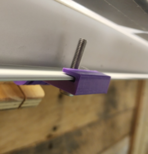
This was designed to hold the module while maintaining vertical mobility, it consists of three parts that are printed so that the hinge comes out in one piece:
Face with one hole: this has a small hook on which the module rests, its only hole coincides with the module's handles.
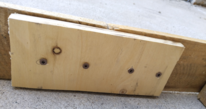
Face with three holes: its purpose is to be fixed to the structure.
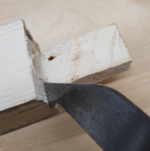
It has a simple design, with the function of holding the module when it needs to be lifted. The hole fits into a certain piece of wood, and its protrusion fits into the module's handles.
There are several types of soil for cultivation, to know which one to choose it is necessary to know the type of crop you want to plant, as well as the specific conditions of the place where the crop will be grown.
In Ontario, due to its large agricultural production, geography, and climate, different types of soil are used for different types of crops. The most common are:
Sandy soils: they feature sand particles that provide good drainage capacity. Sandy soils are ideal for crops that do not require much moisture, such as carrots, radishes, and some varieties of strawberries.
Clay soils: These soils contain a high proportion of clay particles, which gives them a high-water holding capacity. Clay soils are suitable for crops that need a good water supply, such as rice, corn, and some types of vegetables.
Loam soils: Contain a balanced mixture of sand, clay, and silt. They are well suited for a wide range of crops, as they provide good water holding capacity and good aeration.
Calcareous soils: These soils contain high levels of calcium carbonate and can be alkaline. They are suitable for crops such as beets, cauliflower, and some varieties of onions.
Organic soils: These are soils rich in organic matter, such as compost or humus, which improve soil fertility and nutrient retention. Organic soils are excellent for a wide variety of crops and are especially beneficial for vegetable and fruit crops.
The number of materials and the materials on their own can vary, it depends on which material is available at the moment of construction (like if pallets are used or another kind of wood).
Using the angle grinder, cut the head of the nails of the planks. As shown in picture a).
With the help of a hammer, hit the planks in the opposite direction of the supports of the pallets.
For those nails that cannot be cut, use the circular saw to cut the planks flush with the supports of the pallets.
Separate the good planks from the planks that are very old or unstable.
Picture b)Picture c) Picture d)Picture e) Picture f)Picture g) Picture h)Picture i)Choose the thickest pallet supports and clean them by cutting the nails.
For the base, using a small piece of wood, join two planks together to obtain the desired size (in case the boards are short), as shown in picture b), do this step twice. Then, with two shorter boards, join them together at the ends to make a rectangular shape.
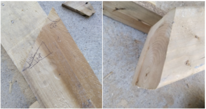
Using the circular saw, make a 34-degree diagonal cut in the thick boards (the pallet supports), specifically, 4 will be needed. E.g., pictures c) and d).
Join the supports at each of the inside corners of the base.
For the main wall, we use the leftover boards, placing them on top of the other horizontally. Since it is a very long side, we place two boards vertically, fixing them from the base to the top of the structure, to serve as the middle fixing point of the wall.
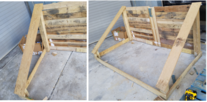
Using a longboard, connect the supports maintaining an angle of 34 degrees, this will oversee holding the panel most of the time. As shown in picture e) and picture f)
Using 4 thick boards of the same length, we fix them to the base of the structure, using pieces of wood so that everything stays in place correctly. As shown in pictures g) and h).
For the remaining walls, we cut the boards so that they have an angle of 34 degrees so that they cover the entire wall.
Place a board horizontally in the center, and place boards horizontally, attaching them to the supports.
Place the rest of the boards horizontally, finishing with the walls.
Joining two planks, connect them from the top to the support boards.
Cut off the excess screws of the structure.
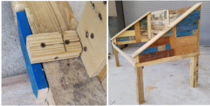
The hinges are placed in the upper part of the structure, taking care that they have the freedom to move.
Finally, the module is assembled, screwing to the hinges. See picture i)
The POSCAS prototype helps us to have a better idea of the aspects to improve in the design, for example, how to reduce the amount of materials such as screws, which would lower the construction price even more, which is the ultimate goal of the structure.
Once the photovoltaic module is installed, we can check the strength of the hinges, allowing us to reduce the amount of hinges in the future, or change the design to improve its function.
With the implementation of this design, the production of photovoltaic energy as well as agricultural production during the cold months will be notably improved, since it is intended to serve as a support and as a greenhouse at the same time. It is a design easily adaptable to the different conditions of the area to be installed, as well as to the different types of photovoltaic modules that exist, however, it is advisable to use the larger types, since in addition to obtaining a greater production of energy, more space is obtained for planting.
Thanks to the simple design and easy procurement of materials, in addition to the flexibility of the same, they make the construction of POSCAS simple and helpful.