
Building a garden at Sunny Brae Middle School is one step towards creating an experiential learning facility designed to educate middle school kids about sustainable agriculture. Having an on site garden where kids can gain direct contact with the processes involved in growing food on a small garden scale is appropriate for many reasons which include:
- Nutrition Education
- Learning the basics of small scale food production
- Teaching life sciences through direct engagement with growing vegetables
- Extracurricular school activity
Criteria Fulfilled[edit | edit source]
- An educational value-One criterion our garden design satisfies is serving as an educational facility for students at Sunny Brae Middle School. A science teacher at Sunny Brae Middle School has agreed to lead a gardening curriculum with students.
- Durability-The garden at Sunny Brae Middle School can be justified as an appropriate technology because the structure's materials are designed to last. Durability is a high criteria because we want the garden site to last as long as possible as a sound structure. Materials such as weed cloth, galvanized steel, redwood and Trex lumber are durable and will insure the continued existence of the garden plot.
- Aesthetics-This site is also aesthetically pleasing, with an aim of attracting students to the premise.
- Simple design-This site requires no special skills or tools, it is practical and to the point. This criterion is important because of the age range and interest level of the students.
Greenhouse[edit | edit source]
With a greenhouse on site at SBMS, this garden plot will be able to provide an educational experience all year long for the students of SBMS. In a coastal climate, one benefit of a greenhouse is season extension. Greenhouse's "can transform your gardening activities, extend the season and increasing the range of crops you can grow. The enclosed environment means you can give the plants exactly the conditions they need to grow fast and well,"[1] By providing a secure micro-climate, vegetable starts can get an early start as well as provide vegetables longer in the season. Greenhouses also provide an environment that can expand the varieties of vegetables grown in our climate. Hot weather crops such as tomatoes, peppers, melons and eggplant can be grown on the coast with a well-designed greenhouse. The greenhouse is 10'x16', and it takes up approximately one quarter of the entire garden plot.
Design[edit | edit source]
Our design plot consists of two areas: A greenhouse and an outdoor garden area, the plot measures 40'x32'.
Materials[edit | edit source]
Greenhouse Materials[edit | edit source]
The greenhouse is a manufactured kit. The kit assembled is a Country Barn, manufactured by the company Hoop House. http://www.hoophouse.com. Materials included in the kit are as follows:
- Anchor posts
- Batten tape
- Carriage bolts and nuts
- Eyebolts with nuts
- Hoop tops and bottoms
- Hoop connectors
- Hoop clamps
- Poly film cover
- Stabilizing wire
- Screws
- Tek Screws
- Turnbuckles
The kit doesn't include the following, which was locally purchased:
- 2"x4" pressure treated lumber (90')
- 1"x4" lumber (144')
- Paint (1 gal)
Inside the greenhouse we built two 3'x6' tables for vegetable propagation, seedlings, transplants and so forth. Also, two 2'x5' raised beds can be found within the greenhouse. The materials required for the construction of the tables and two raised beds are as follows:
- 2"x12" Redwood (28')
- 2"x4" lumber (60')
- 4"x4" lumber (24')
- 1"x4" lumber (30')
- Mesh wire (3'x12')
- Rebar #3 (20')
- U brackets (12)
- Pure linseed oil
Outdoor Garden Plot Materials[edit | edit source]
To complete this part of the garden, additional supplies were needed. The garden plot size including the greenhouse is 40'x32' and is bordered in. To prevent weeds, weed fabric is laid underneath the entire plot. There are seven raised beds of varying sizes in the outdoor plot (see pictures). We laid woodchips everywhere except in the raised beds for mulch, erosion prevention and to provide suitable grounds cover for heavy traffic. The following materials have been purchased locally for the outdoor garden plot:
- 2"x12" Redwood (128')
- 1.25"x5.5" Trex (144')
- Weed fabric (1280 sq.ft.)
- Redwood wood chips (14 yards)
- Rebar #3 (80')
- U brackets (40)
- Pure linseed oil
Tools Required[edit | edit source]
For this project a basic knowledge of construction techniques are helpful. Listed below are necessary tools to complete this job.
- Measuring tape
- 5/16" socket wrench
- Power drill & bits
- Hammer and sledge hammer
- Circular saw
- Level
- Knife
- Staple gun
Cost Analysis[edit | edit source]
Funding for the garden plot at Sunny Brae Middle School was providing through grants. Upon receiving the greenhouse from Sunny Brae Middle School, more supplies were necessary for completion. These costs are shown in the cost analysis. Included in the cost analysis are the costs of the supplies to complete the raised beds, wood chips, weed fabric, Trex boarder, mesh screen, etc. See the table below.
Time[edit | edit source]
The collective time applied to this project's construction was near 100 man-hours. Most of the physical work was done making the foundation, framing the greenhouse, constructing raised beds, spreading wood chips and soil. There were other instances such as planning our project and meeting with the City of Arcata and SBMS faculty that took a significant amount of time.
Maintenance[edit | edit source]
Based upon the way the greenhouse was designed the first projected maintenance issue will be the replacement of the poly film cover. The plastic is issued to last 6-8 years. According to the manufacturer of the kit, "custom sized, 6-mil film, with a 4 year guarantee is included in your greenhouse kit."[2] Another issue will be the degradation of the treated wood which can occur between a 10-12 year period, again dependent upon the weather conditions. Same with the redwood but it lasts about 5 years and is highly variable with direct contact with the ground. The garden beds and soil will need to be maintained on a regular basis. Planting crops, harvesting, rotating crop, placement, and pruning are just some of the tasks associated with bed maintenance.
Construction[edit | edit source]
The initial construction began shortly after the site analysis was complete.
Foundation[edit | edit source]
The foundation of this plot consists of a base layer weed fabric. We then bordered in the plot with 5/4"x6" Trex lumber. The Trex was attached to the ground by rebar and clamps for strength. This perimeter was put up for containment of the area and easy maintenance. Wood chips were also laid after the entire plot design was done. They were laid everywhere except in the raised beds, to provide mulch and erosion prevention for heavy use.
-
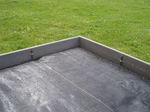
Rebar support
-
Weed Fabric & Trex


Greenhouse[edit | edit source]
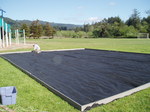
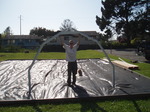
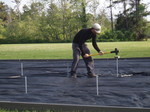
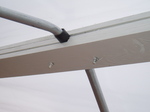
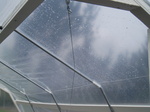
The first step was to paint the necessary number of boards for construction to prevent the degradation of the poly film. We painted 90' of 2"x4" and 144' of 1"x4". Then begin by assembling the greenhouse hoop ends. This is where our design was different from instructions provided. We framed the ends with seven angled cut 2"x4"s instead of following the instructions which called for plywood. This in turn changed the design of the doorway. Next we attached the steel hoop frame to the 2"x4" frame with hoop clamps and carriage bolts. Once the structural ends were built we began to sink the anchor posts in, beginning with one end. We placed the two end corners 9'11" apart and worked our way down each side, driving stakes 4' apart until we had each anchor post staked in the ground. For a top ridgepole we sandwiched together three 1"x4" boards. The top board was cut to be 2" shorter than the length of the greenhouse. The two middle boards for the end sections were cut to 3'11-3/8" and the other middle two sections were cut to 3'10-3/4". The bottom board is the length of the greenhouse. To adhere the three boards together we used 3" carriage bolts. In each four-foot section two carriage bolts were driven down the length of the greenhouse. Next we applied stabilizing wires. They run from the center top of each end to the bottom corner of the opposing end. This reduced some tension on the steel frame construction. For side structural reinforcement we applied three 1"x4" boards to the length of the steel framing. They are attached with d-hoop clamps and carriage bolts. The lowest one is nearly on the ground. The mid-board is 22" up the lowest. The highest is another 42" up. The third 1"x4" was an additional support. This completed the greenhouse frame. The last thing we did was frame in the end doorways with vertical 2"x4"s, 36" wide from center. They attached to the upper hoop arch and to a lower 2"x4" baseboard. (see picture) The poly film cover was pulled over the greenhouse (see picture). Then the film was adhered by 3/8" staples through batten tape to protect the ploy film from ripping against the staples. We begin on one side and in one lower corner pulling tension while the other person stapled. The end plastic pieces were done the same way beginning in the lower corners.
-
2"x4" Framed Hoop Ends
-
Anchor Posts
-
1"x4" Ridgepole
-
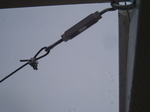
Stabilizing Wire
-
Stabilizing Wire 2
-

End Door Design
-
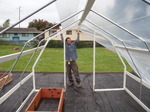
Covering with Poly Film
-
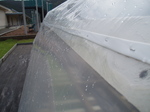
Stapled on Batten Tape for Poly Flim Attachmnet


Raised beds[edit | edit source]
All the redwood-raised beds in the entire garden plot are sealed with pure linseed oil for increased protection to weathering and decay. The bed sizes are 2'x5' in the greenhouse and 3'x6' and 3'x7' outside. They were constructed by screwing the corners together, capping in the short dimension boards. Then to reinforce the bed placement we attached rebar to the beds with clamps.
-
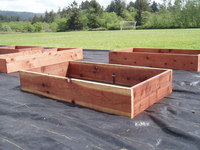
Raised Bed

Tables[edit | edit source]
The tables are designed with seedlings, plant propagation, and storage in mind. They are two 3'x6' tables with mesh screening tops. They provide good drainage and a firm surface. The tables top is a 2"x4" frame. Within the frame is a mid rib support half in between the ends. Attached to the mid rib are four other mid rib to end supports, two on each side. Underneath the table is a platform of 1"x4" boards for storage of pots, flats, tools, etc. For extra solidity the table's legs are made from 4"x4"s.
-

End Table View
-
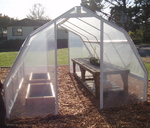
Greenhouse

