How to receive your in-home toolbox: please send an email to team.selftraining@gmail.com to request a shipment containing:
- Wooden simulator box components (8 pieces) with electronic sensors
- PDA outer foam mold (2 pieces)
- PDA plastic mold inserts (3 pieces)
- Material injection nozzles (4 pieces)
Tools and Equipment Required for Setup
- In-home simulation kit (provided by SELF-Training team)
- Measuring jug with >100ml capacity
- Kitchen scale
- Cooking pot
- Scalpel or craft knife
- Tweezers
- 100ml syringe with cap
- Rubber bands (8-10, small)
Ingredients Required for Purchase
- Glycerol (40g per model)
- Gelatin powder (15g per model)
- Red pigment, powdered (0.5g per model)
- 9-volt battery (1)
Step by Step Simulator Setup Instructions[edit | edit source]
Part One: Prepare Mold for Material Injection[edit | edit source]
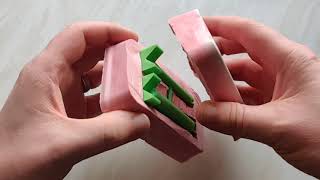
- Connect the three green plastic components to one another as shown on video, and place them in the fitted space in the bottom half of the mold.
- Push the four nozzles into the top half of the mold as shown in the video, ensuring that the tips of the nozzles pass all the way through.
- Put the top half of the mold in place, and use rubber bands to seal the halves firmly together. Set aside on paper or cloth towels while making the molding material.
Part Two: Create and Inject the Molding Solution[edit | edit source]
- Place measuring jug on scale, zero scale, and add 40g of glycerol
- Zero scale and add 15g of gelatin
- Zero scale, add 0.5g of powdered pigment, and spread powdered materials across surface of glycerol
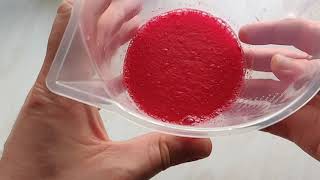
- Add cold tap water to the 100ml fill line of the measuring jug, stir until fully dissolved, let sit for 20 minutes to congeal
- Transfer mixture into cooking pot, spread over surface, mix over low heat (do not boil) for about 10 minutes until it fully liquefies
- Remove plunger from syringe and ensure syringe cap is secure. Carefully fill syringe with hot mixture, replace plunger, turn upside down and remove cap, and slowly push plunger until no air remains.
- Screw the syringe end into each of the four filling nozzles on the model, and firmly push hot material through the nozzle until the mold is completely filled. Leakage through the seam between the two sides of the mold is normal.
- Refrigerate the mold overnight. Excess mixture remaining in the syringe can be ejected into a container and refrigerated for future use.

Part Three: Remove the Mold[edit | edit source]
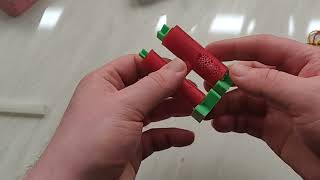
- Remove rubber bands and nozzles, peel away excess gel from outside of mold (the excess material can be saved and reused), and carefully separate the two sides of the mold.
- Use a scalpel or craft knife to remove the gel from the V-shaped ends of the plastic inserts
- Gently twist and pull to remove the smaller of the two long inserts, using knife to loosen from ends as necessary
- Use tweezers to loosen central connecting pin from larger long insert, then gently twist and pull to remove long insert
- Push connecting rod into larger vessel and use tweezers to remove
Part Four: Prepare Box for Use[edit | edit source]
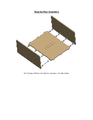
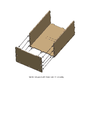
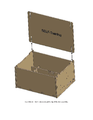
- Slot the base of the box into the two side panels with the four holes.
- Slot the side panel with three holes onto the assembly.
- Slot the side panel with many holes onto the assembly. This panel will be used for mounting the electronics later.
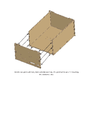
- Assemble the internal frame as shown in the diagram.
- Insert into the main box assembly.
- Insert the lid into the two slots at the top of the box assembly.
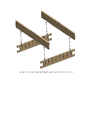
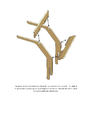
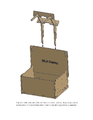
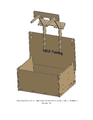
- The phone holder is assembled by slotting the two combs into the two arms. The width of the phone holder can be adjusted by slotting the arms into the different slots on the combs to accommodate many phone sizes.
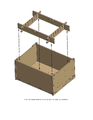
- The phone holder slots onto the lid of the box in a central position. This provides a phone camera with a tall and centralized field of view for recording surgical training exercises.
-
-
-
-
-
-
-
-
-
Finished View


Part Five: Installation of AR app[edit | edit source]
The app installation link:
The Augmented reality app can be installed on smart phones or tablets using:
Android: https://play.google.com/store/apps/details?id=com.NMIS.OrganlikeARDR
or:
Apple iOS: https://testflight.apple.com/join/7CdIIjM4
APPENDIX: Electrical Sensor Configuration (Optional Do-It-Yourself Instructions)
The simulator box will arrive with all electrical sensor equipment pre-configured and ready to use. However, users may also build additional simulator boxes from scratch by purchasing the electrical components themselves, for a total cost of less than US$25, and following the video instructions and schematic diagram below.