Virtual simulation has been a great tool in teaching psychomotor skills, and this has been proved to be true in the field of laparoscopic surgery as well. The primary concern with Laparoscopic surgeries is that the surgeon is visualizing the organs inside the abdomen on a screen. They have to operate in a three-dimensional environment while watching a two-dimensional video image, and the surgeon has to move the instruments in the opposite direction rather than the direction intended. This poses a big challenge, and the psychomotor skills required to perform these tasks are vital.
In traditional open surgeries, most surgeons operate using their right-hand, and their left-hand remains passive. Although in Laparoscopy, they are expected to be ambidextrous, i.e., both hands need to be performing the tasks simultaneously. Moreover, the direction in which the organs are approached is fixed, because the point from which the instruments are initially introduced is not going to change. Furthermore, the magnification of organs also poses a substantial cognitive challenge, the more the telescope zooms in, the greater will be the magnification. Hence, the perspective of organs shifts throughout the surgery.
There are also numerous challenges due to the minute instruments. The forces exerted to grasp a tissue/organ will certainly be different from when the whole hand is being utilized and when compared to a relatively sharp instrument. The tissues cannot be perceived in the way a hand can, because several joints in the tool do not allow transmission of the exact forces that are being applied (i.e., there is a force transmission loss). Hence, there is a lot of learning required for a surgeon to be able to grasp tissues or organs gently, without causing injuries.
The major problem, specific to Laparoscopic Cholecystectomy is the change in the type of tissue, based on the inflammation and on the time at which the surgery is performed. There could be diverse pathological changes in the gallbladder, including fibrosis and contraction. There are also times when the stone is impacted for a long time and this leads to erosion of parts of the gallbladder wall. Understanding these changes that can happen and deciding on what techniques to be used in each of these conditions is critical to perform a safe Laparoscopic Cholecystectomy.
We have designed our Endotrainer module (one of three) in such a way as to ensure that the trainee acquires the psychomotor skills required to overcome these challenges, and to teach them how to handle tissues with appropriate forces and pressures. We have devised a cost-effective box simulator wherein task-based exercises are designed to train basic skills of Laparoscopy. Later, synthetic models of various organs around the gallbladder, along with the pathological variations of the gallbladder are used to train different steps of Laparoscopic Cholecystectomy. The box simulator will also provide annotated visual cues in Augmented Reality (AR) through a Head-Mounted Display.
This low-cost simulator is a compact system consisting of smart laparoscopic surgical instruments, a 3D printed platform for performing simple tasks, a wide-angle camera capable of streaming HQ video wirelessly, a mini-computer and a silicone model for performing Laparoscopic cholecystectomy. The highlight of this system is its potential to track the smallest of hand movements and gestures through its advanced yet inexpensive sensors. The instruments are calibrated to precision and are capable of recognizing millimeter movements.
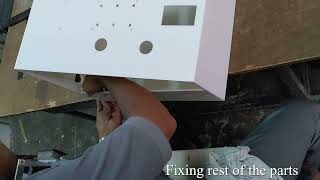
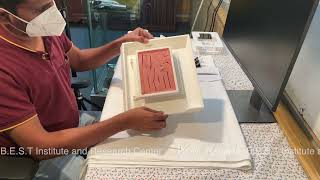
The simulator conforms to the shape of the abdominal cavity in which laparoscopic surgery is performed. The volume of the box is similar to the abdominal cavity. It is made out of a plain acrylic sheet which is available universally and is economically priced. The white glossy sheet reflects light and illuminates the objects within the trainer box. The upper layer is inclined to simulate the angulation of the abdominal cavity similar to when performing a Laparoscopic Cholecystectomy. The port sites are designed to provide the same distance and angulation maintained while performing a Laparoscopic Cholecystectomy. The platform is positioned taking into consideration the length of the instruments that enter the body while performing surgery.
The following features are incorporated in the box to make it a realistic simulator for training laparoscopic surgeries:
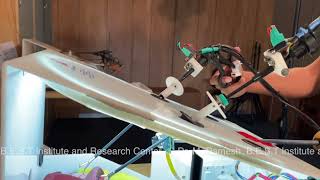
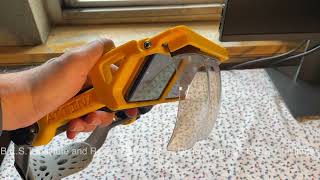
An umbrella handle with a camera at one end is used which is used to replace the endoscope and provide us a good image during training.
The distance and angulation of the telescope and camera are designed to give the same visualisation as in realtime surgery.
A long cable is provided to connect the camera to an LCD TV which is freely available
A platform is provided at the same level and angulation at which surgery is performed and this has several attachments based on which task based exercise is practised.
Designed to have 4 instruments at any time to practise any task.
Lastly, Endotrainer box is easy to make at any small place for and is very affordable.
The endo trainer box used in Module 3 is an indigenously developed simple design made of Acrylic (white color), explicitly chosen for its affordability, its light-reflecting properties and can be easily reproduced in a workshop by referring to the manual on Appropedia. Before finalizing the endo trainer design we have gone through many iterations and taken inputs from experienced surgeons. The size and design of the developed endo trainer box exactly replicate the actual environment during the surgery and gives the feeling of performing actual surgery. The upper plate of the box is kept 30° inclined to the horizontal surface and the gap between the two instruments is approximately 160 mm which again exactly replicates the actual accessible space available during the surgery.
We have finalized the design after two iterations and testing of the trainer box was done at each stage. Development and modification in each iteration is detailed under evaluation section at the end of this page.
Different mechanical components and smart instruments used in the simulator are explained in detail under the different sections.
Box trainer is made of Acrylic (white colour), explicitly chosen for its affordability, its light-reflecting properties and can be easily reproduced in a workshop. For manufacturing and assembly of boc trainer please follow the instructions given in the attached video.
The combination of IMU and TOF sensors for Instrument position estimation is an affordable solution as opposed to expensive cameras and the computational complexity that follows. In the early stages of development, the IMU sensors used didn’t prove to be reliable, with the introduction of BNO055 a 9DOF system on chip enclosing a 3 axis Accelerometer, 3 axis Gyroscope and a 3 axis Magnetometer, various issues related to sensor fusion and calibration were resolved. Consequently, the position information gave way to extract numerous features for the Self-assessment module.
This milestone in development allowed us to embed an encoder to track the state of the instrument tip and a capacitive force sensor to extract the pressure profile of the user. Furthermore, the information from these sensors proved to be valuable is assessing the performance of the user. Once calibrated during Power-ON the system can function seamlessly and whenever there is little or no movement, the system self-calibrates to provide the accurate information that is necessary for the overall functionality of the system.
The computation for attitude and position estimation is taken care by the STM32 based controller which provides fresh data every 5ms. The fused data from all the sensors are used for extracting features in real-time. The instruments are designed to be modular and can be quickly interchanged to adapt with the needs of the exercise.
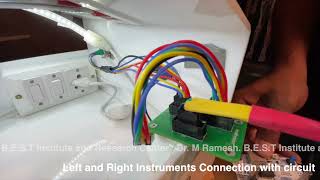
1. Right Instruments: Laparoscopic grasping forceps assembly consists of handle, connector, grasping forcep, sensor mounts, distance sensor, motion sensor and connecting wires
2. Left Instruments: Laparoscopic grasping forceps assembly consists of handle, connector, grasping forcep, sensor mounts, distance sensor, motion sensor and connecting wires
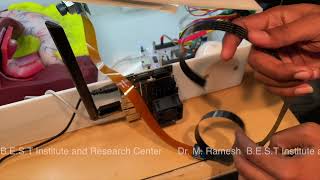
3. Camera mount assembly consists of wooden holder attached with steel rod and at one end and camera is mounted at the other end Arducam 12 MP IMX477
4. Circuit board
5. Laparoscopic instrument assembly:
Consists of Distance sensor: VL53L1X Time-of-Flight Distance Sensor,
Motion sensor: BNO055 is a System in Package (SiP) solution that integrates a triaxial 14-bit accelerometer, an accurate close-loop triaxial 16-bit gyroscope, a triaxial geomagnetic sensor and a 32-bit microcontroller running the BSX3.0 FusionLib software
6. NVIDIA® Jetson Nano™
7. Silicone organ: Simulab
c. Task Based Exercises and Self Assessment Table[edit | edit source]
Our training modules provide step-by-step training, cognitive and surgical psychomotor skills. There are 6 Training activities included in the current box trainer which will help novices to improve their laparoscopy skills such as grasping, depth perception, suturing, cutting, and knotting.
There are 6 Training activities are included in the current box trainer which will helps novice to improve their surgical skills such as grasping and dropping, depth perception, suturing, cutting and knotting.
Training Module 1 – Thermocol beans
Training Module 2 – Rubber bands
Training Module 3 – Building blocks
Training Module 4 and 5 – Precise cutting
Training Module 6 – Suturing/Knotting
Each module is designed to be fit in universal task table where slots are provided to fix the task pad and it can be easily replaced with the next task pad. Universal task table along with all the activity pads can be 3D printed and respective files in .stl format are attached at the end.
Tools needed for manufacturing and assembly[edit | edit source]
3D printer with a bed size of 0.30 m X 0.30 m X 0.10 m (L x B x H) minimum.
Flat file to file the extended surfaces and sharp knife to trim off the plastic on the edges and support structures from the 3D printed parts (Depends on the print quality).
Universal task table is designed to fit different activity pads in the same table. It reduces the overall cost and time for fabricating new table for each particular task instead it allows fitting small pad on which activity is designed. There is small slot is provided in which activity pad can be placed and locked in all the direction to restrict the table movement.
Thermocol beans module 1 is an excellent choice for novices, it allows the acquisition of basic instrument manipulation skills involved in laparoscopic surgery. The activity pad consists of one large, four small cylinders and thermocol beans (four colours and 10 no. each). The task is to grab the particular colour beans from large cylinder and transfer it to each of the small cylinders. Each small cylinder should be filled with 10 no. of same colour.
Skills attained: Grasping, Dropping, Depth perception and colour
The Rubber Bands Module 2, is perfect for training manual skills with the use of laparoscopic instruments. During the laparoscopic surgery, operating in a narrow area and stretching the tissues are biggest difficulties and this module will allow the novices to acquire these skills. Stretching the elastic rubbers with the instrument in this training module exactly imitates stretching the natural tissues during the surgery. This can help to better understand and feel the tension whilst performing laparoscopic surgery. This module also helps to improve manual skills at various angles and in many configurations, as well as symmetric use of both hands with the same precision to stretch and place the rubber band.
Skills attained: Stretching, Hand coordination, Depth perception
Building blocks module 3, helps to improve the symmetric use of both hands with the same precision to place blocks over blocks. In this module participants should place the blocks one over other to complete the task. Total time taken to complete the task and hand coordination are major criteria helps to evaluate the participant skills in this module.
Skills attained: Hand coordination, Depth perception
Training Module 4 and 5: Cutting (Circle and Line)[edit | edit source]
The cutting module 4 and 5, help in acquiring precise cutting skills and it can be performed with these replaceable pads which are intended to be clipped onto the universal pad. The trainee must cut the circle between the two lines in module 4 and lines in module 5 within given specifications. During the task, the participant has 5 minutes to cut 2 circles in module 4 and 5 minutes to cut lines in module 3.
Skills attained: precise cutting, Hand coordination, Depth perception
Training Module 6: Suturing and Knotting[edit | edit source]
The suturing and knotting module 6, allow the participant to practice surgical suturing and knotting during minimally invasive surgery. This realistic suture pad imitates artificial tissues and it is easily available in the market. It consists of a flat pad made out of a special type of silicone with different shapes of cut on the surface. The training module allows novices to practice, placing various types of sutures. It also helps to improve the skills of suturing tight tissues, proper selection and tightening of knots.
Synthetic organ used in the present simulator is commercially available and procured from Simu Lab Corporation. Two models that we have used are Replaceable Gallbladder and Laparoscopic Cholecystectomy Model.
The ATTINA headset is a low-cost 3D printable AR headset with the ability to print and assemble right at home using off-the-shelf parts and it doesn’t require any technical skills to assemble it. Most of the headset parts are 3D printable and respective CAD models are designed in CAD software and few components such as a reflective combiner, and a welding gear harness serving as the head strap are commercially available. The smartphone's display reflects off the combiner and into the user's eyes—a wireless remote act as a laser pointer to interact with the UI. The headset design is finalized after four iterations. The finalized design is cost-effective, easy to assemble and flexible enough to insert any smartphone available on the market.
a. ATTINA: Affordable DIY Augmented Reality Headset[edit | edit source]
The headset parts are 3D printable and respective CAD models are designed in CAD software. The files related to individual parts in 3D printable format (.stl) are attached at the end. Some of the components which are required to assemble AR headset are commercially available and details of these parts are available under bill of material section.
Print the main frame (Part A: IntelliVision_AR Headset_Main Frame_Mobile Holder.stl) in vertical position (landing on side face) to achieve the maximum flexibility of mobile holder clamp which helps to hold mobile rigidly towards the reflector. Length of the frame is around 196 mm and to accommodate this length printer should have bed size of min 200 mm moving in Z-axis. This part requires a more support when it is printed in vertical position. To save material one should maintain more gap between supports and after printing is done the part is to be filed and edges needs to be trimmed wherever the surface is not smooth. Total printing time of main frame is around 10 hours.
Print the welding harness right and left (Part B: IntelliVision_AR Headset_Frame to Welding Harness Connector_Right.stl and Part C: IntelliVision_AR Headset_Frame to Welding Harness Connector_Left.stl) in an upright position without any support the letters on the welding harness facing upwards. Printing time: 2 hours
Two numbers of locking screws (Part D: IntelliVision_AR Headset_Frame and Connector Lock Screw.stl) can be printed in vertical position, starting from head of the screw. Printing time: 20 minutes
Print reflector holder (Part E: IntelliVision_AR Headset_Reflector Frame.stl) with slot for fixing the reflector facing up. Printing time: 90 minutes
Trim of the excess material and support from all the parts to smoothen the edges and surfaces. Cleaning time: 20 minutes.
Total print and cleaning time may vary between 14 hrs to 16 hrs depends on filler diameter.
Follow the steps illustrated below to assemble the parts.
Self- assessment of the quality of the skill acquisition must include some mechanism for targeted feedback which enables the user to: ensure they are practicing the appropriate skills; modify their performance to improve competence; and determine when they have practiced to a sufficient level of mastery to perform the procedure in a patient.
The assessment system we have designed scores students on overall proficiency with performing certain tasks. These tasks have been designed to develop psycho-motor skills specifically required for laparoscopy. Once the user has completed a task, the testing module proves them with an overall score, higher score reflects higher proficiency.
Over the past months, we have tried to collect as much data as we could across expertise levels for the above mentioned tasks, However, since data collection is expensive(time taking) we have been able to collect about 100 completed tasks across expertise levels. Given a small size of data, we have currently used rule-based algorithms to do the assessment and for segregating people across expertise levels. (Expert, Medium, Trainee)
Our plan is to collect more data in the coming months. We can afford to solely focus on collecting data since all other parts of our tool are almost fully developed. Once we have more data we intend to use Hidden MArkov Models/ RNNs to produce more fine grained scores to assess a candidate's proficiency levels across skill types ( steadiness, speed, etc).
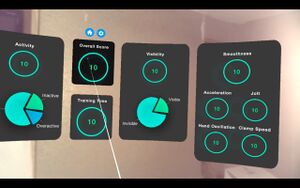
Self-assessment
Smoothness of Movement — Acceleration, Hand Oscillation, Jolt, Clamp speed.
Economy of Movement — Distance Travelled, Clamps count, Insertion of instruments
Activity — Inactive, Active, and Overactive percentages; represented as a Pie Chart
The methods we shall be using in the self-assessment framework are detailed as follows:
Comparison of force signatures between novices, residents, and experts. We shall use the force signatures from experts as the comparison metric for novices and residents.
Self assessment environmentWe will be implementing advanced Artificial Intelligence (AI) technologies such as deep recurrent neural network models to predict the probable pitfalls during force and motion-based tasks.
The AI-based framework will also be employed to classify the skill sets of surgical participants and predict the tissue damage at an early stage based on the history of force and motion parameters. Please also refer to Appendix I, where we explain the usage of AI in our modules in detail.
We will provide Visual Feedback in the form of AR cues through a Head-mounted. Display on excessive force application and to combat misperception of self-applied forces.
The movement time and index of difficulty based on the planned target and Region of interest (RoI) will be estimated.
Impedance index of Novices, Residents, and experts shall be recorded and analysed to assess misperception.Display - self assessment
The economy of movements will be assessed. Usually, novice surgeons tend to be more nervous and hence will make unnecessary hand movements.
The metrics to evaluate the effects of handedness (dominant and non-dominant hand) on both the fundamental and complex psychomotor force-based tasks will be evaluated.
Due to the elongated instruments in Laparoscopy, there will be force transmission loss from the handle to the tip. This will be measured and presented to the surgeon in the form of cues.
The evaluation of Transfer of Training score from the simulator to the operating room will be detailed.
The Visual Focus and Attention Deficit assessment pertaining to whether the novice/resident is looking to the same RoI that the expert Surgeon is focussing on, will be included in the framework.
The time taken to complete basic and complex tasks will be compared to metrics obtained from expert surgeons.
Furthermore, metrics such as Just Noticeable Difference (JND), Coefficient of Force Variation, Peak First, Second, and Third order Force, Force derivatives, and velocity shall be used for assessment of the mastery level and also to differentiate the expertise levels of different groups of surgical participants.
Learning curve shall be assessed at each stage of complex and fundamental tasks and will involve tracking of surgeons' projectile motion and path taken to reach the desired RoI, number of misses during knot tying process, excess pinch force exertion on tissue surface, and damage caused to neighbouring tissues.
Haptic and force-based guidance mechanism to redirect the surgeon/novice to the desired area of interest. Reaction forces arising from virtual environments shall be measured and mapped back to the user.
Both surgeons and residents shall be evaluated on force-based and psychomotor/motion/movement-based skill sets for box trainer-based simulation tasks and VR/ AR based haptic force-feedback tasks.
We have a step by step evaluation of the trainer as he is going through our 3 modules.
In module 1, we have a set of multiple choice questions of various sorts and this will assess the knowledge of the trainee. The candidate is expected to answer 80% of the questions correctly, failing which he /she is advised to go through the lectures, videos and animations once more.
The assessment module is going to evaluate the trainers knowledge regarding
Basic understanding of laparoscopic surgery.
Equipment and instruments and their usage.
Trouble shooting during equipment failure.
Steps of Laparoscopic Cholecystectomy operation.
Complications that can occur during surgery.
Management of complications.
Management of different situations based of anatomical and pathological variations.
Aspects of safety of surgery.
Team work.
10. Usage of different types of instruments and energy sources.
Module II: Virtual Simulator Mobile App (iOS & Android)
The assessment of performance of the trainee in Module II exercises will evaluate the cognitive skills particularly with regard to:
Selection of operating instruments.
Approach to a particular situation, with regards to type of surgery and technique.
Steps of the operation and prioritising safety aspect.
Choice of energy source usage.
Trouble shooting in problematic situation.
Managing complications that occur during surgery.
Module III:
a. Box Trainer
This low-cost simulator is a compact system consisting of smart laparoscopic surgical instruments, a 3D printed platform for performing simple tasks, a wide-angle camera capable of streaming HQ video, a mini-computer and a silicone model for performing Laparoscopic cholecystectomy. The highlight of this system is its potential to track the smallest of hand movements and gestures. The instruments are calibrated to precession and are capable of recognizing millimeter movements.
The endo trainer box used in Module 3 is an indigenously developed simple design made of Acrylic (white color), explicitly chosen for its affordability, its light-reflecting properties and can be easily reproduced in a workshop by referring to the manual on Appropedia. Before finalizing the endo trainer design we have gone through many iterations and taken inputs from experienced surgeons. The size and design of the developed endo trainer box exactly replicate the actual environment during the surgery and gives the feeling of performing actual surgery. The upper plate of the box is kept 30° inclined to the horizontal surface and the gap between the two instruments is approximately 160 mm which again exactly replicates the actual accessible space available during the surgery.
We have finalized the design after two iterations and testing of the trainer box was done at each stage.
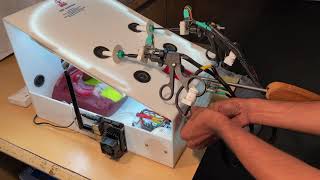
In the first iteration, the trainer box is made of a white color acrylic sheet to increase the visibility inside the box. A normal single LED bulb was attached to the holder inside the box to improve the brightness and visibility. We have also used a normal 5 MP camera fixed to the flexible rod which moves in and out to view the movement of the instruments during the surgery. After performing the activities we have concluded that light inside the trainer box is not sufficient to have access to each corner, and also the placement of light is not correct because it takes much space inside the box. After continuous use due to an increase in temperature, the circuit board wires inside the box were getting heated up. Secondly, the camera which was selected was not good enough in terms of resolution and quality of the video to view on a bigger screen. Thirdly, wires connected to the circuit board and instruments were clumsy and the user felt uncomfortable and weighed, which creates difficulty in handling the instruments. To overcome these design flaws we have modified the design in the second iteration.
In the second iteration, a single LED bulb was replaced with LED strip and it was placed around the trainer box on the upper surface to improve the visibility and to reduce space consumption. Due to this modification, we were able to place all the circuit boards inside the box and the user felt the greater accessibility to every part inside the box. The 5 MP camera present in the older version was replaced with a 12 MP camera and connected to the CPU which then wirelessly streams the feed to the AR headset. The wiring is bundled with flexible hosing to prevent obstruction and is screwed into the trainer. It is then carefully mapped to a circuit that connects to a micro-controller. A new PCB was designed and printed (a single board which connects all the instruments to the CPU) to carefully map all the wires that connects the instruments to the micro-controller. This modification later helped to reduce overall weight on the instruments and difficulty in using laparoscopic instruments.
The combination of IMU and TOF sensors for Instrument position estimation is an affordable solution as opposed to expensive cameras and the computational complexity that follows.
In the early stages of development, the IMU sensors used didn’t prove to be reliable, with the introduction of BNO055 a 9DOF system on chip enclosing a 3 axis Accelerometer, 3 axis Gyroscope and a 3 axis Magnetometer, various issues related to sensor fusion and calibration were resolved. Consequently, the position information gave way to extract numerous features for the Self-assessment module.
This milestone in development allowed us to embed an encoder to track the state of the instrument tip and a capacitive force sensor to extract the pressure profile of the user. Furthermore, the information from these sensors proved to be valuable in assessing the performance of the user. Once calibrated during Power-ON the system can function seamlessly and whenever there is little or no movement, the system self-calibrates to provide the accurate information that is necessary for the overall functionality of the system.
The computation for attitude and position estimation is taken care of by the STM32 based controller and provides fresh data every 5 ms. The fused data from all the sensors are used for extracting features in real-time. The instruments are designed to be modular and can be quickly interchanged to adapt to the needs of the exercise.
Synthetic organ used in the present simulator is commercially available and procured from Simu Lab Corporation. Two models that we have used are Replaceable Gallbladder and Laparoscopic Cholecystectomy Model.
b. Training Modules
In the first iteration, acrylic-based single task table was developed in which only two training modules were able to perform. During the training activity, after completing each module, the whole table was replaced with a new table to perform the next module. Users felt every time replacing the whole table is not economical and it was taking more time to prepare the platform for the next module. To place the thermocol beans and rubber, small bowls were placed over the platform and it was affecting on calibration and accuracy of the sensors. To overcome all these difficulties, in the next stage whole platform was modified and tested.
In the second iteration, the universal task table is designed to fit different activity pads in the same table. This modified version reduces the overall cost and time for fabricating a new table for each particular module instead it allows fitting a small pad on which activity can be designed. There is a small slot provided in which activity pad can be placed and locked in all the direction to restrict the table movement. Two small pockets are given on the table which is used to place the instruments for calibration. This indigenously designed and developed table can be easily 3D printed and assembled by following the instruction provided on our page. Files related to the task table in 3D printable format are also attached to the page. The overall dimension of the task table is 0.3 m X 0.247 m X 0.025 m and the activity pad is 0.148 m X 0.148 m within this dimension any type of activity can be designed which may help to improve the surgical skills.
c. ATTINA Headset
The ATTINA headset is a low-cost 3D printable AR headset with the ability to print and assemble right at home using off-the-shelf parts and it doesn’t require any technical skills to assemble it. Most of the headset parts are 3D printable and respective CAD models are designed in CAD software and few components such as a reflective combiner, and a welding gear harness serving as the head strap are commercially available. The smartphone's display reflects off the combiner and into the user's eyes—a wireless remote act as a laser pointer to interact with the UI.
The headset design is finalized after four iterations. In every iteration, we tried to reduce the overall weight of the headset and to control the image distortion. After the market survey on various AI headsets available in the market, we have decided to develop a new design that can be 3D printed easily and assembled for few dollars. In the first iteration compression, the spring type of technique was used for mobile mounting and mobile was kept inclined at an angle of 45°. During the assembly, we have observed distorted images on the reflector and difficulty in placing the smartphone. After careful observation, we have modified the design and introduced a new type of mobile holder with a reduced inclined angle of the mobile to 35°. But the weight of the headset and distortion of the image was still more. To overcome this in the next iteration we have modified the design and removed unwanted material from the headset and kept the reflector close to the mobile. After using the headset for few days we experienced further scope for weight reduction and image resolution. In the fourth iteration, most of the design flaws were carefully taken into account during the design phase. The finalized design is cost-effective, easy to assemble and flexible enough to insert any smartphone available on the market.
Our low-cost simulator is a highly innovative and compact system comprising smart laparoscopic instruments, a wide-angle camera capable of streaming HQ video wirelessly, a mini-computer, and a silicone model for performing Laparoscopic Cholecystectomy. The highlight of this system is its potential to track the smallest of hand movements through its advanced yet inexpensive sensors. We can capture metrics such as their position in 3D space, their acceleration and velocity, insertion length, force applied on the tissue, and lastly, opening and closing of the clamps. An AI model compares these metrics to datasets captured from experts and assigns a score to the trainee.
Furthermore, we give users the choice to use Augmented Reality as the visualization medium, which allows them to place the virtual content at any comfortable location in their field of view. The user will experience lesser neck strain through this feature than when looking at a conventional display while performing the surgery.
Module I is educational videos gives information on basics to advanced laparoscopic techniques and different instruments. Module II is application based where trainer can easily download our app and practice surgical techniques virtually both the modules are available on internet
Module III: Aim to make the trainer is available on internet. The details which include 3D models, downloadable software, hardware design and video to make and assemble, it is available on the net.
Besides they can have readymade trainers from vendors, whom we can guide them to. We can also have a video call and guide anyone to make the product.
There are videos of task based exercises which are self-explanatory and trainers can watch these videos and practise task based exercises which will help them in skills acquisition.
Base on their budget, we have offered various skills assessment modules:
Recording their practice sessions and evaluating their skills based on metrics, that we have mentioned. This is a very simple skill scoring (assessment) module for self-assessment.
If they can mount sensors on the instrument and have the PC board made, they will get an assessment of their performance via an E-mail at the end of the exercise.
If they are using the “ATTINA” headset they will get a real time skill score display on the headset while performing the task based exercises.
In this simulator, sensors used for assessment there is good standardization of their skills assessment and the scoring is quite accurate.
Since the practice environment is similar to what is done during live surgery, regards to the space of operation, type of activities and the instruments used to perform the procedure. The scoring of skills in the endotrainer is bound to translate to performance of the surgery in the operating room.