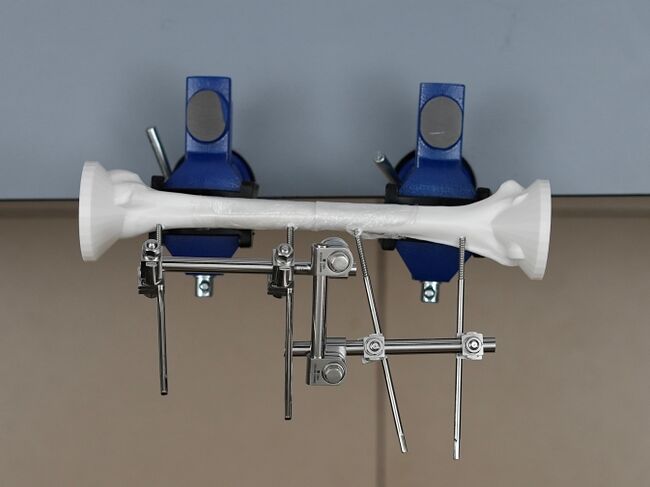
This module allows medical officers and surgeons who are not orthopedic specialists to become confident and competent in irrigation and debridement, powered and manual drilling, positioning and correctly inserting Schanz screws, and constructing the rod-to-rod modular frame as part of external fixation procedures for open humeral shaft fractures performed in regions without specialist coverage. To maximize patient safety, this module teaches learners to use a powered drill to insert self-drilling Schanz screws through the near cortex and then manually advance Schanz screws into the far cortex to avoid plunging.
Learning Objectives[edit | edit source]
By the end of this module, learners will be able to:
- Perform modular external fixation of an open humeral shaft fracture.
- Understand this module's training content on modular external fixation of an open humeral shaft fracture and can demonstrate it to others.
- Verbally explain the objectives and principles of modular external fixation of an open humeral shaft fracture.
- Verbally explain the sequence and interrelationship between each procedural step of modular external fixation of an open humeral shaft fracture.
- Precisely imitate the instructed steps and actions of modular external fixation of an open humeral shaft fracture.
- Smoothly complete the operation steps of modular external fixation of an open humeral shaft fracture.
- Monitor their modular external fixation of an open humeral shaft fracture for improvements.
- Monitor their modular external fixation of an open humeral shaft fracture operations and make proper adjustments as needed.[1]
External Fixation of Open Humeral Fractures[edit | edit source]
- External Fixation Principles and Overview
- The Use of External Fixation in the Emergency Department
- Basic Technique in Adult Fracture Care - Modular External Fixation
Modular External Fixation of Open Humeral Shaft Transverse Fractures[edit | edit source]
- Simple, Transverse Humeral Fracture Indications - Modular External Fixator (please scroll down to Modular External Fixator and click on "Read full indications")
- AO Surgery Reference: Safe Zones in the Humerus for Percutaneous Pins or Screws
- Basic Treatment Techniques for Simple, Transverse Humeral Fractures - Modular External Fixation
Surgical Safety Checklist[edit | edit source]
- World Health Organization Surgical Safety Checklist (available in Arabic, Chinese, English, French, Russian, Spanish, Portuguese, Farsi, German, Italian (draft), Norwegian, Nynorsk, and Swedish)
Procedure Checklist[edit | edit source]
Please print out the Procedure Checklist below and write your name, your assistant's name, and date of training at the bottom of the Procedure Checklist.
It's highly recommended to: (i) print off this checklist and review it before the surgical case, (ii) bring it to the operating room and have an non-sterile operating room staff member read out and complete this checklist to verify that all steps are properly performed during the actual clinical procedure, (iii) file the completed checklist in the patient's medical record, and (iv) save a copy for your training records.
| # | Self-Assessment Checklist | Check the most appropriate response |
|---|---|---|
| 1A | Wore proper eye protection and gloves |
Done Correctly Done Incorrectly Not Done |
| 1B | Performed irrigation using an average of 3L of irrigation solution for each successive Gustilo Type (i.e., 6L for Gustilo Type II open tibial fracture and 9L for Gustilo Type III open tibial fracture) |
Done Correctly Done Incorrectly Not Done |
| 1C | Debrided all foreign material and non-viable tissue |
Done Correctly Done Incorrectly Not Done |
| 2A | Inserted the Schanz screws into the safe zones of the humerus by placing the pins anterolaterally in the proximal fragment and laterally in the distal fragment when the patient is supine |
Done Correctly Done Incorrectly Not Done |
| 2B | Positioned the “far” Schanz screw (furthest from the fracture line) in the proximal fragment 7 cm below the acromion while avoiding traumatized soft tissues |
Done Correctly Done Incorrectly Not Done |
| 2C | Placed the two “near” Schanz screws (closest to the fracture line) at least 2.0 cm (a finger breadth) from the fracture line while avoiding traumatized soft tissues |
Done Correctly Done Incorrectly Not Done |
| 2D | Placed the "far" Schanz screw in the distal fragment at least two fingers’ breadth proximal to the lateral epicondyle to avoid entry into the elbow joint |
Done Correctly Done Incorrectly Not Done |
| 2E | Used a 22 blade scalpel to make a stab incision in the skin overlying the anterolateral wall of the humerus for the near and far Schanz screws in the proximal fragment and used dissecting scissors to spread the soft tissue apart in each incision to expose the bone for drilling |
Done Correctly Done Incorrectly Not Done |
| 2F | Used a 22 blade scalpel to make a lateral skin incision large enough to accommodate two pins and permit palpation and/or direct visualization of the radial nerve in the distal fragment and used dissecting scissors to spread the soft tissues apart in the incision to permit the practitioner to palpate and/or visualize the radial nerve, and to expose the bone for drilling |
Done Correctly Done Incorrectly Not Done |
| 2G | Inserted pins in divergent directions in the distal fragment to minimize the size of the incision while permitting better control of displacing forces to optimize stabilization of the reduction |
Done Correctly Done Incorrectly Not Done |
| 3A | Prepared the powered surgical drill for use by inserting a Schanz screw into the powered surgical drill, inserting the chuck key into the opening in the drill, turning the chuck key clockwise to tighten the drill over the Schanz screw, and then engaging the switch for forward drilling direction |
Done Correctly Done Incorrectly Not Done |
| 3B | Confirmed that the drill is ready for use by pressing the on/off trigger and observing that the Schanz screw tip is rotating clockwise when the drill is pointing forward |
Done Correctly Done Incorrectly Not Done |
| 3C | Used the properly sized drill sleeve, placed the drill sleeve with the trocar directly on the near cortex, removed the trocar from the drill sleeve, inserted the Schanz screw into the drill sleeve, and placed the Schanz screw tip directly on the near cortex of the humerus |
Done Correctly Done Incorrectly Not Done |
| 3D | Used the properly sized drill sleeve, placed the drill sleeve with the trocar directly on the near cortex, removed the trocar from the drill sleeve, inserted the Schanz screw into the drill sleeve, placed the Schanz screw tip directly on the near cortex of the humerus, and held the drill sleeve directly on the cortex to protect the surrounding soft tissues when drilling |
Done Correctly Done Incorrectly Not Done |
| 4A | Directed an assistant to perform irrigation with a syringe while drilling |
Done Correctly Done Incorrectly Not Done |
| 4B | Placed each Schanz screw tip on the near cortex of the humerus, started drilling with the screw tip rotating in a clockwise direction, and ensured that the tip did not slip on the near cortex |
Done Correctly Done Incorrectly Not Done |
| 4C | Power drilled all four Schanz screws through the near cortex and used tactile and acoustic feedback to stop drilling after passing through the near cortex and before or when the inner surface of the far cortex was reached |
Done Correctly Done Incorrectly Not Done |
| 5A | Inserted the chuck key into the opening in the drill, turned the chuck key anticlockwise, detached the drill from the Schanz screw, and removed the drill sleeve from the Schanz screw |
Done Correctly Done Incorrectly Not Done |
| 5B | Slid the universal chuck with T-handle over each Schanz screw, and tightened the chuck over the Schanz screw by manually rotating the proximal part of the chuck clockwise or by inserting the chuck key into the opening in the chuck and turning the chuck key clockwise |
Done Correctly Done Incorrectly Not Done |
| 5C | Used the universal chuck with the T-handle to turn each Schanz screw clockwise for one to two 360 degree rotations to anchor the screw tip into the far cortex without exiting the far cortex |
Done Correctly Done Incorrectly Not Done |
| 5D | Detached the universal chuck with T-handle from each Schanz screw by manually rotating the proximal part of the chuck anticlockwise, or by inserting the chuck key into the small, circular opening in the chuck and turning the chuck key anticlockwise |
Done Correctly Done Incorrectly Not Done |
| 6A | Applied the pin-to-rod clamps to connect the two Schanz screws in each fragment to a 150 mm rod |
Done Correctly Done Incorrectly Not Done |
| 6B | Tightened the pin-to-rod clamps initially by hand and then applied and turned the 11 mm spanner with T-handle wrench clockwise for final tightening |
Done Correctly Done Incorrectly Not Done |
| 7A | Applied the rod-to-rod clamps to loosely fix the 100 mm connecting rod to interconnect the two 150 mm rods for the proximal and distal fragments |
Done Correctly Done Incorrectly Not Done |
| 8A | Used the two 150 mm rods as handles to manually reduce the fracture and adequately restore alignment
|
Done Correctly Done Incorrectly Not Done |
| 8B | Manipulated the two near Schanz screws to compress the fragments together
|
Done Correctly Done Incorrectly Not Done |
| 9A | Used an assistant to stabilize the reduced and compressed fracture while using the spanner with T handle wrench for final tightening of the rod-to-rod clamps around the 100 mm connecting rod |
Done Correctly Done Incorrectly Not Done |
| 9B | Verified the reduction visually, to confirm whether alignment has been adequately restored
|
Done Correctly Done Incorrectly Not Done |
| 9C | If required, adjusted the fragments to achieve an adequate reduction
|
Done Correctly Done Incorrectly Not Done |
| 10A | Checked for skin tenting around Schanz screws and if present, widened the stab incision to release soft tissue tension around the pin site |
Done Correctly Done Incorrectly Not Done |
| 10B | Cleaned the extremity and applied sterile gauze dressings to all four pin sites |
Done Correctly Done Incorrectly Not Done |
| 10C | Re-evaluated the Gustilo open-fracture classification in the operating room, and updated the antibiotic regimen and surgical treatment plan accordingly |
Done Correctly Done Incorrectly Not Done |
| 11A | Provided specific, clear, and concise directions to the assistant during the clinical procedure |
Done Correctly Done Incorrectly Not Done |
| 12A | Photographed this completed and signed procedure checklist on a cellphone as a backup and filed this original completed procedure checklist in your training records. |
Done Correctly Done Incorrectly Not Done |
Surgical Practitioner's Nameː
Surgical Practitioner's Signature:
Assistant's Nameː
Assistant's Signature:
Procedure Start Time:
Procedure End Time:
Date of Procedureː
Safe Zones of the Humerus[edit | edit source]
- Insert the far Schanz screw in the proximal fragment 7 cm below the acromion to avoid injuring the axillary nerve.
- Insert the far Schanz screw in the distal fragment at least two fingers’ breadth proximal to the lateral epicondyle to avoid entry into the elbow joint.
Intra-Operative Assessment[edit | edit source]
The Gustilo open-fracture classification for the injury should be re-evaluated after debridement in the operating room, and the antibiotic regimen and surgical treatment plan updated accordingly.[2][3][4][5]
Gustilo Open-Fracture Classification[3][4]| Gustilo Type I: | An open fracture with a wound less than 1 cm long and clean. |
| Gustilo Type II: | An open fracture with a laceration more than 1 cm long without extensive soft tissue damage, flaps, or avulsions. |
| Gustilo Type IIIA: | Adequate soft-tissue coverage of a fractured bone despite extensive soft-tissue laceration or flaps, or high-energy trauma irrespective of the size of the wound. |
| Gustilo Type IIIB: | Extensive soft-tissue injury loss with periosteal stripping and bone exposure. This is usually associated with massive contamination. |
| Gustilo Type IIIC: | Open fracture associated with arterial injury requiring repair. |
If the injury is re-classified to a Gustilo Type IIIB or Type IIIC, the patient should be referred to a tertiary center with specialist care. A Gustilo Type IIIC injury is a surgical emergency.
Verify the reduction visually to confirm whether alignment has been adequately restored
- > 50% bone apposition
- < 15° malrotation (at 0° of rotation the patient's palm is facing straight up towards the ceiling when the patient is supine and the forearm is supinated)
- < 20° anterior angulation
- < 30° varus/valgus angulation
If the reduced humeral fracture is not within acceptable parameters, the fracture fragments must be re-adjusted in the operating room.
All pin sites will be inspected for skin tenting.
If skin tenting is present, the stab incision should be widened to release any soft tissue tension around the pin site to reduce the risk of inflammation and pin infection.[6]
Acknowledgements[edit | edit source]
This work is funded by a grant from the Intuitive Foundation. Any research, findings, conclusions, or recommendations expressed in this work are those of the author(s), and not of the Intuitive Foundation.
References[edit | edit source]
- ↑ Adapted from the L-SES (Learning Self-Efficacy Scale) for Clinical skill assessment described in Kang Y-N, Chang C-H, Kao C-C, Chen C-Y, Wu C-C (2019) Development of a short and universal learning self-efficacy scale for clinical skills. PLoS ONE 14(1): e0209155. https://doi.org/10.1371/journal.pone.0209155
- ↑ https://surgeryreference.aofoundation.org/orthopedic-trauma/adult-trauma/further-reading/principles-of-management-of-open-fractures?searchurl=%2fSearchResults#classification-of-open-fractures
- ↑ 3.0 3.1 Gustilo RB, Anderson JT. Prevention of infection in the treatment of one thousand and twenty-five open fractures of long bones: retrospective and prospective analyses. J Bone Joint Surg Am. 1976 Jun;58(4):453-8. PMID: 773941.
- ↑ 4.0 4.1 Gustilo RB, Mendoza RM, Williams DN. Problems in the management of type III (severe) open fractures: a new classification of type III open fractures. J Trauma. 1984 Aug;24(8):742-6. doi: 10.1097/00005373-198408000-00009. PMID: 6471139.
- ↑ Garner MR, Sethuraman SA, Schade MA, Boateng H. Antibiotic Prophylaxis in Open Fractures: Evidence, Evolving Issues, and Recommendations. J Am Acad Orthop Surg. 2020 Apr 15;28(8):309-315. doi: 10.5435/JAAOS-D-18-00193. PMID: 31851021.
- ↑ https://surgeryreference.aofoundation.org/orthopedic-trauma/adult-trauma/tibial-shaft/simple-fracture-transverse/modular-external-fixator#aftercare-following-external-fixation


