The Emergency Solar Battery Box was created at the request of Appropedia. The objective of this project is to provide an affordable and reliable source of clean power, a form of power storage, and a collection of emergency response information in the case of shelter-in-place emergencies, such as natural disasters, when power is often lost. This project was designed and created by Elemental Solar, a team of students; Emily Handy, Justin Romani, and Sol Wright; from Cal Poly Humboldt for the Spring 2022 Engr205 Introduction to Design course.
Background[edit | edit source]
At the beginning of the semester, Appropedia presented multiple different proposals for design projects that featured solar components and were affordable and relatively easy to construct, including DIY air filtration systems and portable solar emergency kits. Elemental Solar chose to design a solar kit intended for use at home in the case of rolling blackouts, smoke events, earthquakes, or any other disaster situation where power might not be available otherwise. We spoke with Emilio Velis, the executive director of Appropedia, in order to determine what we should consider in our design.
Problem Statement[edit | edit source]
The objective of this project is to create an affordable photovoltaic system that can easily be stored when not in use and deployed to dependably generate and store energy in the case of shelter in place emergencies, while also providing storage for printable contact lists, emergency preparedness and natural disaster response materials, and other emergency items.
Shown below is a table of the criteria we generated for our design, weighted by their importance as we determined during our design process.
| CRITERIA | DEFINITION | WEIGHT |
| Emergency Application | Generates and stores electricity and powers loads when deployed, provides useful information for natural disaster response | 10 |
| Reproducibility | Constructed of readily available materials, straightforward assembly and use | 9 |
| Cost | Costs $425 or less | 8 |
| Reliability | Fully functional when deployed, will not fail | 8 |
| Accessibility | Affordable; not too heavy; easy to understand, construct, and maintain | 7 |
| Aesthetic Appeal | Not unsightly when in use, storable when not in use | 4 |
Prototyping[edit | edit source]
-
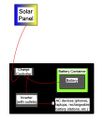
A very simple diagram of the electrical components to be included in a prototype.
-
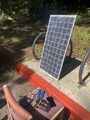
A picture of a prototype including the solar panel and electrical parts sitting on a chair - along with a phone being charged by the setup!
-
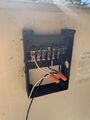
A picture of the wiring of the solar panel set up in parallel.
-
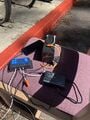
A picture showing the electrical components of our prototype, with a charging phone.


Final Product[edit | edit source]
WIP
Costs[edit | edit source]
| ITEM | COST |
| LiFePO4 Battery | $49.99 |
| Charge Controller | $14.99 |
| Inverter | $17.98 |
| Rechargeable Battery Kit | $14.49 |
| Reclaimed Solar Panel | $0.00 |
| Dremel Cut-Off Wheel | $7.59 |
| Dremel Sandrum | $5.69 |
| PVC Pipe (10') | $35.07 |
| PVC Elbow (2) | $5.38 |
| PVC Cement/Primer | $11.69 |
| PVC Elbow (4) | $10.76 |
| PVC Outlet (2) | $10.78 |
| Hardware | $15.40 |
| Pipe Insulation (3') | $6.29 |
| PVC Pipe (3') | $4.38 |
| Wire Connectors | $5.60 |
| Hardware | $0.60 |
| Vinyl Tubing | $5.30 |
| Epoxy (2) | $13.58 |
| Wire (2) | $22.88 |
| 2-Way DC Connector | $2.39 |
| Fuse Holder | $3.99 |
| Fuses | $3.09 |
| Slide Terminal | $6.69 |
| Acrylic Sheet | $12.74 |
| Plastic Cutter | $7.30 |
| Heat Shrink | $7.80 |
| Sandpaper | $2.54 |
| File | $7.59 |
| TOTAL | $312.57 |
Construction[edit | edit source]
Electrical Set-up[edit | edit source]
- Cut wires to appropriate lengths and strip the ends
- Use different color wires to help differentiate between positive/negative
- Using connectors, connect fuse holder to positive wire between the charge controller and battery. Insert fuse
- Attach disconnects to positive and negative wires leading to battery. Attach disconnects to respective terminals
- Attach wires to solar panel at respective (terminals?)
- Use connector to connect both outputs from panel to wire leading to charge controller
- Strip wire included with inverter to expose the positive red sealed wire and other exposed negative wire. Using connectors, attach there wires to respective wires to charge controller
- Check charge controller to ensure solar panel connected
Frame Assembly[edit | edit source]
Printables and Emergency Items[edit | edit source]
Print recommended materials while assembling the Emergency Solar Battery Box. Fill out the contact sheet with as much information as possible. Place all print outs in the storage container to be referred to in case of emergencies. Place any other items you choose to keep in the box as well (e.g. medications, copies of important documents, etc).
Operation[edit | edit source]
This section will explain how to use the Emergency Solar Battery Box.
Panel and Electrical[edit | edit source]
Once the frame is assembled and the electrical components are ready to use, find a location outside with relatively level ground that receives as much sun as possible throughout the day. Set the frame here. Then, place the solar panel on the frame. Adjust the angle of the frame so that sunlight is hitting the frame as directly as possible so as to maximize the output of the panel. Based on the length of the cable used to connect the panel to the charge controller, find a convenient location to set the battery box inside your house. This can be either near a window or a door that can be kept open (such as a garage door or door to a sunroom etc.) so that the cable can be run into the house without interruption.