This training module is intended for use by Foothill College EMT students to train to administer COVID-19 vaccine under the supervision of EMS Faculty in volunteer vaccination clinics. Authorization for EMTs, Paramedics and EMS students in a EMT or Paramedic training program to draw up and administer vaccine via IM injection is subject to Medical Direction and Authorization on a county by county basis.
Prepare your work area[edit | edit source]
- Wash your hands with soap and warm water (or hand sanitizer if water is not available) put on respirator, any other PPE (face shield, gown etc.) as required by the vaccination site where you are administering the vaccine, and don gloves
- Gather all needed supplies at your vaccination station:
- needles and syringes
- vaccine vials
- vaccine record cards and pen
- alcohol pads
- gauze
- red, plastic sharps container
- bandages
- box of gloves
- disinfectant for work space
- hand sanitizer
In general for IM (intramuscular) injections you would use a 21 to 23 gauge needle:
- 1" Minimum generally for adult patients under 200 lbs
- 1.5-2" long for an adults over 200 lbs.
- In a smaller child you use a 1 inch long, 25 to 27 gauge needle.
In general, although they may look more alarming to the patient, longer needles hurt less, cause fewer local reactions and assure proper route and dose.
Prepare your patient[edit | edit source]
- Check the "Five Rights" of delivering medications (in this case, 6)
- Right Patient: If not already done as part of the intake processing for the patients, check the patient's age, occupation and medical eligibility to receive the vaccine, that if it is a second dose that the correct amount of time has elapsed since the first dose (28 days for Moderna, 21 days for Pfizer-Biontech), and that their name matches a government provided form of ID. Always follow the protocols of the county in which you are administering the vaccine.
- Right Drug: At present, Moderna and Pfizer two-dose regimens and J&J single dose regimen vaccines are approved under FDA Emergency Use Authorization for administration in patients 18 and older, Pfizer may be administered to patients 16 and older. If the patient has already received a first dose, verify that they are receiving the second dose of the SAME vaccine.
- Right Dosage: Moderna 0.5mL per dose (10 dose vials), Pfizer-Biontech 0.3mL per dose (6 dose vials which must be prepared with a diluent of 1.8mL 0.9% sodium chloride (normal saline, preservative-free)), J&J 0.5mL per dose (5 dose vials)
- Right Route: intramuscular injection in the deltoid
- Right Date: Ensure the medication is not expired, and is inside the time limit since opened/diluted. There is a strict 6 hour limit for both the Moderna and Pfizer-Biontech vaccines.
- Right Documentation: Ensure that the patient has a vaccine card already if this is their second dose, and it is filled out with the vaccine type, lot number and date administered. Record the data for this injection in the clinic's system. It is required that COVID-19 vaccination providers must document vaccine administration in their medical record systems within 24 hours of administration and use their best efforts to report administration data to the relevant system for the jurisdiction (i.e., immunization information system) as soon as practicable and no later than 72 hours after administration.
- Explain the procedure to the patient.
Draw up vaccine[edit | edit source]
- Assemble a fresh, sterile syringe and needle
- Swirl the vial gently to ensure that it is well mixed - DO NOT SHAKE as this introduces bubbles
- Remove the cap on the vial of medication, take a note of when the vial was first opened.
- (Add diluent and prepare as locally directed if administering Pfizer-Biontech vaccine.)
- Every time you draw from a vial, clean the rubber stopper with an alcohol swab. (unless otherwise directed by local protocols, perform 3 separate single swipes of the alcohol pad over the rubber stopper using 3 different corners of the pad to perform each swipe)
- Draw back the plunger to fill the syringe with air up to the dose that you'll be injecting. (This is done because the vial is a vacuum and you need to add an equal amount of air to regulate the pressure. This also makes it easier to draw the medication into the syringe.)
- Remove the cap from the needle, push the needle through the rubber stopper at the top of the vial, and inject all of the air into the vial.
- Turn the vial and syringe upside down so the needle points upward and is completely submerged beneath the level of the fluid. Pull back on the plunger to withdraw the correct amount of medication, withdraw the needle from the vial, and set the vial aside for drawing later doses.
- Still holding the needle upright, tap the syringe on its side to dislodge any bubbles to the top and gently depress the plunger to push the air bubbles out.
Perform the Injection[edit | edit source]
- Locate injection site - Vaccinations are typically given in the central/thickest part of the deltoid muscle on the non-dominant arm of the patient. The person receiving the injection should get into a position that's comfortable with the arm turned towards you, and the arm positioned on an armrest or table such that the arm and shoulder muscles are relaxed. (If patient is seated in a car for drive through vaccinations, have the patient cross their arm across the chest at a 90 degree with their hand over their stomach and support the arm to be vaccinated with the opposite hand)
- Clean the site selected for injection with an alcohol swab (in a circular outward motion) and allow the skin to air dry completely before the injection to prevent it stinging.
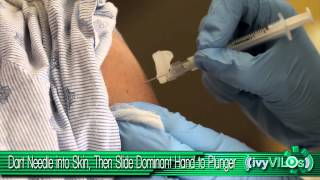
- With two fingers on your non-dominant hand, spread the skin at the injection site slightly. Insert the needle using your dominant hand. Hold the syringe like a dart close to the needle and insert it into the muscle at a 90-degree angle. You should insert the needle in a quick, but controlled manner, and make sure that the needle tip is in the muscle, and not just in the skin or the subcutaneous fat. Do not have your hand in contact with the plunger.
- Stabilize the needle with the non-dominant hand, and with your dominant hand, push the plunger (within 2 seconds) to inject the full dose of vaccine into the muscle.
- Withdraw the needle quickly and discard it into the sharps container. Don't recap the needle.
Aftercare[edit | edit source]
- Use a piece of gauze or your gloved finger to apply light pressure to the injection site.
- Place a small bandage over the site and advise the patient that they may remove it in 15-20 minutes.
- Fill out the patient's vaccine card with the name of the vaccine manufacturer, the lot number of the vaccine, the date of administration, and the clinic site where it was administered. Fill out the back of the card with the return date for the 2nd vaccine (if applicable), and hand it back to the patient. Advise the patient to go wait in the observation area for 15 minutes.
- Advise them that it's normal to experience some discomfort after an intramuscular injection but that they should notify the observers if they experience.
- severe pain at the injection site
- tingling or numbness
- redness, swelling, or warmth at the injection site
- signs of an allergic reaction, such as difficulty breathing or facial swelling
It's also normal to have some anxiety about performing or receiving an injection, especially an intramuscular injection due to the long needle. Read through the steps several times until you feel comfortable with the procedure, practice with the simulators before injecting patients and take your time.
Documentation[edit | edit source]
Documentation of vaccine administration should be included in the Patient Care Report (PCR) in the form:
- TBD
Self Assessment[edit | edit source]
- Practice with saline and the arm simulator until confident and smooth. Your goal is to minimize discomfort and worry on the part of your patient.
- Test your knowledge with this quiz
Tips and Tricks[edit | edit source]
TBD - things to look out for, common mistakes people make etc.
Additional Resources[edit | edit source]
TBD - extra videos to watch, links to other pages for more reading