This article describes the painting, educational signage, and planned hardware for C.C.A.T.'s Mobile Energy On Wheels aka M.E.O.W:
By Alex Buangsuwon for ENST 490s Capstone Student Service learning project.

Background[edit | edit source]
The CCAT MEOW has been an ongoing project since around 2002. After a multitude of engineering project conducted over the years the MEOW
Following the repair of the interior electronics by the 2023 ENG 305 team, the MEOW was nearly complete.
Problem statement[edit | edit source]
The objective this project is to further pursue working on the CCAT MEOW (Mobile Energy Operation Wagon) as part of my service-learning capstone project. Last year, I was apart of the engineering team that worked on the MEOW during Spring of 2023. Following that project we mostly succeeded in fixing the MEOW into working order, but we never completed all the goals we set out to complete. For this service learning capstone project, I want to finish all the goals we set out to complete.
Goals for MEOW Capstone[edit | edit source]
- Paint exterior, and interior floor.
- Print and install large signs/MEOW infographics.
- Introduce the project idea of a photosensor, and describe it: A photosensor will allow the MEOW to automatically turn itself on/off to conserve energy at night or during rain storms.
- Create this Appropedia page.
- Create multiple community engagement opportunities.
Mural Description[edit | edit source]
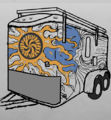
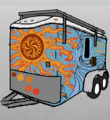
One of the main goals I had for this mural was to create a piece that grabs the attention of the viewer, while demonstrating the main themes of the MEOW without the use of direct engagement. I wanted to use bright positive colors to support this goal, and have the trailer itself standout, yet blend in with the rest of CCAT. In order to fulfill these goals I broke the MEOW mural into three main segments. The first segment was the front of the trailer, or the CCAT Sun as I like to call it. The CCAT sun is a take on the main component of this project, in which the act of harnessing energy from the sun in order to generate power is demonstrated. Another reason for the CCAT Sun is to pay respects to the past CCAT Logo and its history, as a Sun was apart of CCAT's original logo design. I thought it would be fun to incorporate it into the final design of the MEOW, (also I've always wanted to paint flames on a moving vehicle, or anything with wheels, so I'm glad I was able to fulfill this childhood dream) The CCAT Sun starts at the very front of the MEOW, and wraps around both the left and right main walls, stopping about halfway across the left wall, and 1/3 across the right wall. The second segment follows the flow of the first and is located on the second half of the left main wall of the trailer. The Title, and wave design. I wanted to add the CCAT and MEOW abbreviations as well as their full written names to this side of the trailer as it is the easiest to see from all angles, and helps the viewer understand what they are looking at. The wave design under the title is an abstract piece to support the overall flow of the imagery, and add artistic flair to the painting. Last but certainly not least segment is located at the back of the MEOW. The Back of the trailer features two swing out doors, that support another main theme of this project, cats! The Co-directors and I agreed that cats would absolutely need to be features somewhere in this project. So saving the best for last, the back left door features 3 different cats on it, these three cats are real cats, and the the first 3 cats to have officially lived in the CCAT BUCH House with their Co-director owners. The top cat is Sassy, the first cat to live officially in the house, belonging to Co-director Cody Ellis Spring 22 - Fall 23, The middle Cat is AJ, the second cat to officially live in the house belonging to Co-director CJ Paulsen Fall 23 - Spring 24, and the Last cat on the Bottom is Basil the Third cat to live in the house, belonging to Co-director Natalie Luna Fall 23 - Spring 24. This door also features a rat in the bottom left corner, and a feather in the top left corner that Sassy is playing with. The right door features all the credits of the mural on the bottom, a few cute fish, and a very large black cat. This cat does not have a designated owner, but likes to hangout in the garden, and we believe her name is Nova. Lastly this door contains the arm of an orange cat playing with some orange yarn at the top of the door. The orange cats coat and color are based off a friends cat, his name is ''Honey''.
Prototyping[edit | edit source]
Photos:
-

-
-
-

MEOW first sketches, to complete prototype and color palet.


Painting/Construction[edit | edit source]
Photos[edit | edit source]
Videos:
The first step of the MEOW mural was to sand the entire wagon. I first began by sanding the outside by hand, although this was taking far too long, so i opted to sand the outside with an orbital sander. I used 180 grit sandpaper to smooth the interior and exterior. The goal wasn't to remove the past paint, but to instead smooth the surface to prepare it for priming.
After fully sanding down the MEOW, I began to tape off all the metal and plastic components on the exterior of the trailer (I ended up painting over a few of these parts, but went back later to clean them off). Next I applied two coats of 123 Primer to the exterior of the trailer with a roller and brush, ensuring the whole thing was covered well.
Once the Primer was completely dry I began the exterior color paint job. I used exterior house paint, applying two coats to the entire trailer.
After thoroughly sanding, priming, and painting the exterior of the trailer I set my focus on the interior floor the the MEOW. I first began by removing the old pedal power bike mount that was attached to the floor via screws and nails. I then used an orbital sander to smooth out the floor, and remove large particulates. Next I taped off the edges of the floor and used the same 123 primer to apply two coats to the floor. Next with the help of volunteers we painted the floor grey, as well as the battery case cover grey. Once dry, we coated the floor in a clear coat to seal and protect it.
Following the completion of the exterior paint job I re-visited the floor as the clear coat we applied to the floor made the floor extremely slippery and hazardous. To combat this problem, I utilized a pre-made mix in silicon powder additive to the clear coat, and coated the floor with it. The powder is supposed to help with grip, and give the floor a texture.
After finishing the interior paint job, I shifted my focus back to the exterior of the trailer. For the exterior color, I chose sky blue exterior house paint and gave the whole trailer 2-3 very solid coats of paint. *Note: In the process of buying paint I accidentally bought the wrong color, but instead of returning it, I opted to use it in the mural process to block in colors.
A large portion of this project was painting out the entire mural on all sides of the trailer. For this process I opted to use acrylic paint for a few reasons. While acrylic paint is not the most environmentally friendly option, it is both easy to work with, and is more resilient to UV and weathering compared to natural pigments. Furthermore, since the MEOW is mobile the paint job needs to withstand the forces of driving on the road/highway. For these reasons is why i opted to use acrylic paints as I believed it was the most appropriate paint for longevity, and operations of the MEOW.
To assist the process of painting this mural I decided to break the painting into three main segments, the front, south side, and back. I opted to design all sides of the MEOW first on paper, then I scanned the drawings into photoshop to work on color blocking, and determine scale. Once I was happy with the digital version I would use the digital image as a reference, and free-hand the image onto the side of the trailer with a pencil. Once I felt happy with the sketch I would begin to block in my colors over the drawings. I used this technique for everything except the logo on the front. For the logo I used a projector to project the CCAT logo onto the front of the trailer to scale, then traced the design with a pencil then painted over it. Aside from strictly acrylic paint I also used acrylic paint pens to work on detailed aspects of the painting.
After finishing the painting process I used a clear coat to finish the seal the mural, the clear coat dries in a satin finish which give the paints a vibrant and colorful finish.
Marcome
- Leaking Ceiling: When working on the interior of the trailer, I noticed two small holes in the ceiling dripping water all over the ground. I sealed the holes with caulking, and it seemed to fix the leak. - Tape Issue: While painting the MEOW I accidentally left tape from detailing out in the rain, which led to the tape disintegrating and fully sticking to the metal. This was extremely difficult to remove, needing to use, goo-gone, vinegar, alcohol, WD-40, and razor blades to remove. Adding lots of time and work. (don't do that) - Caulking: I needed to use clear caulking to re-water seal parts of the trailer and re-apply it to parts of the MEOW to fix parts. (This wasn't in the initial plan, but still needed to be completed) -