
Abstract
The purpose of this watershed model is to build an interactive watershed model with components of pollution to demonstrate and educate 6th to 7th graders of Zane Middle School (ZMS) how a watershed works and its impact on the environment. The A-Team has researched and designed an upcycled watershed model for the students that is also interactive, so the students can be engaged when using the watershed model. The Watershed Project was a collaborative effort by the A team, Joan Crandell (ZMS point person), and Camille Penny.
Background
The A-Team is a group of Cal Poly Humboldt Students in Engineering 215-Introduction to Design during Spring of 2016. HSU and Zane Middle School have established a partnership with the purpose of promoting greater interest and education in science, technology, engineering, arts, and math for students and the community. The Watershed Model project requirements are to design and construct an interactive watershed model for Joan Crandell to be used by the students of Zane Middle School in Eureka, California. The Watershed Model will serve as a visual learning aid for students to learn about the importance and the function of watersheds.
Problem statement and criteria
The objective of the Watershed Model project was to build an interactive watershed model that will engage the students of Zane Middle School to learn and understand how a watershed works while demonstrating how components of pollution move through the watershed. The outcome of this project is to show the students the impacts of pollution and taking out natural filtering systems such as wetlands and marsh areas. The watershed model will be built on a 3' by 2' wooden platform with a water tray catchment system. Table-1 indicates a list of criteria that was created by the members of the A team and approved by Joan Crandell. These criteria were weighted, based on the importance of the criteria, to help determine the final design that would create the most effective interactive watershed model for the students.
Table-1: Criteria
| Criteria | Importance | Constraints |
|---|---|---|
| Educational | 10 | Students understand how a watershed works and pollution impact. |
| Durability | 10 | Must be able to last for at least 5 years. |
| Consistency | 9 | Should produce the same results. |
| Ease of Use | 7 | Students able to interact with the model with very little problems. |
| Cost | 6 | Less than $100 per member. |
Description of final project
Interactive Watershed Features
Foundation
The foundation is made of 2 by 4 inches pine wood cut into varied lengths as seen on the AutoCAD drawing in Figure-3. It holds a 3 by 2 feet platform that is cut into two pieces to accommodate for the slope so that the water may flow smoothly down the watershed. The wood connecting the platform was added later for more support. Once the foundation was built, the river was etch into the wood.
Mountains
The mountains are made from chicken wire, which were shaped into mountains. After that, fiberglass was used to mold the mountains with the chicken wire. Once the fiberglass dries, lacquer was added to the mountains for a smooth finish.
Buildings
The buildings were made of up-cycle materials, mainly milk cartons, and then were painted. The straws inside the buildings was added as a way for the students to add pollution (food-dye) that will come out of the buildings to demonstrate point pollution.
Tray Holder
Under the platform of the foundation, a tray holder is placed under at the very end of the river. The tray holder was made of an up-cycle material from a metal construction sign. The tray holder was put into place to hold a tray, brought from Target, that will catch the water once it reaches the end of the water shed model. A drainage hole was drilled near the end of the river, so that the water may fall down into the tray.
-
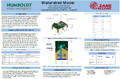
Figure-2: A Team's final poster design.
-
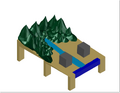
Figure-3: AutoCAD Drawing of Interactive Watershed model.


Costs
-

Figure-4: Hours spent on brainstorming, researching, and implementing our ideas to build the interactive watershed model.

Table-2: Material Cost
| Material | Quantity | Total |
|---|---|---|
| Wooden Plank | 1 | $10 |
| Plywood | 2 | $15 |
| Chicken Wire | 1 | $15 |
| Lacquer | 1 | $9 |
| Milk carton | 2 | Upcycled |
| Glue | 1 | $10 |
| Fiber Glass | 1 | $30 |
| Tray Holder | 1 | Upcycled |
| Straws | 3 | Upcycled |
| Tray | 1 | $5 |
| Paint | 3 | $15 |
| Total w/Tax | $109 |
Table-3: Maintenance
| Task | Frequency | Cost(Minutes) | Cost($) |
|---|---|---|---|
| Clean residue | After every use | 5 | 0 |
| Purchase food dye | When it runs out | 2 | 5 |
Testing Results
The testing of the watershed model went well, but we have found some minor flaws as to the water being poured onto the mountains. We realized that if the students were to pour too fast, it would overflow the rivers and tributaries and push the water out to the sides. This is something we don't want as it can get the classroom messy, especially if there is food dye in the water. We only want it to go to one destination, which is the tray. Overall, the model works very well and all we need to do is to fix this minor flaw and our model is ready to go. The final results were almost perfect, and we determined that there should be minor changes for the interactive model to perform effectively and meet the criteria.
Here is a video of the A team testing and demonstrating their interactive watershed:

How to build

Acquire materials needed for watershed model

Cut 2 by 4 inches of a wood plank into desired lengths to be able to create a platform with slope.

Cut out a wood platform into 3 by 2 feet and then split into two pieces.

Assemble the foundation for the model.

Create mountains out of chicken wire.

create paper mache[1] on to mountains to paint green.

Apply fiber glass[2] to painted mountains

Create tray holder and make a drainage hole on the river.

Paint model.

Apply lacquer to model.

Create buildings with straws coming out of building made of up-cycle materials if possible and apply to model.

Apply any finishing touches and you have a finished model.
How to build a watershed model.
Discussion and next steps
There are a few next steps that can be taken with this interactive watershed model. After the testing of the model, we realized we could create a little barrier or 'hill' so that the water that is running down the mountains goes in the right path and straight down the river. A simple carving into the plywood should do the trick. The mountains and wood should be a cleaned up a bit more for safety precaution so the students don't get hurt while they are interacting with the model.
Overall, we hope the students of Zane Middle school will have a great educational experience with our interactive watershed, with supervision of course.