
The objective of this project was to develop a cost-effective composting system that is durable, educational, and safe for children gardeners to use at Catherine L. Zane Middle School in Eureka, CA. As of spring 2017, teachers at Zane had tried to adopt a couple of different composting systems for the garden, but they had to be removed for a variety of reasons. The school requested a compost system that would be educational, safe, and able to accommodate garden waste, woody debris, and organic waste from the cafeteria. The new composter at Zane Middle School is a 2-bin system. The left-side bin is used for depositing fresh organic matter, while the right-side bin houses maturing compost. The structure is painted with weather-resistant paint, which prevents the wood from warping and postpones its decomposition. It is equipped with educational posters, and is lined with hardware cloth to detour rats. Each bin has a front door to encourage ease of access, although the corrugated steel roof is too heavy. In the future, a plastic or wood roof should be used.
Background[edit | edit source]
Catherine L. Zane Middle School in Eureka, CA focuses their curriculum around science, technology, engineering, art, and math (STEAM), and caters to a diverse group of children. Zane and the Environmental Resources Engineering department at Cal Poly Humboldt have a rich history of partnership around the STEM programs. As of spring 2017, the school had tried a couple of composting systems in the past, but were faced with a variety of problems including rats, the need for excessive maintenance, and destructive children, so they removed the compost altogether.
Problem statement and criteria[edit | edit source]
The objective of this project is to develop a cost-effective composting system that will be strong and safe for the children gardeners to use. This composter will be low-maintenance, simple to use, and will accommodate a variety of garden waste, woody debris, and the occasional organic waste from the cafeteria. The design will ensure the compost is free of pests such as rats and raccoons, and will be sturdy enough to stand up to the test of rowdy middle-schoolers.
| Criteria | Constraints | Weight (0-10 high) |
|---|---|---|
| Pet Resistance | Must be rat-proof | 8 |
| Maintenance | Maximum of five hours of maintenance each week | 5 |
| Durability | Must not be easily altered by middle-schoolers | 6 |
| Safety | Must not be sharp or splintery | 10 |
| Educational Value | Includes an appropriate display for middle-schoolers | 9 |
| Simplicity | The compost must be accessible to the middle-schoolers | 7 |
| Cost | Maximum cost is not to exceed $425 | 4 |
| Aesthetics | The aesthetics must agree with those of the garden and the school | 3 |
Description of final project[edit | edit source]
The new composter at Zane Middle School is a 2-bin system. The left-side bin is a receptacle for fresh organic matter, while the right-side bin houses maturing compost. Each bin has an attached poster that contains information for users about how to maintain the compost, and also a little bit about decomposition.
The structure is 8 feet long, 3 feet deep, and 4 feet high at its highest point. The compost is easy to access through the fold-down doors, and the slanted roof directs rain away from the compost. Together, the bins can reasonably accommodate about 18 cubic feet of compost at any given time. This leaves plenty of room for garden waste, as the only school produces about 12 cubic feet of food waste each year. The bottom is open, which will encourage exchange of decomposer organisms with the environment (like worms). The bottom is lined with 1/4" hardware cloth to keep rats from entering the compost.
-
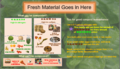
The educational poster on the left-side bin.
-
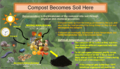
The educational poster on the right-side bin.
-
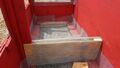
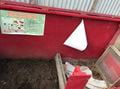
The base is lined with hardware cloth to keep out rats and allow for an exchange of worms and other decomposers with the environment.
-

The doors fold up when the compost isn't being accessed.
-
The composter in the garden at Zane Middle School
-
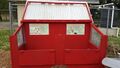
Finished composting bins


Costs[edit | edit source]
The capital costs for the project stayed within the budget of $425. In total, the number of labor hours spent on the design process, from conceptualization to implementation, was 204.
| Quantity | Material | Source | Cost ($) | Total ($) |
|---|---|---|---|---|
| 1 | Corrugated metal, 73 sq. ft. | Arcata Scrap and Salvage | 17 | 17 |
| 2 | Weather-Resistant Paint (quart) | Ace Hardware | 14.37 | 28.74 |
| 1 | Wood Glue | Ace Hardware | 3.99 | 3.99 |
| 2 | Hinge (small) | Ace Hardware | 4.59 | 9.18 |
| 1 | Hinge (large) | Ace Hardware | 5.99 | 5.99 |
| 1 | Corner Brace | Ace Hardware | 5.99 | 5.99 |
| 1 | Mending Brace | Ace Hardware | 7.99 | 7.99 |
| 2 | Hook & Eye Closures (2-pack) | Ace Hardware | 2.59 | 5.18 |
| 4 | 2 x 6 (Doug Fir) | Pierson's | 6.00 | 24.00 |
| 2 | 4 x 8 (Cedar) | Pierson's | 38.89 | 77.78 |
| 7 | 2 x 2 (Cedar) | Pierson's | 2.00 | 14.00 |
| 6 | 2 x 4 (cedar) | Pierson's | 3.84 | 23.04 |
| 1 | 2 x 2 (pine) | Pierson's | 6.98 | 6.98 |
| 20 | Wood Screws | Pierson's | 0.33 | 7.16 |
| 1 | Compost Thermometer | Amazon.com | 22.84 | 22.84 |
| 1 | Galvanized Mesh, 2'x50' 1/4" | Ron's Home and Hardware | 42.37 | 42.37 |
| 1 | Staples for staple gun | Ace Hardware | 4.49 | 4.49 |
| 1 | 5/32" Drill bit | Ace Hardware | 2.59 | 2.59 |
| 1 | 1/4" Nut driver | Ace Hardware | 4.59 | 4.59 |
| 1 | Gasketed screws | Ace Hardware | 9.29 | 9.29 |
| 1 | Mending brace | Ace Hardware | 8.59 | 8.59 |
| 1 | Hinges | Ace Hardware | 13.98 | 13.98 |
| 1 | Plasti Dip | Ace Hardware | 10.08 | 10.08 |
| 1 | Poster lamination | Ace Hardware | 19.98 | 19.98 |
| 1 | 1/2" Hardware cloth | Ace Hardware | 18.98 | 18.98 |
| Total Cost | $394.80 | |||
Testing Results[edit | edit source]
This table describes the prototyping of different components of the composing system.

Fig 1: The first aspect tested was the area (size and location) in the garden the composter would occupy. This was accomplished using cardboard and duct tape. After the frame was built, the doors were modeled from cardboard to test for accessibility. Fold-down doors were selected.

Fig 2: After the frame was built, the doors were modeled from cardboard to test the accessibility with various sizes of doors.

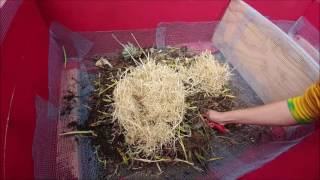
Fig. 3: 1/4" hardware cloth was selected to line the bins and keep rats out of the compost. The pest-resistant quality of the design was tested by placing fruit in a bucket, closing it with hardware cloth, and allowing it to sit outside for two days. Control fruit was left outside of the bucket, and it dissapeared, while the fruit in side the bucket remained. It was a success!

Fig 3: The educational posters were prototyped using cardboard. Information about decomposition and how to use the compost was put on the cardboard, and sent into classrooms at the middle school. This is the left-side bin poster prototype, which has information anbot things users can and cannot compost.

Fig 4: This is the right-side bin poster prototype, with information about decomposition. The prototypes were accompanied by lists of questions for the students to answer before and after interacting with the compost posters, for the purpose of documenting whether they learned anything. The prototypes were inconclusive because the "before" questions were severed from the "after" questions, but the client representative said the content of the posters was great.
How to build[edit | edit source]

Sketch We first needed to made sketch drawings with dimensions of the compost bin. After careful consideration and talking with the client, we figured out dimensions as well as made a few design decisions.

Mark Out Garden Area The area and frame of the compost was a prototype in the garden. It was carefully measured and marked out with cardboard boxes. This gave both us and the client an idea of how big we wanted to build the compost.

Buy materials
Prototyping Doors For the students to easily access the compost pile, we had to prototype the mixing heights as well as the doors we wanted to attach to our compost. We decided how tall we wanted to make the doors and marked the area out with cardboard. The pile needs to accessible to potentially more than one child at a time so we ensured that there would be enough space for the children to interact with the pile.

Attachment of doors with metal hinges and hook latches. The front doors provides ease of access into the compost pile as well as helps enclose the pile.

Application of weather resistant paint. Eureka receives a lot of rainfall during the year so to further protect our project from warping, weather resistant paint was used. To fit the general motif of the school, a tulip red color was selected.

Assembly of roof frame. A roof frame was constructed to hold the corrugated roof together as well as provide a way to attach hinges to the roof so it can be opened and closed. The frame and big hinges used also provides support to the heavy roof so it can be safely opened.

Attachment of corrugated roof to wood frame. Gasketed metal screws were used to attach the corrugated roof to the frame. Gasketed screws would ensure that no unwanted moisture would seep into the pile through the holes they created in the roof.

Lining the bottom of the compost bins with metal wire. Pest control was one of our main criteria for the project so we lined the bin with metal wire to prevent rodents from being able to chew through. It is important for a compost system to be exposed to air and the wire mesh also functions as such.
Attachment of roof with hinges to the frame. With the ability to open the compost system, it allows for students to interact with the pile from all sides. Heavy duty hinges were used to ensure the weight of the roof will be supported.

Apply Pasti Dip to edges of corrigated roof The corrugated roof had really sharp edges. The edges were first grinded down and then Plasti Dip was applied to future make sure no one would get cut by the edges.

Finished Product Educational signage was placed on the inside of the compost bin. Students are to refer to the signage to learn about the compost and reference what items can be put into the pile.
Video[edit | edit source]
Maintenance[edit | edit source]
The following maintenance tasks should be completed as often as specified to ensure the ongoing success of the composting system.[1] Neglect of any of these tasks could result in the failure of the system to produce desirable soil.
Schedule[edit | edit source]
Complete the following tasks, as often as specified.
Daily
- Add fresh compost to the bin on the left
- Add water to the compost if moisture levels are low.
- Make sure the lid and doors remain closed except when working with the compost
- Keep an eye on the temperature of both piles, relate to information found on the informational posters attached to the bins
Weekly
- Turn the compost thoroughly on a weekly or bi-weekly basis, depending on temperature and moisture levels
Monthly
- When the soil in the right side bin appears relatively homogeneous in texture, it can be added to the garden
- Move compost from the left-side bin to the right-side bin after the thermoplastic phase
Yearly
- Make sure the hardware cloth remains securely attached to the wood
Every few years, as necessary
- Replace hinges and hooks
- Repaint/touch up with weather-resistant paint
- Replace metal wire mesh and staple as needed.
- Re-apply plastic dip to the edges of the lid
- Replace the compost thermometer
| Task | Frequency | Participants |
|---|---|---|
| Add compost to left-side bin | Daily | Students and teachers |
| Move left-side compost to right-side bin | Every few months | Students and teachers |
| Turn compost in each bin | Every two weeks | Students and teachers |
| Monitor for structural degradation, upkeep as necessary | Ongoing | Teachers |
| Add soil from right-side bin to the garden | As available and necessary | Students and teachers |
Instructions[edit | edit source]

Gather Material Make sure the correct material could be added to the pile. Reference the signage on the inside of the compost for a list of what can and cannot compost.

Open Compost

Mix Contents Add new compostable material and thoroughly mix contents of the compost.
Troubleshooting[edit | edit source]
This is a list of possible problems one may encounter during regular use, and steps to resolve those problems.[2]
| Problem | Suggestion |
|---|---|
| The compost is dripping wet | Add dry browns (like sawdust) and mix thoroughly |
| The compost smells like methane | Mix thoroughly, and increase the normal frequency the pile is turned |
| The compost is too hot | Turn the pile and moisten if it's dry |
| The compost is too cold | Add greens, make sure it's moist but not dripping wet, and increase the size if the pile is small. |
| The gopher wire came undone from the wood | Staple the two back together with an industrial stapler (~14 mm staples) |
| The Plastic Dip is peeling off | Peel all of the loose ends off, and apply more with a sponge brush. |
Discussion and next steps[edit | edit source]
The client was very happy with the professional aesthetics and educational value of the final product. Although the roof is functional, it is a little on the heavy side. Hooks were installed on both sides of the roof and is designed secure it to the fence when opened. If the roof is not secured, it can act as a sail and the wind will easily blow the roof closed.
Suggestions for future changes[edit | edit source]
Although functional and sized well, the large corrugated metal roof was not ideal for this project. The roof requires too much effort to lift, both because it is so long and because it is heavy. In the future, the lid should be made from two shorter sections (one over each bin), and should be made of a relatively light material. Instead of using corrugated metal, a corrugated plastic roof would make it a lot lighter although may be more expensive to buy brand new. The wire mesh edges proved to be really sharp so if replaced, it is recommended to fold the sharp edges toward the inner walling of the compost. This is to ensure that the sharp edges are pointed inwards to prevent potential harm.
September 2019 Update[edit | edit source]
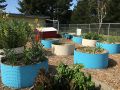
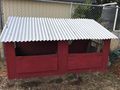
Overall the compost was well put together and stable.. The compost bin is filled with soil on one side and carbon material plus some plastic on the other side. It seems that the compost bin and the garden are not being used heavily, though this could be because of the summer break. The top lid was found to be rather heavy, stated by a teacher, this makes it difficult to use around kids. But the hooks in the fence work well. One of the posters is falling off the inside lid and the two fold-down doors were open when we found it, making it easy for pests to get in. However, no food scraps were seen inside. The school does not use too much compost, explained by a teacher who keeps it and teachers children. They also have in fava beans, kale, and squash in some beds where they use the compost. The garden is coming together as the school year starts. It seems the compost is in good use with some minor improvements necessary.
-
September 2019 Update
-
September 2019 Update

