
Abstract
The purpose of this project was to create a working camera obscura that would teach students point perspective and allow students to trace the images displayed. Team Girl Scout Cookies designed a durable and portable model called the Accordion Camera Obscura, shown in Figure-1. This design was built around three major aspects: aesthetics, the bellows, and durability. Team Girl Scout Cookies was formed in Cal Poly Humboldt's Engineering 215 class.
-
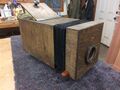
Figure-1: Image of the Accordion Camera Obscura
-
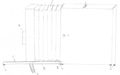
Figure-2:Sketch of The Accordion Camera Obscura designed by team Girl Scout Cookies

Background
The spring 2017 ENGR 215 class partnered with Zane Middle School, a local school in Eureka, to design several projects that enhance the school or serve as a teaching aid. Team Girl Scout cookies is to design a camera obscura that will serve as a teaching aid for Ken Weiderman's, client representative, art class. The camera is to display the scene in front of the lens onto a view port located on top of the camera.
Problem statement and criteria
Team Girl Scout Cookies' objective in this project is to design an aesthetically pleasing camera obscura that is capable of projecting images onto a viewing glass and allows students to trace the images displayed. The Model will be used in a classroom environment and would be used as a learning tool for students, therefore the camera had to be durable. The team was informed that students would be carrying the camera so mobility should be kept in mind when designing the camera. Table-1 shows a list of criterion along with its weighted importance and definitions. The criterion were weighted by the team along with our client representative, Ken Weiderman, in order to help guide the team in choosing a design that best fits the client's needs.
| Criteria | Weight | Description |
|---|---|---|
| Functionality | 10 | Middle school student is able to use |
| Durability | 9 | Can survive a fall off a desk |
| Mobility | 9 | Can be moved by a single middle school student |
| Aesthetics | 9 | More interesting than a plain box |
| Education | 8 | Meets common core standards |
| Safety | 7 | No sharp edges |
| Cost | 6 | Less than $400 |
| Wow Factor | 6 | Far greater than that of a plain box |
| Environmental Impact | 4 | Greater than of a commercial product |
Description of final project
The Accordion Camera Obscura was designed around three major aspects: aesthetics, the bellows, and durability. These three aspects allowed the team to design a camera that would best-fit the client's needs.
Aesthetics
Aesthetics became a major aspect considering that this model was designed for students taking art at Zane Middle School, therefore the design had to be aesthetically pleasing towards younger students. Our client representative, Ken Weiderman, informed the team that his students would be more intrigued on the model if it looked older compared to a modern design. Therefore, the team decided a vintage aesthetic would be appropriate for the model. To achieve this, the wood used would be stained with a walnut stain to give it an antique look. Vintage cameras are also known to have bellows so the team believed it would be appropriate to incorporate bellows into the design. The bellows would serve a larger purpose than just aesthetics in the design.
Bellows
The bellows would not only give a vintage feel to the camera obscura but it would also allow the camera to compact into a smaller size. This meant that the camera could be both easily stored and easily carried. The bellows would also allow users to focus images by allowing them to manipulate the focal length. This would be done by extending or compacting the bellows, which have the lens attached to one side, until the image would appear clearer. The bellows also helped reduced a bit of weight from the model by using fabric bellows over more wood. The original plan was to make a smaller box that would somehow compact into a larger box but that would cost more and also increase the weight. The team wanted the design to be as light as possible without sacrificing durability.
Durability
The team kept in mind that the model would be used in a classroom environment, which meant that it had to be durable. Therefore, the team decided to construct the camera out of birch plywood. Birch plywood is several sheets of birch glued together and is known for its strong and lightweight properties. Birch plywood is not the lightest or strongest wood but it does have the most favorable strength to weight ratio compared to other woods. Birch is also very safe because its known to not crack or splinter, which is why its popular among toy makers. This material is also very affordable. The team also decided to use ¼" thick glass for the viewing window since students would be exerting a downward force on the glass in order to trace images. A thicker glass meant that the window could withstand a greater force without cracking.
How to use
-
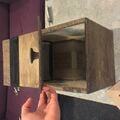
Fig 2: Open the lid exposing the viewport.
-
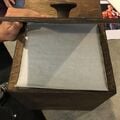
Fig 2a: Lay a piece of tracing paper over the viewport, this is where the image will be displayed.
-
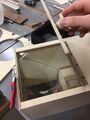
Fig 2b: Place a small blanket over your head and viewport in order to reduce the amount of light entering.
-
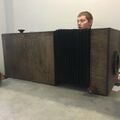
Fig 2c: Adjust the bellows by extending them until image appears focused.
-
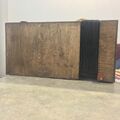
Fig 2d: When done using, compact the bellows and store away.


Video

Costs
Implementation Cost
Below is Table-2 which shows the cost of building the Accordion Camera Obscura. Table-2 includes a list of materials along with the quantity purchased, place of purchase, cost of purchase, and a total cost.
| Quantity | Material | Source | Cost ($) | Total ($) |
|---|---|---|---|---|
| 1 | Glass Pane (9"x8.5"x0.25") | Humboldt Glass | 14.00 | 14.00 |
| 1 | Mirror (9"x11.33") | Humboldt Glass | 6.00 | 6.00 |
| 1 | Camera Lens | Amazon.com | 2.54 | 2.54 |
| 00 | Birch Wood | Donated | 0.00 | 0.00 |
| 00 | Brass screws | Donated | 0.00 | 0.00 |
| 1 | Fabric | Scrap Humboldt | 11.00 | 11.00 |
| 1 | Polibond Adhesive | Ace Hardware | 6.99 | 6.99 |
| 1 | Can of Wood Stain | Donated | 0.00 | 0.00 |
| Total Cost | $40.53 | |||
Design Cost
The pie chart below, Chart-1, shows the total hours spent designing the Accordion Camera Obscura.

Testing Results
The Accordion Camera Obscura met the client's needs and functioned properly. Images displayed on the viewing glass were visible (Figure-3) and the bellows allowed images to be focused through the manipulation of the focal length. By compacting the bellows, the camera can be easily stored and carried. The combination of the bellows and stained wood gave the camera a vintage look and made it aesthetically appealing. The use of birch plywood reduced the overall weight of the camera without compromising its structural integrity. The custom built sliders allowed the bellows to slide smoothly and kept the bellows leveled. A design flaw was that too much light was being allowed in from the view port. This was solved by using a small blanket in order to darken the viewport.

How to build
To build the Accordion Camera Obscura, an enclosing box and bellows will have to be built separate. Once the enclosed box and bellows are complete, the next step will be to attach the bellows to the enclose box on one side. On the other side the lens box holding the lens will be attached. The lens box is a plain box with a width of 3".

Measure the wood with the required dimensions, in order to creat a 9"x 9.5' box that is 14" long, and ensure that the top piece has small 8"x8" cut out which will be used as the cover for the viewport. (no front lid is required)

Screw on the lining in place. This can be done by measuring pieces of wood which would hold the viewing glass horizontally and the mirror at a 45 angle.

Screw all the sides together to create a box and put the viewing glass and mirror in place.

Attach the slider in the center of the box, this will help keep the bellows and lens box leveled. (sliders can be purchased at a local hardware store but for this design we used a custom built slider).

Measure the wood with the required dimensions, in order to create a 9" x 9.5" box that is 2-3/4" long. (no back lid is required)

On the front lid, cut a circle the size of the diameter of your lens.

Create a way to hold your lens into the cut-out (for this design we created a small lens holder that would be screwed to the front of the camera)

Draw out templet with three 9"x15" rectangles and two 4.5"x15" rectangles on either side of the three 9"x15" rectangles on canvas.

Cut out boning pieces from card paper. 60 trapezoids 1cm thick, 9" long pieces with sides at 45-degree angles and 60 rectangles 1cm thick, and 9" long.

Glue boning onto Fabric with 2mm spacing between for easy folding. First section should have trapezoids in alternating order, then second section should have rectangles and so on.

Once the glue is dry, glue the black fabric to the white, with boning sandwiched between.Glue the trapezoids from the first section to the last section, which should both be 4.5"x15", then glue the black fabric onto the last section.

Once the glue is dry, glue fabric into a cylindrical tube then spray paint both sides with latex spray paint.

fold the bellows with opposites sides folding in, while other sides are folded out. repeat until bellows are all folded.

Glue one end of the bellows onto the enclosing box and glue the other end onto the lens box. The sliders should also be attached to the lens box.

Check that sliders and bellows extend and compact properly before continuing.

Place the cover over the viewport and screw a hinge between the cover and top panel of the camera.

Glue the top panel of the box on (this part should have the cover of the viewport cut out).

Stain the wood with a walnut stain to give a weathered look to the wood.
Add rubber bumpons onto every bottom-corner of the camera to provide friction when tracing images.

Screw on a handle or knob onto the lens box to make adjusting the bellows easier.
Maintenance
The accordion camera obscura needs little maintenance, but the little care it needs will keep it creating clear images for years.
Schedule
- Daily
- close the viewing glass lid
- avoid touching the lens
- Weekly
- Clean lens
- Clean viewing glass
Instructions
To maintain the camera obscura, it is important to clean the lens and viewing window with a clean and soft cloth. Make sure to close viewing window and to keep the camera closed while being stored and not in use. This will help prolong the life of the lens and viewing glass.
Troubleshooting
| Problem | Suggestion |
|---|---|
| Images appear blurry | Adjust the focus by sliding the bellows until image looks sharper. |
| No image is appearing | Place a blanket (the thicker the better) over your head and the viewport, this will reduce the amount of light entering through the window. This occurs because too much light is being allowed into the camera. |
| Bellows are damaged | Build the bellows again or contact Luke Pascasio at lap558@humboldt.edu |
Discussion and next steps
The lens located on the camera is too small and does not allow enough light to pass through the lens. This reduces the brightness of the images. Therefore, the team is working on purchasing a lens with a bigger diameter that will provide brighter images.
Suggestions for future changes
Adding an extra coating of paint (or glue) will ensure that little to no light seems through the bellows. Adding dividers to the side of the viewingport-lid will reduce the amount of light entering through the window. Using Screws instead of nails will not only prolong the life of the camera but also makes it easier to replace parts that are located inside the camera.
References
http://web.mit.edu/biyeun/Public/How%20to%20make%20Bellows.pdf