(→Costs) |
(cats) |
||
| (20 intermediate revisions by 9 users not shown) | |||
| Line 1: | Line 1: | ||
{{TOCright}} | {{TOCright}} | ||
{{Template: Waterpod Student Projects Header}} | {{Template: Waterpod Student Projects Header}} | ||
== Background == | == Background == | ||
[[Image:PWWtitle.JPG|thumb]] | [[Image:PWWtitle.JPG|thumb]] | ||
The WaterPod project based in New York city, consisting of a group of artist, decided to attempt to design, build, and have five people live on a self-sufficient ,as possible, barge for a period of six months. Our Team, along with other teams from our Engineering 215 class at Humboldt State University, were given a list of problems that needed to be addressed. Some of these problems were food, clean water, electricity, and waste management. Each team was given a task, which they were to research, design, and build a system that completes the task given. Once completed, the projects were shipped to New York, where they were implemented on the WaterPod's barge~(Plan as of 5/5/09). The WaterPod team's barge is planned to set sail on June 1st, 2009 and to cruise the New York Waterways along the Hudson River docking at different places along the way. While docked, the public will be able to come aboard and see the different systems being used by the crew to survive. | The [[WaterPod]] project based in New York city, consisting of a group of artist, decided to attempt to design, build, and have five people live on a [[self-sufficient]], as possible, barge for a period of six months. Our Team, along with other teams from our [[Engr215 Introduction to Design|Engineering 215]] class at [[Humboldt State University]], were given a list of problems that needed to be addressed. Some of these problems were food, clean water, electricity, and waste management. Each team was given a task, which they were to research, design, and build a system that completes the task given. Once completed, the projects were shipped to New York, where they were implemented on the WaterPod's barge~(Plan as of 5/5/09). The WaterPod team's barge is planned to set sail on June 1st, 2009 and to cruise the New York Waterways along the Hudson River docking at different places along the way. While docked, the public will be able to come aboard and see the different systems being used by the crew to survive. | ||
To learn more about the waterPod view: http://www.appropedia.org/Waterpod | To learn more about the waterPod view: http://www.appropedia.org/Waterpod | ||
| Line 15: | Line 13: | ||
Our teams objective was to design a system that would grow food for the occupants of the barge without the presence of soil. There are many different types of soil-less grow system designs. In the beginning the client gave a specific set of criteria to our team. We used the criteria, to help us make a decision on what type of soil-less system we chose from. Our Criteria were: | Our teams objective was to design a system that would grow food for the occupants of the barge without the presence of soil. There are many different types of soil-less grow system designs. In the beginning the client gave a specific set of criteria to our team. We used the criteria, to help us make a decision on what type of soil-less system we chose from. Our Criteria were: | ||
* Cost | |||
* Size | |||
* Weight | |||
* Durability | |||
* Transportability | |||
* Ease of set up | |||
* Use of recycled materials | |||
* Design and construction time | |||
* Educational value | |||
* Level of energy efficiency | |||
The two soil-less system types we chose between were aeroponics and hydroponics. Each of these two types had many different designs that we could choose from. For aeroponics, there was the True Aeroponics, Deep Flow Aeroponics, Bubbleponics, and Fogponics. Right away we could eliminate the Fogponics system due to the high cost and our small budget of just 300 dollars. Hydroponics had many design choices to choose from as well. Some of these include, NTF (Nutrient Film Technique), Ebb and Flow, Wick System, and Drip Systems. The Nutrient Film Technique was able to be eliminated in the beginning because of the large amount of water that this system would require. | The two soil-less system types we chose between were aeroponics and hydroponics. Each of these two types had many different designs that we could choose from. For aeroponics, there was the True Aeroponics, Deep Flow Aeroponics, Bubbleponics, and Fogponics. Right away we could eliminate the Fogponics system due to the high cost and our small budget of just 300 dollars. Hydroponics had many design choices to choose from as well. Some of these include, NTF (Nutrient Film Technique), Ebb and Flow, Wick System, and Drip Systems. The Nutrient Film Technique was able to be eliminated in the beginning because of the large amount of water that this system would require. | ||
| Line 40: | Line 28: | ||
As the criteria became more specific, our choice of which type of systems we could choose from became easier. At first all that we knew is that we wanted to use as little electricity and water as possible, but had no figures on how much was allowed to us. This made most of the systems still available as choices. As a team we came up with many different alternative design solutions, then met up and weighed the designs against our criteria. By doing this our team was able to eliminate all but the top three designs that met our criteria best. | As the criteria became more specific, our choice of which type of systems we could choose from became easier. At first all that we knew is that we wanted to use as little electricity and water as possible, but had no figures on how much was allowed to us. This made most of the systems still available as choices. As a team we came up with many different alternative design solutions, then met up and weighed the designs against our criteria. By doing this our team was able to eliminate all but the top three designs that met our criteria best. | ||
These three systems designs were Umbrella Aeroponics, True Aeroponics System, and the Bubbleponics Supertray. Our team made a few changes to the True Aeroponics System design and decided to build it. After we talked with the client a little bit more about their final criteria for us, we decided to change our design. The energy | These three systems designs were Umbrella Aeroponics, True Aeroponics System, and the Bubbleponics Supertray. Our team made a few changes to the True Aeroponics System design and decided to build it. After we talked with the client a little bit more about their final criteria for us, we decided to change our design. The [[energy]] consumption for the pump required to run this system was more then the client was willing to use. Instead we decided to keep our overall design, but to make it into a gravity fed hydroponic system. Eliminating most of the [[electricity]] required for the growth of their plants. | ||
'''For our Decision phase View:''' For our Decision phase View: http://www.appropedia.org/images/b/ba/Criteria.pdf | '''For our Decision phase View:''' For our Decision phase View: http://www.appropedia.org/images/b/ba/Criteria.pdf | ||
== Final Solution == | == Final Solution == | ||
| Line 50: | Line 36: | ||
===Implementation and Use of Design=== | |||
The hydroponic system should be set up in an area that has regular temperatures that hover between 55-70 degrees Fahrenheit. Nutrient solution will have to be bought and then mixed with the correct ratio of water to fill the fifty-five gallon drum. Once the pump has been fully submerged into the solution container it will sit on the bottom. Then place the desired plants in the sixteen holes on the 8” plant housing. Once the plants have been placed and pump has been plugged in with the timer, turn the pump on and watch the plants grow. | The hydroponic system should be set up in an area that has regular temperatures that hover between 55-70 degrees Fahrenheit. Nutrient solution will have to be bought and then mixed with the correct ratio of water to fill the fifty-five gallon drum. Once the pump has been fully submerged into the solution container it will sit on the bottom. Then place the desired plants in the sixteen holes on the 8” plant housing. Once the plants have been placed and pump has been plugged in with the timer, turn the pump on and watch the plants grow. | ||
The solution will have to be changed out, on average, every 7 days and a new solution batch mixed up for the plants. The solution may be need to be changed either more or less frequent due to different outside variables that can affect how fast the plants use the nutrient Solution. These variables include humidity, temperature, and size of plants. The only part of the project that needs to be watched is the nutrient solution drum. The Ph and Temperature inside of the drum should be checked regularly in order for the plants growth not to be stunted. | The solution will have to be changed out, on average, every 7 days and a new solution batch mixed up for the plants. The solution may be need to be changed either more or less frequent due to different outside variables that can affect how fast the plants use the nutrient Solution. These variables include humidity, temperature, and size of plants. The only part of the project that needs to be watched is the nutrient solution drum. The Ph and Temperature inside of the drum should be checked regularly in order for the plants growth not to be stunted. | ||
===Results=== | |||
The Drip Hydroponic System, after some alterations, works perfectly. During tests runs the system grew tomatoes, strawberries, and lettuces for a week. Growth was noticed and no leeks were discovered. All together the system is functional and meets the client criteria. The Drip Hydroponic System uses very little water, uses very low electricity, and is shippable | The Drip Hydroponic System, after some alterations, works perfectly. During tests runs the system grew tomatoes, strawberries, and lettuces for a week. Growth was noticed and no leeks were discovered. All together the system is functional and meets the client criteria. The Drip Hydroponic System uses very little [[water]], uses very low electricity, and is shippable. | ||
'''For entire Final Solution Document View''' http://www.appropedia.org/images/9/99/Finalsolution.pdf | '''For entire Final Solution Document View''' http://www.appropedia.org/images/9/99/Finalsolution.pdf | ||
== Costs == | == Costs == | ||
{| border="1" cellspacing="0" cellpadding="2" align="center" | {| border="1" cellspacing="0" cellpadding="2" align="center" | ||
! Material !! Quantity !! Source !! Our Cost !! Potential Total | ! Material !! Quantity !! Source !! Our Cost !! Potential Total | ||
|- | |- | ||
|1” PVC Pipe || 20 feet || Arcata Salvage || $16.00 || $40.00 | |1” PVC Pipe || 20 feet || Arcata Salvage || $16.00 || $40.00 | ||
|- | |- | ||
|1”PVC Pipe || 20 feet || Pat’s House || $0.00 || $40.00 | |1”PVC Pipe || 20 feet || Pat’s House || $0.00 || $40.00 | ||
|- | |- | ||
|PVC T joints || 32 pieces || Ace Hardware || $16.12 || $16.12 | |PVC T joints || 32 pieces || Ace Hardware || $16.12 || $16.12 | ||
|- | |- | ||
|PVC Elbow Joints || 28 pieces || Ace Hardware ||$20.00 || $20.00 | |PVC Elbow Joints || 28 pieces || Ace Hardware ||$20.00 || $20.00 | ||
|- | |- | ||
|Spray Paint || 4 cans || Ace Hardware || $20.00 || $20.00 | |Spray Paint || 4 cans || Ace Hardware || $20.00 || $20.00 | ||
|- | |- | ||
|Hemp Rope || 20 feet ||Ben’s Dorm || $0.00 || $10.00 | |Hemp Rope || 20 feet ||Ben’s Dorm || $0.00 || $10.00 | ||
| Line 98: | Line 81: | ||
|Bung Hole For Barrel || 1 || West Coast Plumbing || $3.50 || $5.00 | |Bung Hole For Barrel || 1 || West Coast Plumbing || $3.50 || $5.00 | ||
|- | |- | ||
|'''Spray System''' | |'''Spray System''' | | ||
|- | |- | ||
|1/8” hose || 10 feet || Ace Hardware || $15.00 || $20.00 | |1/8” hose || 10 feet || Ace Hardware || $15.00 || $20.00 | ||
| Line 120: | Line 103: | ||
|Marbles|| ½ lb bag || Pat's House || $0.00 || $3.50 | |Marbles|| ½ lb bag || Pat's House || $0.00 || $3.50 | ||
|- | |- | ||
|colspan="4" align="right" | '''Total Cost''' $406.87 '''Potential | |colspan="4" align="right" | '''Total Cost''' $406.87 | ||
|colspan="4" align="right" | '''Potential Cost''' $711.37 | |||
|- | |- | ||
|} | |} | ||
[[Image:PWWhours.JPG|center|Fig 1: Table of Total Hours Spent on Project]] | [[Image:PWWhours.JPG|center|Fig 1: Table of Total Hours Spent on Project]] | ||
== Specifications == | == Specifications == | ||
| Line 137: | Line 116: | ||
Image:102_1957.JPG|Fig 1b: Basket With Perlite in it ready to be inserted into troughs. | Image:102_1957.JPG|Fig 1b: Basket With Perlite in it ready to be inserted into troughs. | ||
Image:102_1958.JPG|Fig 1c:Basket Inserted into trough | Image:102_1958.JPG|Fig 1c:Basket Inserted into trough | ||
Image:102_1963.JPG|Fig 1c: Lettuce withb the | Image:102_1963.JPG|Fig 1c: Lettuce withb the hydroponic Drip "Halo" surrounding it | ||
Image:102_1956.JPG|Fig 1d: View of troughs set up on foundation | Image:102_1956.JPG|Fig 1d: View of troughs set up on foundation | ||
Image:102_1960.JPG|Fig 1e: Hydroponic Sysyetm with Watering Hoses attached | Image:102_1960.JPG|Fig 1e: Hydroponic Sysyetm with Watering Hoses attached | ||
| Line 146: | Line 125: | ||
'''For Full Specifications of Project Visit:''' http://www.appropedia.org/images/c/c4/Specifications.pdf | '''For Full Specifications of Project Visit:''' http://www.appropedia.org/images/c/c4/Specifications.pdf | ||
== Construction instructions == | == Construction instructions == | ||
| Line 157: | Line 134: | ||
'''For Full Assembly Instructions Visit:''' http://www.appropedia.org/images/e/e7/Assembly_instructions.pdf | '''For Full Assembly Instructions Visit:''' http://www.appropedia.org/images/e/e7/Assembly_instructions.pdf | ||
[[Image:HYDRO.JPG|thumb|Fig 3: Assembled Hydroponic System]] | [[Image:HYDRO.JPG|thumb|Fig 3: Assembled Hydroponic System]] | ||
== Next steps == | == Next steps == | ||
| Line 168: | Line 143: | ||
• Quality of the final developed product. | • Quality of the final developed product. | ||
== Contact Details == | == Contact Details == | ||
We are currently waiting feedback from the WaterPod on our project. If you have any questions please contact us: | We are currently waiting feedback from the WaterPod on our project. If you have any questions please contact us: | ||
* Benjamin Yost - inneed4speed145@aol.com | |||
* Mike Ishee - mli5@humboldt.edu | |||
* Edward Kier - edwardkier@gmail.com | |||
* Patrick Kelly - pksport55@aol.com | |||
'''For Entire Design Document View:''' http://www.appropedia.org/images/0/09/Final_hydroponic_document.pdf | |||
| Line 217: | Line 190: | ||
TrendGrinder. “Aeroponic Tomato Farming Experiment Results”. Available: http://www.trendgrinder.com/aeroponic-tomato-results/ | TrendGrinder. “Aeroponic Tomato Farming Experiment Results”. Available: http://www.trendgrinder.com/aeroponic-tomato-results/ | ||
University of Illinois Extension Watch Your Garden Grow, 2009 [Website]. Available: http://urbanext.illinois.edu/veggies/tomato1.html | |||
Van Patten, George. (2007) “Gardening Indoors with Soil & Hydroponics”. Vancouver, Washington: Van Patten Publishing. | |||
Wilson, Geoff. (2008) "Aquaponics Miserly Water Use". Aquaponics: 3-5. | |||
[[Category:Engr215 Introduction to Design]] | |||
[[Category:Aeroponics]] | |||
[[Category:Gardening]] | |||
[[Category:Waterpod]] | |||
[[Category:Projects]] | |||
Revision as of 08:36, 28 October 2010
Background

The WaterPod project based in New York city, consisting of a group of artist, decided to attempt to design, build, and have five people live on a self-sufficient, as possible, barge for a period of six months. Our Team, along with other teams from our Engineering 215 class at Humboldt State University, were given a list of problems that needed to be addressed. Some of these problems were food, clean water, electricity, and waste management. Each team was given a task, which they were to research, design, and build a system that completes the task given. Once completed, the projects were shipped to New York, where they were implemented on the WaterPod's barge~(Plan as of 5/5/09). The WaterPod team's barge is planned to set sail on June 1st, 2009 and to cruise the New York Waterways along the Hudson River docking at different places along the way. While docked, the public will be able to come aboard and see the different systems being used by the crew to survive.
To learn more about the waterPod view: http://www.appropedia.org/Waterpod
Introduction
Our teams objective was to design a system that would grow food for the occupants of the barge without the presence of soil. There are many different types of soil-less grow system designs. In the beginning the client gave a specific set of criteria to our team. We used the criteria, to help us make a decision on what type of soil-less system we chose from. Our Criteria were:
- Cost
- Size
- Weight
- Durability
- Transportability
- Ease of set up
- Use of recycled materials
- Design and construction time
- Educational value
- Level of energy efficiency
The two soil-less system types we chose between were aeroponics and hydroponics. Each of these two types had many different designs that we could choose from. For aeroponics, there was the True Aeroponics, Deep Flow Aeroponics, Bubbleponics, and Fogponics. Right away we could eliminate the Fogponics system due to the high cost and our small budget of just 300 dollars. Hydroponics had many design choices to choose from as well. Some of these include, NTF (Nutrient Film Technique), Ebb and Flow, Wick System, and Drip Systems. The Nutrient Film Technique was able to be eliminated in the beginning because of the large amount of water that this system would require.
As the criteria became more specific, our choice of which type of systems we could choose from became easier. At first all that we knew is that we wanted to use as little electricity and water as possible, but had no figures on how much was allowed to us. This made most of the systems still available as choices. As a team we came up with many different alternative design solutions, then met up and weighed the designs against our criteria. By doing this our team was able to eliminate all but the top three designs that met our criteria best.
These three systems designs were Umbrella Aeroponics, True Aeroponics System, and the Bubbleponics Supertray. Our team made a few changes to the True Aeroponics System design and decided to build it. After we talked with the client a little bit more about their final criteria for us, we decided to change our design. The energy consumption for the pump required to run this system was more then the client was willing to use. Instead we decided to keep our overall design, but to make it into a gravity fed hydroponic system. Eliminating most of the electricity required for the growth of their plants.
For our Decision phase View: For our Decision phase View: http://www.appropedia.org/images/b/ba/Criteria.pdf
Final Solution
Our final solution, "The Drip Hydroponic System" was designed to best fit the needs of our client.
Implementation and Use of Design
The hydroponic system should be set up in an area that has regular temperatures that hover between 55-70 degrees Fahrenheit. Nutrient solution will have to be bought and then mixed with the correct ratio of water to fill the fifty-five gallon drum. Once the pump has been fully submerged into the solution container it will sit on the bottom. Then place the desired plants in the sixteen holes on the 8” plant housing. Once the plants have been placed and pump has been plugged in with the timer, turn the pump on and watch the plants grow. The solution will have to be changed out, on average, every 7 days and a new solution batch mixed up for the plants. The solution may be need to be changed either more or less frequent due to different outside variables that can affect how fast the plants use the nutrient Solution. These variables include humidity, temperature, and size of plants. The only part of the project that needs to be watched is the nutrient solution drum. The Ph and Temperature inside of the drum should be checked regularly in order for the plants growth not to be stunted.
Results
The Drip Hydroponic System, after some alterations, works perfectly. During tests runs the system grew tomatoes, strawberries, and lettuces for a week. Growth was noticed and no leeks were discovered. All together the system is functional and meets the client criteria. The Drip Hydroponic System uses very little water, uses very low electricity, and is shippable.
For entire Final Solution Document View http://www.appropedia.org/images/9/99/Finalsolution.pdf
Costs
| Material | Quantity | Source | Our Cost | Potential Total | |||
|---|---|---|---|---|---|---|---|
| 1” PVC Pipe | 20 feet | Arcata Salvage | $16.00 | $40.00 | |||
| 1”PVC Pipe | 20 feet | Pat’s House | $0.00 | $40.00 | |||
| PVC T joints | 32 pieces | Ace Hardware | $16.12 | $16.12 | |||
| PVC Elbow Joints | 28 pieces | Ace Hardware | $20.00 | $20.00 | |||
| Spray Paint | 4 cans | Ace Hardware | $20.00 | $20.00 | |||
| Hemp Rope | 20 feet | Ben’s Dorm | $0.00 | $10.00 | |||
| PVC Pipe Glue | 1 jar | Ace Hardware | $2.75 | $2.75 | |||
| Solution System | |||||||
| 55 gallon barrel | 1 barrel | Resale Lumber | $35.00 | $65.00 | |||
| Pump | 1 | Let it Grow | $55.00 | $62.00 | |||
| Solution Delivery Hose | 20 feet | Ace Hardware | $20.00 | $20.00 | |||
| Teflon Tape | 1 role | Ace Hardware | $0.75 | $0.75 | |||
| Release Valve | 1 valve | West Coast Plumbing | $2.35 | $3.75 | |||
| 5 way splitter set up | 1 set up | West Coast Plumbing | $9.50 | $11.50 | |||
| Solution Delivery Hose | 20 feet | Ace Hardware | $20.00 | $20.00 | |||
| Bung Hole For Barrel | 1 | West Coast Plumbing | $3.50 | $5.00 | |||
| 1/8” hose | 10 feet | Ace Hardware | $15.00 | $20.00 | |||
| 1/8” T-connectros | 16 | Ace Hardware | $5.00 | $6.00 | |||
| Metal Fence Nails | 16 | Pat's House | $0.00 | $1.00 | |||
| Corks | 4 | Pat's House | $0.00 | $1.00 | |||
| Plant Containment System | |||||||
| 8" PVC Pipe | 20 feet | Resale Lumber | $32.00 | $180.00 | |||
| 8" PVC caps | 8 | West Coast Plumbing | $116.00 | $180.00 | |||
| Plant Baskets | 16 | Lety It Grow | $26.00 | $40.00 | |||
| Perlite | 5 lb bag | Let It Grow | $8.00 | $8.00 | |||
| Marbles | ½ lb bag | Pat's House | $0.00 | $3.50 | |||
| Total Cost $406.87 | Potential Cost $711.37 | ||||||

Specifications
Overall our project is roughly 4.5 feet wide, 4.5 feet tall, and 4.3 feet deep. The overall structure weighs little over 60 pounds.
-
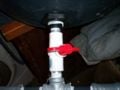
Fig 1: Nutrient Release Valve
-
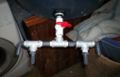
Fig 1a: View of 4 way splitter comeing of off Solution barrel
-

Fig 1b: Basket With Perlite in it ready to be inserted into troughs.
-
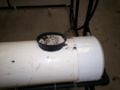
Fig 1c:Basket Inserted into trough
-
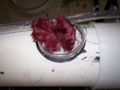
Fig 1c: Lettuce withb the hydroponic Drip "Halo" surrounding it
-
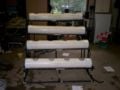
Fig 1d: View of troughs set up on foundation
-
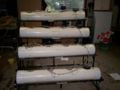
Fig 1e: Hydroponic Sysyetm with Watering Hoses attached
-
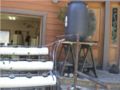
Fig 1f: Final assembled project


For Full Specifications of Project Visit: http://www.appropedia.org/images/c/c4/Specifications.pdf
Construction instructions
The Construction instructions for our Drip Hydroponic system are summarized with photos in the PDF on the bottom. On average the assembly time takes only one hour. The only tool that is needed is a jar of PVC cement to permanently join the different sections.
The hydroponic system should be set up in an area that has regular temperatures that hover between 55-70 degrees Fahrenheit. Nutrient solution will have to be bought and then mixed with the correct ratio of water to fill the fifty-five gallon drum. Once the pump has been fully submerged into the solution container it will sit on the bottom. Then place the desired plants in the sixteen holes on the 8” plant housing. Once the plants have been placed and pump has been plugged in with the timer, turn the pump on and watch the plants grow. The solution will have to be changed out, on average, every 7 days and a new solution batch mixed up for the plants. The solution may be need to be changed either more or less frequent due to different outside variables that can affect how fast the plants use the nutrient Solution. These variables include humidity, temperature, and size of plants. The only part of the project that needs to be watched is the nutrient solution drum. The Ph and Temperature inside of the drum should be checked regularly in order for the plants growth not to be stunted.
For Full Assembly Instructions Visit: http://www.appropedia.org/images/e/e7/Assembly_instructions.pdf

Next steps
We are closely monitoring the drip hydroponic system as it travels to New York and is then implemented in the barge. The team will be following the progress of the WaterPod throughout the six months to ensure of final design was sufficient for their use. We will also be asking the WaterPod for feedback on the design so that the team can iterate the design after testing has proceeded.
In addition it is necessary to find out:
• Overall efficiency of the design.
• Quality of the final developed product.
Contact Details
We are currently waiting feedback from the WaterPod on our project. If you have any questions please contact us:
- Benjamin Yost - inneed4speed145@aol.com
- Mike Ishee - mli5@humboldt.edu
- Edward Kier - edwardkier@gmail.com
- Patrick Kelly - pksport55@aol.com
For Entire Design Document View: http://www.appropedia.org/images/0/09/Final_hydroponic_document.pdf
References
Works Cited BBC, 2006. "New York Average Rainfall and Temperature.". <http://www.bbc.co.uk/weather/world/images/country/barcharts/TT001090_newyorkcity.gif> (21 Feb. 2009)
Brown, Gordon. (2009) "Welcome to Simply Hydroponics and Organics". Simply Hydro. http://simplyhydro.com/hydrou.htm.
Carrol, Ron. (2009) “Astrogrow Aeroponics“ [Website]. Available: http://www.astrogrow.com/, [February 19, 2009]
Darrin. (2007) "Aeroponic Wall System.",<http://www.ki7xh.com/index.html>(29 Apr. 2007. 21 Feb. 2009 )
Dr. Delbert D. Hemphill, Jr. “Vegetable Research”, http://hort-devel-nwrec.hort.oregonstate.edu/bienn82.html nce 1976 at Ore “Figure 1” http://www.bbc.co.uk/weather/world/images/country/barcharts/TT001090_newyorkcity.gif
Howard M Resh, Ph.D. (1985). Hydroponic Food Production 3rd edition, Woodbridge Press Publishing Company, Santa Barbara, California.
Hudwon, (1981). “Plant’s necessary Nutrients.”Plant Science, Prentic-Hall, Engle wood Cliffs, NJ
Jason’s Indoor Guide to Organic and Hydroponic Gardening [Website]. Available: http://www.jasons-indoor-guide-to-organic-and-hydroponics-gardening.com/homemade-aeroponics-system-2.html
Jason, (2005) "One Innovative Way to Grow Aeroponics.", <http://www.jasons-indoor-guide-to-organic -and-hydroponics-gardening.com/Jasons-indoor-guide-to-organic-and-hydroponics-gardening> (21.Feb 2009)
Michael Raviv, Johann Heinrich Lieth, “Soilless Culture”, Published by Elsevier, 2008
M. S. Sweat, G. J. Hochmuth. “Production Systems - Florida Greenhouse Vegetable Production Handbook, Vol 3”. Available: http://edis.ifas.ufl.edu/CV263
Resh, (1978). “Growing Indoors.” Hydroponic Food Production, Woodridge Press Company, Santa Barbra, CA.
Synergy International Inc. [Website]. Available: http://www.synergyii.com/aeroponic/VAP.pdf
Tom Alexander, Don Parker, “Plant Plane Hydroponics”. , Published by New Moon Publishing, Inc., 1994
TrendGrinder. “Aeroponic Tomato Farming Experiment Results”. Available: http://www.trendgrinder.com/aeroponic-tomato-results/
University of Illinois Extension Watch Your Garden Grow, 2009 [Website]. Available: http://urbanext.illinois.edu/veggies/tomato1.html
Van Patten, George. (2007) “Gardening Indoors with Soil & Hydroponics”. Vancouver, Washington: Van Patten Publishing.
Wilson, Geoff. (2008) "Aquaponics Miserly Water Use". Aquaponics: 3-5.