
Reflective paragraph on your participation in the Open Source movement:
Understanding the market
This is where you can describe what already exists, what is needed, etc. You may want to include inline references. [1]
To make bullets use the asterisk:
- Like this
- and like this
- and two for the next indent
- and back to one...
Project goals
Describe project goals here.
To make a numbered list use the pound sign:
- Like this
- and like this
- See Help:Contents for more formatting code.
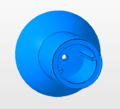
Big Money Project
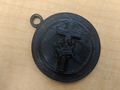
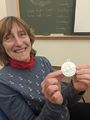
This is a Christian Science "Crown and Cross" key chain designed for the engineering department of Principia College during the 3D printing Lab class directed by Dr. Marie Farson. The purpose of this Christian Science "Crown and Cross" key chain is to give as an incentive for every $5 donation for Do Good Be Happy, a Pincipia College based business that takes donations to then host community building activities.
This product was designed in FreeCAD and then using NetFab for STL file reinforcement.
This Christian Science "Crown and Cross" key chain has a Commons - Attribution - Share Alike LICENSE.
ACCESS TO FREECAD FILE, STL FILE, GCODE FILE and DESIGN SPECIFICATIONS: https://www.thingiverse.com/thing:4027029
COSTS:
$15/335mts * 2.23mts = $0.099 USD
TOTAL COST: $0.099 USD
The average cost for a Cross and Crown Christian Science key chain is $10 USD.
Savings: $9.90 USD
The slicing parameters used in the Ultimaker-Cura software were:
Layer Height: 0.3mm| Infill: 10%| Orientation: Horizontal| Travel speed: 120mm/s| Extrusion speed: 48mm/s| Print temp: 220 Celcius| Skirt/Brim/Raft: Brim 8mm| Number of shells: 16| Fan speed: 100%|
- Christian Science
-
Black Filament
-
Dr. Marie Farson
-
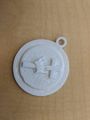
White


Solar Powered Flashlight
Project developed by [Esteban Rojas Acuna [User:Estebanrojas27]]
Template:Statusboxtop Template:Status-design Template:Status-prototype You can help Appropedia by contributing to the next step in this OSAT's status. Template:Boxbottom
Abstract
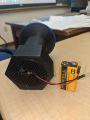
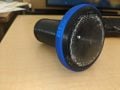
This is a 3D Printable Solar Powered Flashlight designed for low-income communities that have access to 3D Printers, Solar Panels and batteries. The main idea is to provide them with an easy to print design big enough to hold a circuit board, on/off button, led and input inside. The flashlight will be powered by a battery that was previously powered with solar energy, therefore it wouldn't be as expensive as buying batteries once they run out or as unsustainable as using the power grid to recharge them. This designed was a result of the OSAT project for the 3D printing class in the engineering department of Principia College directed by Dr. Marie Farson. The design includes a flashlight body and a lid, which have been carefully designed taking into account filament shrinking, so they can fit together.
This product was designed in FreeCAD, and there are two components: The flashlight and the lid. Both have independent STL, FreeCAD and GCODE files that are provided below.
This Solar Powered Flashlight has a Commons - Attribution - Share Alike LICENSE
- Solar Powered 3D Printable Flashlight
-
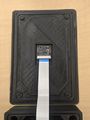
Before 3D prints
-
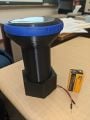
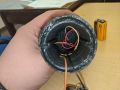
Input and 9V Battery
-
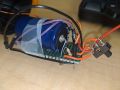
Circuit
-
Vertical View
-
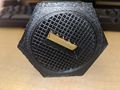
Back of Lid
-
Front View
-
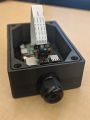
Inside view
-
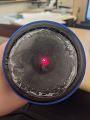
It works!
-
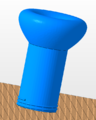
Side view design
-
Back view design
-
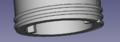
View of thread design
-
Lid top view design


Bill of Materials
ACCESS TO ALL FREECAD FILES, STL FILES, GCODE FILES and DESIGN SPECIFICATIONS: https://www.thingiverse.com/thing:3989964
COSTS:FOR THIS PROJECT:
-Circuit Board + components: $2.47| -Print Filament Flashlight: 28.04 meters: $15/335mts * 34.5mts = $1.25| -Print Filament Lid: 8.97 meters: $15/335mts * 8.97 mts = $0.41|
TOTAL COST: $4.13 USD
Tools needed for fabrication of the OSAT
- Jellybox or similar RepRap 3-D printer
- Circuit Welder
- Circuit Board
- Resistor
- LED
- Capacitor
- 9V Bettery
- On/Off Button
- 1.75 mm PLA Fillament
Skills and Knowledge Necessary to Make the OSAT
- Circuit Welding
- Circuit Assembly
- Ultramaker Cura Knowledge (Specifications provided)
Technical Specifications and Assembly Instructions
- FOR FLASHLIGHT BODY PRINT
First, upload the "Weird but works.stl" file to a slicer software (Ultramaker Cura Recommended) in order to generate the GCode. This particular file will print the body of the flashlight. Second, when slicing, use the following parameters:
Layer Height: 0.3mm| Infill: 10%| Orientation: Horizontal| Travel speed: 120mm/s| Extrusion speed: 48mm/s| Print temp: 210 Celsius| Skirt/Brim/Raft: Brim 6mm| Number of shells: 16| Fan speed: 50%|
This print should take an average of 5 hours and it is advised to check on it every 30 minutes, that way if it fails you won't waste a lot of filament.
- FOR LID PRINT
First, upload "THE LID_ Fixed.stl" file to a slicer software (Ultramaker Cura Recommended) in order to generate the GCode. This particular file will print the LID of the flashlight. Second, when slicing, use the following parameters:
Layer Height: 0.3mm| Infill: 10%| Orientation: Horizontal| Travel speed: 120mm/s| Extrusion speed: 45mm/s| Print temp: 210 Celsius| Skirt/Brim/Raft: Brim 8mm| Number of shells: 16| Fan speed: 60%|
It is VERY VERY VERY VERY IMPORTANT to print the LID 5% BIGGER!!! When in Ultramaker Cura (or whatever slicing software you're using), to go to the "scale: section and change 100% to 105%. This step will allow the LID thread and the Flashlight thread to fit perfectly.
This print should take an average of 1.5 hours.
- FOR CIRCUIT ASSEMBLY
Use a board less than 10cm wide and 15cm wide. Therefore, it can fit inside the flashlight. Put the LED inside the Flashlight head and then weld with the circuit, this way it is locked in place. Then, when you finish assembling the circuit, pull the On/Off button and the energy input through the lid.
Once it is charged you can start using it!
Common Problems and Solutions
- The biggest problem can happen if the LID .stl file is not sliced properly. It is imperative to set the scale to 105%, this way the lid will close.
- Use a big enough capacitor, this way you can use your flashlight for longer.
Cost savings
- If your solution is not a low cost one then it is not really appropriate.
- As mentioned before in the Bill of Materials the total cost for this project is approximately $4.13 USD
- A product considered commercially equivalent in Tanzania would be "Yellow LED Flashlight, AA, 55lm" found in Zoro.com, of the most used online stores in Tanzania. This product costs $9.59 USD [2].
- A 4-pack of "Alkaline AA Battery" that would fit the previous flashlight costs $2.35 USD. [3]
Savings not only would come from the price of the flashlight but also from the continuous use of batteries.
- Savings = $9.59 USD + $2.35 USD - $4.13 USD = $7.81 USD (Not taking into account the purchase of batteries once the first ones run out)
Benefited Internet Communities
- Community in Twende Lab in Arusha, Tanzania
- Thingiverse.com
- Appropedia.com
References
- Twende Lab in Arusha, Tanzania
- Principia College ENGR242 Dr. Marie Farson
OSH Science Project
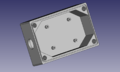
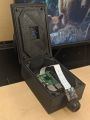
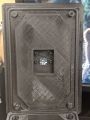
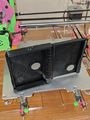
This is a Waterproof Raspberry Pi 2B + Raspberry Pi Noir camera v2 Case designed for Dr. Scott Eckert in the biology department of Principia College during the 3D printing Lab class directed by Dr. Marie Farson. The purpose of this Waterproof case is to take pictures of Rattle Snakes allocated on campus for research purposes. This case has a waterproof entrance for cables, specifically for an external battery so the Raspberry Pi 2B and camera can be powered. The idea is to upload software to the Raspberry Pi that will take a picture every 5-10 minutes and capture the behaviors inside the Rattle Snake's dens providing data for Dr. Eckert's research.
This product was designed in FreeCAD, and there are two components: The box and the lid. Both have independent STL, FreeCAD and GCODE files that are provided below.
This Waterproof Raspberry Pi 2B + Raspberry Pi Noir camera v2 Case has a Commons - Attribution - Share Alike LICENSE.
ACCESS TO FREECAD FILE, STL FILE, GCODE FILE and DESIGN SPECIFICATIONS: https://www.thingiverse.com/thing:3950645
COSTS:
-Raspberry Pi 2B: $45.00| -Raspberry Pi Noir Camera v2:$30.00| -Print Filament Box: 34.5 meters: $15/335mts * 34.5mts = $1.54| -Print Filament Lid: 14.7 meters: $15/335mts * 14.7 mts = $0.65| -M2 screws x 8 = $0.10 * 8 = $0.80| -M2 Bolts x 8 = $0.12 * 8 = $0.96| -Waterproof Cable Gland = $1.42|
TOTAL COST: $80.37 USD
The slicing parameters used in the Ultimaker-Cura software were:
FOR BOX PRINT
Layer Height: 0.3mm| Infill: 10%| Orientation: Horizontal| Travel speed: 120mm/s| Extrusion speed: 48mm/s| Print temp: 220 Celcius| Skirt/Brim/Raft: Brim 8mm| Number of shells: 16| Fan speed: 100%|
FOR LID PRINT
Layer Height: 0.3mm| Infill: 20%| Orientation: Horizontal| Travel speed: 120mm/s| Extrusion speed: 48mm/s| Print temp: 210 Celcius| Skirt/Brim/Raft: Brim 6mm| Number of shells: 16| Fan speed: 60%|
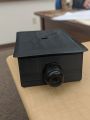
- Waterproof Raspberry Pi 2B + Raspberry Pi Noir camera v2
-
Box
-

Lid
-
Box and Lid
-
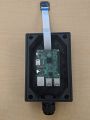
Top View
-
Camera Hole
-
Back of Lid
-
Attach Camera to Lid
-
Waterproof Cable entry
-
Front View


OpenCAD Design#1: Rock Wall Hand Hold
This Rock Wall Hand Hold is a result of an exercise done in the ENGR 242 class at Principia College taught by Dr. Marie Farson. We are currently learning the software program "OpenCAD" which will help us start designing and therefore contribute to the open source community.
This Rock Wall Hand Hold has a Commons - Attribution - Share Alike LICENSE.
The slicing parameters used in the Ultimaker-Cura software were:
Layer Height: 0.3mm| Infill: 100%| Orientation: Horizontal| Travel speed: 120mm/s| Extrusion speed: 48mm/s| Print temp: 205 Celcius| Skirt/Brim/Raft: Skirt| Number of shells: 16| Fan speed: 60%|
- Rock Wall Hand Hold
-
Side view
-
Top view
-
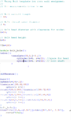
OpenCAD parameters
-
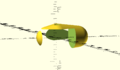
After pressing F6


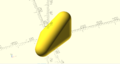
FreeCAD Design#1: Weird Couch Thingy
This couch looking 3D polygon is a result of an exercise done in the ENGR 242 class at Principia College taught by Dr. Marie Farson. We are currently learning the software program "FreeCAD" which will help us start designing and therefore contribute to the open source community.
This 3D polygon box has a Commons - Attribution - Share Alike LICENSE.
The slicing parameters used in the Ultimaker-Cura software were:
Layer Height: 0.3mm| Infill: 100%| Orientation: Horizontal| Travel speed: 120mm/s| Extrusion speed: 44mm/s| Print temp: 205 Celcius| Skirt/Brim/Raft: Skirt| Number of shells: 4| Fan speed: 100%|
- Couch gallery
-

Can you sit on it?
-
Side view


BLENDER Design#1: Pyramid Box
This Pyramid Box is a result of an exercise done in the ENGR 242 class at Principia College taught by Dr. Marie Farson. We are currently learning the software program "Blender" which will help us start designing and therefore contribute to the open source community.
This pyramid box has a Commons - Attribution - Share Alike LICENSE.
The slicing parameters used in the Ultimaker-Cura software were:
Layer Height: 0.3mm| Infill: 40%| Orientation: Horizontal| Travel speed: 120mm/s| Extrusion speed: 42mm/s| Print temp: 210 Celcius| Skirt/Brim/Raft: Skirt| Number of shells: 8| Fan speed: 80%|
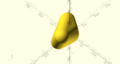
- Pyramid Box gallery
-
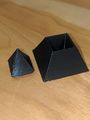
Opened!
-
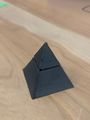
Closed!


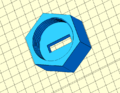
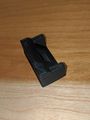
Design#1: Duo-Whistle
This duo ring whistle is specifically made for Umpires and Referees! It was designed by jipvanleeuwenstein in Oct 12, 2014 and the G-Code was pulled out from Thingiverse.com and sliced with Ultimaker Cura V.4.1. It works pretty well and it is very loud!
Layer Height: 0.3mm| Infill: 60%| Orientation: Horizontal| Travel speed: 120mm/s| Extrusion speed: 44mm/s| Print temp: 210 Celcius| Skirt/Brim/Raft: Skirt| Number of shells: 6| Fan speed: 100%|
- Whistle gallery
-
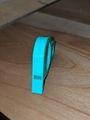
Great Design
-
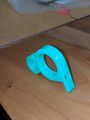
Index Finger Fits Perfectly in the Whistle!
-
This is the type of license posted on Thingiverse
-
This is how the design looked on Ultimaker Cura


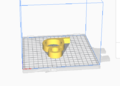
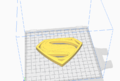
Design#2: Superman Logo
This duo Superman logo was designed by ErgoProxy on Jul 4, 2013 and taken from the movie "Man of Steel" (2013). The G-Code was pulled out from Thingiverse.com and sliced with Ultimaker Cura V.4.1. It looks pretty solid! and it is very cool!
Layer Height: 0.3mm| Infill: 90%| Orientation: Horizontal| Travel speed: 100mm/s| Extrusion speed: 44mm/s| Print temp: 215 Celcius| Skirt/Brim/Raft: Skirt| Number of shells: 12| Fan speed: 100%|
- Superman Logo gallery
-
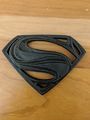
Great Design
-

I will put this on my nightstand!
-
This is the type of license posted on Thingiverse
-
This is how the design looked on Ultimaker Cura


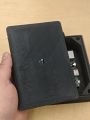
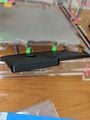
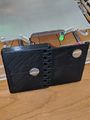
Design#3: 3D Wallet
This 3D printed wallet is a great design by Amplivibe posted Jul 26, 2013 and the G-Code was pulled out from Thingiverse.com and sliced with Ultimaker Cura V.4.1. I still haven't figure out how to fold it, I am afraid to break it! But if it did, I would love to use it as my personal wallet!
- 3D Wallet gallery
-
Great Design
-
Very slick finished
-
I wish it could fold :(
-

This is the type of license posted on Thingiverse
-
This is the how the design looks on Ultimaker Cura


Design#4: NASA LOGO
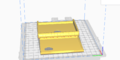
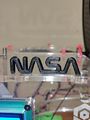
This NASA logo was designed by f16v1per May 25, 2014 and the G-Code was pulled out from Thingiverse.com and sliced with Ultimaker Cura V.4.1. I always loved the idea of exploring space and why not start with a great NASA LOGO to decorate my room?!
- NASA LOGO gallery
-
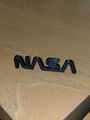
Great Design
-
Black is the new Black?
-
This is the type of license posted on Thingiverse
-
This is the how the design looks on Ultimaker Cura


Costs
You may describe your costs here.
| header 1 | header 2 | header 3 |
|---|---|---|
| row 1, cell 1 | row 1, cell 2 | row 1, cell 3 |
| row 2, cell 1 | row 2, cell 2 | row 2, cell 3 |
See Help:Tables and Help:Table examples for more.
Template:Statusboxtop Template:Status-design Template:Status-model Template:Boxbottom
Demo stuff
| Picture | Stuff | Describe something else |
|---|---|---|

|
Stuff in length | More stuff |
Videos
| jellybox print |
|---|
Error in widget YouTube: Unable to load template 'wiki:YouTube' |
Userboxes
Template:Userboxtop Template:User OSH Template:User 3D printing Template:Userboxbottom
Picture gallery


- ↑ You can use the ref code to include inline references. See Help:Footnotes for more.