No edit summary |
|||
| Line 2: | Line 2: | ||
<!-- these comments are offered as an aid as you get started. Remove as you wish --> | <!-- these comments are offered as an aid as you get started. Remove as you wish --> | ||
==Introduction== | ==Introduction== | ||
Revision as of 03:36, 14 June 2010
Introduction
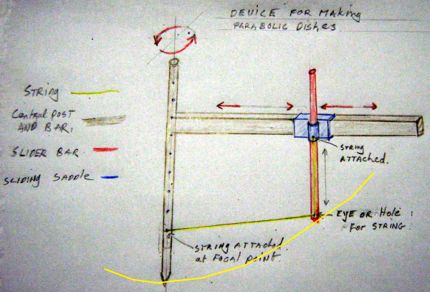
There are many ways to construct a parabolic dish. This method aims to be the simplest and most quickly adjustable one. This method does not need the input of a mathematician or any high technology people. So I call it the mechanical mathematician. I have made several paraboloids with this. I made them as proof of concept.
It works but I do not know how precise it can be.
 Typically I have used it to mark the correct curve on a cob mold and then used the mold as a form to construct the paraboloid.
For the dual dish tracking solar accumulator, I think that the mathematician might be the ideal tool for making the approximate "Half dishes" that are needed.
I think it also can be used to make good molds for home made "butterfly" parabolics.
This is a level one heading
This is italic text.
This is a level two heading (etc)
This is bold text.
- This is indented text. Click Show preview, to see what this looks like.