Modular Surgical Retractor Ring
Project developed by [Leighton Gaines (user:ldgaines)]
Template:Statusboxtop Template:Status-design
You can help Appropedia by contributing to the next step in this OSAT's status. Template:Boxbottom
Abstract
- Surgical retractors are used in order to hold tissue aside while surgery is performed on some underlying bodily structure. Depending on the size and depth of the cavity as well as the area of the body being accessed, different retracting implements as well as retractor ring sizes and shapes are needed. This project is a preliminary attempt to create a modular retractor ring and pinnable retractors that are all entirely 3D printed.
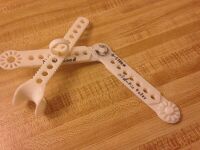
- Picture of completed print

Bill of Materials
- Plastic: PLA or other structurally similar plastic
- Printed Components
- Ring Module
- Retractor Scoop
- Retainer Ring
- EasyPin
[STL and OpenSCAD files: https://www.youmagine.com/designs/modular-surgical-retractor-ring]
As a rule of thumb for components, a closed loop composed of ring modules will require a retainer ring for every module. Every retractor scoop will require one EasyPin.
Tools needed for fabrication of the OSAT
- MOST Delta RepRap or similar RepRap 3-D printer
- Sanitary environment for printing and post processing
- Sand paper and needle file for finishing parts
Skills and Knowledge Necessary to Make the OSAT
Medical knowledge is required to determine the ring size and shape required for a specific operation.
Technical Specifications and Assembly Instructions
- Recommended printing specifications
- Print AND transition speed should be slow (30mm/s) for highest quality
- Infill of no less than 30%
- Support must be used when printing ring modules, which must be printed with the positive features (pins) facing up.
- All other parts can be printed with the flattest surface down.
- Clean and file ring module holes, specifically the radial holes that accommodate the radial pins and the grooves for the retainer rings.
- Assembly (see video for help)
- Decide on ring size/shape. Smallest possible configuration is a triangle. Other ideal shapes are a square and hexagon.
- Adjust ring modules to desired angle and press the positive pins into the bottom side of the negative pin holes from the next module until a closed loop of the desired size is formed.
- Apply retainer rings to the exposed slots in each main joining pin on each ring module.
- Retractor scoops can then be attached by aligning the holes on the retractor with those on the modules, and inserting an EasyPin.
- Print time estimate:
- Ring Module: 3 hours ea.
- Retractor Scoop: 2.5 hours ea.
- Retainer Ring: 10 minutes ea.
- EasyPin: 20 minutes ea.
- Assembly time estimate: Depends on ring size, generally less than a few minutes.
- Assembly Video ->
| Modular Retractor Assembly Aid |
|---|
Error in widget YouTube: Unable to load template 'wiki:YouTube' |
Common Problems and Solutions
- Holes on the main ring modules may be too small. Using a needle file will help make joining them more easy, as will cleaning the positive pins on the other module.
- EasyPins may not lock well. A paper shim can be inserted between the pin legs once installed to ensure there the pin stays in place.
Cost savings
- Estimated print cost: Depends on # of modules/components, generally $2-10 in plastic
- Commercial equivalents:
- Disposable plastic type
- Used metal set. It is worth noting that most equipment like this does not even have a listed price. A quote is needed, generally indicating high cost.
- Savings: $50 to $1000+